(目次はこちら)
(Tensorflow2.0版: https://qiita.com/kumonkumon/items/46c1490706115de45a9c)
はじめに
最近よく耳にする、Deep Learning / 深層学習についてちょっと勉強してみたいと思う。でも、自分で実装するほどやる気(実力も)ないので、TensorFlow使う。
本来であれば、数式やらを交えた方がいいが、数式アレルギーの人にとっては苦痛なので、そういった説明は他の専門家の方々に任せてシンプルに説明する。
Deep Learning / 深層学習とは?
- ニューラルネットワークの一種で、誰かのbreakthroughで最近になって突然出てきたものではない。
- ニューラルネットワークのうち、中間層 / 隠れ層が2層以上あるもの
- ニューラルネットワークは、2度の冬の時代を経て、Deep Learningという形で再びホットになった。
ロジスティック回帰(logistic regression)
ニューラルネットワークとの違いを理解するためにも、まずはロジスティック回帰からやってみる。
ロジスティック回帰は、パーセプトロンの拡張で、入力を線形変換して活性化関数をかませて出力を得るというものには違いない。パーセプトロンでは、活性化関数にステップ関数を利用するが、ロジスティック回帰ではシグモイド関数を使う。
コード
とりあえず、コードを。
Python: 3.6.8, Tensorflow: 1.13.1で動作確認済み
(もともと2016年前半に書いたものなので、順次更新しています。)
from helper import *

IMAGE_SIZE = 28 * 28
CATEGORY_NUM = 1
LEARNING_RATE = 0.1
TRAINING_LOOP = 20000
BATCH_SIZE = 100
SUMMARY_DIR = 'log_logistic'
SUMMARY_INTERVAL = 1000
BUFFER_SIZE = 1000
EPS = 1e-10

with tf.Graph().as_default():
    (X_train, y_train), (X_test, y_test) = mnist_samples(flatten_image=True, binalize_label=True)
    ds = tf.data.Dataset.from_tensor_slices((X_train, y_train))
    ds = ds.shuffle(BUFFER_SIZE).batch(BATCH_SIZE).repeat(int(TRAINING_LOOP * BATCH_SIZE / X_train.shape[0]) + 1)
    next_batch = ds.make_one_shot_iterator().get_next()

    with tf.name_scope('input'):
        y_ = tf.placeholder(tf.float32, [None, CATEGORY_NUM], name='labels')
        x = tf.placeholder(tf.float32, [None, IMAGE_SIZE], name='input_images')

    with tf.name_scope('readout'):
        W = weight_variable([IMAGE_SIZE, CATEGORY_NUM], name='weight')
        b = bias_variable([CATEGORY_NUM], name='bias')
        y = tf.nn.sigmoid(tf.matmul(x, W) + b)

    with tf.name_scope('optimize'):
        y = tf.clip_by_value(y, EPS, 1.0 + EPS)
        log_likelihood = tf.reduce_mean(tf.reduce_sum(y_ * tf.log(y) + (1 - y_) * tf.log(1 - y), axis=1))
        train_step = tf.train.GradientDescentOptimizer(LEARNING_RATE).minimize(-log_likelihood)
        log_likelihood_summary = tf.summary.scalar('log likelihood', log_likelihood)

    with tf.Session() as sess:
        train_writer = tf.summary.FileWriter(SUMMARY_DIR + '/train', sess.graph)
        test_writer = tf.summary.FileWriter(SUMMARY_DIR + '/test')

        correct_prediction = tf.equal(tf.sign(y - 0.5), tf.sign(y_ - 0.5))
        accuracy = tf.reduce_mean(tf.cast(correct_prediction, tf.float32))
        accuracy_summary = tf.summary.scalar('accuracy', accuracy)

        sess.run(tf.global_variables_initializer())
        for i in range(TRAINING_LOOP + 1):
            images, labels = sess.run(next_batch)
            sess.run(train_step, {x: images, y_: labels})

            if i % SUMMARY_INTERVAL == 0:
                train_acc, summary = sess.run(
                        [accuracy, tf.summary.merge([log_likelihood_summary, accuracy_summary])],
                        {x: images, y_: labels})
                train_writer.add_summary(summary, i)
                test_acc, summary = sess.run(
                        [accuracy, tf.summary.merge([accuracy_summary])],
                        {x: X_test, y_: y_test})
                test_writer.add_summary(summary, i)
                print(f'step: {i}, train-acc: {train_acc}, test-acc: {test_acc}')
後ほど使う分も含まれているけど、
helper.py
import numpy as np
import tensorflow as tf
from scipy import spatial
import operator

def weight_variable(shape, name=None):
    initial = tf.glorot_uniform_initializer()
    return tf.Variable(initial(shape), name=name)

def bias_variable(shape, name=''):
    initial = tf.zeros_initializer()
    return tf.Variable(initial(shape), name=name)

def prewitt_filter():
    v = np.array([[ 1, 0, -1]] * 3)
    h = v.swapaxes(0, 1)
    return tf.constant(np.dstack([v, h]).reshape((3, 3, 1, 2)), dtype = tf.float32, name='prewitt')

def mnist_samples(flatten_image=False, binalize_label=False):
    (X_train, y_train), (X_test, y_test) = tf.keras.datasets.mnist.load_data()

    def normalize(images):
        return images.astype(np.float32) / 255.0

    def flatten(images):
        d, w, h = images.shape
        return images.reshape(d, w * h)

    def binalize(labels):
        return list(map(lambda x: [1] if x == 1 else [0], labels))

    def one_hot_label(labels):
        return tf.keras.utils.to_categorical(labels, 10)

    X_train, X_test = normalize(X_train), normalize(X_test)
    if flatten_image:
        X_train, X_test = flatten(X_train), flatten(X_test)

    if binalize_label:
        y_train, y_test = binalize(y_train), binalize(y_test)
    else:
        y_train, y_test = one_hot_label(y_train), one_hot_label(y_test)

    return (X_train, y_train), (X_test, y_test)
コードの説明
データの読み込み
MNISTってのは、28x28ピクセルの手書き数字の画像のデータセット。
MNISTは0〜9の10カテゴリの分類問題だけど、ロジスティック回帰のために、無理矢理、1かそれ以外かの2カテゴリの分類問題にしているので、データの教師ラベルを付け替えている(1以外の時にラベルを0)。
def mnist_samples(flatten_image=False, binalize_label=False):
    (X_train, y_train), (X_test, y_test) = tf.keras.datasets.mnist.load_data()

    def normalize(images):
        return images.astype(np.float32) / 255.0

    def flatten(images):
        d, w, h = images.shape
        return images.reshape(d, w * h)

    def binalize(labels):
        return list(map(lambda x: [1] if x == 1 else [0], labels))

    def one_hot_label(labels):
        return tf.keras.utils.to_categorical(labels, 10)

    X_train, X_test = normalize(X_train), normalize(X_test)
    if flatten_image:
        X_train, X_test = flatten(X_train), flatten(X_test)

    if binalize_label:
        y_train, y_test = binalize(y_train), binalize(y_test)
    else:
        y_train, y_test = one_hot_label(y_train), one_hot_label(y_test)

    return (X_train, y_train), (X_test, y_test)
入力層
with tf.name_scope('input'):
    y_ = tf.placeholder(tf.float32, [None, CATEGORY_NUM], name='labels')
    x = tf.placeholder(tf.float32, [None, IMAGE_SIZE], name='input_images')
出力層
入力xをWで線形変換して、シグモイド関数に渡して結果yが得られる。Wとbが求めるパラメータ。
ちなみに、この時点では、モデル(Tensorflowではgraphという)を作っているだけなのでなにも動いていない。
with tf.name_scope('readout'):
    W = weight_variable([IMAGE_SIZE, CATEGORY_NUM], name='weight')
    b = bias_variable([CATEGORY_NUM], name='bias')
    y = tf.nn.sigmoid(tf.matmul(x, W) + b)
最適化(パラメーター推定)
ロジスティック回帰の最適化では対数尤度ってのを最大化してパラメータを求める。最適化手法は、Stochastic Gradient Descent / 確率的勾配降下法。
y = tf.clip_by_value(y, EPS, 1.0 - EPS)は、yが0または1になるとlog(0)となって困るので、それを防いでいる。
with tf.name_scope('optimize'):
    y = tf.clip_by_value(y, EPS, 1.0 - EPS)
    log_likelihood = tf.reduce_mean(tf.reduce_sum(y_ * tf.log(y) + (1 - y_) * tf.log(1 - y), axis=1))
    train_step = tf.train.GradientDescentOptimizer(LEARNING_RATE).minimize(-log_likelihood)
    log_likelihood_summary = tf.summary.scalar('log likelihood', log_likelihood)
実行
変数の初期化後、sess.run()で、データを食わせて学習を実行する。
本来であれば、カテゴリ間でデータの偏りがあるのは望ましくないが、今回は識別率は重要じゃないので気にしない。
sess.run(tf.global_variables_initializer())
for i in range(TRAINING_LOOP + 1):
    images, labels = sess.run(next_batch)
    sess.run(train_step, {x: images, y_: labels})
評価
出力が、0.5以上なら1であるとして評価。正解ラベルと推定値が一致しているかを集計。
correct_prediction = tf.equal(tf.sign(y - 0.5), tf.sign(y_ - 0.5))
accuracy = tf.reduce_mean(tf.cast(correct_prediction, tf.float32))
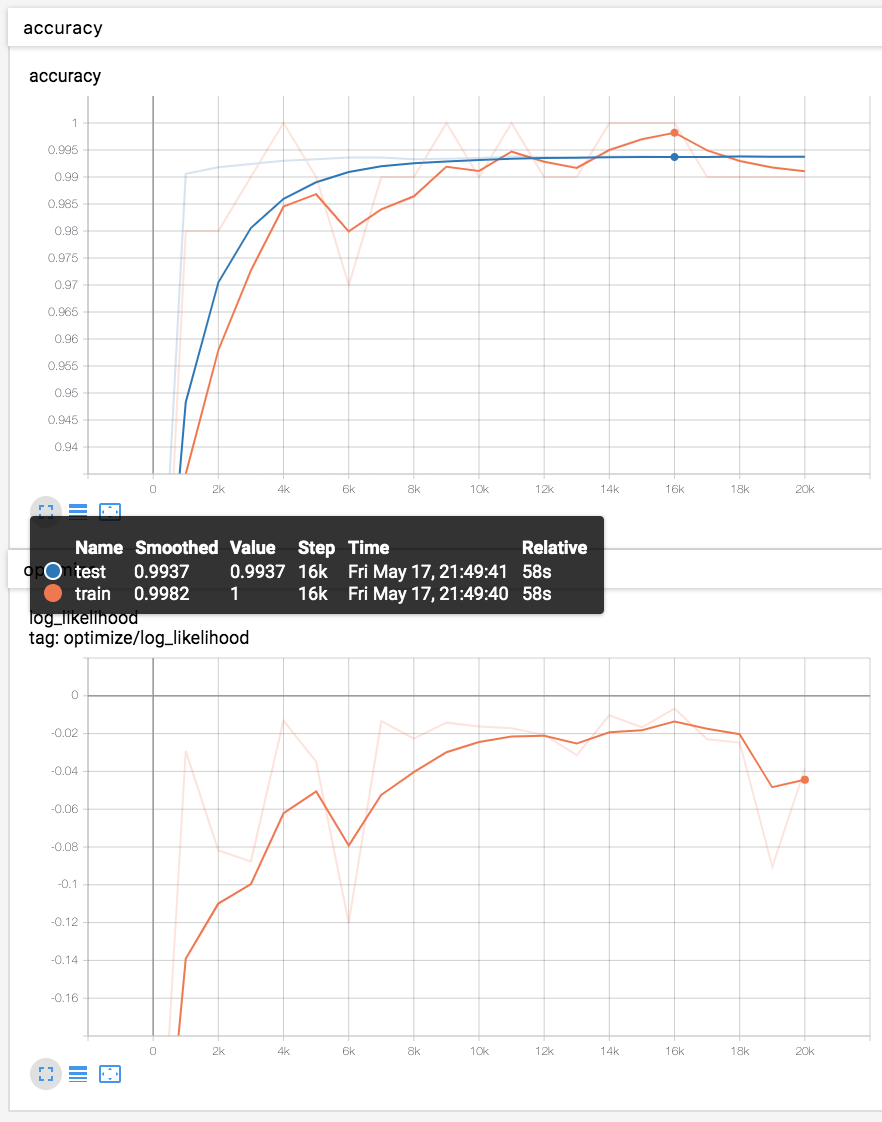
学習の過程を可視化
TensorFlowはTensorBoardという可視化ツールを持っているので、それを利用して、学習過程での、対数尤度 / 学習データでの正解率 / テストデータでの正解率を定期的に出力して可視化。
log_likelihood_summary = tf.summary.scalar('log likelihood', log_likelihood)
accuracy_summary = tf.summary.scalar('accuracy', accuracy)
if i % SUMMARY_INTERVAL == 0:
    train_acc, summary = sess.run(
            [accuracy, tf.summary.merge([log_likelihood_summary, accuracy_summary])],
            {x: images, y_: labels})
    train_writer.add_summary(summary, i)
    test_acc, summary = sess.run(
            [accuracy, tf.summary.merge([accuracy_summary])],
            {x: X_test, y_: y_test})
    test_writer.add_summary(summary, i)
    print(f'step: {i}, train-acc: {train_acc}, test-acc: {test_acc}')
結果
テストデータ(青線)での識別率は、99.3%程度。
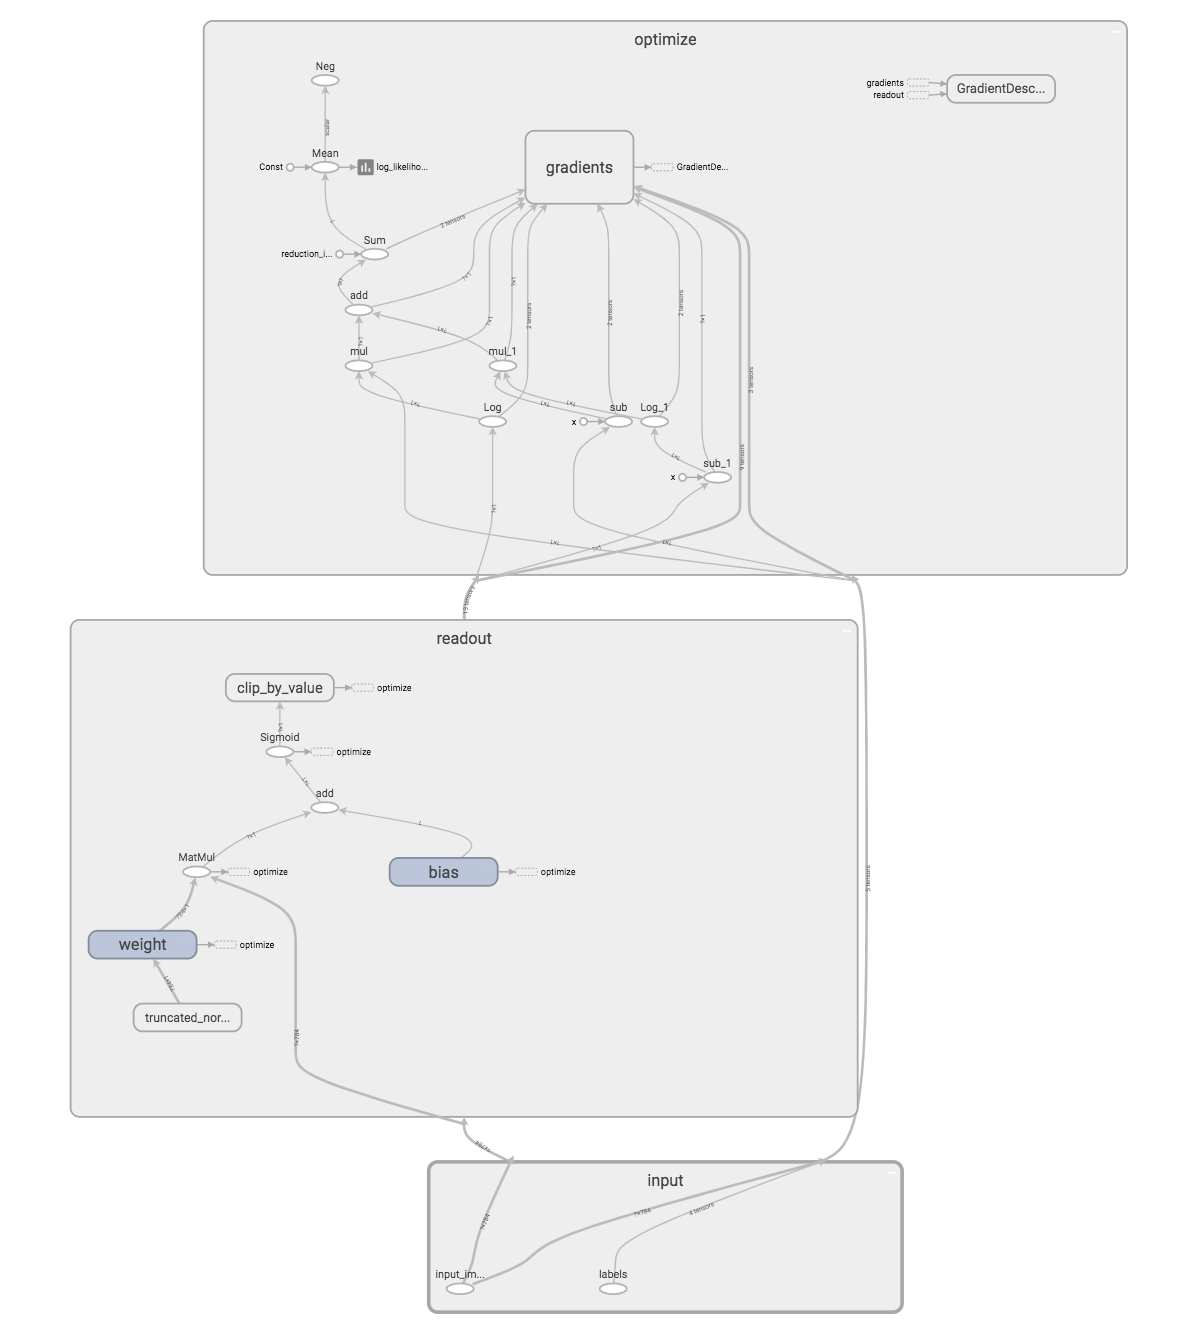
ちなみに、今回は単純なモデルなのであまり意味は無いが、モデル(グラフ)も可視化できる。
あとがき
次回の記事では、今回の2クラスの分類から、多クラスの分類に拡張してみます。