Pythonを独学で学習しており、躓いています。
解決したいこと
現在、Pythonを使用して簡単なアルバムのアートワーク取得アプリを作成しようとしています。
おおまかな枠組みは作成できたのですが、一部機能が想定通りに機能しません。
解決方法を教えていただけると幸いです。
初心者なので単語など理解が間違っている可能性がありますが、ご容赦ください。
解決したい内容
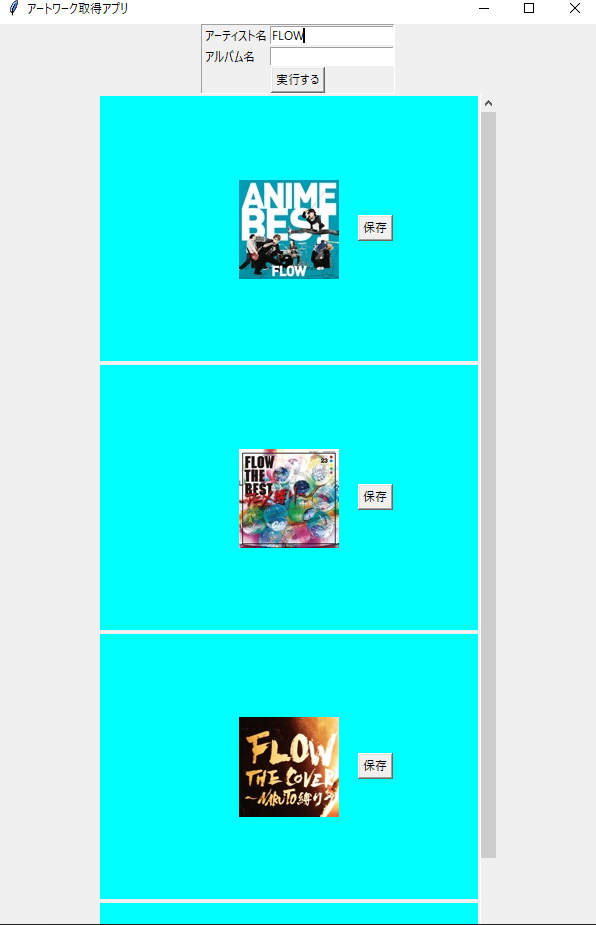
Tkinterを使用して画像のようにほしいアートワークの画像を保存すると画像が取得できるというものになっています。
ですが、ほしい画像が下の方にあったときスクロールバーを使用して下に行きたいのですがスクロールバーのみ動いて左のcanvas部分が動かない状態です。
コード上ではcanvasとScrollbarを紐づけを行っているつもりではいますが、うまく紐づけされていないのでしょうか?
問題が起きている画像
該当するソースコード
import tkinter
from PIL import Image, ImageTk
import requests
import json
import urllib
import re
import os
import tempfile
import cv2
from functools import partial
from tkinter import ttk


# ==================================
# Applicationオブジェクトクラスの定義
# ==================================


class DesktopApp(tkinter.Frame):
    # ======================================
    # アプリケーションオブジェクト初期設定
    # ======================================
    def __init__(self, window=None):
        super().__init__(window, width=600, height=900, borderwidth=1, relief="groove")

        self.window = window
        self.pack()
        self.pack_propagate(0)
        self.widgets()

    # ======================================
    # ウィジェット作成
    # ======================================
    def widgets(self):
        # ラベル
        self.label1 = tkinter.Label(self, text="アーティスト名")
        self.label2 = tkinter.Label(self, text="アルバム名")

        # 実行ボタン
        submitBtn = tkinter.Button(self)  # ボタンウィジェット
        submitBtn["text"] = "実行する"  # ボタンテキスト
        submitBtn["command"] = self.executeProcess  # ボタン押下後に実行される処理

        # テキストボックス1
        self.text_box1 = tkinter.Entry(self)  # テキストボックスウィジェット
        self.text_box1["width"] = 20  # 幅

        # テキストボックス2
        self.text_box2 = tkinter.Entry(self)  # テキストボックスウィジェット
        self.text_box2["width"] = 20  # 幅

        # 関数外で定義
        self.canvas = []  # imread_web関数内で使用する。関数内でループさせると毎回初期化が走るから関数外で定義
        self.photo_image = []  # 配列にしないと度々画像が更新されてしまい、参照出来なくなる。https://onl.bz/gTdAMxf 参照
        self.SaveBtn = []
        self.jpeg_high = []
        self.a = []
        self.jpeg = []
        self.albumName = []

        # gridでウィジェットの配置
        self.label1.grid(row=0, column=0, sticky=tkinter.W)
        self.label2.grid(row=1, column=0, sticky=tkinter.W)
        submitBtn.grid(row=2, column=0, columnspan=2)
        self.text_box1.grid(row=0, column=1, sticky=tkinter.E)  # テキストボックス表示位置
        self.text_box2.grid(row=1, column=1, sticky=tkinter.E)  # テキストボックス表示位置

    # 実行ボタン押下後に実行される処理
    def executeProcess(self):
        self.root_canvas = tkinter.Canvas(self.master, bg="black")
        self.root_canvas.propagate(False)
        self.root_canvas.pack()

        self.root_frame = tkinter.Frame(self.root_canvas, bg="yellow")
        self.root_frame.propagate(False)
        self.root_frame.grid(row=0, column=0)

        url = "https://itunes.apple.com/search?term={}&country=jp&lang=ja_jp&limit=50&media=music&entity=album&attribute=artistTerm".format(
            self.text_box1.get()
        )
        res = requests.get(url).json()
        i = 0

        with open(
            "{}.json".format(self.text_box1.get()), "w", encoding="utf-8_sig"
        ) as f:
            json.dump(res, f, indent=4, ensure_ascii=False)

        LoopCount = res["resultCount"]
        for a in range(LoopCount):
            if self.text_box2.get() in res["results"][a]["collectionCensoredName"]:
                self.albumName.insert(i, res["results"][a]["collectionCensoredName"])
                self.albumName[i] = re.sub(r"[\/:*?" "'<>|]", "_", self.albumName[i])
                print(self.albumName[i])

                self.jpeg.insert(i, res["results"][a]["artworkUrl100"])
                self.imread_web(i)  # 画像表示関数
                i = i + 1
            else:
                pass

        # 縦のスクロールバー
        self.ybar = ttk.Scrollbar(
            self.root_canvas, orient="v", command=self.root_canvas.yview
        )
        self.ybar.grid(row=0, column=1, sticky=(tkinter.N, tkinter.S))
        self.root_canvas.config(yscrollcommand=self.ybar.set)
        self.root_canvas.config(scrollregion=(0, 0, 1000, 10000))
        print(self.canvas)
        print(i)

    def imread_web(self, x):
        res = requests.get(self.jpeg[x])
        img = None

        # 画像処理フェーズ
        fp = tempfile.NamedTemporaryFile(dir="./", delete=False)  # Tempfileを作成して即読み込む
        fp.write(res.content)
        fp.close()
        self.img = cv2.imread(fp.name)
        os.remove(fp.name)  # これがないと一時DLされた画像がtmpとして残ってしまう
        self.image_rgb = cv2.cvtColor(self.img, cv2.COLOR_BGR2RGB)
        self.image_pil = Image.fromarray(self.image_rgb)

        # Canvasの作成・Canvasを配置
        self.canvas.insert(x, tkinter.Canvas(self.root_frame, bg="cyan"))
        self.canvas[x].grid(row=x + 3, column=0, columnspan=2)

        # Canvas紐付け保存ボタン
        self.SaveBtn.insert(x, tkinter.Button(self.root_frame))
        self.SaveBtn[x]["text"] = "保存"
        self.SaveBtn[x]["command"] = partial(self.SaveProcess, x)
        self.SaveBtn[x].grid(row=x + 3, column=1)

        # PIL.ImageからPhotoImageへ変換する
        self.photo_image.insert(x, ImageTk.PhotoImage(image=self.image_pil))

        # キャンバスのサイズを取得
        self.update()  # Canvasのサイズを取得するため更新しておく(中心にならなくなる)
        canvas_width = self.canvas[x].winfo_width()
        canvas_height = self.canvas[x].winfo_height()

        # 画像の描画
        self.canvas[x].create_image(
            canvas_width / 2,  # 画像表示位置(Canvasの中心)
            canvas_height / 2,
            image=self.photo_image[x],  # 表示画像データ
        )
        self.update()

        # 縦のスクロールバー
        # self.sb1 = tkinter.Scrollbar(self.window, orient = 'v', command = self.canvas.yview)
        # self.sb1.grid(row = 1, column = 2, sticky = 'ns')
        # self.canvas.config(yscrollcommand = self.sb1.set)

    def SaveProcess(self, m):
        self.jpeg_high.insert(
            m, self.jpeg[m].replace("100x100bb.jpg", "100000x100000-999.jpg")
        )
        urllib.request.urlretrieve(
            self.jpeg_high[m], "{}_high.jpg".format(self.albumName[m])
        )  # 高画質画像取得できた!

        print("We are ONE PIECE")


# ==================================
# アプリケーション起動
# ==================================

# Wndiow
window = tkinter.Tk()  # TKオブジェクト
window.title("アートワーク取得アプリ")  # アプリタイトル
window.geometry("600x900")  # 表示画面サイズ(幅x高さ)

# アプリケーションオブジェクト
App = DesktopApp(window=window)  # アプリケーションオブジェクトに指定のWindow設定を渡す
App.mainloop()  # アプリケーション起動
自分で試したこと
・self.root_canvas.config(scrollregion=(0, 0, 1000, 10000))の範囲を拡大
