前回 の記事は DataViewMappings について見ていきました。今回は objects を見ていきます。
情報元: GitHub の Objects の説明
Objects : カスタムプロパティの定義
Objects を使うとビジュアルの書式パネルに、カスタム書式の定義が行えます。1 つの書式には複数のプロパティが設定できます。プロパティのカスタマイズは フィールド書式のカスタマイズ で試しましたが、今回はより詳細を見ていきます。
カスタム書式を使うには、以下の 3 ステップが必要です。
- Capabilities.json の objects にプロパティを定義する
- コード側の enumerateObjectInstances 関数でプロパティの定義と値の受け取り先を指定する
- コード側の update 関数で値が変わった場合の変更を処理する
まずは objects の各プロパティについて見ていきます。
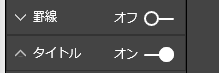
displayName
object の表示名を定義します。以下のオブジェクトの場合、一番上の「タイトル」が表示名となります。
"objects": {
    "myCustomObject": {
        "displayName": "My Object Name",
        "properties": { ... }
    }
}

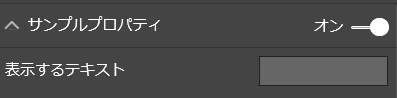
properties
カスタム書式は複数のプロパティを持てます。properties には各プロパティの詳細を定義します。以下のオブジェクトの場合「タイトル」「フォントの色」「背景色」「配置」などがオブジェクトのプロパティとなります。
"properties": {
    "myFirstProperty": {
        "displayName": "firstPropertyName",
        "type": ValueTypeDescriptor | StructuralTypeDescriptor
    }
}

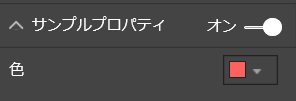
※ show は特殊なプロパティで、オブジェクト全体に対して On/Off のスイッチを設定します。表示名の横にある「オン/オフ」のトグルを表示します。
"properties": {
    "show": {
        "displayName": "My Property Switch",
        "type": {"bool": true}
    }
}
プロパティのタイプ
プロパティで設定できるタイプは以下の 2 種類ありますが、定義方法はあまり変わらないので、開発者が意識する必要は無さそうです。
- Value Type Descriptor: テキストや数値など単純な型
- Structural Type Descriptor: Fill や Formatting など追加情報があるもの
以下に例をいくつかあげます。
"displayText": {
    "displayName": "表示するテキスト",
    "type": {
        "text": true
    }
},
"boolBold": {
    "displayName": "太字にする",
    "type": {
        "bool": true
    }
}

"alignText": {
    "displayName": "配置",
    "type": {
        "formatting": {
            "alignment": true
        }
    }
}

"textColor": {
    "displayName": "色",
    "type": {
        "fill": {
            "solid": {
                "color": true
            }
        }
    }
}

"labelDisplayUnits": {
    "displayName": "ディスプレイユニット",
    "type": {
        "formatting": {
            "labelDisplayUnits": true
        }
    }
}
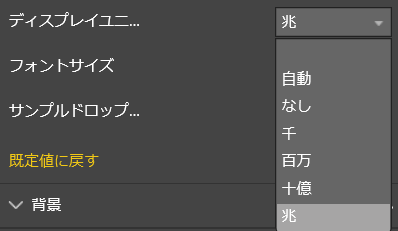
"fontSize": {
    "displayName": "フォントサイズ",
    "type": {
        "formatting": {
            "fontSize": true
        }
    }
}

"enumration": {
    "displayName": "サンプルドロップダウン",
    "type": {
        "enumeration": [
            {
                "displayName": "オプション1",
                "value": "1"
            },
            {
                "displayName": "オプション2",
                "value": "2"
            },
            {
                "displayName": "オプション3",
                "value": "3"
            }
        ]
    }
}

コード側での処理
Capabiities.json に定義した objects はコード側でも処理が必要です。例えば以下のような object 定義があるとします。
{
    "dataRoles": [
        {
            "displayName": "サンプルメジャー",
            "name": "myMeasure",
            "kind": "GroupingOrMeasure"
        }
    ],
    "dataViewMappings": [
        {
            "single": {
                "role": "myMeasure"
            }
        }
    ],
    "objects": {
        "myProperty": {
            "displayName": "サンプルプロパティ",
            "properties": {
                "show": {
                    "displayName": "表示する",
                    "type": {
                        "bool": true
                    }
                },
                "displayText": {
                    "displayName": "表示するテキスト",
                    "type": {
                        "text": true
                    }
                },
                "alignText": {
                    "displayName": "配置",
                    "type": {
                        "formatting": {
                            "alignment": true
                        }
                    }
                }
            }
        }
    }
}
この場合、visual.ts の enumerateObjectInstances で各種プロパティを変数を関連付けします。
private showMyProperty: boolean;
private myPropertyText: string;
private myPropertyTextAlginment: string;

public enumerateObjectInstances(options: EnumerateVisualObjectInstancesOptions): VisualObjectInstance[] | VisualObjectInstanceEnumerationObject {
    debugger;

    let objectName = options.objectName;
    let objectEnumeration: VisualObjectInstance[] = []
    // 設定名によって処理を実施
    switch (objectName) {
        case 'myProperty':
            objectEnumeration.push({
                objectName: objectName,
                properties: {
                    show: this.showMyProperty,
                    displayText: this.myPropertyText,
                    alignText: this.myPropertyTextAlginment
                },
                selector: null
            });
            break;
    }
    return objectEnumeration;
}
また設定が変わった場合に update 関数で処理します。DataViewObjects.getValue 関数に取得したいオブジェクト名とプロパティ名を指定、また値がない場合の既定値を設定します。
public update(options: VisualUpdateOptions) {
            debugger;

            this.showMyProperty = DataViewObjects.getValue(
                options.dataViews[0].metadata.objects, {
                    objectName: "myProperty",
                    propertyName: "show"
                }, true
            );
            this.myPropertyText = DataViewObjects.getValue(
                options.dataViews[0].metadata.objects, {
                    objectName: "myProperty",
                    propertyName: "displayText"
                }, ""
            )
            this.myPropertyTextAlginment = DataViewObjects.getValue(
                options.dataViews[0].metadata.objects, {
                    objectName: "myProperty",
                    propertyName: "alignText"
                }, "center"
            )
...
enumerateObjectInstances 関数
この関数では、利用するオブジェクト毎にプロパティを処理します。capabilities.json に指定したオブジェクトの数だけ呼ばれるため、switch 文で都度処理を行います。最終的に VisualObjectInstance の配列を返します。
VisualObjectInstance
オブジェクトに対応する定義を格納するクラスです。
objectName
オブジェクトの名前を指定します。
properties
利用するプロパティと対応するローカル変数を指定します。
selector
セレクターは、このプロパティが dataView に対してどこに配置されるかを指定します。
static
selector に null を指定した場合、dataviews[index].metadata.objects に設定されます。上記の例でも selector に null を指定しているため options.dataViews[0].metadata.objects から値を取得しています。
selector: null
columns
selector で metadata を指定した場合、QueryName に一致する column に対してオブジェクトが設定されます。dataViews[index].table.columns[index].objects
selector: { metadata: 'QueryName' }
columns の例
以下の例では selector: { metadata: 'Table1.金額' } のように Table1.金額 column に対するオブジェクト設定をしています。処理の方法はいくつかありますが、ここではデータをバインドするタイミングで値を確認して、設定しています。
{
    "dataRoles": [
        {
            "displayName": "サンプルメジャー",
            "name": "myMeasure",
            "kind": "GroupingOrMeasure"
        }
    ],
    "dataViewMappings": [
        {
            "table": {
                "rows": {
                    "for": {
                        "in": "myMeasure"
                    }
                }
            }
        }
    ],
    "objects": {
        "myProperty": {
            "displayName": "サンプルプロパティ",
            "properties": {
                "show": {
                    "displayName": "表示する",
                    "type": {
                        "bool": true
                    }
                },
                "textColor": {
                    "displayName": "色",
                    "type": {
                        "fill": {
                            "solid": {
                                "color": true
                            }
                        }
                    }
                }
            }
        }
    }
}
import DataViewObjects = powerbi.extensibility.utils.dataview.DataViewObjects;

module powerbi.extensibility.visual {
    "use strict";
    export class Visual implements IVisual {

        private area: d3.Selection<HTMLElement>
        private table: d3.Selection<HTMLElement>
        private thead: d3.Selection<HTMLElement>
        private tbody: d3.Selection<HTMLElement>
        private host: IVisualHost;
        private settings: VisualSettings;
        private showMyProperty: boolean;
        private myPropertyTextColor: any;

        constructor(options: VisualConstructorOptions) {
            // カスタムビジュアルを配置しているホストの情報を取得
            this.host = options.host;
            // カスタムビジュアルのエリアを取得
            this.area = d3.select(options.element);
            this.table = this.area.append("table");
            this.thead = this.table.append("thead").append("tr");
            this.tbody = this.table.append("tbody");
        }

        public update(options: VisualUpdateOptions) {
            debugger;

            this.thead.selectAll("th").remove();
            this.tbody.selectAll("tr").remove();

            // append the header row
            this.thead
                .selectAll("th")
                .data(options.dataViews[0].table.columns)
                .enter()
                .append("th")
                .append("font")
                .attr('color', (column) => {
                    if (column.objects != null) {
                        this.showMyProperty = DataViewObjects.getValue(
                            column.objects, {
                                objectName: "myProperty",
                                propertyName: "show"
                            }, true
                        );
                        let columnColor = DataViewObjects.getValue(
                            column.objects, { objectName: "myProperty", propertyName: "textColor" }, null);
                        if (columnColor != null && this.showMyProperty) {
                            this.myPropertyTextColor = columnColor.solid.color;
                            return columnColor.solid.color;
                        }
                    }
                    else {
                        return "black"
                    }
                })
                .text((column) => { return column.displayName; });

            options.dataViews[0].table.rows.forEach((row) => {

                this.tbody.append("tr")
                    .selectAll("td")
                    .data(row)
                    .enter()
                    .append("td")
                    .text((cell) => { return cell.toString(); });
            });
        }

        private static parseSettings(dataView: DataView): VisualSettings {
            return VisualSettings.parse(dataView) as VisualSettings;
        }

        public enumerateObjectInstances(options: EnumerateVisualObjectInstancesOptions): VisualObjectInstance[] | VisualObjectInstanceEnumerationObject {
            debugger;

            let objectName = options.objectName;
            let objectEnumeration: VisualObjectInstance[] = []
            // 設定名によって処理を実施
            switch (objectName) {

                case 'myProperty':

                    objectEnumeration.push({
                        objectName: objectName,
                        properties: {
                            show: this.showMyProperty,
                            textColor: this.myPropertyTextColor,
                        },
                        selector: { metadata: 'Table1.金額' }
                    });
                    break;
            }
            return objectEnumeration;
        }
    }
}
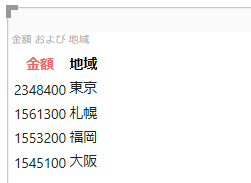
[メジャーに金額と地域を設定]
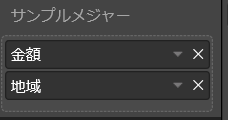
[プロパティで色を指定]
[結果]
selector
ISelectionId プロパティを持ったインスタンスに対して、オブジェクトを配置します。棒グラフのように複数のインスタンスが画面上にあり、それぞれ異なる色を付ける場合などに利用します。具体例は フィールド書式のカスタマイズ を参照してください。
scope identity
例えばカテゴリーとして、["Jan", "Feb", "March", ...] があり、他のカテゴリとして、["Small", "Medium", "Large"] があった場合、"Feb" かつ "Large" に対してオブジェクトを配置したい場合、scope identity が使えます。それぞれの DataViewScopeIdentity を selector に対して指定します。
selector: {
    data: <DataViewScopeIdentity[]>identities
}
まとめ
高度なビジュアルの開発にはカスタム書式の利用は欠かせません。既存のビジュアルを参考にしながら、色々試してください。次回は Sorting、SupportsHighlight、AdvancedEditModeSupport を見ていきます。
尚、書式をより簡単に扱うためのユーティリティとして DataViewObjectsParser があります。是非そちらもご覧ください。