はじめに
PythonでGUI開発をするためのライブラリ「PySide2」の基本的な使い方を、いくつかの段階に分けて説明していきます。
当ページではPySide2のラジオボタンについて説明しています。
環境
以下の通りになります。
- Windows 10
- Python 3.8以降
公式リファレンス
ベースプログラム
以下のウィンドウを表示するだけのプログラムをベースにして実装していきます。
# PySide2のモジュールを読み込む
from PySide2 import QtWidgets


# ウィンドウの見た目と各機能(今はウィンドウだけ)
class MainWindow(QtWidgets.QWidget):
    def __init__(self):
        super().__init__()


# アプリの実行と終了
app = QtWidgets.QApplication()
window = MainWindow()
window.show()
app.exec_()
PySide2でラジオボタン
ラジオボタンを表示する
3つの選択肢を持つラジオボタンを表示します。ここでは応用が効くようにラジオボタンのグループ化も行います。
サンプルプログラム
# PySide2のモジュールを読み込む
from PySide2 import QtWidgets


# ウィンドウの見た目と各機能
class MainWindow(QtWidgets.QWidget):
    def __init__(self):
        super().__init__()

        # ラジオボタンのグループ登録用オブジェクト
        self.radioGroup = QtWidgets.QButtonGroup()

        # ラジオボタンオブジェクトの生成
        radioButton1 = QtWidgets.QRadioButton("Radio Button 1", self)
        radioButton2 = QtWidgets.QRadioButton("Radio Button 2", self)
        radioButton3 = QtWidgets.QRadioButton("Radio Button 3", self)

        # ラジオボタンオブジェクトのグループ登録
        self.radioGroup.addButton(radioButton1, 1)
        self.radioGroup.addButton(radioButton2, 2)
        self.radioGroup.addButton(radioButton3, 3)

        # ラジオボタンの配置設定
        radioButton1.move(10, 0)
        radioButton2.move(10, 30)
        radioButton3.move(10, 60)


# アプリの実行と終了
app = QtWidgets.QApplication()
window = MainWindow()
window.show()
app.exec_()
実行結果

プログラム解説
● ラジオボタンのグループ管理
「あるグループの中から一つ選ぶ」というのがラジオボタンの基本な考え方です。そのグループに選択肢を登録して管理するためのオブジェクトをQButtonGroup()クラスを使用して生成します。
書式:
    QtWidgets.QButtonGroup()
引数:
    無し
サンプルプログラムでは単にQButtonGroup()クラスで生成したボタングループオブジェクトをradioGroupに格納しているだけです。
# ラジオボタンのグループ登録用オブジェクト
radioGroup = QtWidgets.QButtonGroup()
● ラジオボタンの生成
QRadioButton()クラスでラジオボタンのオブジェクトを生成します。
書式:
    QtWidgets.QRadioButton("string", window_object)
引数:
    string:
        ラジオボタンに表示させる文字列
    window_object:
        ラジオボタンを表示させるウィンドウのオブジェクト
サンプルプログラムでは各々のラジオボタンにRadio Button <連番>という名前付けでウィンドウselfに配置しています。
# ラジオボタンオブジェクトの生成
radioButton1 = QtWidgets.QRadioButton("Radio Button 1", self)
radioButton2 = QtWidgets.QRadioButton("Radio Button 2", self)
radioButton3 = QtWidgets.QRadioButton("Radio Button 3", self)
● グループ登録と識別番号の割り当て
ラジオボタンをグループ登録するにはaddButton()メソッドを使用します。
書式:
    QtWidgets.QButtonGroup().addButton(button_object, id)
引数:
    button_object:
        QtWidgets.QRadioButton()メソッドで生成したオブジェクト
    id:
        「-1」を除く数字(-1は未入力時の値 ⇒ エラー値)
button_objectにはQtWidgets.QRadioButton()クラスで生成したラジオボタンのオブジェクトを指定します。
idには-1を除く識別番号を指定します。選択したラジオボタンに応じて異なる機能を与えたい場合、このidを使用します。ちなみにidを指定しなければ-2から始まり、-3、-4、-5、…とデクリメントされて識別番号が割り振られます。
サンプルプログラムでは各ラジオボタンオブジェクトradioButton1~3をradioGroupに登録しています。
# ラジオボタンオブジェクトのグループ登録
self.radioGroup.addButton(radioButton1, 1)
self.radioGroup.addButton(radioButton2, 2)
self.radioGroup.addButton(radioButton3, 3)
● ラジオボタンの配置
配置設定をしないとラジオボタン同士で上書きされます。それを防ぐために各々のラジオボタンの配置場所を決めます。
書式:
    QtWidgets.QRadioButton("string", window_object).move(x, y)
引数:
    x:
        x座標(横方向)に配置する値(px単位)
    y:
        y座標(縦方向)に配置する値(px単位)
サンプルプログラムではx座標は全て10pxの位置に、y座標は30pxずつズラして配置しています。
# ラジオボタンの配置設定
radioButton1.move(10, 0)
radioButton2.move(10, 30)
radioButton3.move(10, 60)
ラジオボタンの初期入力を決定する
ラジオボタンはいずれか一つを選択するボタンなので、未入力状態はおかしいです。そこで最初から「2番目のボタン」が入力されている状態にしてみます。
サンプルプログラム
先ほどのサンプルプログラムに1文加わっただけです。
# PySide2のモジュールを読み込む
from PySide2 import QtWidgets


# ウィンドウの見た目と各機能
class MainWindow(QtWidgets.QWidget):
    def __init__(self):
        super().__init__()

        # ラジオボタンのグループ
        self.radioGroup = QtWidgets.QButtonGroup()

        # ラジオボタンオブジェクトの生成
        radioButton1 = QtWidgets.QRadioButton("Radio Button 1", self)
        radioButton2 = QtWidgets.QRadioButton("Radio Button 2", self)
        radioButton3 = QtWidgets.QRadioButton("Radio Button 3", self)

        # ラジオボタンオブジェクトのグループ登録
        self.radioGroup.addButton(radioButton1, 1)
        self.radioGroup.addButton(radioButton2, 2)
        self.radioGroup.addButton(radioButton3, 3)

        # 2番目のラジオボタンを初期入力として設定
        radioButton2.setChecked(True)

        # ラジオボタンの配置設定
        radioButton1.move(10, 0)
        radioButton2.move(10, 30)
        radioButton3.move(10, 60)


# アプリの実行と終了
app = QtWidgets.QApplication()
window = MainWindow()
window.show()
app.exec_()
実行結果
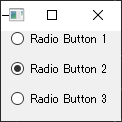
プログラム解説
● 初期入力のボタンを選択
setChecked()メソッドで複数あるラジオボタンの一つを初期入力状態にできます。
書式:
    QtWidgets.QRadioButton("string", window_object).setChecked(bool)
引数:
    bool:
        「True」または「False」を指定。
        初期入力状態にする場合はTrueを引数に指定。
サンプルプログラムの初期入力を設定している所です。特に説明するところはないです。
# 2番目のラジオボタンを初期入力として設定
radioButton2.setChecked(True)
選択したラジオボタンのIDを取得する
選択したラジオボタンのIDを取得するプッシュボタンを実装します。
サンプルプログラム
# PySide2のモジュールを読み込む
from PySide2 import QtWidgets


# ウィンドウの見た目と各機能
class MainWindow(QtWidgets.QWidget):
    def __init__(self):
        super().__init__()

        # ラジオボタンのグループ登録用オブジェクト
        self.radioGroup = QtWidgets.QButtonGroup()

        # ラジオボタンオブジェクトの生成
        radioButton1 = QtWidgets.QRadioButton("Radio Button 1", self)
        radioButton2 = QtWidgets.QRadioButton("Radio Button 2", self)
        radioButton3 = QtWidgets.QRadioButton("Radio Button 3", self)

        # ラジオボタンオブジェクトのグループ登録
        self.radioGroup.addButton(radioButton1, 1)
        self.radioGroup.addButton(radioButton2, 2)
        self.radioGroup.addButton(radioButton3, 3)

        # 2番目のラジオボタンを初期入力として設定
        radioButton2.setChecked(True)

        # ラジオボタンの配置設定
        radioButton1.move(10, 0)
        radioButton2.move(10, 30)
        radioButton3.move(10, 60)

        # 選択中のラジオボタンのIDを取得するボタン
        button = QtWidgets.QPushButton("IDを取得", self)
        button.clicked.connect(self.print_radiobutton_id)
        button.move(10, 90)

    # ラジオボタンを表示するメソッド
    def print_radiobutton_id(self):
        button_id = self.radioGroup.checkedId()  # 選択中のラジオボタンID
        print("Radio Button ID:", button_id)     # ID表示


# アプリの実行と終了
app = QtWidgets.QApplication()
window = MainWindow()
window.show()
app.exec_()
実行結果
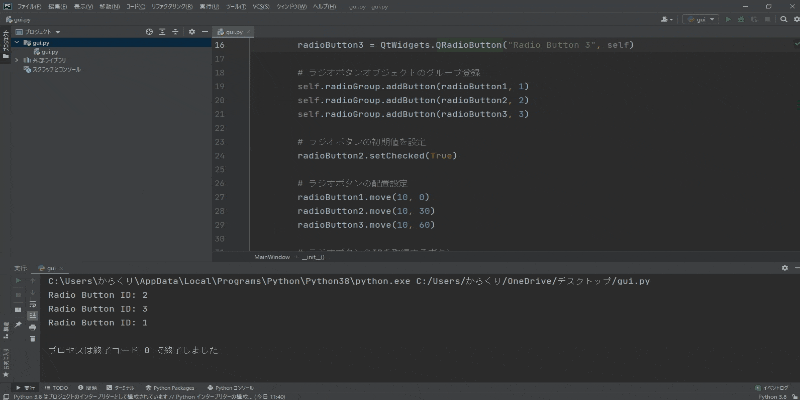
プログラム解説
ラジオボタンがQButtonGroup()クラスでグループ登録されていることが前提です。グループ登録されていればcheckedId()でラジオボタンの識別番号IDを取得できます。
書式:
    QtWidgets.QButtonGroup().checkedId()
引数:
    なし
サンプルプログラムではボタンをクリックしたらprint_radiobutton_idメソッドを実行し、選択されている
def __init__(self):
    ...(略)...
    # 選択中のラジオボタンのIDを取得するボタン
    button = QtWidgets.QPushButton("IDを取得", self)
    button.clicked.connect(self.print_radiobutton_id)
    button.move(10, 90)

    # ラジオボタンを表示するメソッド
def print_radiobutton_id(self):
    button_id = self.radioGroup.checkedId()  # 選択中のラジオボタンID
    print("Radio Button ID:", button_id)     # ID表示
ラジオボタンを使ったサンプルプログラム
ラジオボタンを使用した簡単なサンプルプログラムをいくつかご披露。
選択したアプリを起動する
PySide2をゼロから学んでいく~#2 ボタン~でも紹介したサンプルプログラムのラジオボタン版になります。以下のアプリを起動するラジオボタンになります。
- Chrome
- サクラエディタ
- Kindle
import subprocess
# PySide2のモジュールを読み込む
from PySide2 import QtWidgets


# ウィンドウの見た目と各機能
class MainWindow(QtWidgets.QWidget):
    def __init__(self):
        super().__init__()
        self.setGeometry(200, 200, 500, 150)

        # アプリの案内を表示
        label = QtWidgets.QLabel(self)
        label.setStyleSheet("""QLabel {
            font-size: 24px;        /* 文字サイズ */
            font-weight: bold;      /* 太文字 */
            font-family: umeboshi;  /* 梅干フォント */
        }""")
        label.setText("起動したいアプリを選択してください:")

        # ラジオボタンのグループ登録用オブジェクト
        self.radioGroup = QtWidgets.QButtonGroup()

        # ラジオボタンオブジェクトの生成
        chromeButton = QtWidgets.QRadioButton("Chrome", self)
        sakuraButton = QtWidgets.QRadioButton("サクラエディタ", self)
        kindleButton = QtWidgets.QRadioButton("Kindle", self)

        # ラジオボタンオブジェクトのグループ登録
        self.radioGroup.addButton(chromeButton, 1)
        self.radioGroup.addButton(sakuraButton, 2)
        self.radioGroup.addButton(kindleButton, 3)

        # Chromeを初期入力として設定
        chromeButton.setChecked(True)

        # ラジオボタンの配置設定
        chromeButton.move(10, 30)
        sakuraButton.move(10, 60)
        kindleButton.move(10, 90)

        # 起動ボタン
        runButton = QtWidgets.QPushButton("アプリを起動", self)
        runButton.clicked.connect(self.run_application)
        runButton.move(10, 120)

    def run_application(self):
        appId = {
            "Chrome": 1,
            "Sakura": 2,
            "Kindle": 3
        }

        if appId["Chrome"] == self.radioGroup.checkedId():
            subprocess.Popen(R"C:\Program Files\Google\Chrome\Application\chrome.exe")
        elif appId["Sakura"] == self.radioGroup.checkedId():
            subprocess.Popen(R"C:\Program Files (x86)\sakura\sakura.exe")
        elif appId["Kindle"] == self.radioGroup.checkedId():
            subprocess.Popen(R"C:\Users\からくり\AppData\Local\Amazon\Kindle\application\Kindle.exe")
        else:
            print("Unknown")


# アプリの実行と終了
app = QtWidgets.QApplication()
window = MainWindow()
window.show()
app.exec_()
パソコンのリソース情報を取得する
事前にpsutilをインストールしてください。
pip install psutil
使用しているパソコンのリソース情報を表示するラジオボタンになります。
- CPUコア数
- メモリ容量
- ストレージ容量
- などなど
import multiprocessing
import psutil
# PySide2のモジュールを読み込む
from PySide2 import QtWidgets


# ウィンドウの見た目と各機能
class MainWindow(QtWidgets.QWidget):
    def __init__(self):
        super().__init__()
        self.setGeometry(200, 200, 600, 300)

        # アプリの案内を表示
        label = QtWidgets.QLabel(self)
        label.setStyleSheet("""QLabel {
            font-size: 24px;        /* 文字サイズ */
            font-weight: bold;      /* 太字 */
        }""")
        label.setText("確認したいリソース情報を選択してください:")

        # ラジオボタンのグループ登録用オブジェクト
        self.radioGroup = QtWidgets.QButtonGroup()

        # ラジオボタンオブジェクトの生成
        cpuCore = QtWidgets.QRadioButton("CPUコア数", self)
        cpuUseRate = QtWidgets.QRadioButton("CPU使用率", self)
        ramCapacity = QtWidgets.QRadioButton("メモリ容量", self)
        ramUseRate = QtWidgets.QRadioButton("メモリ使用率", self)
        storageCapacity = QtWidgets.QRadioButton("ストレージ容量", self)
        storageUseRate = QtWidgets.QRadioButton("ストレージ使用率", self)
        storageFreeSpace = QtWidgets.QRadioButton("ストレージ空き容量", self)

        # ラジオボタンオブジェクトのグループ登録
        self.radioGroup.addButton(cpuCore,          1)
        self.radioGroup.addButton(cpuUseRate,       2)
        self.radioGroup.addButton(ramCapacity,      3)
        self.radioGroup.addButton(ramUseRate,       4)
        self.radioGroup.addButton(storageCapacity,  5)
        self.radioGroup.addButton(storageUseRate,   6)
        self.radioGroup.addButton(storageFreeSpace, 7)

        # CPUコア数を初期入力として設定
        cpuCore.setChecked(True)

        # ラジオボタンの配置設定
        cpuCore.move(10, 30)
        cpuUseRate.move(10, 60)
        ramCapacity.move(10, 90)
        ramUseRate.move(10, 120)
        storageCapacity.move(10, 150)
        storageUseRate.move(10, 180)
        storageFreeSpace.move(10, 210)

        # 表示ボタン
        showButton = QtWidgets.QPushButton("リソース情報表示", self)
        showButton.clicked.connect(self.get_pc_resource)
        showButton.move(10, 240)

    def get_pc_resource(self):
        resourceId = {
            "cpu_core":             1,  # CPUコア数
            "cpu_use_rate":         2,  # CPU使用率
            "ram_capacity":         3,  # メモリ容量
            "ram_use_rate":         4,  # メモリ使用率
            "storage_capacity":     5,  # ストレージ容量
            "storage_use_rate":     6,  # ストレージ使用率
            "storage_free_space":   7   # ストレージ空き容量
        }

        # メモリ情報の取得
        ram = psutil.virtual_memory()

        # ストレージ情報の取得
        storage = psutil.disk_usage("/")

        # リソース情報を表示
        if resourceId["cpu_core"] == self.radioGroup.checkedId():
            print("CPUコア数:", multiprocessing.cpu_count())
        elif resourceId["cpu_use_rate"] == self.radioGroup.checkedId():
            print("CPU使用率:", psutil.cpu_percent(interval=1))
        elif resourceId["ram_capacity"] == self.radioGroup.checkedId():
            print("メモリ容量:", ram.total)
        elif resourceId["ram_use_rate"] == self.radioGroup.checkedId():
            print("メモリ使用率:", ram.used)
        elif resourceId["storage_capacity"] == self.radioGroup.checkedId():
            print("ストレージ容量:", storage.total)
        elif resourceId["storage_use_rate"] == self.radioGroup.checkedId():
            print("ストレージ使用率:", storage.used)
        elif resourceId["storage_free_space"] == self.radioGroup.checkedId():
            print("ストレージ空き容量:", storage.free)
        else:
            print("Unknown")


# アプリの実行と終了
app = QtWidgets.QApplication()
window = MainWindow()
window.show()
app.exec_()