概要
Kerasを用いてVGG16をFine-tuningして分類してみました。
学習時間は1時間 ~ 2時間ほどでまぁまぁな精度を出せるようにします。
参考程度に見ていただけると嬉しいです。
VGG16の論文
2018年 上半期ブレイク女優ランキング
2018年 上半期ブレイク俳優ランキング
2018年 上半期ブレイク芸人ランキング
上記のサイトを参考に1位 ~ 3位の画像をそれぞれ100枚収集し、トレーニング画像を水増し(ぼかし、反転など)して7倍に増やしました。
また、集めた画像で2人以上人が写っている写真は削除しました。
トレーニングデータに使用した画像は、バリデーションデータに入れないでください。
画像は、PythonでGoogle Custom Search APIを使い画像収集してみたを参考に集めてください。
ディレクトリ構造
vgg16_fine_tuning/
├── main.ipynb
├── images
| ├── train
| | ├── 志尊淳
| | ├── 新田真剣佑
| | ├── 田中圭
| | ├── 川栄李奈
| | ├── 広瀬アリス
| | ├── 永野芽郁
| | ├── ひょっこりはん
| | ├── みやぞん
| | ├── 野生爆弾くっきー
| ├── test
| | ├── 志尊淳
| | ├── 新田真剣佑
| | ├── 田中圭
| | ├── 川栄李奈
| | ├── 広瀬アリス
| | ├── 永野芽郁
| | ├── ひょっこりはん
| | ├── みやぞん
| | ├── 野生爆弾くっきー
├── tests.jpg
トレーニングデータ、バリデーションデータの作成
画像を集めてからこのコードを実行してください。
from keras.preprocessing.image import ImageDataGenerator

# 分類するクラス
classes = ['志尊淳', '新田真剣佑', '田中圭', '川栄李奈', '広瀬アリス', '永野芽郁', 'ひょっこりはん', 'みやぞん', '野生爆弾くっきー']
nb_classes = len(classes)

# 224 * 224でやると時間かかるので64 * 64
img_width, img_height = 64, 64

# トレーニング用とバリデーション用の画像の保存先
train_data_dir = './images/train'
validation_data_dir = './images/test'

# バッチサイズを指定
batch_size = 16

# エポック数を指定
nb_epoch = 30

# トレーンングデータを作成
train_datagen = ImageDataGenerator(rescale=1.0 / 255,zca_whitening=True, horizontal_flip=True)

train_generator = train_datagen.flow_from_directory(
  train_data_dir,
  target_size=(img_width, img_height),
  color_mode='rgb',
  classes=classes,
  class_mode='categorical',
  batch_size=batch_size,
  shuffle=True)

# バリデーションデータを作成
validation_datagen = ImageDataGenerator(rescale=1.0 / 255)

validation_generator = validation_datagen.flow_from_directory(
    validation_data_dir,
    target_size=(img_width, img_height),
    color_mode='rgb',
    classes=classes,
    class_mode='categorical',
    batch_size=batch_size,
    shuffle=True)
モデルの作成
VGG16の全結合層を捨てて、自分で全結合層を作成し、VGG16と全結合層をくっつけます。
from keras.applications.mobilenet import MobileNet
from keras.applications.vgg16 import VGG16
from keras.optimizers import SGD
from keras.layers import Input, Dense, Flatten, Dropout
from keras.models import Sequential
from keras.models import Model


input_tensor = Input(shape=(img_width, img_height, 3))

# VGG16のロード。FC層は不要なので include_top=False
vgg16 = VGG16(include_top=False, weights='imagenet', input_tensor=input_tensor)

# FC層の作成
top_model = Sequential()
top_model.add(Flatten(input_shape=vgg16.output_shape[1:]))
top_model.add(Dense(256, activation='relu'))
top_model.add(Dropout(0.5))
top_model.add(Dense(nb_classes, activation='softmax'))

# VGG16とFC層を結合してモデルを作成
vgg16_model = Model(input=vgg16.input, output=top_model(vgg16.output))

# 最後のconv層の直前までの層をfreeze(最後の畳み込み層より前の層の再学習を防止)
for layer in vgg16_model.layers[:15]:
    layer.trainable = False

# 多クラス分類を指定
vgg16_model.compile(loss='categorical_crossentropy',
          optimizer=SGD(lr=1e-4, momentum=0.9),
          metrics=['accuracy'])
学習
作成したモデルを学習させます。
学習時間は2時間です。
# Fine-tuning
history = vgg16_model.fit_generator(
    train_generator,
    nb_epoch=nb_epoch,
    validation_data=validation_generator)

# 重みを保存
vgg16_model.save_weights('vgg16_finetuning_weights.h5')

# モデルを保存
vgg16_model.save('vgg16_finetuning_model.h5')
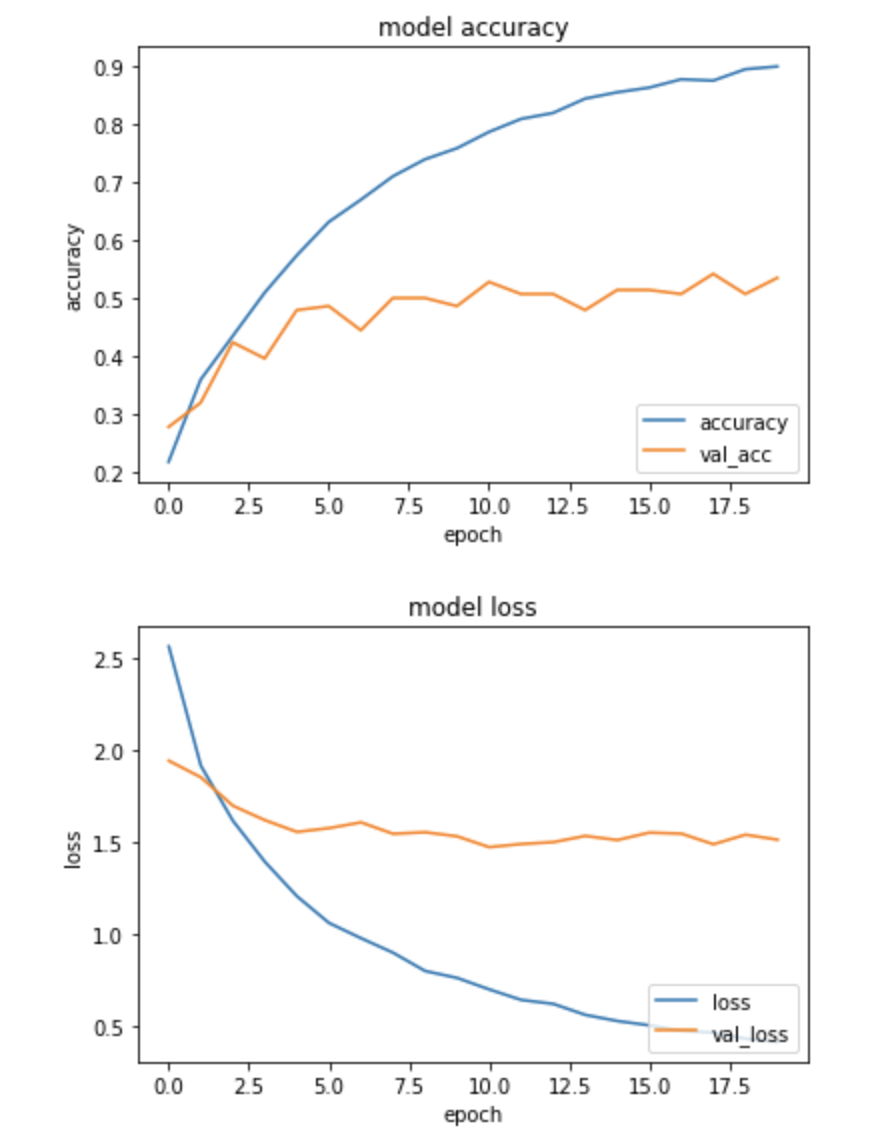
学習結果
import matplotlib.pyplot as plt
% matplotlib inline

plt.plot(history.history['acc'],label="accuracy")
plt.plot(history.history['val_acc'],label="val_acc")
plt.title('model accuracy')
plt.xlabel('epoch')
plt.ylabel('accuracy')
plt.legend(loc="lower right")
plt.show()

plt.plot(history.history['loss'],label="loss",)
plt.plot(history.history['val_loss'],label="val_loss")
plt.title('model loss')
plt.xlabel('epoch')
plt.ylabel('loss')
plt.legend(loc='lower right')
plt.show()
過学習していますね。
FC層を以下のように変えて、epoch数も20にします。
バッチノーマライゼーションとドロップアウトを加え、ユニット数も少なくしています。
学習時間は2時間です。
# FC層の作成
top_model = Sequential()
top_model.add(Flatten(input_shape=vgg16.output_shape[1:]))
top_model.add(Dense(64, activation='relu'))
# バッチノーマライゼーションを追加
top_model.add(BatchNormalization())
top_model.add(Dropout(0.5))
top_model.add(Dense(32, activation='relu'))
# バッチノーマライゼーションを追加
top_model.add(BatchNormalization())
top_model.add(Dropout(0.5))
top_model.add(Dense(nb_classes, activation='softmax'))
あんまり変わってない。。。
バリデーションスコアが気持ち上がったかなぐらいですね。。。
テスト
トレーニング・バリデーションでも使用していない画像でテストします。
from keras.preprocessing import image
from PIL import Image
import numpy as np
from keras.applications.mobilenet import preprocess_input, decode_predictions

label = ['志尊淳', '新田真剣佑', '田中圭', '川栄李奈', '広瀬アリス', '永野芽郁', 'ひょっこりはん', 'みやぞん', '野生爆弾くっきー']

img = image.load_img('テスト画像<img width="152" alt="スクリーンショット 2018-12-21 13.53.45.png" src="https://qiita-image-store.s3.amazonaws.com/0/285122/dbcf8a0d-1bcd-6b0c-db00-090b38dfd8ac.png">
',target_size=(64,64))
img_array = image.img_to_array(img)
test_img = img_array.astype('float32')/255.0
test_img= test_img.reshape((1,64,64,3))
img_pred = model.predict(test_img)

# 予測
print(label[np.argmax(img_pred)])


一応予測はできていますね。
ただ、予測値が低いので改善していきたいです。
改善点
・集めたデータの顔だけを切り取る
・サイズを変えてみる
・結合層をいじってみる
・VGG16以外のモデルでもやってみる
参考にさせていただいた記事
Keras(Tensorflow)の学習済みモデルのFine-tuningで少ない画像からごちうさのキャラクターを分類する分類モデルを作成する
Keras学習済みモデルをFine-tuningさせて精度比較
VGG16のFine-tuningによる犬猫認識 (2)
ファインチューニングをやってみた


