ハードウェアI2CとソフトウェアI2Cの比較
その4では、ハードウェアSPIとソフトウェアSPIとの差異が見られたので、I2Cではどうなるか試す。
用いたもの
いつもと同じロジックアナライザ、Arduino、ESP32搭載のM5Stackおよび光センサー(TLS2561搭載)。Arduino IDE開発環境利用。
ソースコード
ハードウェアI2C
# include <Wire.h>

void setup() [
  Wire.begin();
  .....
}
ハードウェアI2Cは、ArduinoおよびM5Stackで共通。
ソフトウェアI2C(Arduino)
# define SDA_PORT PORTD
# define SDA_PIN 2
# define SCL_PORT PORTD
# define SCL_PIN 3
# include <SoftI2CMaster.h>
# include <SoftWire.h>

SoftWire Wire = SoftWire();

void setup() [
  Wire.begin();
  .....
}
ArduinoのソフトウェアI2Cについては、ArduinoとESP32のWire.begin()の差異参照。
ソフトウェアSPI(M5Stack)
void setup() {
  Wire.begin(16, 17);
  ....
}
M5Stack(ESP32)のソフトウェアI2Cについては、ArduinoとESP32のWire.begin()の差異参照。
ハードウェアSPIとソフトウェアSPIに共通部分
# include "TLS2561.h"

void writeRegisterValue(int deviceAddress, int address, uint8_t val) {
  Wire.beginTransmission(deviceAddress);  // start transmission to device
  Wire.write(address);                    // send register address
  Wire.write(val);                        // send value to write
  Wire.endTransmission();                 // end transmission
}
uint8_t readRegisterValue(int deviceAddress, int address) {
  uint8_t value;
  Wire.beginTransmission(deviceAddress);
  Wire.write(address);                // register to read
  Wire.endTransmission();
  Wire.requestFrom(deviceAddress, 1); // read a byte
  while (!Wire.available());
  value = Wire.read();
  return value;
}

void setup() {
  // 上述のハードウェアSPIおよびソフトウェアSPIの部分がここに入る。 Wire.begin()など。

  Serial.begin(9600);
  writeRegisterValue(TSL2561_Address, TSL2561_Control, 0x03); // POWER UP
  writeRegisterValue(TSL2561_Address, TSL2561_Timing, 0x00); //No High Gain (1x), integration time of 13ms
  writeRegisterValue(TSL2561_Address, TSL2561_Interrupt, 0x00);
  writeRegisterValue(TSL2561_Address, TSL2561_Control, 0x00); // POWER Down
}

void loop() {
  writeRegisterValue(TSL2561_Address, TSL2561_Control, 0x03); // POWER UP
  delay(14);
  Serial.print("Channel 0 Low value: ");
  Serial.println(readRegisterValue(TSL2561_Address, TSL2561_Channal0L));
  writeRegisterValue(TSL2561_Address, TSL2561_Control, 0x00); // POWER Down
  delay(2000);
}
TLS2561のハンドリングについては、以前の記事参照。ここでは、チャネル0のLow値を定期的に取得している。
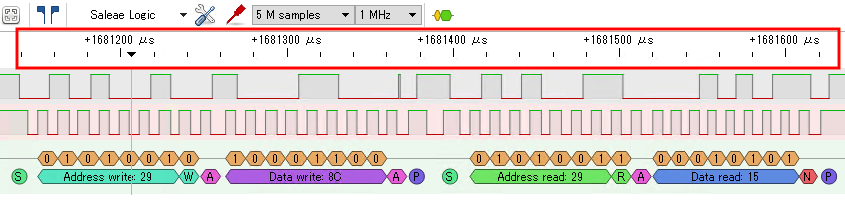
ロジックアナライザで計測
Arduino
Hardware I2C:460μs

Software I2C:480μs
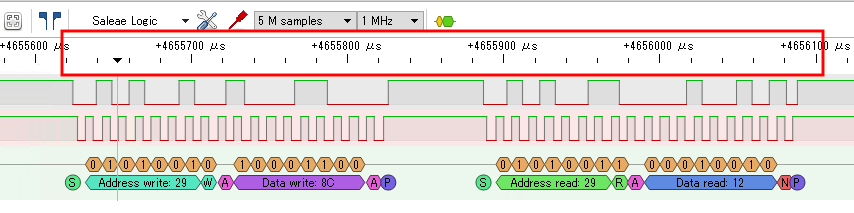
M5Stack(ESP32)
Hardware I2C:460μs
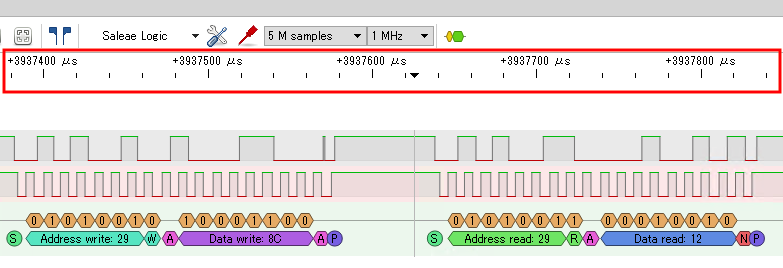
Software I2C:480μs
考察
差がほとんど見られず。まずは比較のみで、その詳細調査はしていない。Wire.setClock()を用い、同一クロックにすれば同じになるかもしれない。いつかやってみるかも。