はじめに
YOLO(最初の論文)はYou Only Look Onceの略称で「一度見ればOK」みたいな感じのモデルです。
物体の検出と識別を同時に行うことで高速で処理を行うことができ、他の物体検出アルゴリズムと比較し高速であることが特徴的です。
そのためリアルタイムのアプリケーションでの使用が可能であるとされており、自動運転や監視システムを始め様々な分野で研究されています。
今回はその比較的新しいモデルYOLOv7(YOLOv7論文)を使って折角なのでデータセット自作して小銭の検出をしてみます。(本記事投稿時の最新はYOLOv8)
YOLOv7シリーズの中ではYOLOv7-e6eが一番精度が高いようですが、サイズの大きいモデルになりそうなのでベーシックなものを使います。
基本的にjupyter notebookで実行してます。
(コードは長いので記事中では折り畳んどきます。)
YOLO原理参考記事【物体検出手法の歴史 : YOLOの紹介】
流れ
- スクレイピングで画像収集
- 画像整理(手作業)
- 画像のラベル作成(labelImg)
- データの拡張(オーグメンテーション)
- YoLo学習
- テスト(画像読み込み)
- 動画でリアルタイムテスト
1. 画像収集
以前も使用したBing用のicrawlerライブラリ使いました。
Bingicrawlerスクレイピング
from icrawler.builtin import BingImageCrawler

coin_list=['一円玉', '五円玉', '十円玉', '五十円玉', '百円玉', '五百円玉', '小銭 画像']

#スクレイピングを行う関数
def scraping(word, max_num, path):
    bing_crawler = BingImageCrawler(downloader_threads = 4, storage = {'root_dir': path})
    bing_crawler.crawl(keyword = word, filters = None, offset = 0, max_num = max_num,
                       min_size=(200, 200), max_size = None)
# スクレイピング実行
for i in range(len(coin_list)):
    scraping(coin_list[i], 200, './coin/' + coin_list[i] + '/')
また検索エンジン違えば収集結果も違うかなと思い、こちら(【Python】Google画像検索からオリジナル画像を根こそぎダウンロード)の記事のコード使ってGoogle画像検索からのスクレイピングもしてます。
"find_elements_by_class_name"が現在は使えなさそうだったので一部変えてますがほぼ同じものを使用させていただきました。
実行にはchromedriverをインストールする必要あります(こちら)。
Google画像検索スクレイピング
from selenium import webdriver
from selenium.webdriver.chrome.options import Options
from selenium.webdriver.common.keys import Keys
from selenium.webdriver.common.action_chains import ActionChains
import time
import requests
import re
import urllib.request
import os
from tqdm import tqdm
from selenium.webdriver.common.by import By

# ドライバーのパス
DRIVER_PATH = './chromedriver.exe'

options = Options()
options.add_argument('--disable-gpu')
options.add_argument('--disable-extensions')
options.add_argument('--proxy-server="direct://"')
options.add_argument('--proxy-bypass-list=*')
options.add_argument('--start-maximized')

def search():
    global driver, actions
    driver = webdriver.Chrome(executable_path=DRIVER_PATH, options=options)
    actions = ActionChains(driver)
    url = "https://www.google.com/search?q=" + '+'.join(
        query.split()) + "&safe=off&hl=ja&source=lnms&tbm=isch&sa=X"
    driver.get(url)

    while not driver.find_elements(By.CLASS_NAME, "wXeWr"):
        time.sleep(.5)
    driver.find_element(By.CLASS_NAME, "wXeWr").click()

def getLinks():
    global srcs
    more = driver.find_element(By.CLASS_NAME, "mye4qd")
    end = driver.find_element(By.CLASS_NAME, "OuJzKb")
    for i in range(300):
        actions.key_down(Keys.ARROW_RIGHT)
    cnt = 1
    while not (more.is_displayed() or end.is_displayed()):
        if cnt % 5 == 0:
            if len(re.findall("imgurl=(.+?)&", urllib.parse.unquote(driver.page_source))) > max_num + 5:
                break
        driver.execute_script("window.scrollTo(0, document.body.scrollHeight);")
        actions.perform()
        time.sleep(1)
        cnt += 1

    if more.is_displayed():
        more.click()
    while not end.is_displayed():
        if cnt % 5 == 0:
            if len(re.findall("imgurl=(.+?)&", urllib.parse.unquote(driver.page_source))) > max_num + 5:
                break
        driver.execute_script("window.scrollTo(0, document.body.scrollHeight);")
        actions.perform()
        time.sleep(1)
        cnt += 1
    for _ in range(5):
        actions.perform()
        time.sleep(1)
    srcs = re.findall("imgurl=(.+?)&", urllib.parse.unquote(driver.page_source))
    print("Number of links:", len(srcs))  # ログを追加
    driver.close()

def download():
    filename = '_'.join(query.split())
    while True:
        if not os.path.exists(filename):
            os.mkdir(filename)
            break
        else:
            filename += "_"

    for i, src in enumerate(tqdm(srcs[:max_num])):
        ext = src[-4:] if src[-4:] in ('.jpg', '.png', '.gif') else '.png'
        with open(f"{filename}/{filename}{i}{ext}", "wb") as f:
            try:
                f.write(requests.get(src).content)
            except:
                try:
                    with urllib.request.urlopen(src) as u:
                        f.write(u.read())
                except:
                    continue

if __name__ == "__main__":
    query = input("Search:  ")
    max_num = int(input("何枚ダウンロードしますか?(最大)"))
    print("Searching...")
    search()
    print("Done.")
    print("Getting links...")
    getLinks()
    print("Number of links:", len(srcs))  # リンクの数をログに出力
    print("Done.")
    print("Now downloading...")
    download()
    print("Done.")
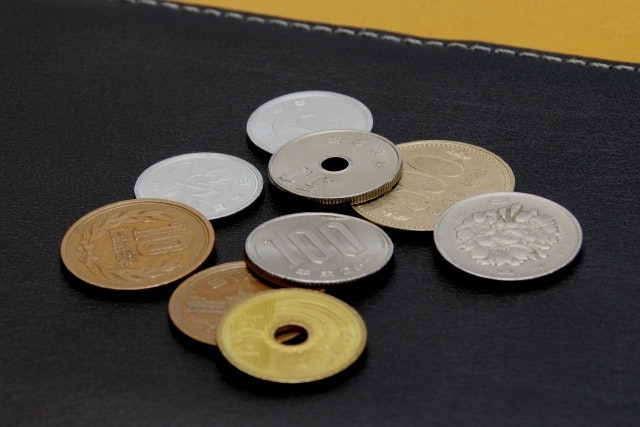
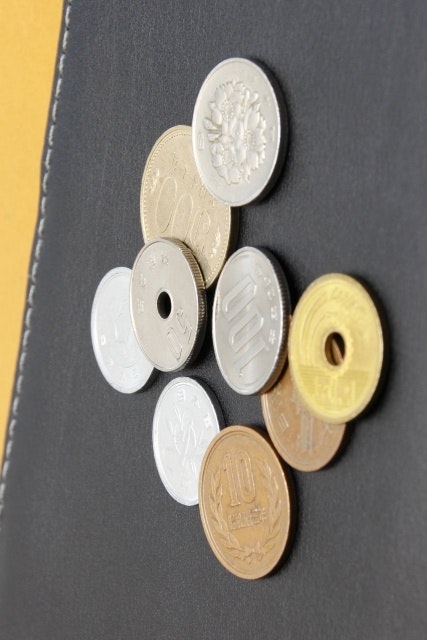
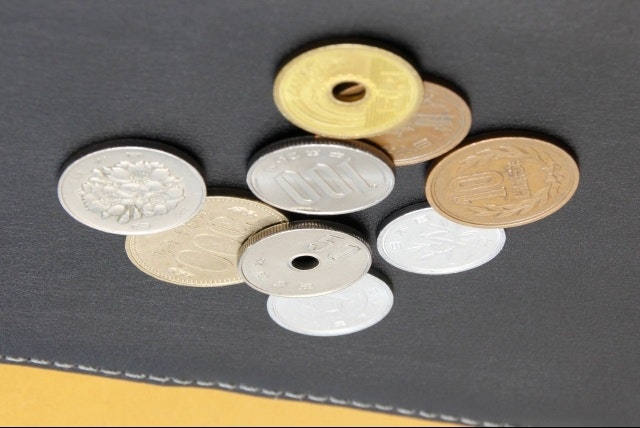
あと自分で小銭並べて写真撮ったものも使用してます。

2. 画像整理
小銭関係ない画像や、被り、ラベル付けがしんどそうな画像は手作業で削除します。
また下記コード適当に編集して使ってフォルダ移動させたり、ファイルの名前変えたりしてます。
フォルダ移動
import shutil
import glob
#別フォルダへ移動
in_dir = "<入力パス>/*.txt"
in_img = glob.glob(in_dir)
for t in range(len(in_img) // 1):
    shutil.move(in_img[t], "<出力パス>/labels")
ファイル名変更
import glob
import os

files = glob.glob("<入力パス>/*.png")
for i, old_name in enumerate(files):
    # 新しいファイル名
    new_name = "each_{0:03d}.jpg".format(i + 1)
    # ファイル名の変更
    os.rename(old_name, new_name)
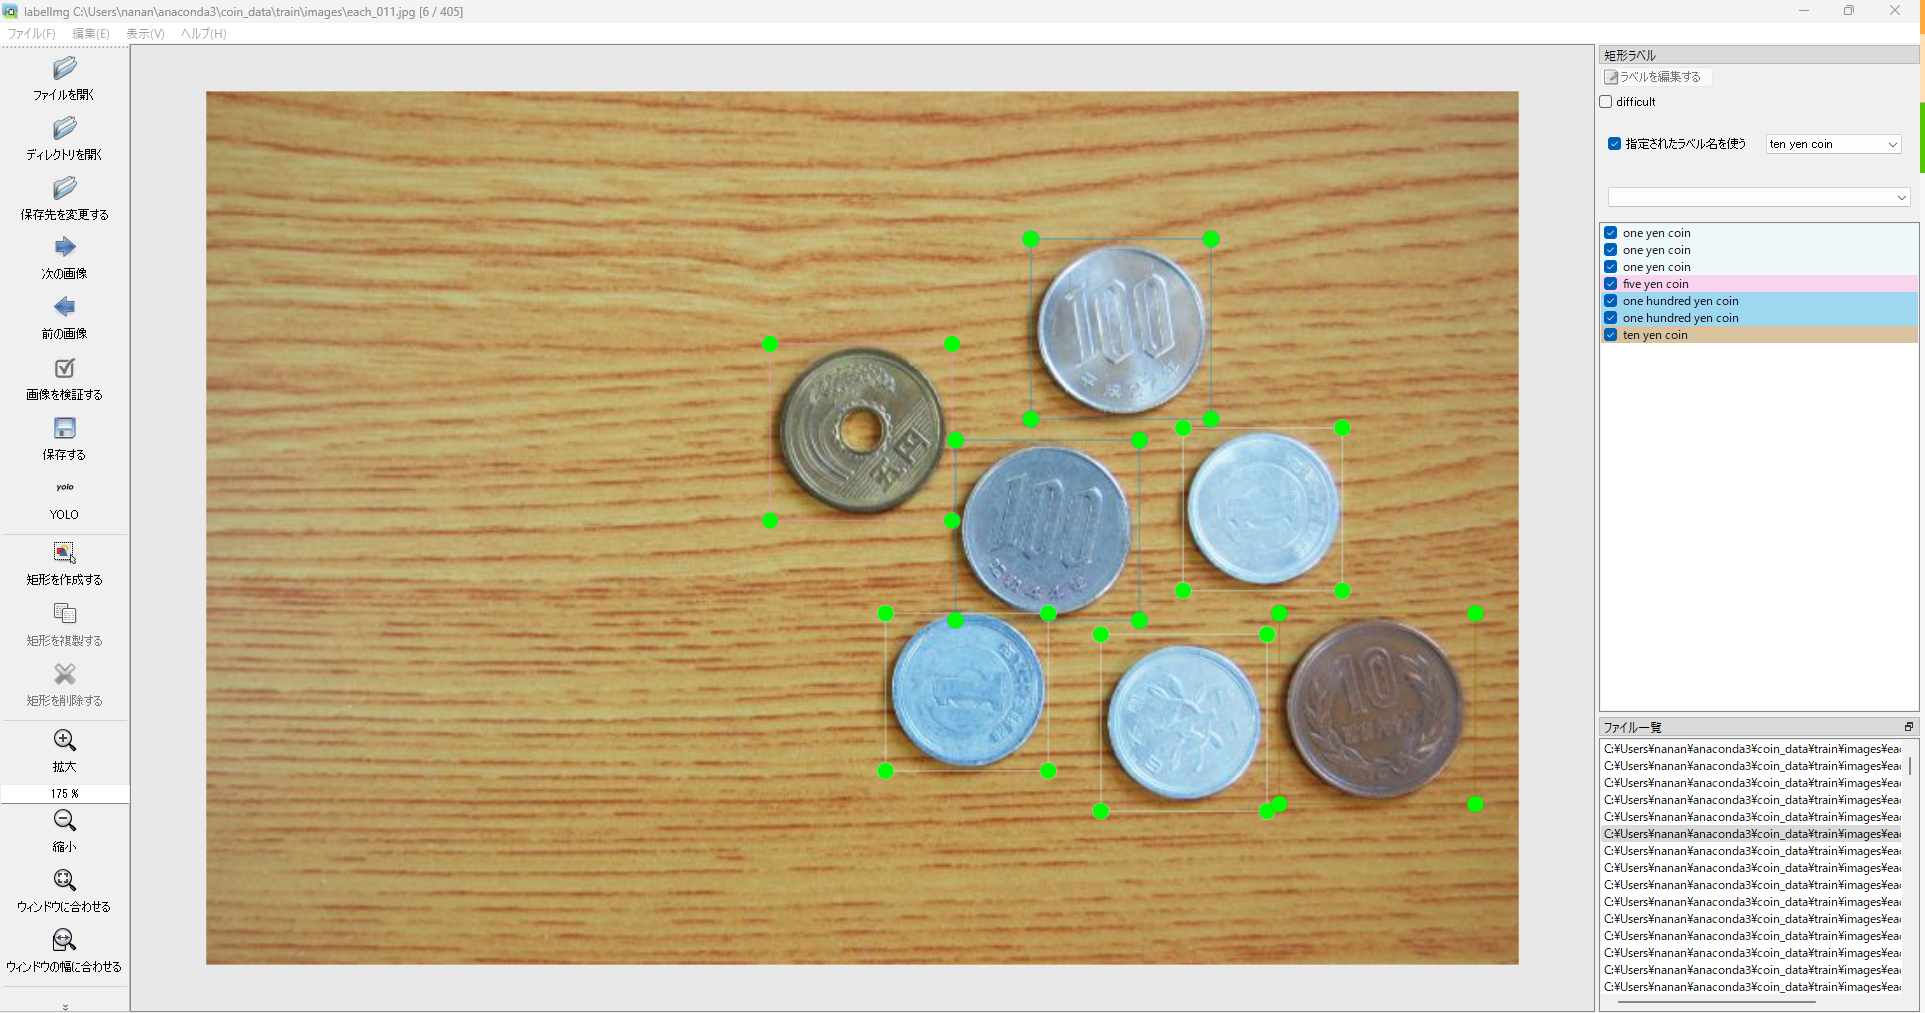
3. アノテーション作業
各画像に対してアノテーションを行います。アノテーションでは画像内の小銭を矩形(バウンディングボックス, 以下BBox)で囲み、ラベル付けを行います。この作業にはlabelImg(こちら)を使いました。
使い方はリンク先に詳しく書かれていますが、注意点として画像をlabelImgで読み込む際に絶対パスに日本語が含まれているとエラーになった気がします。
labelImgを使用してラベル付けを行っていきます。ひたすら単純作業で時間もかかるのでショートカットキー使いながら黙々と頑張ります。
アノテーションが完了すると各画像に対しtxtファイルが生成され、その中にクラスの種類や矩形の座標が保存されます。
作業の様子
作業が終わったらデータ拡張前に訓練データと、検証データ、テストデータに適当に分けときます。
ちなみに、この面倒な作業を楽にしようという記事もありました。(機会があればやってみたい)
参考:labelImgとChainerCVを使ってアノテーション作業を楽にする
4. データ拡張(augmentation)
データの拡張(augmentation)はデータを加工してデータを水増しする作業です。
今回はalbumentationsを使いました。
albumentationsは画像だけでなくアノテーション作業で作ったtxtファイルのBBox座標も変換してくれます。
albumentations公式ドキュメント
pipして使います。
pip install -U albumentations
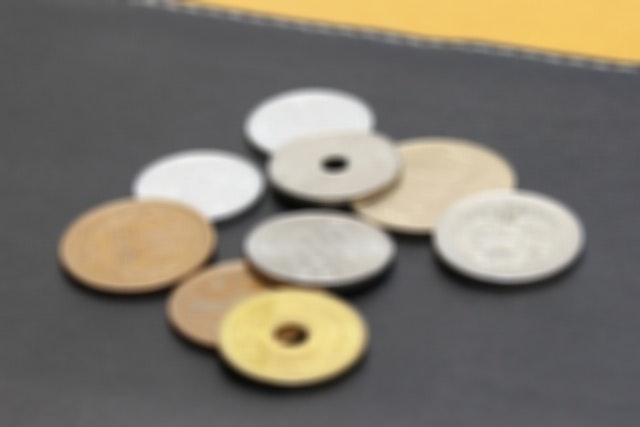
硬貨なので画像反転(Flip)は不要かなと思いつつ、拡張もそんなにしなくても今回は難しいクラス分けでもないかなと思いつつで回転とぼかしと明暗調整だけやりました。
スクレイピングした画像はほとんどが明るい空間でピントも合って、同じ向きから撮影されたものばかりでしたので、この辺の水増しはあった方がいいかなと思いました。
また回転させたそれぞれのデータ対して、ぼかしを行い、その後すべての画像に明暗調整を行えば画像枚数は一気に増えますが、実行に時間がかかりすぎるのも嫌なので、元画像に各処理をするだけに留めております。
albumentationsの回転処理でRandomRotateがありますが、これはランダムに0回以上90度回転させるもので引数のpは回転させる確率(最大1)です。
p=1とすると必ずその処理がされますが、必ず"0回以上90度回転"処理がされるわけで、結果として回転されない場合もあるっぽいです。
なので"Affine"を使って回転させるのがよさそうです。
ぼかしは"blur", 暗くする処理は"RandomBrightness"で明るさ範囲を-0.2に固定で変換してます。
こちらの記事のコードを拝借しつつ、部分的に編集しております。
【albumentations】データ拡張による精度向上を検証する
データ拡張関数定義
import os
import random
import cv2
import albumentations as A
from matplotlib import pyplot as plt
import copy
import numpy as np

class Data:

    rotate90_transform = A.Compose([
     A.Affine(rotate=[90, 90], p=1, mode=cv2.BORDER_CONSTANT, fit_output=True)
    ], bbox_params=A.BboxParams(format='yolo', label_fields=['class_labels']))

    rotate180_transform = A.Compose([
     A.Affine(rotate=[180, 180], p=1, mode=cv2.BORDER_CONSTANT, fit_output=True)
    ], bbox_params=A.BboxParams(format='yolo', label_fields=['class_labels']))

    rotate270_transform = A.Compose([
     A.Affine(rotate=[270, 270], p=1, mode=cv2.BORDER_CONSTANT, fit_output=True)
    ], bbox_params=A.BboxParams(format='yolo', label_fields=['class_labels']))

    blur_transform = A.Compose([
      A.Blur(blur_limit=31, p=1),
    ], bbox_params=A.BboxParams(format='yolo', label_fields=['class_labels']))

    dark_transform = A.Compose([
      A.RandomBrightness(limit=[-0.2,-0.2], p=1),
    ], bbox_params=A.BboxParams(format='yolo', label_fields=['class_labels']))

    def __init__(self, image="", bboxes=0, id="", class_labels=[]):
        self.image = image
        self.bboxes = bboxes
        self.id = id
        self.class_labels = class_labels

# jpgとtxtからデータをインポートするメソッド
    def importdata(self, imgpath):
        dirpath = os.path.dirname(imgpath)[:-7]
        id = os.path.splitext(os.path.basename(imgpath))[0]
        txtpath = dirpath + f"/labels/{id}.txt"

        img = cv2.imread(imgpath)
        self.image = cv2.cvtColor(img, cv2.COLOR_BGR2RGB)

        bboxes = []
        class_labels = []  # クラスラベルを格納するリストを作成

        with open(txtpath) as f:
            for line in f:
                line_list = line.split(" ")
                class_label = int(line_list[0])  # txtファイルの先頭がクラスラベル
                bbox = line_list[1:]
                bbox = [float(i.replace('\n', '')) for i in bbox]
                bboxes.append(bbox)
                class_labels.append(class_label)  # クラスラベルをリストに追加

        self.bboxes = bboxes
        self.label = 0
        self.id = id
        self.class_labels = class_labels

# albumentationsで変換したデータをインポートするメソッド
    def import_transformdata(self, transform_data, origin_data, process):
        self.image = transform_data["image"]
        self.bboxes = transform_data["bboxes"]
        self.label = 0
        self.id = origin_data.id + "_" + process
        self.class_labels = transform_data["class_labels"]

# 90度回転したデータを返す
    def rotate90(self):
        rotate90_transformed = Data.rotate90_transform(image=self.image,
                                                        bboxes=self.bboxes,
                                                        class_labels=self.class_labels)
        image =rotate90_transformed["image"]
        bboxes = rotate90_transformed["bboxes"]
        id = self.id + "_rot90"
        class_labels = rotate90_transformed["class_labels"]
        rot90data = Data(image, bboxes, id, class_labels)
        return rot90data

# 180度回転したデータを返す
    def rotate180(self):
        rotate180_transformed = Data.rotate180_transform(image=self.image,
                                                        bboxes=self.bboxes,
                                                        class_labels=self.class_labels)
        image =rotate180_transformed["image"]
        bboxes = rotate180_transformed["bboxes"]
        id = self.id + "_rot180"
        class_labels = rotate180_transformed["class_labels"]
        rot180data = Data(image, bboxes, id, class_labels)
        return rot180data

# 270度回転したデータを返す
    def rotate270(self):
        rotate270_transformed = Data.rotate270_transform(image=self.image,
                                                         bboxes=self.bboxes,
                                                         class_labels=self.class_labels)
        image =rotate270_transformed["image"]
        bboxes = rotate270_transformed["bboxes"]
        id = self.id + "_rot270"
        class_labels = rotate270_transformed["class_labels"]
        rot270data = Data(image, bboxes, id, class_labels)
        return rot270data

# ぼかしたデータを返す
    def blur_method(self):
        blur_transformed = Data.blur_transform(image=self.image,
                                                bboxes=self.bboxes,
                                                class_labels=self.class_labels)
        image =blur_transformed["image"]
        bboxes = blur_transformed["bboxes"]
        id = self.id + "_blur"
        class_labels = blur_transformed["class_labels"]
        blurdata = Data(image, bboxes, id, class_labels)
        return blurdata

# 暗くしたデータを返す
    def dark_method(self):
        dark_transformed = Data.dark_transform(image=self.image,
                                                bboxes=self.bboxes,
                                                class_labels=self.class_labels)
        image =dark_transformed["image"]
        bboxes = dark_transformed["bboxes"]
        id = self.id + "_dark"
        class_labels = dark_transformed["class_labels"]
        darkdata = Data(image, bboxes, id, class_labels)
        return darkdata

# 指定のパスにjpgとtxtファイルでデータ保存するメソッド
    def export_data(self, imgdirpath):
        id = self.id
        dirpath = imgdirpath[:-7]
        export_imgpath = imgdirpath + f"/{id}.jpg"
        export_txtpath = dirpath + f"/labels/{id}.txt"

        img = cv2.cvtColor(self.image, cv2.COLOR_RGB2BGR)
        cv2.imwrite(export_imgpath, img)

        txt = ""
        for class_label, bbox in zip(self.class_labels, self.bboxes):
            x_min, y_min, width, height = [i for i in bbox]
            line = f"{class_label} {x_min} {y_min} {width} {height}"
            txt += line + "\n"
            print(line)

        f = open(export_txtpath, 'w')
        f.write(txt)
        f.close()

# 画像とバウンディングボックスを表示するメソッド
    def visualize(self, img_width, img_height, figsize = (10,10)):

        for bbox in self.bboxes:
            x_mid_nor, y_mid_nor, width_nor, height_nor  = [float(i) for i in bbox]

            width = width_nor * img_width
            height = height_nor * img_height

            x_min = x_mid_nor * img_width - width/2
            y_min = y_mid_nor * img_height - height/2
            x_max = x_min + width
            y_max = y_min + height

            x_min = int(x_min)
            x_max = int(x_max)
            y_min = int(y_min)
            y_max = int(y_max)

            img = cv2.rectangle(self.image,
                              pt1=(x_min, y_min),
                              pt2=(x_max, y_max),
                              color=(255, 0, 0),
                              thickness=3)

        plt.figure(figsize = figsize)
        plt.axis('off')
        plt.imshow(img)
画像とテキストファイルを読み込んでデータセットを作成し、そのデータセットに各処理を施し、PCに保存します。
画像とテキストファイルを読み込んでデータセットの作成
dataset_origin = []
imgdirpath = ".\\coin\\train\\images"
for filename in os.listdir(imgdirpath):
  fullpath = imgdirpath + "\\" + filename
  data = Data()
  data.importdata(fullpath)
  dataset_origin.append(data)

dataset = copy.deepcopy(dataset_origin)
各変換適用とデータセット保存
rotate90_dataset = [data.rotate90() for data in dataset]    #反時計周りに90゚回転
rotate180_dataset = [data.rotate180() for data in dataset] #反時計周りに180゚回転
rotate270_dataset = [data.rotate270() for data in dataset]  #反時計周りに270゚回転
blur_dataset = [data.blur_method() for data in dataset] # ぼかし
dark_dataset = [data.dark_method() for data in dataset] # 暗くする
# データセットに上記処理したデータを追加
dataset.extend(rotate90_dataset)
dataset.extend(rotate180_dataset)
dataset.extend(rotate270_dataset)
dataset.extend(blur_dataset)
dataset.extend(dark_dataset)

保存
for data in dataset:
  data.export_data(".\\coin_dataset\\train\\images")
もともと訓練用画像が全部で299枚で、上記のまま実行するとデータセット配列の300番目は90度回転したデータがあるので適当に確認してみます。
# 90度回転画像のデータ確認
width, height, color =dataset[299].image.shape
dataset[299].visualize(height, width)
画像が90度回転されており、BBoxも正しい位置に変換されています。(暗さは元々こんな画像です。)
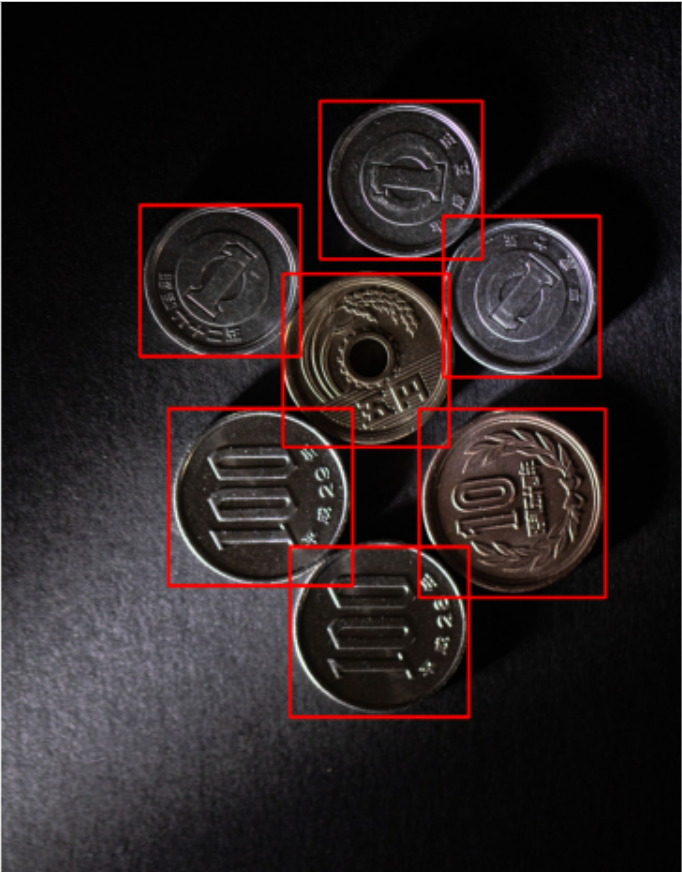
オリジナル、ぼかし、暗

90, 180, 270度回転

データセットの各ラベルの数を確認しときます。
クラスごとのラベル数確認
from collections import defaultdict
import os
from glob import glob

LABEL_PATH="C:\\<path>\\labels\\train\\"
# アノテーションデータ取得
lblAry = sorted([lbl_path for lbl_path in glob(os.path.join(LABEL_PATH,'*.txt'))])

# クラスラベル数える
dict = defaultdict(int)
for lbl_path in glob(os.path.join(LABEL_PATH,'*.txt')):
    if 'class' in lbl_path:
        continue
    with open(lbl_path, 'r') as rf:
        lines = rf.readlines()
        for line in lines:
            line = line.rstrip('\n')
            num = int(line.split()[0])
            dict[num] += 1
print(dict)
本当は全クラス同程度が望ましいですが。。。ラベル3(50円玉)がやや少なかったです。
defaultdict(, {0: 822, 1: 852, 2: 918, 3: 588, 4: 840, 5: 900})
5. YOLOで学習
YOLOv7をcloneして使います。
git clone https://github.com/WongKinYiu/yolov7.git
またwandbを登録してインストールしておくと学習結果やPCの状態をリアルタイムで確認できます。
wandb公式ページ
yamlファイルを編集します。
yamlファイルには画像へのパスやクラス数、クラス名などを記述します。
# train and val data as 1) directory: path/images/, 2) file: path/images.txt, or 3) list: [path1/images/, path2/images/]
train: C:\<path>\yolov7\coin_dataset\images\train
val: C:<path>\yolov7\coin_dataset\images\valid
#test: C:\<path>\yolov7\coin_dataset\images\test

# number of classes
nc: 6

# class names
names: [ 'one','five','ten','fifty','one_hundred','five_hundred']
フォルダの階層
coin_dataset/
├─ mydata.yaml
├─ train/
│  ├─ images/
│  │  ├─ .jpg
│  └─ labels/
│     ├─ .txt
└─  valid/
   ├─ images/
   │  ├─ .jpg
   └─ labels/
      ├─ .txt
実行
使うモデルに合わせて重みは予めダウンロードしておきます。(ベーシックなv7はもともと入ってたと思います)
!python ./train.py --workers 8 --device 0 --batch-size 4 --epochs 100 --data ./coin_dataset/mydata.yaml --cfg ./cfg/training/yolov7.yaml --weight ./yolov7.pt --name ./coin_result --hyp ./data/hyp.scratch.p5.yaml
サイズの大きいモデルを使うときはtrain.pyではなくtrain_aux.pyにして最後の部分もp5からp6に("--hyp ./data/hyp.scratch.p6.yaml")したりする必要があるらしいです。
--nameは結果の出力先(run/train/name/)。
もし「OMP: Error #15」のエラーやメモリ不足っぽい場合は以下のシステムのアクセスを許可する設定のコード実行してから、学習させたり実行時のバッチサイズ小さくします。
import os
os.environ['KMP_DUPLICATE_LIB_OK']='TRUE'
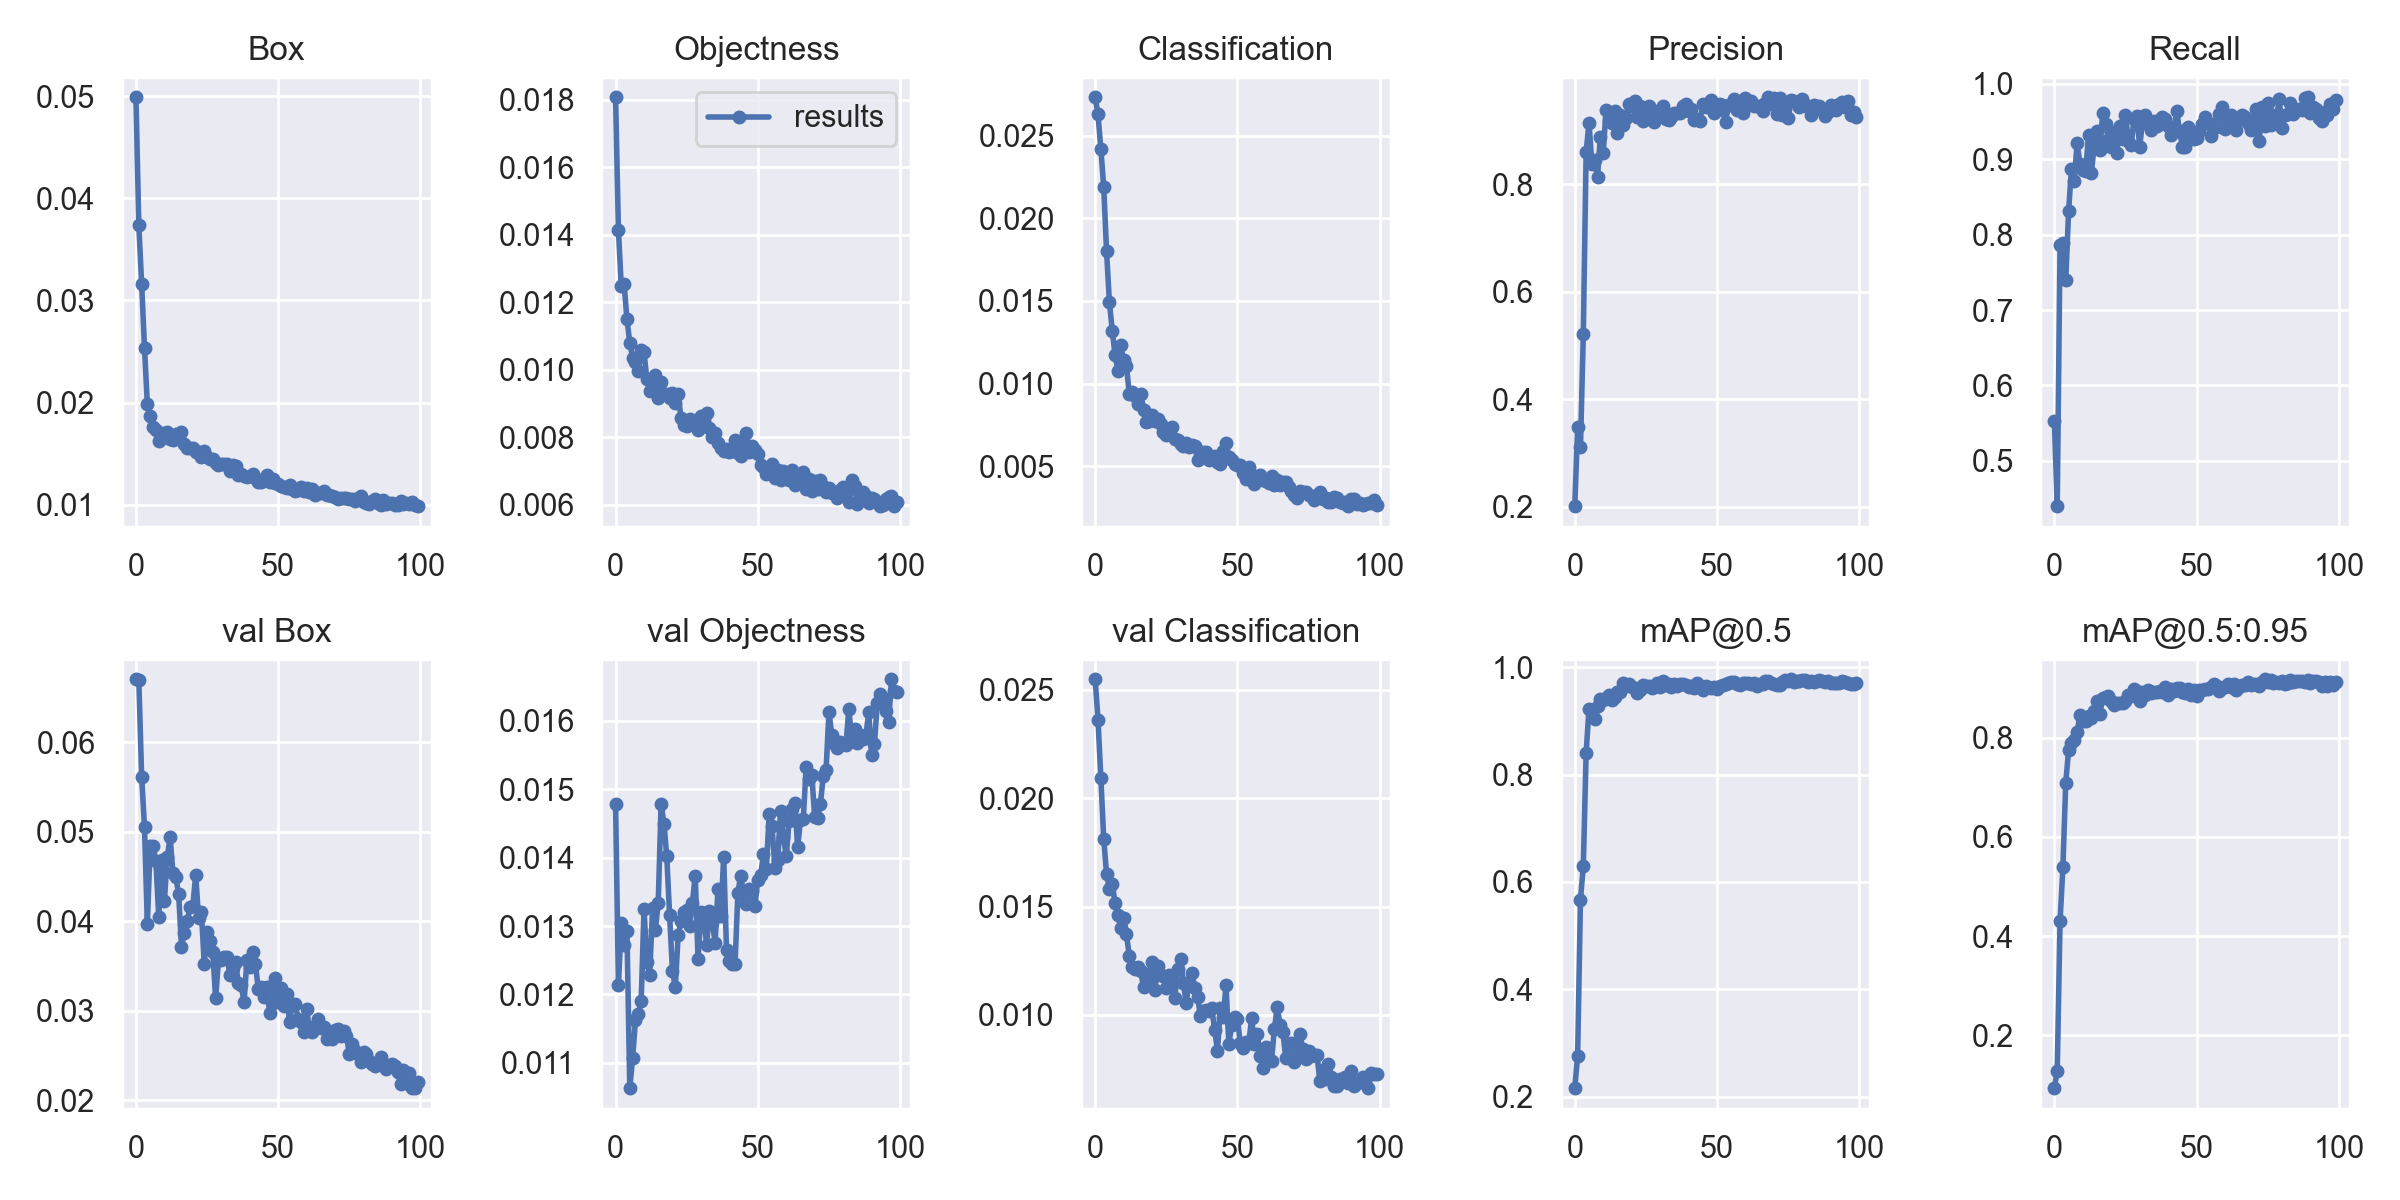
runフォルダ内に実行結果や重みデータ、諸々が保存されます。
結果
混同行列からもだいたいきれいに判別できてそうです。
背景を硬貨と判別してしまってる部分ややありました。
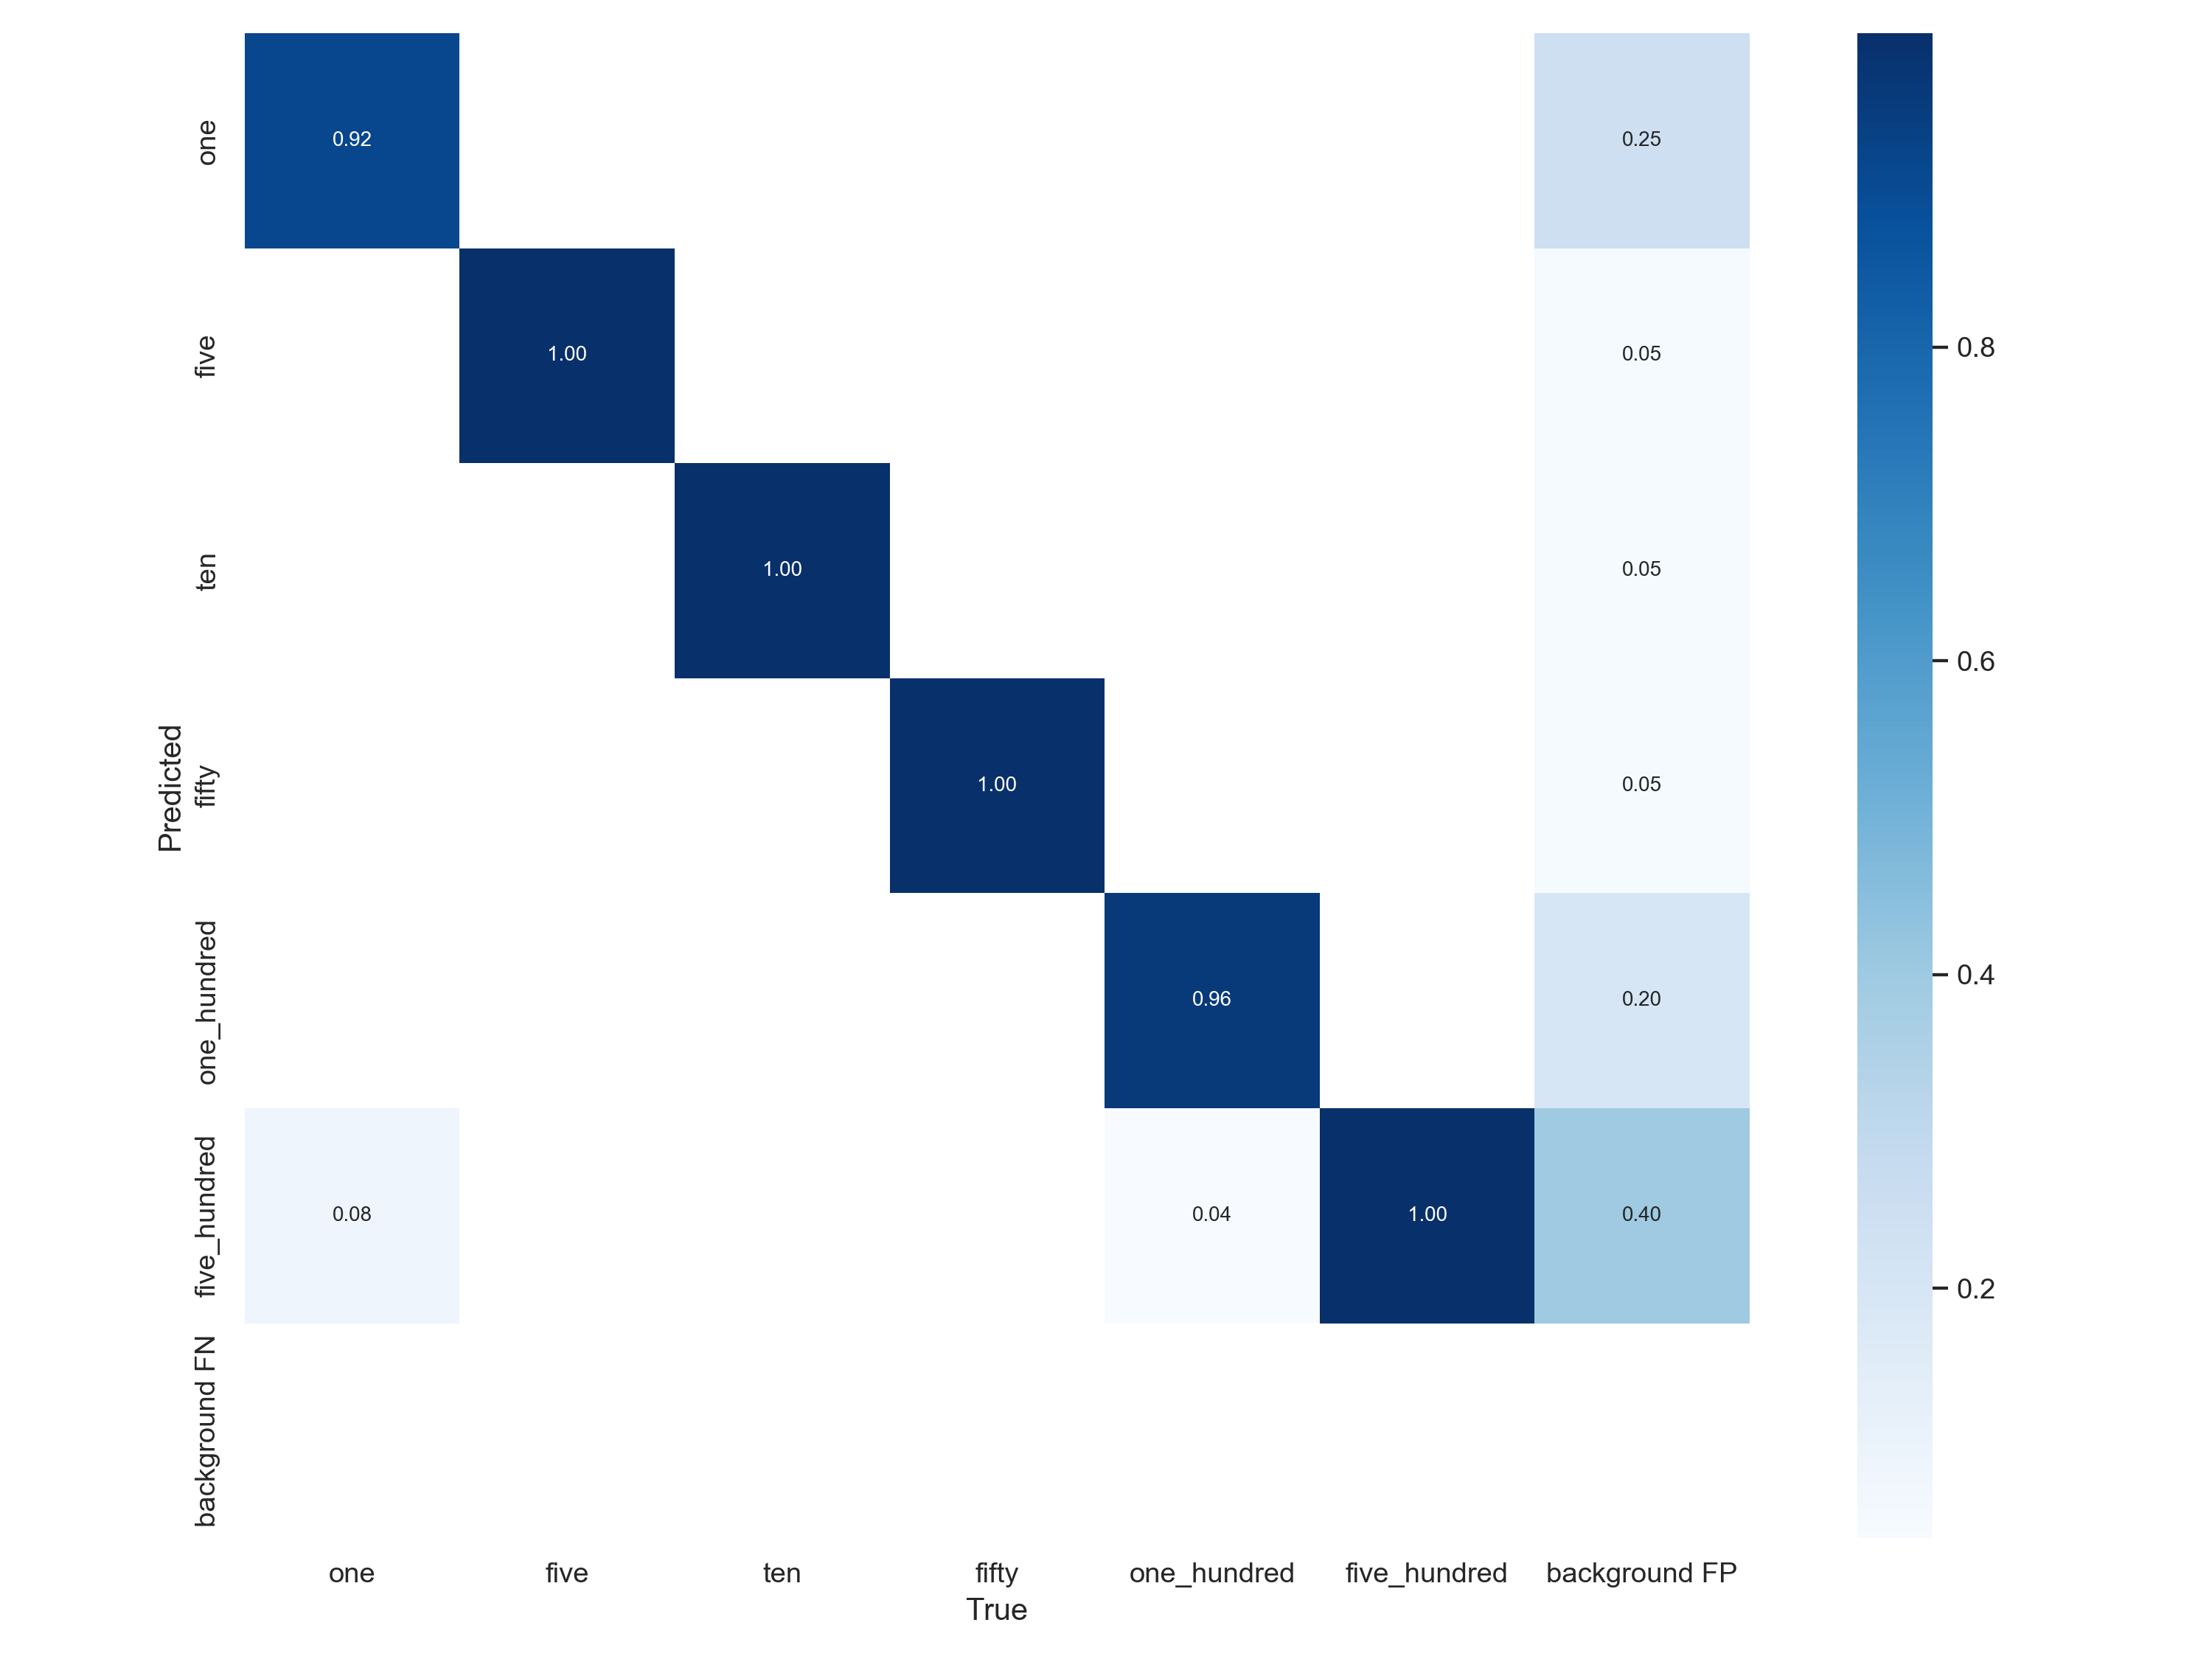
今回ほとんど硬貨のアップ画像なので他のものはあまり映っていなかったですが、アノテーションがちゃんとできていなかったものがあり、そういう結果になってしまったみたいです。
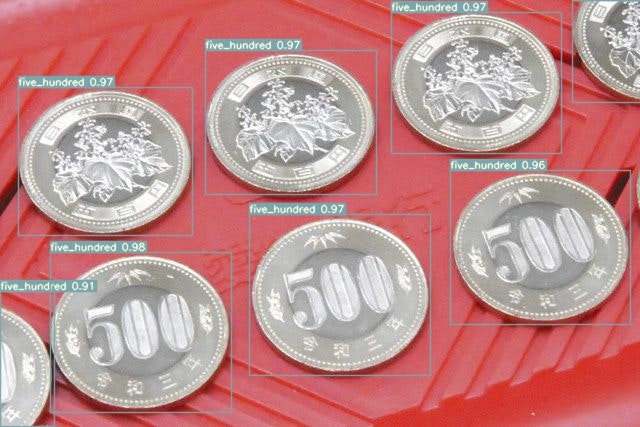
この500円玉が並んだ画像だと見切れている部分も予測してくれてますが、ほとんど見えてないし、と思ってアノテーション作業はしていませんでした。
少しでも映り込んでいればBBoxつけてラベル付けすべきでした。反省。
6. テスト
学習させたモデルを使って推論を行います。
run/detect/name/に推論結果が保存されます。
!python detect.py --weights runs/train/coin_result/weights/best.pt --source coin_dataset/images/test --name test_result
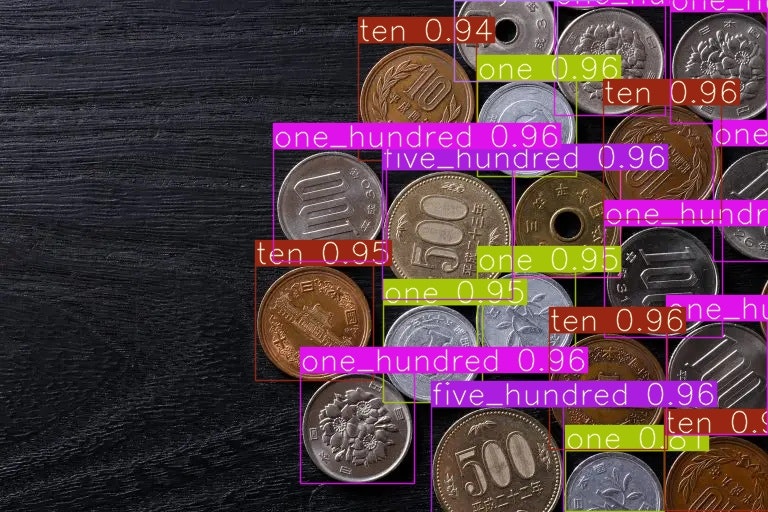
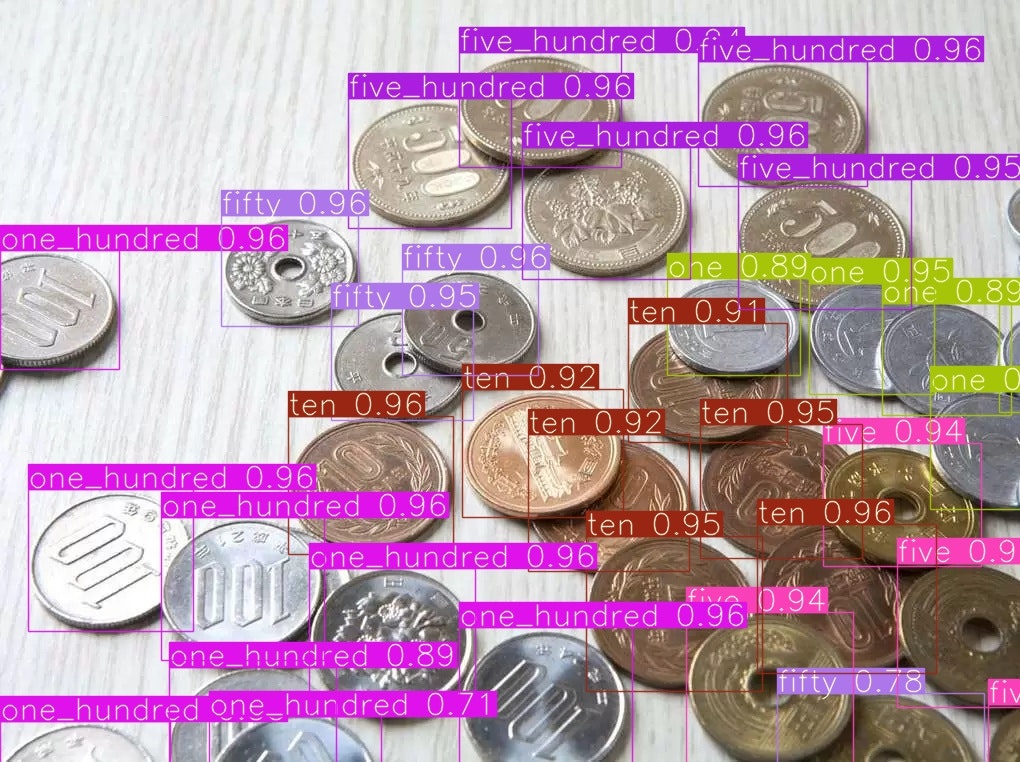
見切れていたり重なっているとやや信頼度低めの部分もありますが、ほぼほぼ判別できていそうです。(二枚目の見切れている5円が50円判定されてます)
表示する文字の大きさや色などを変える場合はdetect.pyやplots.py内の描画する関数あたり編集すれば変更できます。
7. リアルタイムで検出、合計金額計算
最後にWEBカメラ映像を入力とし、リアルタイムで判別できるようにして、あと合計金額表示させてみます。
以前行った自分でtensorflowでモデル組んで学習させたときと同じ流れでできるかと思ってましたが、モデル読み込んで、諸々処理して、が大変そうだったのでdetect.pyを直接編集して動かしてます。
detect.pyの不要な部分を全部消し、入力はWEBカメラ映像固定にして、あと検出結果に応じてフレームごとに合計金額を計算する部分を追記してます。
また雑ですが"c"キーでプログラム終了を追加してます。
途中で呼び出している"check_imshow"関数内にあるwaitKeyについても同様の処理追記してて"c"キーで終了させるようにしてます。(ターミナルで実行する場合は普通にctrl+cで十分ですが。。。)
webカメラ用のdetect.py
import time
from pathlib import Path
import cv2
import torch
import torch.backends.cudnn as cudnn
from models.experimental import attempt_load
from utils.datasets import LoadStreams, LoadImages
from utils.general import check_img_size, check_imshow, non_max_suppression, scale_coords, set_logging
from utils.plots import plot_one_box
from utils.torch_utils import select_device, time_synchronized

coin_labels = {
    0: {"label": "one", "amount": 1},
    1: {"label": "five", "amount": 5},
    2: {"label": "ten", "amount": 10},
    3: {"label": "fifty", "amount": 50},
    4: {"label": "one_hundred", "amount": 100},
    5: {"label": "five_hundred", "amount": 500},
}

def detect(source, weights, device, imgsz, iou_thres, conf_thres):
    webcam = source.isnumeric()

    # Initialize
    set_logging()
    device = select_device("0")
    half = device.type != 'cpu'  # half precision only supported on CUDA

    # Load model
    model = attempt_load(weights, map_location=device)  # load FP32 model
    stride = int(model.stride.max())  # model stride
    imgsz = check_img_size(imgsz, s=stride)  # check img_size

    if half:
        model.half()  # to FP16

    # Set Dataloader
    if webcam:
        view_img = check_imshow()
        cudnn.benchmark = True  # set True to speed up constant image size inference
        dataset = LoadStreams(source, img_size=imgsz, stride=stride)

    # Get names and colors
    names = model.module.names if hasattr(model, 'module') else model.names
    #colors = [[random.randint(0, 255) for _ in range(3)] for _ in names]
    colors = [(51,102,255), (255,255,0), (153,51,0), (0,255,0), (255,153,0), (0,0,255)]


    # Run inference
    if device.type != 'cpu':
        model(torch.zeros(1, 3, imgsz, imgsz).to(device).type_as(next(model.parameters())))  # run once
    old_img_w = old_img_h = imgsz
    old_img_b = 1

    t0 = time.time()

    for path, img, im0s, vid_cap in dataset:
        img = torch.from_numpy(img).to(device)
        img = img.half() if half else img.float()  # uint8 to fp16/32
        img /= 255.0  # 0 - 255 to 0.0 - 1.0
        if img.ndimension() == 3:
            img = img.unsqueeze(0)

        # Warmup
        if device.type != 'cpu' and (old_img_b != img.shape[0] or old_img_h != img.shape[2] or old_img_w != img.shape[3]):
            old_img_b = img.shape[0]
            old_img_h = img.shape[2]
            old_img_w = img.shape[3]

        # Inference
        t1 = time_synchronized()
        with torch.no_grad():   # Calculating gradients would cause a GPU memory leak
            pred = model(img)[0]
        t2 = time_synchronized()

        # Apply NMS
        pred = non_max_suppression(pred, conf_thres, iou_thres)
        t3 = time_synchronized()

        # Process detections
        for i, det in enumerate(pred):  # detections per image
            total_amount = 0
            if webcam:  # batch_size >= 1
                p, s, im0, frame = path[i], '%g: ' % i, im0s[i].copy(), dataset.count

            p = Path(p)  # to Path

            gn = torch.tensor(im0.shape)[[1, 0, 1, 0]]  # normalization gain whwh
            if len(det):
                # Rescale boxes from img_size to im0 size
                det[:, :4] = scale_coords(img.shape[2:], det[:, :4], im0.shape).round()

                # Print results
                for c in det[:, -1].unique():
                    n = (det[:, -1] == c).sum()  # detections per class
                    s += f"{n} {names[int(c)]}{'s' * (n > 1)}, "  # add to string

                # Write results
                for *xyxy, conf, cls in reversed(det):
                    label = f'{names[int(cls)]} {conf:.2f}'
                    #label = names[int(cls)]
                    amount = coin_labels[int(cls)]["amount"]
                    total_amount += amount
                    #label_with_amount = f'{label} {conf:.2f}_yen ({amount}_yen)'

                    plot_one_box(xyxy, im0, label=label, color=colors[int(cls)], line_thickness=1)
                cv2.putText(im0, f'{total_amount}_yen', (100, 100), cv2.FONT_HERSHEY_SIMPLEX, 2.0, (225, 255, 255), thickness=2)

            # Print time (inference + NMS)
            # print(f'{s}Done. ({(1E3 * (t2 - t1)):.1f}ms) Inference, ({(1E3 * (t3 - t2)):.1f}ms) NMS')

        cv2.imshow(str(p), im0)
        if cv2.waitKey(1) == ord('c'):  # 'c'キーが押されたら終了
            cv2.destroyAllWindows()
            exit()

    print(f'Done. ({time.time() - t0:.3f}s)')

if __name__ == '__main__':

    device = 'cuda' if torch.cuda.is_available() else 'cpu'

    print(device)

    with torch.no_grad():
        detect("0", "C:\\<path>\\weights\\best.pt", device, imgsz=640, iou_thres=0.4,conf_thres=0.5)
最後の行の
detect("0", "C:\\<path>\\weights\\best.pt", device, imgsz=640, iou_thres=0.4,conf_thres=0.5)
の部分のiou_thresでIoU(IoUについて)の閾値、conf_thresで信頼度スコアの閾値決めてます。
元のdetect.py使えなくなっちゃうので、別名つけて作ってます。
実行
!python detect_origin.py
1000円くらいのwebカメラなので画質悪いですが、モデルはちゃんと機能していそうです。途中から真ん中に10円が誤検出されてしまっています。誤検出の信頼度のスコアが低い場合は閾値設定で無理やり消したりはできそうですね。。。
おわりに
自分で学習モデル作らなくても精度よく検出してくれるモデルがこんな簡単に使えるのはなかなかいいなと思いました。
具体的な層の構造とかも従来モデルと比較して理解していきたいと思います。
最新のYOLOv8のほうはメモリが足らず、v7で動かしたのですが、その後メモリ増設してYOLOv8も実行してみました。
流れや精度は大きくは変わりませんでしたが、実行時にv7ではなかった正規化前の混同行列や各クラスのラベル数なんかも追加されててデータや結果が直感的にわかりやすいなと思いました。
(青のグラフは画像サイズの分布?)


参考Qiita記事
スクレイピングの仕組みについて:Pythonで画像スクレイピングをしよう
YOLOv7参考1:【物体検出2022】YOLO最新版のYOLOv7を試してみる 〜デモから学習まで〜
YoLov7参考2:Yolov7のつかいかた(推論、学習)
自作データセットでの流れ:ふうたろおう(風太郎)に俺はなる!(YOLOv7)
拡張の手法はたくさんある:Albumentationsのaugmentationをひたすら動かす