Yolo最新モデルを使ってみよう
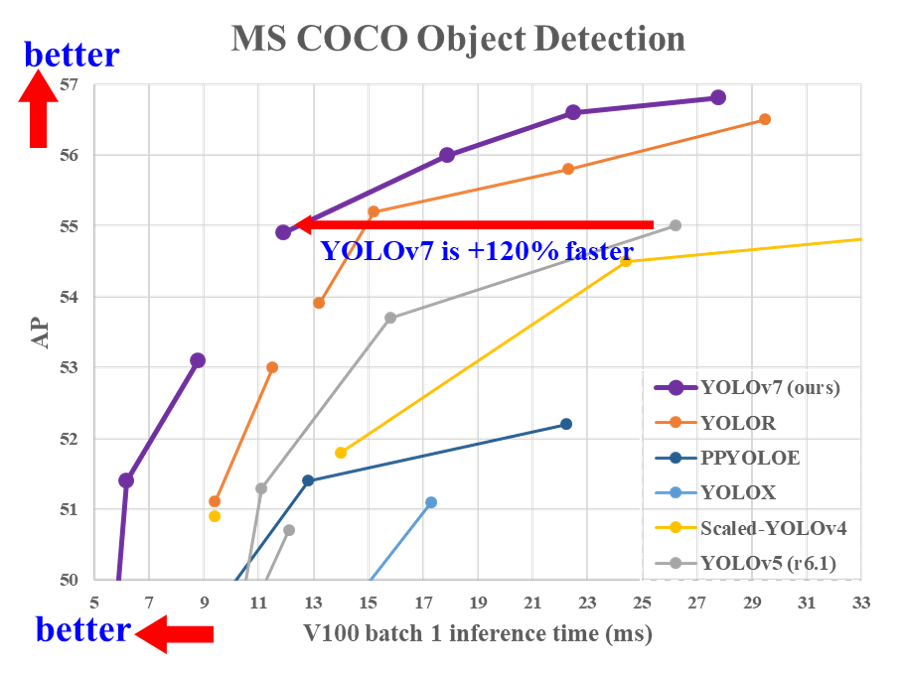
物体検出モデルYolov7(2022リリース)は、従来のYoloモデルに比べて高速かつ高精度と謳われています。

Yolov7による、推論、学習、検証のやり方です。
1、セットアップ
git clone https://github.com/WongKinYiu/yolov7.git # リポジトリをクローン
cd yolov7 # ディレクトリ内へ移動
pip install -r requirements.txt # 必要なpythonライブラリをインストール
wget https://github.com/WongKinYiu/yolov7/releases/download/v0.1/yolov7.pt # 事前トレーニング済みの重みをダウンロード
2、推論
入力のパスを指定して実行します。
python detect.py --weights yolov7.pt --source inference/images/horses.jpg
# --sourceに自前の画像や画像ディレクトリ、動画ファイルのパスを指定する
runs/detect/exp/
に推論結果画像が保存されます。
3、学習
トレーニング用の重みをダウンロードする
wget https://github.com/WongKinYiu/yolov7/releases/download/v0.1/yolov7-e6e_training.pt
データを用意する
データは
・画像
・画像に対応するアノテーション・テキスト・ファイル
を画像フォルダとテキスト・フォルダに分けて、同じ名前で用意します。
例えば、image1.jpgに対応するimage1.txtというアノテーション・テキスト・ファイルを作ります。
アノテーション・テキスト・ファイルには、オブジェクトごとに1行ずつ、以下を記述します。
class x_center y_center width height
ボックス座標は、正規化されたxywh形式(0〜1)である必要があります。
ボックスがピクセル単位の場合は、画像の幅と画像の高さで割ります。
クラス番号は0から始まります。
以下のようなアノテーション・サービスを使って画像のボックスとラベルをテキストにします。
アノテーションが終わったら、以下のようなディレクトリ構成にまとめます。
trainはトレーニングに使うデータ
valはモデルの学習状況の検証に使うデータ
で、8:2程度で全体のデータを振り分けるのが一般的だと思います。
my_dataset
  |
  |__images
  |    |__train
  |    |    |__image1.jpg
  |    |    |__image2.jpg
  |    |    |__...
  |    |
  |    |_val
  |         |__val_image1.jpg
  |         |__val_image2.jpg
  |         |__...
  |
  |
  |__labels
       |
       |__train
       |    |__image1.txt
       |    |__image2.txt
       |    |__...
       |
       |__val
            |__val_image1.txt
            |__val_image2.txt
            |__...
Configファイルの記述
トレーニングの構成を指示するファイルを作ります。.yaml ファイルに以下を記述します。
# train and val data as 1) directory: path/images/, 2) file: path/images.txt, or 3) list: [path1/images/, path2/images/]
train: my_dataset/images/train/
val: my_dataset/images/val/

# number of classes
nc: 3

# class names
names: [ 'my_class_0', 'my_class_1', 'my_class_2']
モデルの大きさによって、二種類のトレーニングスクリプトから選んで実行します。
--cfg はcfgフォルダからモデルの種類に合わせて指定します。
--weight は、自分が使いたいモデルのweightをリポジトリからダウンロードします。
--data は上の手順で作った独自データセットのyamlファイルを指定します。
--projectと--nameで指定したフォルダに結果の重みと数値表が保存されます。
トレーニング中にメモリ不足でエラーになった場合はbatch-sizeを小さくして実行すると、学習できます(2のn乗の値にする)
p5モデル(入力サイズ640のモデル)
python train.py --workers 8 --device 0 --batch-size 32 --data data/custom.yaml --img 640 640 --cfg cfg/training/yolov7.yaml --weights 'yolov7_training.pt' --name yolov7-custom --hyp data/hyp.scratch.custom.yaml --project "runs/"
p6モデル(入力サイズ1280のモデル)
python train_aux.py --workers 8 --device 0 --batch-size 16 --data data/custom.yaml --img 1280 1280 --cfg cfg/training/yolov7-e6e.yaml --weights 'yolov7-e6e_training.pt' --name yolov7-e6e --hyp data/hyp.scratch.custom.yaml --project "runs/"
検証
--weight にトレーニングで保存されたweightを指定します。
--data に検証用のデータセットパスを記載したyamlファイルを指定します。
python test.py --device 0 --batch-size 2 --data data/val_custom.yaml --img-size 640 --weights "runs/yolov7/exp/weights/last.pt"
🐣
フリーランスエンジニアです。
お仕事のご相談こちらまで
rockyshikoku@gmail.com
機械学習、ARアプリ(Web/iOS)を作っています。
機械学習/AR関連の情報を発信しています。
