※この記事はPythonで数独を解く、Pythonで碁盤目を画像から認識する(数独)の続きです
PythonのOCRで1文字の数字を認識する
Pyhtonで数独を認識して解くために、複数のOCRをPythonで試してみた。
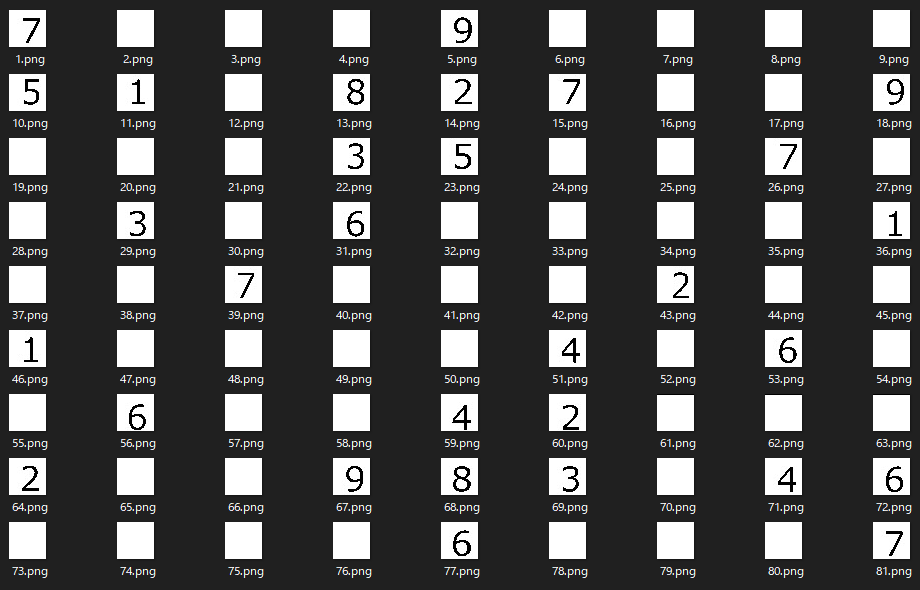
認識するのは白紙、または数字がひとつ書かれたpng画像81枚。
OCRは、
・scikit-learn
・Google CloudVisionAPI
・Tesseract
の三つを試してみた。
認識する画像
今回認識にかけるのは数独の問題を切り取った以下の81枚の画像。
"img"というフォルダ内においてある。

scikit-learn
ひとまず数字の認識ならこれを使うのが手軽ときいたので使ってみた。
機械学習では割とスタンダードなライブラリらしい。
白紙の結果がすべて1になっており、空白を認識させる(認識結果を一致なしとする)方法がわからなかった。
もう少しちゃんと調べればできるかもしれないが自分は機械学習専門じゃないし、
他の部分の一致率もあまり高くなさそうなので、ひとまず使ってみるにとどめておく。
ソースコード
import copy
from sklearn import datasets, model_selection, svm, metrics
import numpy as np
from PIL import Image

digits = datasets.load_digits()

row_list = []
res_list = []
for x in range(1, 82):
    image = Image.open("img/{}.png".format(x)).convert('L')
    image = image.resize((8, 8), Image.ANTIALIAS)
    img = np.asarray(image, dtype=float)
    img = np.floor(16 - 16 * (img / 256))
    img = img.flatten()
    data_train = digits.data
    label_train = digits.target
    data_test = img
    label_test = list(range(0,10))
    clf = svm.SVC(gamma=0.001)
    clf.fit(data_train, label_train)
    text = clf.predict([data_test])[0]
    if text == "":
        row_list.append("-")
    else:
        row_list.append(text)
    if x%9 == 0:
        res_list.append(copy.deepcopy(row_list))
        row_list = []
for l in res_list:
    print(l)
結果
[7, 1, 1, 1, 4, 1, 1, 1, 1]
[9, 1, 1, 1, 7, 7, 1, 1, 9]
[1, 1, 1, 9, 9, 1, 1, 7, 1]
[1, 9, 1, 1, 1, 1, 1, 1, 1]
[1, 1, 7, 1, 1, 1, 1, 1, 1]
[1, 1, 1, 1, 1, 4, 1, 1, 1]
[1, 8, 1, 1, 1, 1, 1, 1, 1]
[2, 1, 1, 4, 8, 9, 1, 4, 4]
[1, 1, 1, 1, 6, 1, 1, 1, 1]
CloudVisionAPI
OCRといえばこれなので一応試しておいた。
ただ、今回の要件だと、一度の処理でAPIを81回叩くというイケてない仕様になってしまった。
実行には、下記を参考にライセンスファイルを取得、環境変数を通す必要がある。
光学式文字認識(OCR)
デフォルトで叩いてみたが認識結果は芳しくなかった。
リクエストのjson等細かく指定すればもう少し認識率上がるかもしれない。
"認識対象は一文字の数字です"みたいなヒントが投げれるといいのだけれど、
どうやらそういった項目はなかった。
認識できていない数も気になるが、数字の後に"."が入ってしまうことがある模様。
何を誤認識しているのだろうか。。
ソースコード
import copy
from google.cloud import vision
from pathlib import Path

client = vision.ImageAnnotatorClient()
row_list = []
res_list = []

for x in range(1, 82):
    p = Path(__file__).parent / "img/{}.png".format(x)
    with p.open('rb') as image_file:
        content = image_file.read()
    image = vision.types.Image(content=content)
    response = client.text_detection(image=image)
    if len(response.text_annotations) == 0:
        row_list.append("-")
    for text in response.text_annotations:
        row_list.append(text.description)
        break
    if x%9 == 0:
        res_list.append(copy.deepcopy(row_list))
        row_list = []

for l in res_list:
    print(l)
結果
['-', '-', '-', '-', '-', '-', '-', '-', '-']
['5', '-', '-', '8.', '2', '-', '-', '-', '9.']
['-', '-', '-', '3', '-', '-', '-', '-', '-']
['-', '3', '-', '6.', '-', '-', '-', '-', '-']
['-', '-', '-', '-', '-', '-', '2', '-', '-']
['-', '-', '-', '-', '-', '-', '-', '-', '-']
['-', '-', '-', '-', '-', '2', '-', '-', '-']
['2', '-', '-', '9.', '-', '3', '-', '4', '-']
['-', '-', '-', '-', '-', '-', '-', '-', '-']
Tesseract
最後にTesseractをpyocrから使ってみた。Googleがオープンソースで開発している(?)らしい。
結論から言うとこれがうまくいき、認識率100%でとることができた。
ただ、普通に使うとうまく認識しなかったので、そのあたりについても書く。
ソースコード
import copy
from PIL import Image
import sys
import pyocr
import pyocr.builders

tools = pyocr.get_available_tools()
if len(tools) == 0:
    print("No OCR tool found")
    sys.exit(1)

tool = tools[0]
lang = 'eng'

row_list = []
res_list = []

for x in range(1, 82):
    text = tool.image_to_string(
    Image.open("img/{}.png".format(x)),
    lang=lang,
    # builder=pyocr.builders.DigitBuilder()
    builder=pyocr.builders.TextBuilder(tesseract_layout=6)
    )
    if text == "":
        row_list.append("-")
    else:
        row_list.append(text)
    if x%9 == 0:
        res_list.append(copy.deepcopy(row_list))
        row_list = []

for l in res_list:
    print(l)
結果
['7', '-', '-', '-', '9', '-', '-', '-', '-']
['5', '1', '-', '8', '2', '7', '-', '-', '9']
['-', '-', '-', '3', '5', '-', '-', '7', '-']
['-', '3', '-', '6', '-', '-', '-', '-', '1']
['-', '-', '7', '-', '-', '-', '2', '-', '-']
['1', '-', '-', '-', '-', '4', '-', '6', '-']
['-', '6', '-', '-', '4', '2', '-', '-', '-']
['2', '-', '-', '9', '8', '3', '-', '4', '6']
['-', '-', '-', '-', '6', '-', '-', '-', '7']
tesseract-ocrについて
結果的にうまくいったが、認識にはパラメータの
・lang
・builder
・tesseract_layout
あたりの設定でうまくいかなかったりしたので、そのあたりについて書いておく。
langに関しては数字の認識なら"jpn"より"eng"の方がよさげ。
おそらく"eng"の方が母数となる文字の量が少ないからだと思われる。
builderに関しては、
TextBuilder 文字列を認識
WordBoxBuilder 単語単位で文字認識
LineBoxBuilder 行単位で文字認識
DigitBuilder 数字 / 記号を認識
DigitLineBoxBuilder 数字 / 記号を認識
となっているようで、今回の要件だとDigitBuilderの方がよさそうだが、
どうやらバージョン4.0以降の新しいエンジンだと機能しないらしい。
tesseract_layoutに関しては、
tesseract_layout (pagesegmode)
pagesegmode values are:
0 = Orientation and script detection (OSD) only.
1 = Automatic page segmentation with OSD.
2 = Automatic page segmentation, but no OSD, or OCR
3 = Fully automatic page segmentation, but no OSD. (Default)
4 = Assume a single column of text of variable sizes.
5 = Assume a single uniform block of vertically aligned text.
6 = Assume a single uniform block of text.
7 = Treat the image as a single text line.
8 = Treat the image as a single word.
9 = Treat the image as a single word in a circle.
10 = Treat the image as a single character.
ということで今回は6を使用した。
参考
scikit-learn
・はじめてのPython - 機械学習で手書き数字認識(MNIST)
・Scikit learnより SVMで手書き数字の認識
・【Python】scikit-learnで手書き数字を判定してみた
・scikit-learnのSVMでMNISTの手書き数字データを分類
・はじめての機械学習、自分で書いて数字が正しく識別できるか試してみる
GoogleCloudVisionAPI
・Google Cloud Vision APIのOCRを使ってPythonから文字認識する方法
・Google Cloud Vision APIで光学式文字認識
・Google Cloud Visionを使ってPythonでOCRしてみる
Tesseract
・PythonとTesseract OCRで文字認識
・Tesseract+PyOCRで簡易OCRを試してみる
・PythonでOCRを実行する方法
・Pythonで書くTesseract 4の基本的な使い方。APIとCLIからOCRを実行する方法
・Python + pyocr で ocr したら高認識率で1桁数字も認識した
・【Python】画像から文字起こししてテキストに変換する方法(tesseract-OCR、pyocr)
・【python】OCR(tesseract-ocr / pyocr)で賞味期限を読み取る(画像→数列) 【お家IT#19】