先日作った環境にアプリケーションを作ってみる企画の第二弾です。今回は簡単な日記アプリです。
つくったもの
今回もデザインは二の次です…。データベースにカテゴリと本文を投稿し、それを一覧で表示します。

コンテナを起動
まずはコンテナを起動します。
$ docker-compose up -d
$ docker-compose exec web bash
startapp
diaryという名前の新規アプリを作成します。
$ python manage.py startapp diary
settings.pyのINSTALL_APPSにdiaryアプリを追加します
INSTALLED_APPS = [
    'home.apps.HomeConfig',
    'diary.apps.DiaryConfig', # これを追加
    # 以下省略
]
データベースの変更
djagoのデータベースはデフォルトでsqlite3になっているので、PostgreSQLに変更します。
DATABASES = {
    'default': {
        'ENGINE': 'django.db.backends.sqlite3',
        'NAME': os.path.join(BASE_DIR, 'db.sqlite3'),
    }
}
ユーザー名などは先日dockerで作った環境で指定した変数を踏襲します。
DATABASES = {
    'default': {
        'ENGINE': 'django.db.backends.postgresql',
        'NAME': 'postgres',
        'USER': 'postgres',
        'PASSWORD': '***',
        'HOST': 'db',
        'PORT': 5432,
    }
}
ルーティング
前回のホーム画面編と同様にルーティングをしていきます。まずはconfフォルダ内のurls.pyから記述します。
from django.contrib import admin
from django.urls import path, include

urlpatterns = [
    path('admin/', admin.site.urls),
    path('', include('home.urls')),
    path('diary/', include('diary.urls')) # これを追加
]
diaryフォルダにurls.pyを新規作成し、以下のように記述します。
from  django.urls import path
from . import views

app_name = 'diary'

urlpatterns = [
    path('', views.top, name='top')
]
views.pyに以下のように記述します。
from django.shortcuts import render
from .models import Diary


def top(request):
    context = {
        'diary_list': Diary.objects.all()
    }
    return render(request, 'diary/diary_list.html', context)
models.pyからDiaryクラスをインポートしていますが、そのようなクラスはまだありませんので、モデルを作成します。
モデル作成
diary/model.pyを開き、次のように記述します。
from django.db import models
from django.utils import timezone


class Diary(models.Model):
    category = models.CharField('カテゴリ', max_length=255)
    text = models.TextField('本文')
    created_at = models.DateTimeField('作成日', default=timezone.now)

    # 特殊メソッド
    def __str__(self):
        return 'カテゴリ:{} 本文:{}'.format(self.category, self.text[:10])
マイグレーション
作成したモデルをデータベースに反映します。
$ python manage.py makemigrations diary
$ python manage.py migrate
管理サイトにモデルを登録する
作成したモデルを管理サイトで扱えるようにします。
from django.contrib import admin
from .models import Diary

admin.site.register(Diary)
スーパーユーザーの作成
スーパーユーザを作成します。以下のコマンドを実行すると、ユーザー名、メールアドレス、パスワードを入力するように求められます。
$ python manage.py createsuperuser
Djangoの管理サイトにアクセス
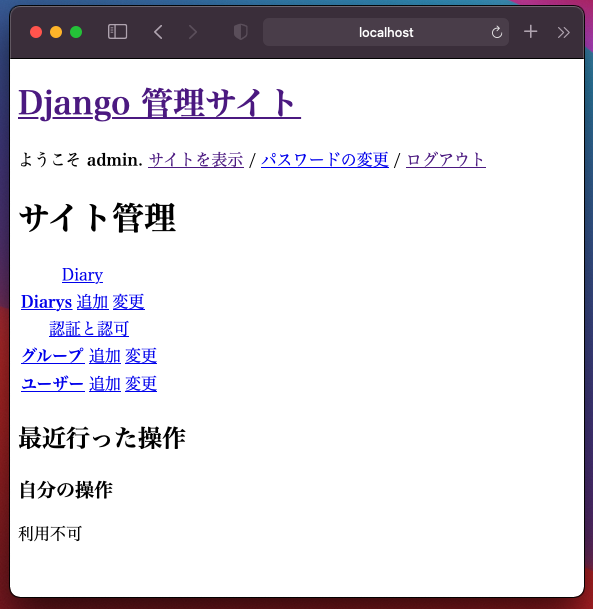
localhost:80/adminにアクセスすると以下のような画面が表示されます。

…あ、CSSが配信されていない……。
まあ、機能自体は問題ないと思うので、このまま進めます。スーパーユーザー作成時に設定したユーザー名とパスワードを入力してログインします。

見かけはアレですが、Diaryモデルが登録されています。Diaryの追加をクリックします。
適当に2、3個くらい投稿を追加しておきます。
htmlの作成
日記を表示するためのhtmlを作成します。前回と同じく、Bootstrap4のスターターテンプレートを使いました(完全に宝の持ち腐れですが)。色々書いていますが、日記を表示するのは{% for diary... から{% endfor %}までの部分です。
<!doctype html>
<html lang="ja">
  <head>
    <!-- Required meta tags -->
    <meta charset="utf-8">
    <meta name="viewport" content="width=device-width, initial-scale=1, shrink-to-fit=no">

    <!-- Bootstrap CSS -->
    <link rel="stylesheet" href="https://stackpath.bootstrapcdn.com/bootstrap/4.3.1/css/bootstrap.min.css" integrity="sha384-ggOyR0iXCbMQv3Xipma34MD+dH/1fQ784/j6cY/iJTQUOhcWr7x9JvoRxT2MZw1T" crossorigin="anonymous">

    <title>django on docker</title>
  </head>
  <body>

    {% for diary in diary_list %}
      <article>
        <span class="category">{{ diary.category }}</span><br>
        <p>{{ diary.text }}</p>
      </article>
    {% endfor %}

    <!-- Optional JavaScript -->
    <!-- jQuery first, then Popper.js, then Bootstrap JS -->
    <script src="https://code.jquery.com/jquery-3.3.1.slim.min.js" integrity="sha384-q8i/X+965DzO0rT7abK41JStQIAqVgRVzpbzo5smXKp4YfRvH+8abtTE1Pi6jizo" crossorigin="anonymous"></script>
    <script src="https://cdnjs.cloudflare.com/ajax/libs/popper.js/1.14.7/umd/popper.min.js" integrity="sha384-UO2eT0CpHqdSJQ6hJty5KVphtPhzWj9WO1clHTMGa3JDZwrnQq4sF86dIHNDz0W1" crossorigin="anonymous"></script>
    <script src="https://stackpath.bootstrapcdn.com/bootstrap/4.3.1/js/bootstrap.min.js" integrity="sha384-JjSmVgyd0p3pXB1rRibZUAYoIIy6OrQ6VrjIEaFf/nJGzIxFDsf4x0xIM+B07jRM" crossorigin="anonymous"></script>
  </body>
</html>
コンテナを再起動する
多分、コンテナを再起動しないとアプリが反映されないと気がするので、やっております。
$ docker-compose stop
$ docker-compose up -d
日記の表示
localhost:80/diaryにアクセスします。うまくいっていれば(もしくはこの記事が正しければ……)以下のようなページが表示されると思います。

