1. はじめに
皆様お疲れ様です。Swift AdventCalendarの24日目を担当させて頂きます、fumiyasac(Fumiya Sakai)と申します。何卒よろしくお願い致します。
今年は本記事でご紹介するトピックの他にも、iOSやSwiftに関連する記事を2つ公開しております。
- Swift Advent Calendar 12日目:
SwiftUIで作る「Drag処理を利用したCarousel型UI」と「Pinterest風GridレイアウトUI」の実装例とポイントまとめ - iOS Advent Calendar 17日目:
Firebase Realtime Database & FireStorageでasync/awaitを利用した簡単な処理実装例の紹介
SwiftUIを活用した少し複雑なUI表現を実現したい場合の実装例に関する解説や、Firebaseで提供されている機能の中でasync/awaitを活用する処理を利用した実装例に関する解説もしておりますので、こちらもご覧頂けますと嬉しく思います。
本記事を執筆するきっかけについて:
今年は業務で行った開発で、「以前にRxDataSourceをベースにして構築していた画面をDiffableDataSourceをベースにした実装へ置き換える対応」を実施する経験をしたり、同様に個人開発の中でも「DiffableDataSourceに加えてCellRegistrationやUICollectionViewCompositionalLayoutを利用したレイアウト実装」を進めていく様な機会がありました。RxDataSource&RxSwiftベースでも画面処理には差し支えがないものの、iOS14以降であればDiffableDataSourceでの差分更新はもちろん、CellRegistrationを利用したCellの生成処理も活用可能である点は魅力に感じていたことや、RxDataSourceからDiffableDataSourceへの置き換えを進めた際に、似ているからすぐできそうと思った部分が落とし穴となったり、想定以上に時間を要することになった経験もあったので、改めてご紹介できればと思います。
以前登壇した際の発表資料:
また、今回の内容につきましては、potatotips #79 (iOS/Android開発Tips共有会)にて登壇の際に利用した資料を下記のリンクにて共有しておりますので、こちらも是非ご活用頂けますと幸いです。紹介しているスライド内においても、業務内で取り組んだコードの抜粋を元におおまかな実装方針に関する解説と実装ポイントについてまとめております。
2. RxDataSourceに関する簡単な概要
RxDataSourceはRxCommunityが提供しているUITableViewまたはUICollectionViewにおけるDataSourceを提供するライブラリになります。
iOS13でDiffableDataSourceが登場する以前から提供されていたもので、
- 差分抽出アルゴリズム利用により、Cell表示要素に対してdelete/insert/move処理を簡単かつ安全に実現する
- RxSwiftを併用してUITableViewまたはUICollectionViewとのDataBindingのための処理を容易にする
等の様に、これまでのUITableViewまたはUICollectionViewの処理では難しかった部分の処理をRxSwiftを利用して実装可能できる点が魅力だと思います。
(とはいえ、RxSwiftに対するある程度の理解が必要になります。)
【RxDataSource関連参考記事】
- RxDataSourcesを使ってみよう!
- 5分で学ぶ差分更新とRxDataSources
- Easy Guide to RxDataSources!
- Bring tables alive with RxDataSources. RxSwift part 1
- UICollectionView + RxDataSources
3. RxDataSourceで構築された画面を段階的に置き換える際の方針
特にアプリのTOP画面等の様に、UICollectionViewをベースに構築されてはいるものの、必要な要素も数多くありSectionによって様々なレイアウトが混在する様な画面に対して、一気に全てを新機能を前提とした実装に変更していくのは大変な作業になるかと思います。その様な場合には、下記の様な形でそれぞれの移行作業のを分割した上で「まずはどこまでを実施していくか?」を考えていくと整理ができるかと思います。
【例. 複雑なアプリTOP画面を置き換える作業のフェーズ分け】
| Phase | 実装Scope |
|---|---|
| Phase1: DataSource移行 |
RxDataSource → DiffableDataSourceへの移行 👉アプリのTOP画面の様に1つの画面に多くのSectionがある画面を対応する際はまずはここを完璧に整える事を目標に! |
| Phase2: CellRegistration移行 |
Cell及びSupplementaryViewの初期化処理への移行 |
| Phase3: Layout構築関連処理移行 |
UICollectionViewCompositionalLayoutへの移行 |
| Phase4: RxSwift処理移行 |
RxSwiftでの処理をCombineやasync/awaitでの処理への移行 |
例えば、
- リファクタリングプラン1:
👉 DiffableDataSource + CellRegistration前提の処理に置き換えるが、UICollectionViewLayoutへの移行は今はしない - リファクタリングプラン2:
👉 DiffableDataSource + UICollectionViewCompositionalLayout前提の処理に置き換えるが、CellRegistrationへの移行は今はしない
といった様な形で、段階的に新しいAPIを利用した処理への移行していく形を取る事も可能ですので、まずはDataSourceの移行を優先し、それ以外の部分についてはスケジュール等とも相談ながら可能な部分から少しずつ対応していくと良さそうに思います。
4. RxDataSourceをNSDiffableDataSourceを置き換えていく際の実装ポイント解説
本記事では、下記の様にTOP画面に複数のSectionやレイアウト定義が必要な形の画面を考えていくことにします。
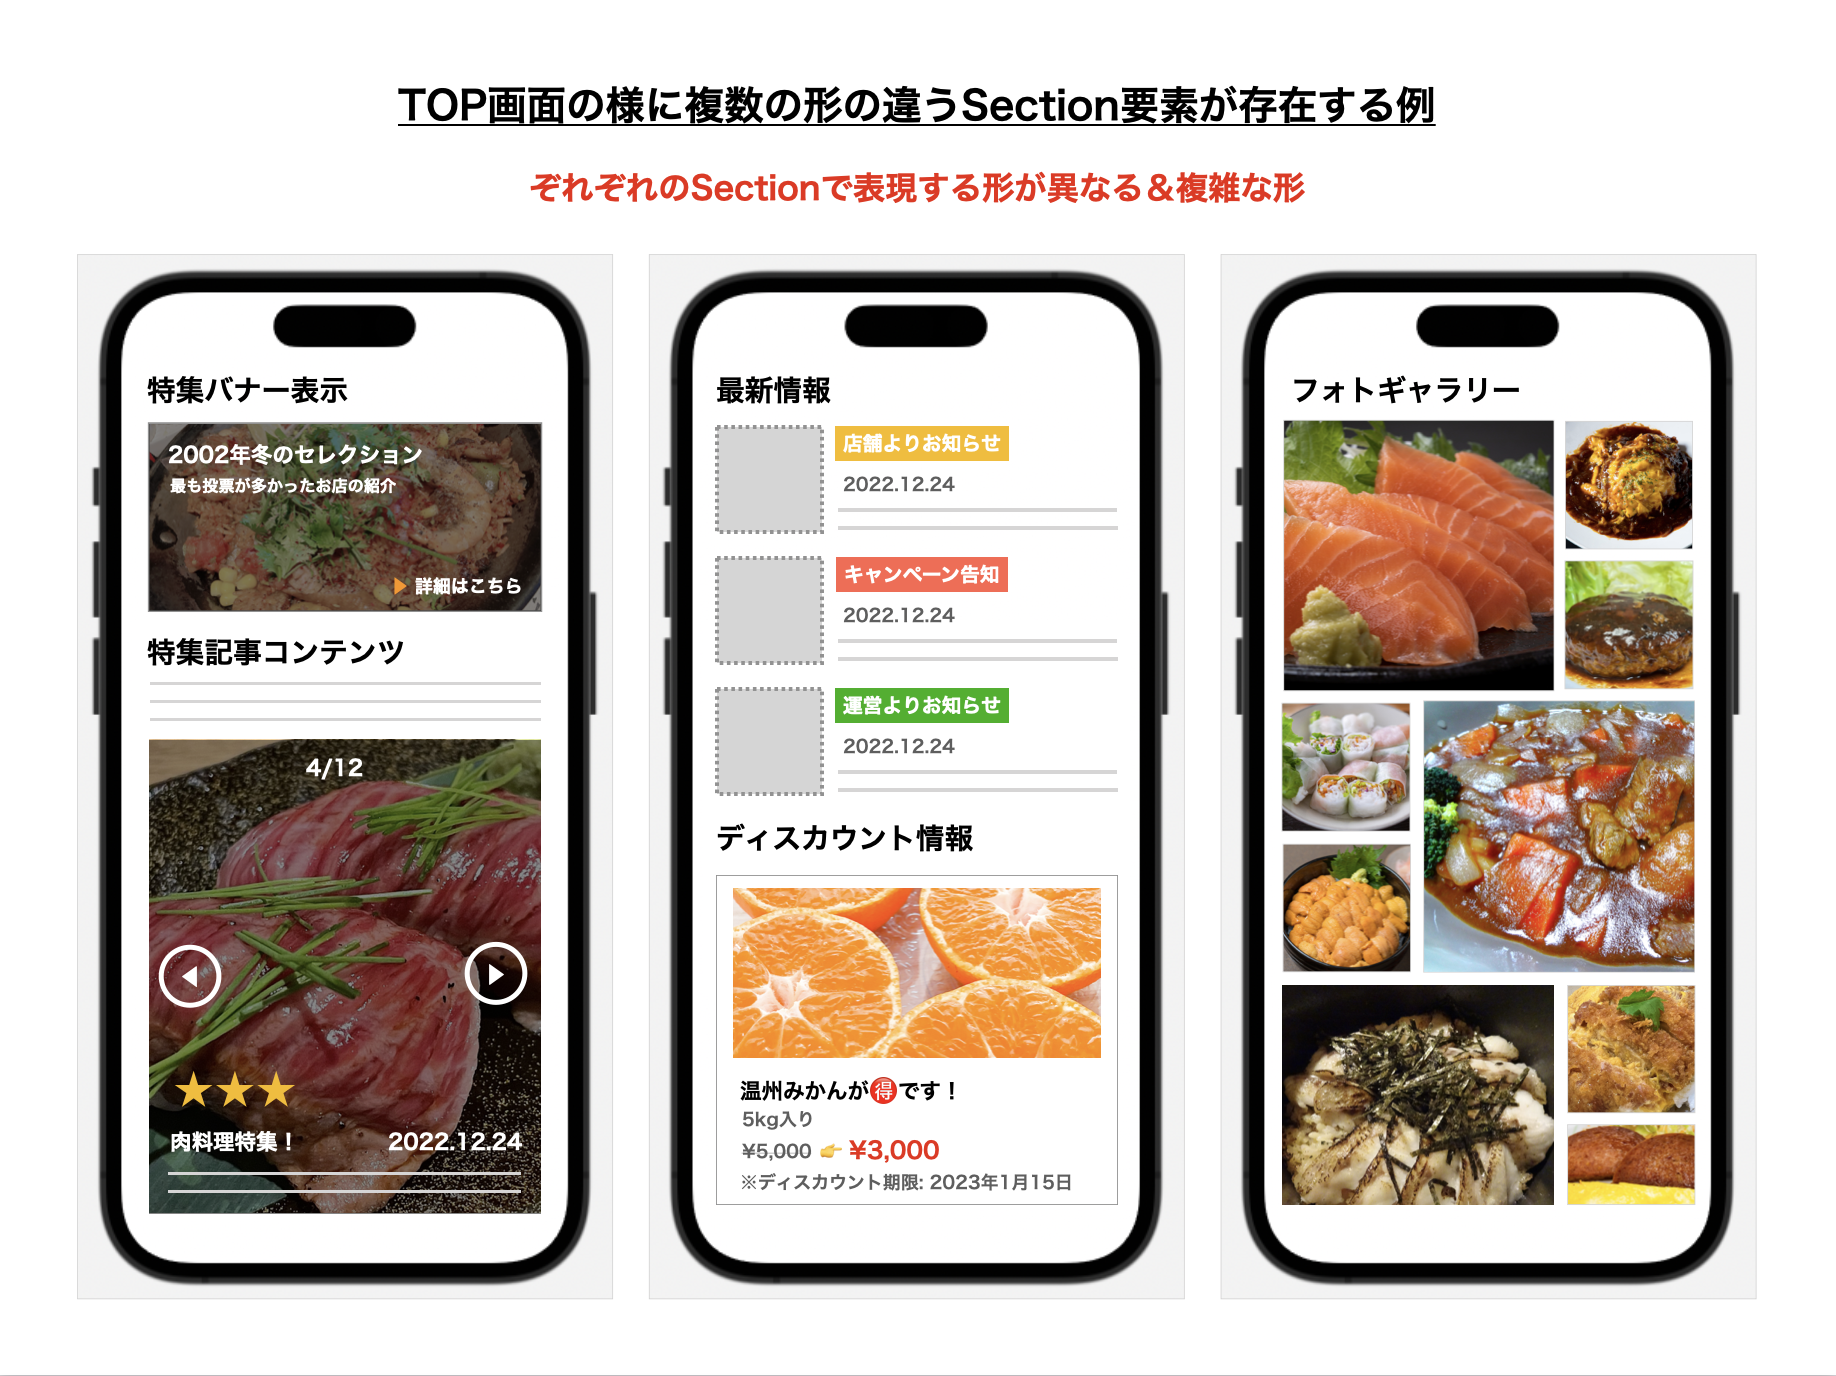
特にアプリの顔となるTOP画面や推しの機能が詰め込まれている画面においては、1つの画面を構成するために多くのSectionが必要になる事も多く、場合によっては1つのSection内で複数のCell要素が必要になるケースもそう珍しくないと思います。以降では 複数のSection表示に必要な要素をAPIからそれぞれ取得して順番を担保してUICollectionViewへ表示する 処理に注目して解説を進めていければと思います。
(実際では表示順番を担保する必要がある点に加えて、様々な条件による表示対象のSectionの増減を伴う処理等、画面の状態変化への配慮も必要になる場合も多いので、単純にDataSourceを差し替えるだけと考えてしまうと想像以上に大変になってしまう部分でもあると思います。)
【本記事で想定しているアプリ内の構成】
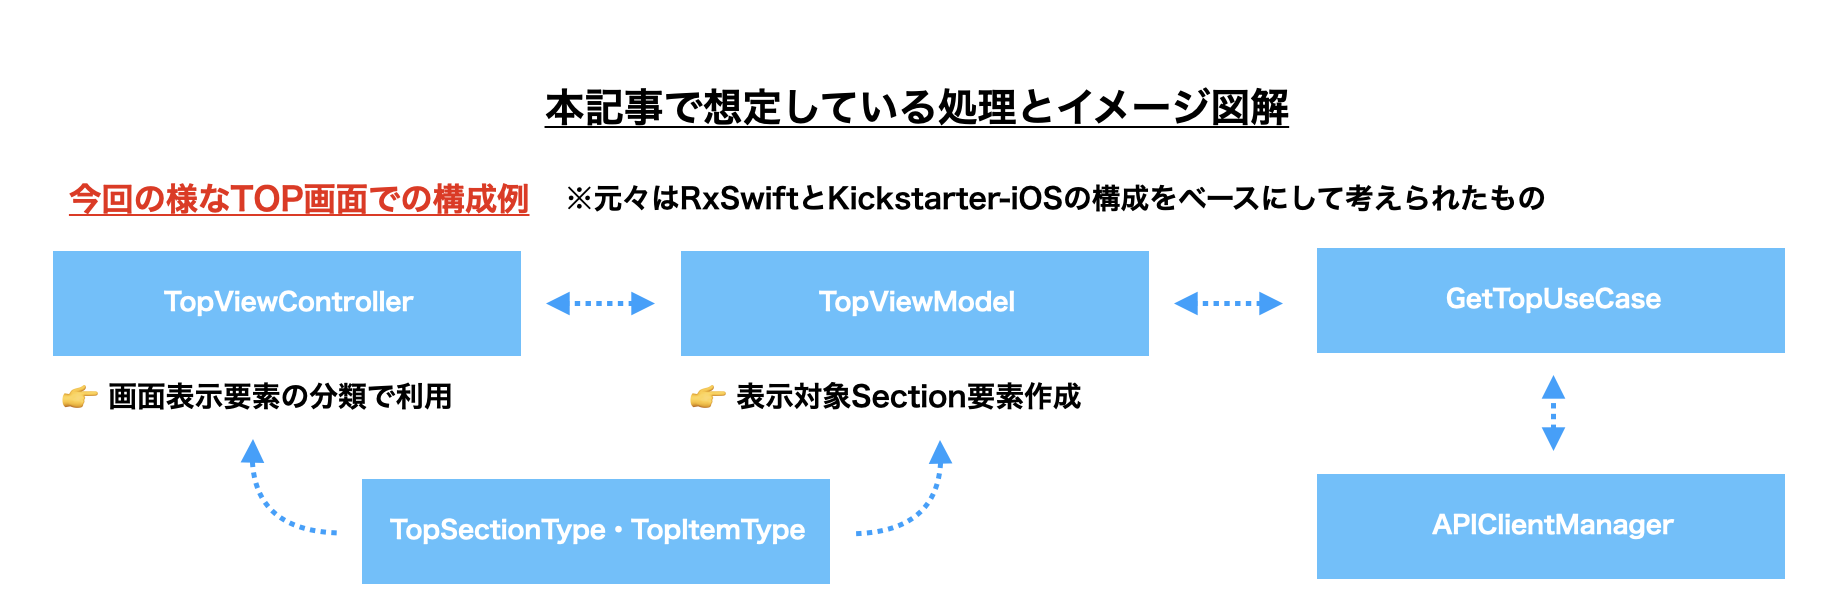
※Kickstarter-iOSのViewModelについては、下記の資料も参考にして頂けますとイメージが掴めると思います。
- kicksterter/ios-oss(GitHub)
- kicksterter/ios-ossを観察してみて思ったこと
- Kickstarter-iOSのViewModelの作り方がウマかった
- Introducing ViewModel Inputs/Outputs: a modern approach to MVVM architecture
【余談: UICollectionViewCompositonalLayoutを導入する事で作成しやすくなるSection要素のレイアウト】
例えば、UICollectionViewをベースとした画面内において、水平方向に動くCarousel要素をCell要素内に持ちたい場合等やその他Carousel側の表現をする場合には、UICollectionViewCompositionalLayoutが登場する前では、UICollectionViewCell内に更にUICollectionViewを配置する必要がありました。今後UICollectionViewCompositionalLayoutをメインとした形にしていく際の布石としても、DiffableDataSourceへの変更対応は意義があると感じました。
4-1. RxDataSource利用時のEnum定義・ViewModel・ViewController等の実装のポイントとなり得る部分の抜粋
RxDataSourceを利用したUICollectionViewをベースにした複数の要素を表示する際のポイントになる部分の実装を下記にコードを交えてまとめました。
この実装の中で特に特徴的な部分としては、
-
TopSectionEnumに定義された、UICollectionViewに表示したいSection要素とそのSection要素にぶら下がるItem要素の定義と、そこに定義されているAssociated Valueに表示データを関連付けている形となっている。 -
TopViewModelに定義された、APIから取得したレスポンスからSection要素とそのSection要素にぶら下がるItem要素の組みを作成し、RxDataSourceが提供しているDataSourceに順次追加していく形となっている。 -
TopViewControllerに定義された、RxDataSourceが提供しているCell要素やSupplementaryView要素を生成するためのロジックと、ViewModelから返却される表示内容データをRxSwiftの処理をバインドさせる形となっている。
の3点になるかと思います。特にTopSectionEnumへ定義したSection要素とそのSection要素にぶら下がるItem要素の定義については、後述するDffableDataSourceへの乗せ替えを進めていく際にのポイントとなる部分です。
【1. TopSectionEnum】
// 表示要素となるSectionModelのTypealias定義
// 👉 1つあたりのSection要素は、TopSection(model: "TopSectionType要素", items: "TopItemType要素のArray"))の形で定める
typealias TopSection = <TopSectionType, TopItemType>

// SectionModelにおけるSection要素へのEnum定義
// 👉 Associated ValueにSupplementaryView要素に利用するデータ(ViewObject)を設定し、ViewObjectはSupplementaryView要素のExtensionとして定義する。
enum TopSectionType {
    case banner(title: String)
    case featured(headerViewObject: TopHeaderView.HeaderViewObject)
    case news(headerViewObject: TopHeaderView.HeaderViewObject)
    case discount(title: String)
    case photo(headerViewObject: TopHeaderView.HeaderViewObject)
}

// SectionModelにおけるSectionに紐づくItem要素へのEnum定義
// 👉 Associated ValueにCell要素に利用するデータ(ViewObject)を設定し、ViewObjectはCell要素のExtensionとして定義する。
enum TopItemType {
    case banner(bannerViewObject: TopBannerCell.CellViewObject)
    // MEMO: 複数形になっているのはCarousel要素の場合等でCell要素内に複数データが必要なケースの場合
    // ※UICollectionViewCell内に更にUICollectionViewを配置している構造にしている想定の部分になります。
    case featured(featuredViewObjects: [TopFeaturedCell.CellViewObject])
    case news(newsViewObject: TopNewsCell.CellViewObject)
    case discount(discountViewObject: TopDiscountCell.CellViewObject)
    case photo(photoViewObject: TopPhotoCell.CellViewObject)
}
【2. TopResponse】
protocol TopResponse: Decodable {
    var version: String

    // ...(※もしversion以外にも必要なKeyあれば定義する)...
}

// 例. TOP画面表示用バナー部分のResponse定義の概略
struct TopBannerResponse: TopResponse {
    let version: String

    // 👉 View表示に必要なデータを格納している場所
    let content: Content

    // ...(バナー表示用のCell要素を表示する処理を記載する)...
}

// 例. TOP画面表示用バナー部分のResponseにおいてView表示に必要なものを定義している部分
extension TopBannerResponse {

    // Contentの内容(View表示に必要なデータ)を定義する
    struct Content: Decodable {
        let id: Int
        let identifier: String
        let imageUrl: URL?

        // ...(※以降はCodingKeyの設定等Decodableに準拠するための処理を記載する)...
    }
}
【3. TopViewModel】
import Foundation
import RxSwift
import RxCocoa
import RxDataSources

enum RequestState {
    case none
    case requesting
    case success
    case error
}

protocol TopViewModelInputs {
    // 初回のデータ取得をViewModelへ伝える
    var initialFetchTrigger: PublishSubject<Void> { get }
}

protocol TopViewModelOutputs {
    // APIから取得したTop画面Section表示用データを格納する
    var items: Observable<[TopSection]> { get }
    // 取得処理の実行結果を格納する
    var requestStatus: Observable<RequestState> { get }
}

protocol TopViewModelType {
    var inputs: TopViewModelInputs { get }
    var outputs: TopViewModelOutputs { get }
}

final class TopViewModel: TopViewModelInputs, TopViewModelOutputs, TopViewModelType {

    var inputs: TopViewModelInputs { return self }
    var outputs: TopViewModelOutputs { return self }

    // MARK: - Propery (for TopViewModelInputs)

    let initialFetchTrigger: PublishSubject<Void> = PublishSubject<Void>()

    // MARK: - Property (for TopViewModelOutputs)

    var items: Observable<[TopSection]> {
        return _items.asObservable()
    }

    var requestStatus: Observable<RequestState> {
        return _requestStatus.asObservable()
    }

    // MARK: - Property

    private let disposeBag = DisposeBag()

    // MEMO: 中継地点となるBehaviorRelayの変数(Outputの変数を生成するための「つなぎ」のような役割)
    // → BehaviorRelayの変化が起こったらObservableに変換されてOutputに流れてくる
    private let _items: BehaviorRelay<[TopSection]> = BehaviorRelay<[TopSection]>(value: [])
    private let _requestStatus: BehaviorRelay<RequestState> = BehaviorRelay<RequestState>(value: .none)

    // MEMO: このViewModelで利用するUseCase(※PropertyWrapperを利用したDI)
    // 参考: https://qiita.com/fumiyasac@github/items/549e10af41ce91cdfbd1
    @Dependencies.Inject(Dependencies.Name(rawValue: "GetTopUseCase")) private var getTopUseCase: GetTopUseCase

    // MARK: - Initializer

    init() {
        // ViewModel側の処理実行トリガーと連結させる
        initialFetchTrigger
            .subscribe(
                onNext: { [weak self] in
                    guard let self = self else { return }
                    self.getTopSection()
                }
            )
            .disposed(by: disposeBag)
    }

    // MARK: - Private Function

    private func getTopSection() {
        _requestStatus.accept(.requesting)
        // MEMO: GetTopUseCaseで想定している処理の概要は下記の通り
        // 👉 func getResource() -> Single<[TopResponse]> の様な形でTop画面に必要なレスポンスをAPI経由で取得する
        getTopUseCase.getResource()
            .subscribe(
                onSuccess: { [weak self] responses in
                    guard let self = self else { return }
                    self._requestStatus.accept(.success)

                    // MEMO: API通信のレスポンスから取得した値を加工してDataSource用の変数へ反映する
                    // 👉 func getResource() -> Single<[TopResponse]>の様な形でTop画面に必要なレスポンスをAPI経由で取得する
                    let topSectionDataSources = self.getTopDataSources(using: responses)
                    self._items.accept(topSectionDataSources)
                },
                onFailure: { [weak self] error in
                    guard let self = self else { return }
                    self._requestStatus.accept(.error)
                }
            )
            .disposed(by: disposeBag)
    }

    // UICollectionViewを表示するためのDataSourceを作成する処理
    private func getTopDataSources(using responses: [TopResponse]) -> [TopSection] {
        // 👉 1. Section用の配列を準備する
        var topSectionDataSources: [TopSection] = []
        // 👉 2. 引数から取得したレスポンスの型を元に分解してSection要素を作成する
        for response in responses {
            // Responseの型を元にして判別をし、表示したいTopSection要素を作成する
            if let topBannerResponse = response as? TopBannerResponse {
                let topBannerDataSource = getTopBannerDataSource(topBannerResponse)
                topSectionDataSources.append(topBannerDataSource)
            }
            // ...(表示する対象のResponseの数だけTopSectionを追加する処理が続きます)...
        }
        return topSectionDataSources
    }

    // TopSectionType.banner&TopItemType.bannerを入れたTopSection要素を作成する(※この部分はTOP画面に表示するバナー部分のSectionを構築する想定)
    private func getTopBannerDataSource(_ topBannerResponse: TopBannerResponse) -> TopSection {
        // 👉 TopBannerResponse(TOP画面に表示するバナーのレスポンス)を元にCell要素表示用のViewObjectに変換しEnumのAssociated Valueに設定する
        let content = topBannerResponse.content
        let section = TopSectionType.banner(title: "年末年始キャンペーンのお知らせ")
        let item = TopItemType.banner(
            bannerViewObject: TopBannerCell.CellViewObject(
                id: content.id,
                identifier: content.identifier,
                imageUrl: content.imageUrl
            )
        )
        // 👉 作成したTopSectionType&TopItemTypeの値を元にしてTopSectionを作成する
        return TopSection(model: section, items: [item])
    }

    // ...(以降同様のイメージで表示対象のSectionをResponseから作成していく形になります)...
}
【4. UICollectionViewExtension】
import Foundation
import UIKit

// NSObjectProtocolの拡張
extension NSObjectProtocol {

    // クラス名を返す変数"className"を返す
    static var className: String {
        return String(describing: self)
    }
}

// UICollectionReusableViewの拡張
extension UICollectionReusableView {

    // 独自に定義したセルのクラス名を返す
    static var identifier: String {
        return className
    }
}

// UICollectionViewの拡張
extension UICollectionView {

    // 作成した独自のカスタムセルを初期化する
    func registerCustomCell<T: UICollectionViewCell>(_ cellType: T.Type) {
        register(UINib(nibName: T.identifier, bundle: nil), forCellWithReuseIdentifier: T.identifier)
    }

    // 作成した独自のカスタムヘッダー用のViewを初期化する
    func registerCustomReusableHeaderView<T: UICollectionReusableView>(_ viewType: T.Type) {
        register(UINib(nibName: T.identifier, bundle: nil), forSupplementaryViewOfKind: UICollectionView.elementKindSectionHeader ,withReuseIdentifier: T.identifier)
    }

    // 作成した独自のカスタムフッター用のViewを初期化する
    func registerCustomReusableFooterView<T: UICollectionReusableView>(_ viewType: T.Type) {
        register(UINib(nibName: T.identifier, bundle: nil), forSupplementaryViewOfKind: UICollectionView.elementKindSectionFooter ,withReuseIdentifier: T.identifier)
    }

    // 作成した独自のカスタムセルをインスタンス化する
    func dequeueReusableCustomCell<T: UICollectionViewCell>(with cellType: T.Type, indexPath: IndexPath) -> T {
        return dequeueReusableCell(withReuseIdentifier: T.identifier, for: indexPath) as! T
    }

    // 作成した独自のカスタムヘッダー用のViewをインスタンス化する
    func dequeueReusableCustomHeaderView<T: UICollectionReusableView>(with cellType: T.Type, indexPath: IndexPath) -> T {
        return dequeueReusableSupplementaryView(ofKind: UICollectionView.elementKindSectionHeader, withReuseIdentifier: T.identifier, for: indexPath) as! T
    }

    // 作成した独自のカスタムフッター用のViewをインスタンス化する
    func dequeueReusableCustomFooterView<T: UICollectionReusableView>(with cellType: T.Type, indexPath: IndexPath) -> T {
        return dequeueReusableSupplementaryView(ofKind: UICollectionView.elementKindSectionFooter, withReuseIdentifier: T.identifier, for: indexPath) as! T
    }
}
【5. TopBannerCell】
// ⭐️ ポイントとなる処理の抜粋:
// Cell要素の定義については、ここではTOP画面に表示するバナー表示エリア用のTopBannerCellのみ記載しています。(※他のCell要素についても同様の流れになります)
import UIKit

final class TopBannerCell: UICollectionViewCell {

    // ...(必要なPropertyや@IBOutletを定義する)...

    // MARK: - Function

    func configure(_ cellViewModel: CellViewModel) {
       // ...(CellViewModelの値をCell要素に反映する)...
    }
}

// MARK: - TopBannerCell Extension

extension TopBannerCell {

    // 👉 この部分がTopItemType.bannerのAssociated Valueと1:1で対応する形となる点がポイント
    struct CellViewModel {
        let id: Int
        let identifier: String
        let imageUrl: URL?
    }
}
【6. TopViewController】
// ⭐️ ポイントとなる処理の抜粋:
import UIKit
import RxSwift
import RxCocoa
import RxDataSources

final class TopViewController: UIViewController {

    // MARK: - @IBOutlet

    @IBOutlet private weak var collectionView: UICollectionView!

    // MARK: - Property

    private let disposeBag = DisposeBag()

    // MARK: - ViewModel

    private var viewModel = TopViewModel()

    // MARK: - DataSource

    // 👉 定義したTopItemTypeに応じたCellの初期化処理を実行する
    private lazy var dataSource = RxCollectionViewSectionedReloadDataSource<TopSection>(configureCell: configureCell, configureSupplementaryView: configureSupplementaryView)

    private lazy var configureCell: RxCollectionViewSectionedReloadDataSource<TopSection>.ConfigureCell = { [weak self] (_, collectionView, indexPath, topItemType) in
        guard let self = self else { return UICollectionViewCell() }

        // 👉 定義したTopItemTypeに応じたCellの初期化処理を実行する
        switch topItemType {
        case .banner(let bannerViewObject):
            let cell = collectionView.dequeueReusableCustomCell(with: TopBannerCell.self, indexPath: IndexPath(row: row, section: 0))
            cell.configure(bannerViewObject)
            return cell
        // ...(以降は他のTopItemTypeのケースでも同様にCellの初期化処理を実行する)...
        }
    }

    private lazy var configureSupplementaryView: RxCollectionViewSectionedReloadDataSource<TopSection>.ConfigureSupplementaryView = { [weak self] dataSource, collectionView, kind, indexPath in
        guard let strongSelf = self else { return UICollectionReusableView() }

        // 👉 定義したTopSectionTypeに応じたSupplementaryViewの初期化処理を実行する
        let topSectionType = dataSource[indexPath.section]
        switch topSectionType {
        case .banner(let title):
            if kind == UICollectionView.elementKindSectionHeader {
                let header = collectionView.dequeueReusableCustomHeaderView(with: TopBannerHeaderView.self, indexPath: indexPath)
                header.configure(title: title)
                return header
            }
            if kind == UICollectionView.elementKindSectionFooter {
                let footer = collectionView.dequeueReusableCustomFooterView(with: TopBannerFooterView.self, indexPath: indexPath)
                return footer
            }
            // ...(以降は他のTopSectionTypeのケースでも同様にSupplementaryViewの初期化処理を実行する)...
        }
    }

    // MARK: - Override

    override func viewDidLoad() {
        super.viewDidLoad()

        // 👉 1. このUICollectionViewで利用するCell要素やSupplementaryView要素の登録処理を行う
        collectionView.registerCustomCell(TopBannerCell.self)
        collectionView.registerCustomReusableHeaderView(TopBannerHeaderView.self)
        collectionView.registerCustomReusableFooterView(TopBannerFooterView.self)
        // ...(以降TopItemTypeの個数分Cellの登録処理を実行する)...

        // 👉 2. UICollectionViewとViewModel内の変数とのバインドを行う
        // ViewModel内の処理で変数itemの内容が更新
        // → DataSourceのClosure内部に定義しているCellやSupplementaryViewの生成処理が実行され画面に内容が反映
        viewModel.outputs.items
            .asDriver()
            .drive(collectionView.rx.items(dataSource: dataSource))
            .disposed(by: disposeBag)

        // ...(その他必要な初期化処理等があれば以降に記載する)...
    }

    // ...(以降では画面表示やUICollectionViewDelegateに関連する処理を記載する)...
}
コードだけをぱっと見すると影響範囲も多く大変そうに感じるかもしれませんが、処理内で変更を施す部分がどこなか?という点に注目すると意外と大まかな方針はイメージしやすいのではないかと思います。RxSwiftベースの処理部分を全てCombineやasync/awaitの機能に置き換える様な変更をすることまで考えると大変になりますが、対象範囲を絞った上で少しずつかつ段階的に置き換えていく様に進めていけば、実際のプロジェクト内でも無理なく取り組む余地はある様に思います。
4-2. DiffableDataSourceで利用可能なEnum定義に合う形とする
UIに表示する状態を保持するNSDiffableDataSourceSnapshot<SectionIdentifierType, ItemIdentifierType>及び、セル要素に表示するためのデータを決定して結びつけるUICollectionViewDiffableDataSource<SectionIdentifierType, ItemIdentifierType>におけるSectionIdentifierType・ItemIdentifierTypeは共にHashableへの準拠が必要になります。(RxDataSourceを利用した実装においてはHashableへの準拠は特に必要がありませんでした。)
RxDataSourceからDiffableDataSourceへの乗せ替えの際には、まずSection要素とそのSection要素にぶら下がるItem要素をHashableに準拠する形へ変更する事が一番最初のスタートラインとなります。
そしてHashableに準拠する際には、Hash値の重複が起きてしまうとNSInternalInconsistencyExceptionが発生してアプリがクラッシュするので、同じSection要素を複数配置する場合やSection要素にぶら下がるItem要素で同じcaseのものが複数必要な場合には、Enum内のAssociated Valueに定義しているViewObject内部の値もHash値に含める等の工夫をする事で、一意な値となる形にする点には注意する必要があります。
// ⭐️ TopSectionTypeをHashableに準拠する
enum TopSectionType {
    case banner(title: String)
    case featured(headerViewObject: TopHeaderView.HeaderViewObject)
    case news(headerViewObject: TopHeaderView.HeaderViewObject)
    case discount(title: String)
    case photo(headerViewObject: TopHeaderView.HeaderViewObject)

    // MARK: - Hashable

    static func == (lhs: TopSectionType, rhs: TopSectionType) -> Bool {
        lhs.hashValue == rhs.hashValue
    }

    // 👉 Sectionを複数利用する想定ではないので一意な文字列を定める
    func hash(into hasher: inout Hasher) {
        switch self {
        case .banner:
            hasher.combine("banner")
        case .featured:
            hasher.combine("featured")
        case .news:
            hasher.combine("news")
        case .discount:
            hasher.combine("discount")
        case .photo:
            hasher.combine("photo")
        }
    }
}

// ⭐️ TopItemTypeをHashableに準拠する
enum TopItemType {
    case banner(bannerViewObject: TopBannerCell.CellViewObject)
    // MEMO: 複数形になっているのはCarousel要素の場合等でCell要素内に複数データが必要なケースの場合
    // ※UICollectionViewCell内に更にUICollectionViewを配置している構造にしている想定の部分になります。
    case featured(featuredViewObjects: [TopFeaturedCell.CellViewObject])
    case news(newsViewObject: TopNewsCell.CellViewObject)
    case discount(discountViewObject: TopDiscountCell.CellViewObject)
    case photo(photoViewObject: TopPhotoCell.CellViewObject)

    // MARK: - Hashable

    static func == (lhs: TopItemType, rhs: TopItemType) -> Bool {
        lhs.hashValue == rhs.hashValue
    }

    // 👉 TopItemTypeは1つのSection要素に対して複数個必要な場合があるので、その様な要素はViewObject内の一意な値(idやidentifier等)を含める
    func hash(into hasher: inout Hasher) {
        switch self {
        case .banner(let bannerViewObject):
            hasher.combine("banner_\(bannerViewObject.identifier)")
        case .featured:
            hasher.combine("featured")
        case .news(let newsViewObject):
            hasher.combine("news_\(newsViewObject.identifier)")
        case .discount(let discountViewObject):
            hasher.combine("discount_\(discountViewObject.identifier)")
        case .photo(let photoViewObject):
            hasher.combine("photo_\(photoViewObject.identifier)")
        }
    }
}
4-3. DiffableDataSourceを利用するコードに対するひと工夫をする
通常のUICollectionViewDiffableDataSourceで行う処理を改めて考えていくと、DataSourceの構築とデータの反映・Cell要素の生成・画面レイアウト定義等、実は必要な処理がたくさんあります。全ての処理をViewController側だけで頑張ろうとするとかなりViewController側のコードが長くなってしまうので、
-
ViewModel側で実施したい処理
👉 APIから取得したレスポンスを加工してDiffableDataSourceへ反映する処理 -
ViewController側で実施したい処理
👉 UICollectionViewCompositionalLayoutの定義やCell要素・SupplementaryView要素の構築処理
とできる様な形にできると、考えやすくなるかと思います。
そのための準備として、下記の様な形で画面専用のDiffableDataSourceクラスを準備する事で、定義したEnumと対応可能な形にしておき、かつ実際のコードではViewController側で行う処理と、ViewModel側で行う処理を住み分ける事ができる様に両方から参照できる様な形としておく点も細かいながらもポイントになるかと思います。
// ⭐️ TopViewControllerのExtensionとして、この画面専用のDataSourceクラスを準備している
// ※ItemIdentifiableの部分もAnyHashableのままではなく、TopItemTypeを利用する形にする
extension TopViewController {
    class TopDataSource: UICollectionViewDiffableDataSource<TopSectionType, TopItemType> {}
}
5. iOS14から利用可能なCellRegistionを利用可能にする際の実装ポイント解説
ここからは、iOS14から登場したUICollectionView.CellRegistrationを利用したCell要素・SupplementaryView要素を構築する処理について簡単にご紹介できればと思います。dequeueConfiguredReusableCellメソッドを利用したCell要素・SupplementaryView要素構築時に、Section要素とItem要素に定義したAssociated Valueと上手に合わせられる様にするための工夫をしています。後述する Registrable.swift で定義している処理にある様にUICollectionView.CellRegistrationやUICollectionView.SupplementaryRegistrationでの処理を便利にするProtocolとExtensionを定義し、該当するCell要素やSupplementaryView要素に準拠させる様にしている点がポイントになります。
(※今回はxibとクラス定義でCell要素・SupplementaryView要素を作る想定をしています。)
【1. UICollectionViewExtension】
import Foundation
import UIKit

extension NSObjectProtocol {
    static var className: String {
        return String(describing: self)
    }
}

extension UICollectionReusableView {
    static var identifier: String {
        return className
    }

    // ⭐️ 作成した独自のUICollectionReusableViewクラスにおけるUINibのインスタンスを取得する
    static func makeSupplementaryViewResource<T: UICollectionReusableView>(_ cellType: T.Type) -> UINib {
        return UINib(nibName: T.identifier, bundle: nil)
    }
}

extension UICollectionView {

    // ⭐️ 作成した独自のUICollectionViewCellクラスにおけるUINibのインスタンスを取得する
    static func makeCellResource<T: UICollectionViewCell>(_ cellType: T.Type) -> UINib {
        return UINib(nibName: T.identifier, bundle: nil)
    }
}
【2. Registrable】
import Foundation
import UIKit

// MARK: - DynamicRegistrable

// ⭐️ Cellクラスに定義されているCellViewObjectを利用して表示するCell要素で準拠するProtocol定義
protocol DynamicRegistrable: UICollectionViewCell {
    associatedtype Item
    static var cellNib: UINib { get }
    static func makeCellRegistration() -> UICollectionView.CellRegistration<Self, Item>
}

extension DynamicRegistrable {
    static func makeCellRegistration() -> UICollectionView.CellRegistration<Self, Item> {
        return .init(cellNib: cellNib, handler: { cell, _, item in
            return cell.configure(item)
        }
    )
}

// MARK: - StaticRegistrable

// ⭐️ Cellクラスに定義されているCellViewObjectが不要なCell要素で準拠するProtocol定義
protocol StaticRegistrable: UICollectionViewCell {
    static var cellNib: UINib { get }
    static func makeCellRegistration() -> UICollectionView.CellRegistration<Self, String>
}

extension StaticRegistrable {
    static func makeCellRegistration() -> UICollectionView.CellRegistration<Self, String> {
        return .init(cellNib: cellNib, handler: { _, _, _ in
            // Do Notiong.
        })
    }
}

// MARK: - SupplementaryRegistrable

// ⭐️ SupplementaryView要素で準拠するProtocol定義
protocol SupplementaryRegistrable: UICollectionViewCell {
    static var supplementaryNib: UINib { get }
    static func makeSupplementaryViewRegistration(elementKind: String) -> UICollectionView.SupplementaryRegistration<Self>
}

extension SupplementaryRegistrable {
    static func makeSupplementaryViewRegistration(elementKind: String) -> UICollectionView.SupplementaryRegistration<Self> {
        return .init(supplementaryNib: supplementaryNib, elementKind: elementKind, handler: { _, _, _ in
            // Do notiong.
        })
    }
}
【3. TopBannerCell】
// ⭐️ ポイントとなる処理の抜粋:
// Cell要素の定義については、ここではTOP画面に表示するバナー表示エリア用のTopBannerCellのみ記載しています。(※他のCell要素についても同様の流れになります)
import UIKit

// 👉 TopBannerCellクラスをDynamicRegistrableプロトコルに準拠する
final class TopBannerCell: UICollectionViewCell, DynamicRegistrable {

    // 👉 CellのIdentifierからUINibを取得する
    // ※ StaticRegistrableやSupplementaryRegistrablの場合は、この処理内にあるUINibに関する設定のみを行えばOK
    static let cellNib = UICollectionViewCell.makeNibResource(TopBannerCell.self)

    // 👉 ItemとしてTopBannerCell.CellViewModelを設定する
    typealias Item = CellViewObject

    // ...(必要なPropertyや@IBOutletを定義する)...

    // MARK: - Function

    // 👉 DynamicRegistrableで定めたmakeCellRegistration()と連動する部分になります。
    func configure(_ item: Item) {
       // ...(バナー表示用のCell要素を表示する処理を記載する)...
    }
}

// MARK: - TopBannerCell Extension

extension TopBannerCell {

    struct CellViewModel {
        let id: Int
        let identifier: String
        let imageUrl: URL?
    }
}
【4. TopViewController側でCell要素やSupplementaryView要素を組み立てるための処理抜粋】
// ⭐️ ポイントとなる処理の抜粋:
// ※ TopViewController内のプロパティとして「private var topDataSource: TopDataSource!」が定義されています。
extension TopViewController {

    private func configureTopDataSource() {

        // 👉 表示対象Cell要素のCellRegistrationをインスタンス化する
        let topBannerCellRegistration = TopBannerCell.makeCellRegistration()
        // ...(表示する必要がある分だけCellRegistrationを追加する)...

        topDataSource = TopDataSource(collectionView: collectionView) { [weak self] (collectionView, indexPath, topItemType) -> UICollectionViewCell? in
            guard let self = self else {
                return UICollectionViewCell()
            }

            // 👉 dequeueConfiguredReusableCellメソッドを利用してCell要素の初期化処理を実行する
            // ※第3引数のitem部分には、TopItemTypeのAssociated Valueを設定する(TopBannerCell.CellViewObjectと紐づく形になる)
            switch topItemType {
            case .banner(let bannerViewObject):
                let cell = collectionView.dequeueConfiguredReusableCell(using: topBannerCellRegistration, for: indexPath, item: bannerViewObject)
                return cell
            // ...(以降は他のTopItemTypeのケースでも同様にCellの初期化処理を実行する)...
            }

            return UICollectionViewCell()
        }
    }

    private func configureTopSupplementaryView() {

        // 👉 表示対象SupplementaryView要素のSupplementaryRegistrationをインスタンス化する
        let topBannerHeaderViewRegistration = TopBannerHeaderView.makeSupplementaryViewRegistration(elementKind: UICollectionView.elementKindSectionHeader)
        let topBannerFooterViewRegistration = TopBannerFooterView.makeSupplementaryViewRegistration(elementKind: UICollectionView.elementKindSectionFooter)
        // ...(表示する必要がある分だけCellRegistrationを追加する)...

        topDataSource.supplementaryViewProvider = { [weak self] (collectionView, kind, indexPath) in
            guard let self = self else {
                return nil
            }
            guard let topSectionType = self.topV2DataSource[safe: indexPath.section] else {
                return nil
            }

            switch topSectionType {
            case .banner(let title):
                if kind == UICollectionView.elementKindSectionHeader {
                    let header = collectionView.dequeueConfiguredReusableSupplementary(using: topBannerHeaderViewRegistration, for: indexPath)
                    header.configure(title: title)
                    return header
                }
                if kind == UICollectionView.elementKindSectionFooter {
                    let footer = collectionView.dequeueConfiguredReusableSupplementary(using: topBannerFooterViewRegistration, for: indexPath)
                    return footer
                }
            // ...(以降は他のTopSectionTypeのケースでも同様にSupplementaryViewの初期化処理を実行する)...
            }

            return UICollectionReusableView()
        }
    }
}
【余談: UITableViewにもCellRegistrationはある?】
UICollectionView.CellRegistrationと同様なものは、UITableViewにもあるのかなと思い調べてみましたがありませんでした。しかしながら、UITableViewにおいてもDiffableDataSourceを利用可能なので、その部分を置き換えてCellの初期化に関する処理は従来通りの処理を利用する方針する形になるかと思います。
(iOS14以降ではUICollectionViewにおいてもUITableViewに近いUIが提供されているので、それを活用していく方針としても良いかもしれません。)
6. async/awaitの処理を利用したSectionの並び順を担保したResponse取得処理例
RxDataSourceを利用している場合には、APIリクエストに関連する処理でもRxSwiiftを利用した処理が前提になっている事が多いかと思います。この様な場合にはRxSwiftの.zipや.flatMapを利用したOperatorを利用し、その後それぞれのAPIリクエスト結果を見てハンドリングをする様な方針をとりますが、下記で紹介するコードはその処理をasync/awaitベースの処理へ置き換えた際のものになります。
@Dependencies.Inject(Dependencies.Name(rawValue: "GetTopUseCase")) private var getTopUseCase: GetTopUseCaseの部分
👉 RxSwiftベースでは`func getResource() -> Single<[TopResponse]>`であったが、async/awaitベースでは`func getResource() async throws -> [TopResponse]`としたい。
【GetTopUseCaseの処理をasync/awaitベースのものにした実装例】
protocol GetTopUseCase {
    func getResource() async throws -> [TopResponse]
}

final class GetTopUseCaseImpl: GetTopUseCase {

    // MARK: - Function

    func getResource() async throws -> [TopResponse] {
        var responses: [TopResponse] = []
        var endpoints = ['/banner', '/featured', '/news', '/special', '/photos']

        // 👉 withTaskGroupを利用して複数のAPIリクエスト並列で実行する
        // この時点では実行順ではなく完了した順である点に注意
        await withTaskGroup(of: [TopResponse].self, body: { [weak self] group in
            guard let self = self else { return }
            for endpoint in endpoints {
                group.addTask {
                    // 👉 エンドポイントのパス文字列に応じたResponseを取得する処理を実行する
                    return try await APIRequest.shard.get(endpoint: endpoint)
                }
            }
            // 👉 endpointsの配列に格納されている順番でレスポンスデータが格納される
            for await response in group {
                responses.append(response)
            }
            // TODO: エンドポイントに応じた並べ替え処理を実施する

            // TODO: エラーハンドリング処理をする(例. レスポンスが全て空だった場合はエラーとみなす等の配慮を加える)
        })
        return responses
    }
}
7. DiffableDataSourceとCellRegistrationを導入した後の関連部分コードのイメージ
最後に、ここまでで紹介したDiffableDataSourceへの移行のために必要な処理をViewControllerクラス及びViewModelクラスにまとめると、下記の様なコードになるかと思います。
ViewModel側でのコードにおいて大きく変更がある部分は、
-
typealias SnapshotElement = (section: [TopSectionType], items: [TopItemType])
👉 DiffableDataSourceに反映するSection要素1つ分を表すエイリアス -
private var dataSource: TopViewController.TopDataSource!
👉 ViewController側から渡された、この画面専用のDataSource -
private var currentSnapshot = NSDiffableDataSourceSnapshot<TopSectionType, TopItemType>()
👉 UI表示に反映する要素を格納している部分
の3点になります。RxDataSourceを利用していた際の処理と大きく変化する部分は、この3点が関わる部分になると考えていますので、必要なデータを取得して変数: currentSnapshotに保持するための処理部分の違いに注目するとよりイメージが掴みやすくなるのではないかと思います。
【1. TopViewModel】
// ⭐️ 単純にエラー表示をしたいだけならCombineをでなくとも良いかもしれない...
import Foundation
import Combine

enum RequestState {
    case none
    case requesting
    case success
    case error
}

protocol TopViewModelInputs {
    // 初回のデータ取得をViewModelへ伝える
    var initialFetchTrigger: PassthroughSubject<Void, Never> { get }
}

protocol TopViewModelOutputs {
    // 取得処理の実行結果を格納する
    var requestStatus: AnyPublisher<RequestState, Never> { get }
}

protocol TopViewModelType {
    var inputs: TopViewModelInputs { get }
    var outputs: TopViewModelOutputs { get }
}

final class TopViewModel: TopViewModelInputs, TopViewModelOutputs, TopViewModelType {

    var inputs: TopViewModelInputs { return self }
    var outputs: TopViewModelOutputs { return self }

    // MARK: - Property (for TopViewModelInputs)

    let initialFetchTrigger = PassthroughSubject<Void, Never>()

    // MARK: - Property (for TopViewModelOutputs)

    var requestStatus: AnyPublisher<RequestState, Never> {
        return $_requestStatus.eraseToAnyPublisher()
    }

    // MARK: - Property (for TopDataSource)

    typealias SnapshotElement = (section: [TopSectionType], items: [TopItemType])
    private var dataSource: TopViewController.TopDataSource!
    private var currentSnapshot = NSDiffableDataSourceSnapshot<TopSectionType, TopItemType>()

    // MARK: - Property

    private var cancellables: [AnyCancellable] = []

    // MEMO: 中継地点となる@Publishedの変数(Outputの変数を生成するための「つなぎ」のような役割)
    // → @Publishedの変化が起こったらObservableに変換されてOutputに流れてくる
    @Published private var _requestStatus: RequestState = .none

    // MEMO: このViewModelで利用するUseCase(※PropertyWrapperを利用したDI)
    // 参考: https://qiita.com/fumiyasac@github/items/549e10af41ce91cdfbd1
    @Dependencies.Inject(Dependencies.Name(rawValue: "GetTopUseCase")) private var getTopUseCase: GetTopUseCase

    // MARK: - Function

    func setup(dataSource: TopViewController.TopDataSource) {
        // TopViewControllerから渡されたTopDataSourceクラスのインスタンスを反映する
        self.dataSource = dataSource
        // ViewModel側の処理実行トリガーと連結させる
        initialFetchTrigger
            .sink(
                receiveValue: { [weak self] in
                    guard let self = self else { return }
                    self.getTopSection()
                }
            )
            .store(in: &cancellables)
    }

    // MARK: - Private Function

    private func getTopSection() {
        Task { @MainActor in
            self._requestStatus = .requesting
            do {
                // 👉 func getResource() async throws -> [TopResponse]の様な形でTop画面に必要なレスポンスをAPI経由で取得する
                let responses = try await getTopUseCase.getResource()
                // 👉 受け取ったレスポンスを加工してDiffableDataSourceに反映する
                // ※この処理が完了したらTopViewController側の表示が変化する
                self.updateTopDataSource(using: responses)
                self._requestStatus = .success
            } catch let error {
                print("Get All Shops Error: " + error.localizedDescription)
                self._requestStatus = .error
            }
        }
    }

    // UICollectionViewを表示するためのDataSourceを作成する処理
    private func updateTopDataSource(using responses: [TopResponse]) {
        // 👉 1. 現在のSnapshop(変数:currentSnapshot)をリセットする
        currentSnapshot = NSDiffableDataSourceSnapshot<TopSectionType, TopItemType>()
        // 👉 2. 引数から取得したレスポンスの型を元に分解してSnapshot要素を生成する
        for response in responses {
            // Responseの型を元にして判別をし、表示したいSnapshot要素を作成した後にNSDiffableDataSourceSnapshotへ追加する
            if let topBannerResponse = response as? TopBannerResponse {
                if let snapshotElement = getTopBannerSnapshot(topBannerResponse)
                appendSnapshotElementInCurrentSnapshot(snapshotElement)
            }
            // ...(表示する対象のResponseの数だけTopSectionを追加する処理が続きます)...
        }
        // 👉 3. DiffableDataSourceにデータを反映する
        dataSource.apply(currentSnapshot, animatingDifferences: true)
    }

    // TopSectionType.banner&TopItemType.bannerを入れたSnapshot要素を作成する(※この部分はTOP画面に表示するバナー部分のSectionを構築する想定)
    private func getTopBannerSnapshot(_ topBannerResponse: TopBannerResponse) -> SnapshotElement {
        // 👉 TopBannerResponse(TOP画面に表示するバナーのレスポンス)を元にCell要素表示用のViewObjectに変換しEnumのAssociated Valueに設定する
        let content = topBannerResponse.content
        let section = TopSectionType.banner(title: "年末年始キャンペーンのお知らせ")
        let item = TopItemType.banner(
            bannerViewObject: TopBannerCell.CellViewObject(
                id: content.id,
                identifier: content.identifier,
                imageUrl: content.imageUrl
            )
        )
        // 👉 作成したTopSectionType&TopItemTypeの値を元にしてTopSectionを作成する
        return SnapshotElement(section: [section], items: [item])
    }

    // ...(以降同様のイメージで表示対象のSectionをResponseから作成していく形になります)...

    // 👉 変数:currentSnapshotにSnapshot要素を追加する処理を共通化したもの
    private func appendSnapshotElementInCurrentSnapshot(_ snapshotElement: SnapshotElement) {
        currentSnapshot.appendSections(snapshotElement.section)
        currentSnapshot.appendItems(snapshotElement.items, toSection: snapshotElement.section.first!)
    }
}
【2. TopViewController】
// ⭐️ ポイントとなる処理の抜粋:
import UIKit
import Combine

final class TopViewController: UIViewController {

    // MARK: - @IBOutlet

    @IBOutlet private weak var collectionView: UICollectionView!

    // MARK: - Property

    private var cancellables: [AnyCancellable] = []

    // MARK: - ViewModel

    private var viewModel = TopViewModel()

    // MARK: - DataSource

    private var topDataSource: TopDataSource!

    // MARK: - Override

    override func viewDidLoad() {
        super.viewDidLoad()

        // 👉 1. 新しいDataSourceの初期化を行う
        configureTopDataSource()
        configureTopSupplementaryView()

        // 👉 2. ViewModelに関する処理を行う
        // ※このタイミングでViewModel側に利用するDataSourceのインスタンスを渡す
        viewModel.setup(dataSource: topDataSource)
        viewModel.outputs.requestStatus
            .subscribe(on: RunLoop.main)
            .sink(
                receiveValue: { [weak self] result in
                    // TODO: RequestStateに合わせた画面表示のハンドリング処理をする
                }
            )
            .store(in: &cancellables)

        // ...(その他必要な初期化処理等があれば以降に記載する)...
    }

    // ...(以降では画面表示やUICollectionViewDelegateに関連する処理を記載する)...
}
8. (補足) 個人的に要点と感じた部分をまとめたノートの共有 📝
今回の記事内容を改めて記事にまとめるにあたり、その前段として個人的に要点と感じた部分や実装等のポイントになり得る部分をまとめたノートもこちらに共有致します。
(こちらは以前にpotatotipsでの登壇資料を作成する際にも利用したものになります。)
【No.1】
【No.2】
9. まとめ
個人開発や業務内での実装に取り組んでいく過程において、この様なUICollectionViewの実装に関連するリファクタリングや軽微ではありますがリアーキテクトに取り組んだことで、改めてUICollectionViewに関連する部分の便利さやその恩恵を感じる事ができた様に思います。特に本記事では主に、
-
Section及びItemに対応するEnum定義部分をまずは確認する
👉 RxDataSource・DiffableDataSourceを考えていく場合には、共にSection・Itemに対応するEnum定義の整備が前提ではありますが、DiffableDataSourceではHashableへの準拠がポイントになります。特にHashableへの準拠については、重複が起きない様にHash値を定める必要がある点には注意が必要です。 -
EnumのAssociated Valueを有効活用してCell要素やSupplementaryView要素を構築する
👉 Associated ValueにおいてCell表示要素やSupplementaryView表示要素と対応する構造体を定義しておき、UICollectionViewに表示する要素を生成するCellRegistrationやSupplementaryRegistrationとも連動可能な形となる様にすると便利かと思います。 -
画面実装側での処理とDataSourceの内容構築部分に関する部分を整える
👉 DataSourceに関する処理については、ViewController側ではCell・SupplementaryView・UICollectionViewCompositionalLayout等のレイアウト構築に関連する様な処理に専念させて、ViewModelやPresenter(Presentation層)側では表示対象となるDataSourceの構築を行うといった様な住み分けをしておくと良いかと思います。
の3点に関する解説をメインにしましたが、この部分を整理していく事で実際にリファクタリング等を進めていく際にもイメージがより掴みやすくなった様に感じました。(これらのTIPSはiOS14以降のバージョンであれば特に問題なく利用できます。)
今回はCell等のView要素等で利用する部分をUIKit→SwiftUIを導入する等の部分には触れていませんが、この様な部分に関しても今後は積極的に試しながら、より開発しやすく体験を良くしていくための可能性の模索や知見を広めていける様な活動は引き続き継続していければと考えておりますので、引き続きではありますがよろしくお願い致します。
※ 可能であれば、これらの方針を取り入れて作成したAPIレスポンスを受け取って画面に表示するだけの簡単なサンプルを、RxDataSource前提のコードで作成したものとNSDiffableDataSource + Combine + async/await前提のコードで作成したものを比較したものも後程ご用意してこの記事内に追記できればと考えております。