はじめに
TensorFlow Lite なるものをご存知でしょうか。主にエッジ用途など低リソース環境のために、重みパラメータを整数化してモデルサイズの縮小と計算量の削減を行うというものです。
実はこのモデル、JavaScriptからでも使えます。モデルをダウンロードしてクライアントサイドで推論する場合、モデルサイズの削減はトラフィック削減にもつながるので嬉しいです。また、計算量が減ることは比較的CPUが非力なモバイル用途においてもよいと思うので、Cordovaなどを使ってHTML/JavaScriptベースでモバイルアプリを作る場合に活用することもできそうです。
ということで、簡単なMNIST手書き数字認識のモデルを学習して重みパラメータを整数化し、JavaScriptから呼び出すところまでを一通り作ってみたいと思います。
検証環境
- 学習: Google Colaboratory
- TensorFlow 2.6.0
- TensorFlow.js 3.8.0
- 推論: Firefox 91.0
ご覧のように tfjs-tflite はアルファ版です。きっと未サポートの機能も多々あるので、どんなモデルでも使えるというわけにはいかないかもしれませんが、基本的なレイヤーを使っていれば大丈夫なのでしょう(少なくとも Conv2D と MaxPooling2D は使えています)。
モデル学習
前回の記事と同様に、まずはMNISTを使って適当なモデルを学習します。
import numpy as np
import tensorflow as tf
from tensorflow.keras.models import Sequential
from tensorflow.keras.layers import Conv2D, MaxPooling2D, Flatten, Dense
from tensorflow.keras.datasets import mnist

# データセットの準備
(x_train, y_train), (x_test, y_test) = mnist.load_data()
x_train = x_train[:, :, :, np.newaxis].astype("float32") / 255.0  # (60000, 28, 28, 1)
x_test = x_test[:, :, :, np.newaxis].astype("float32") / 255.0    # (10000, 28, 28, 1)

# モデルの準備
model = Sequential([
  Conv2D(32, kernel_size=(3, 3), activation='relu', padding="same", input_shape=(28, 28, 1)),
  MaxPooling2D(pool_size=(2, 2)),
  Conv2D(64, kernel_size=(3, 3), activation='relu', padding="same"),
  MaxPooling2D(pool_size=(2, 2)),
  Flatten(),
  Dense(128, activation='relu'),
  Dense(10, activation='softmax')
])
model.compile("Adam", loss="sparse_categorical_crossentropy", metrics="sparse_categorical_accuracy")

# 学習
model.fit(x_train, y_train, batch_size=256, epochs=10, validation_data=(x_test, y_test))
保存するときはこんな感じです。
converter = tf.lite.TFLiteConverter.from_keras_model(model)
converter.optimizations = [tf.lite.Optimize.DEFAULT]
def representative_data_gen():
  for input_value in tf.data.Dataset.from_tensor_slices(x_train).batch(1).take(100):
    # Model has only one input so each data point has one element.
    yield [input_value]
converter.representative_dataset = representative_data_gen
tflite_model_int8 = converter.convert()
with open("model_int8.tflite", "wb") as f:
  f.write(tflite_model_int8)
重みパラメータを量子化する時には、値の取りうる範囲を調べておかないと効率的な量子化ができないので、学習データの一部を入力することでそれを行います。
変換後のモデルは重みがfloat32 → int8になっていますので、単純計算でモデルサイズが1/4になります。実際にint8になっていることを確認するため、ファイルサイズを確認すると
!ls -l model_int8.tflite
-rw-r--r-- 1 root root 428560 Aug 21 13:45 ./model_int8.tflite
となっています。一方、model.summary() の結果は以下のようになります。
Model: "sequential"
_________________________________________________________________
Layer (type)                 Output Shape              Param #
=================================================================
conv2d (Conv2D)              (None, 28, 28, 32)        320
_________________________________________________________________
max_pooling2d (MaxPooling2D) (None, 14, 14, 32)        0
_________________________________________________________________
conv2d_1 (Conv2D)            (None, 14, 14, 64)        18496
_________________________________________________________________
max_pooling2d_1 (MaxPooling2 (None, 7, 7, 64)          0
_________________________________________________________________
flatten (Flatten)            (None, 3136)              0
_________________________________________________________________
dense (Dense)                (None, 128)               401536
_________________________________________________________________
dense_1 (Dense)              (None, 10)                1290
=================================================================
Total params: 421,642
Trainable params: 421,642
Non-trainable params: 0
_________________________________________________________________
「パラメータ数+α」くらいのファイルサイズ(バイト)になっているので、確かに重みパラメータが1バイト (int8) で表現されているらしいと分かります。
このモデルをGoogle Drive経由でダウンロードしておきます。詳細は前回の記事をご覧ください。
推論
TensorFlow.js の Task API を用いる方法
少し調べた範囲だと、TensorFlow.js の Task API 経由で呼び出す方法が出てきました。
- TensorFlow Hub の TensorFlow Lite用モデルを HTML+JavaScript から使って画像分類(TFJS Task API を利用) - Qiita
- TensorFlow Lite のモデルを Web で扱えるという話についてのざっくりなメモ【Google I/O 2021】 - Qiita
- 30行未満の HTML+JavaScript でカスタムモデルを使った画像分類を試す(TFJS Task API を利用)【Google I/O 2021】 - Qiita
モデルに合うTaskが以下のページにあれば使えますが、任意のモデルを対象にできるわけではないようです。
@tensorflow-models/tasks - npm
例えば画像分類であれば以下のページにモデルの要件が書かれていますが
画像分類器の統合 | TensorFlow Lite
RGB 入力のみがサポートされています (channelsは 3 である必要があります)。
とあるように、入力はカラー画像でなければなりません。同じ画像分類であっても、MNISTの手書き文字認識のようなグレースケール画像の場合だと使えません。
定義済みTaskに合わないモデルは、どうしようもないのでしょうか?
TensorFlow Lite APIを直接呼び出す方法
実はTensorFlow.jsから使えるTensorFlow LiteのAPIがあるので、これを直接使うことが可能です。こんな感じでHTMLとスクリプトを記述し、tflite.html という名前で保存します。
<!DOCTYPE html>
<html lang="ja">
  <head>
    <meta charset="utf-8">
  </head>

  <body>
    <div><img src="sample_5.png" id="input_image"></div>
    <div>Prediction: <span id="pred"></span></div>

    <!-- Load TensorFlow.js -->
    <script src="https://cdn.jsdelivr.net/npm/@tensorflow/tfjs/dist/tf.min.js"></script>

    <!-- Import @tensorflow/tfjs-tflite -->
    <script src="https://cdn.jsdelivr.net/npm/@tensorflow/tfjs-tflite/dist/tf-tflite.min.js"></script>

    <!-- Place your code in the script tag below. You can also use an external .js file -->
    <script>
      // Notice there is no 'import' statement. 'tf' is available on the index-page
      // because of the script tag above.

      async function run(){
        const model = await tflite.loadTFLiteModel('./model_int8.tflite');
        const x = tf.browser.fromPixels(document.getElementById('input_image'), 1).reshape([1, 28, 28, 1]).div(tf.scalar(255));
        const y = model.predict(x); // [1, 10]
        document.getElementById('pred').textContent = y.reshape([-1]).argMax().arraySync();
      }
      run();
    </script>
  </body>
</html>
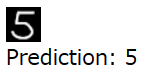
model_int8.tflite と、入力画像 sample_5.png がHTMLと同じ場所にあるとします。http:// や https:// でアクセスできる場所を用意してください。sample_5.png は適当にペイントのソフトで描いたこの画像です。

見た感じ、ほとんど前回の記事と同じです。差分を見ていきましょう。
まず、TensorFlow LiteのAPIを使用するため、スクリプトを追加で読み込んでいます。
<script src="https://cdn.jsdelivr.net/npm/@tensorflow/tfjs-tflite/dist/tf-tflite.min.js"></script>
モデルを読み込むためのAPIが変わります。
const model = await tflite.loadTFLiteModel('./model_int8.tflite');
えーと、差分はこれだけです。
実行してみる
ブラウザから tflite.html のURLにアクセスします。数秒待って「Prediction: 5」と表示されたら成功です。やってみたら意外と簡単でした。