はじめに
JavaScriptからTensorFlowを使える TensorFlow.js というものがあります。
https://www.tensorflow.org/js
https://github.com/tensorflow/tfjs
公式サンプルも色々あるのですが、シンプルにTensorFlow (Python) で学習したモデルを読み込んで、それを使ってブラウザ側で推論する部分を作ってみました。
検証環境
学習
- Google Colaboratory
- TensorFlow 2.6.0
- TensorFlow.js 3.8.0
推論
- Firefox 91.0
- TensorFlow.js 3.8.0
モデル学習
これは普通にやれば良いのですが、保存するときにTensorFlow.jsから読み込める形式にする必要があります。というわけで最初にpipパッケージをセットアップしておきます。
!pip install tensorflowjs
MNISTの手書き数字分類をするとして、データを準備。
import numpy as np
import tensorflow as tf
from tensorflow.keras.models import Sequential
from tensorflow.keras.layers import Conv2D, MaxPooling2D, Flatten, Dense
from tensorflow.keras.datasets import mnist

# データセットの準備
(x_train, y_train), (x_test, y_test) = mnist.load_data()
x_train = x_train[:, :, :, np.newaxis].astype("float32") / 255.0  # (60000, 28, 28, 1)
x_test = x_test[:, :, :, np.newaxis].astype("float32") / 255.0    # (10000, 28, 28, 1)
続いて適当なモデルを作って学習させます。サンプルなので10エポックくらいでよいでしょう。GPUインスタンスを使えばすぐ終わります。
# モデルの準備
model = Sequential([
  Conv2D(32, kernel_size=(3, 3), activation="relu", padding="same", input_shape=(28, 28, 1)),
  MaxPooling2D(pool_size=(2, 2)),
  Conv2D(64, kernel_size=(3, 3), activation="relu", padding="same"),
  MaxPooling2D(pool_size=(2, 2)),
  Flatten(),
  Dense(128, activation="relu"),
  Dense(10, activation="softmax")
])
model.compile("Adam", loss="sparse_categorical_crossentropy", metrics="sparse_categorical_accuracy")
# 学習
model.fit(x_train, y_train, batch_size=256, epochs=10, validation_data=(x_test, y_test))
モデルをTensorFlow.jsで使える形式に保存します。
import tensorflowjs as tfjs
tfjs.converters.save_keras_model(model, "./tfjs_model")
モデルのダウンロード
Google Drive経由でダウンロードします。まずはGoogle Driveをマウントします。
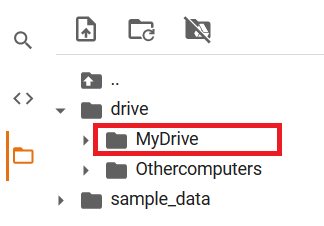
「ドライブをマウント」を押し、確認ダイアログで「Googleドライブに接続」を押すと

このように drive/MyDrive というディレクトリが利用できるようになります。ここにファイルをコピーすると、Google Drive経由でモデルをダウンロードできるようになります。
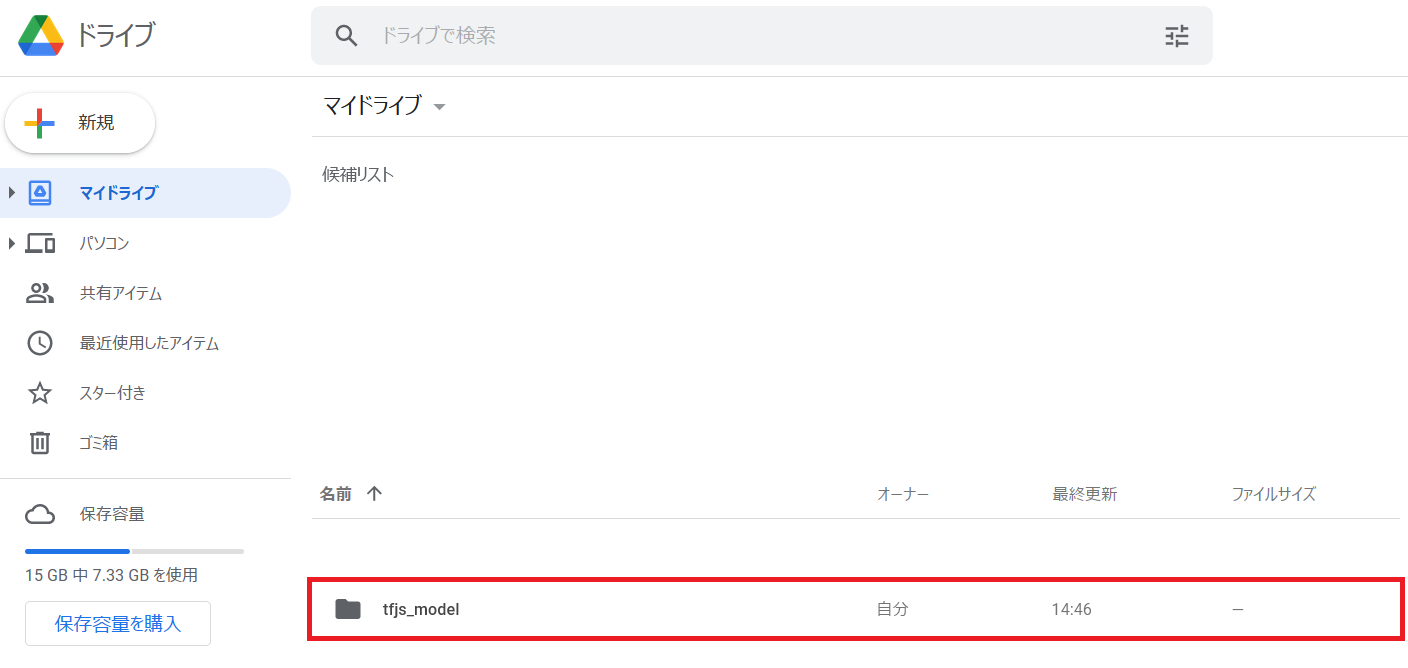
以下のコマンドでモデルをコピーしたら、あとはブラウザでGoogle Driveにアクセスし、モデルをダウンロードしましょう。
!cp -r ./tfjs_model ./drive/MyDrive
参考: ColaboratoryでのGoogle Driveへのマウントが簡単になっていたお話 - Qiita
推論
今度はクライアントのHTMLとJavaScriptを書いていきます。tfjs.html という名前のファイルを以下の内容で作成します。
※ブラウザのセキュリティ対策のため、ローカル環境 (file:///) では動きません。XAMPPでもレンタルサーバーでも何でもよいので、 http:// でアクセスできる場所を準備しましょう。
(後述: 実はもう少し簡単に書けます)
<!DOCTYPE html>
<html lang="ja">
  <head>
    <meta charset="utf-8">
  </head>

  <body>
    <div><img src="sample_5.png" id="input_image"></div>
    <div>Prediction: <span id="pred"></span></div>

    <!-- Load TensorFlow.js -->
    <script src="https://cdn.jsdelivr.net/npm/@tensorflow/tfjs/dist/tf.min.js"></script>

    <!-- Place your code in the script tag below. You can also use an external .js file -->
    <script>
      // Notice there is no 'import' statement. 'tf' is available on the index-page
      // because of the script tag above.

      // https://blog.codecamp.jp/programming-javascript-Imagedata
      function createImageData(img) {
        var cv = document.createElement('canvas');
        cv.width = img.naturalWidth;
        cv.height = img.naturalHeight;
        var ct = cv.getContext('2d');
        ct.drawImage(img, 0, 0);
        var data = ct.getImageData(0, 0, cv.width, cv.height);
        return data;
      }

      async function run(){
        const model = await tf.loadLayersModel('./tfjs_model/model.json');
        const image_data = createImageData(document.getElementById('input_image'));
        const x = tf.tensor1d(new Float32Array(image_data.data)).gather(tf.range(0, 28*28*4, 4, 'int32')).div(tf.scalar(255)).reshape([1, 28, 28, 1]);
        const y = model.predict(x); // [1, 10]
        document.getElementById('pred').textContent = y.reshape([-1]).argMax().arraySync();
      }
      run();
    </script>
  </body>
</html>
以下の各ページを参考にしました。
- tensorflow/tfjs: A WebGL accelerated JavaScript library for training and deploying ML models. の "Getting Started" のコード
- TensorFlow.js API
- 【javaScript学習】ImageDataへの画像読み込みと画像処理 | CodeCampus: 画像ファイルの読み込み方法
HTMLと同じ場所に、先程ダウンロードしたモデル(tfjs_model ディレクトリ)を置いておきます。
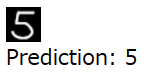
また、ペイントなどのソフトで適当に手書きした数字(背景色を黒、文字を白にしてください)を保存し、同じ場所に置きます。ここでは 5 を書いて sample_5.png という名前で保存しました。

推論コード
run() の部分を抜き出してみます。
      async function run(){
        const model = await tf.loadLayersModel('./tfjs_model/model.json');
        const image_data = createImageData(document.getElementById('input_image'));
        const x = tf.tensor1d(new Float32Array(image_data.data)).gather(tf.range(0, 28*28*4, 4, 'int32')).div(tf.scalar(255)).reshape([1, 28, 28, 1]);
        const y = model.predict(x); // [1, 10]
        document.getElementById('pred').textContent = y.reshape([-1]).argMax().arraySync();
      }
-
tf.loadLayersModelを用いて学習済みモデルを読み込む - 画像を
ImageData(中にピクセルデータが入っている)に変換する - TensorFlowの入力形式に変換する
- 推論する
- 結果を表示する
という流れです。特に3の部分にかなり引っかかるポイントがあります。
TypedArray → Tensor
image_data.data が Uint8ClampedArray 型なので、リファレンスを見るとそのまま Tensor に変換できそうですが、できません。実は Float32Array に一度変換しておく必要があります。
image_data.data のデータ構造とスライシング
RGBARGBA... のように1ピクセルが4バイトで表されています。今回はグレースケール入力ですから、Rの値だけを取り出すことにします。それが以下の gather の部分です。
tf.tensor1d(...).gather(tf.range(0, 28*28*4, 4, 'int32'))
要するにNumPyやTensorFlowでいうところの ...[0::4] をやりたいのですが、どうもTensorFlow.jsではこのような書き方はできないようなので、上のように取り出したいインデックスの配列を作って gather で取り出します。tf.range() の第3引数に int32 を指定しないと、float32の配列になってしまってうまくいきません。
ブロードキャスト
モデルは入力ピクセル値として0~1のfloat32型を取るようになっているので、各ピクセル値を255で割るのですが、これがまた一工夫必要です。割り算には div() メソッドを使い、除数に tf.scalar() を使用しています。
tf.tensor1d(...).gather(...).div(tf.scalar(255))
NumPyやTensorFlowのノリで以下のようにしたくなるところですが、うまくいきません。
tf.tensor1d(...).gather(...) / 255      // NaN
tf.tensor1d(...).gather(...).div(255)   // 先頭の要素を255で割った結果1つしか返ってこない
参考: ディープラーニングのお勉強~その13。TensorFlow.jsでMNISTリアルタイム推論してみる | mgo-tec電子工作
ブラウザで動作確認
tfjs.html にブラウザからアクセスします。数秒間待って「Prediction: 5」と出れば成功です。
推論(もう少し簡単に)
実はCanvas APIを介さずに <img> タグの画像を直接Tensorに変換できるようです。
<!DOCTYPE html>
<html lang="ja">
  <head>
    <meta charset="utf-8">
  </head>

  <body>
    <div><img src="sample_5.png" id="input_image"></div>
    <div>Prediction: <span id="pred"></span></div>

    <!-- Load TensorFlow.js -->
    <script src="https://cdn.jsdelivr.net/npm/@tensorflow/tfjs/dist/tf.min.js"></script>

    <!-- Place your code in the script tag below. You can also use an external .js file -->
    <script>
      // Notice there is no 'import' statement. 'tf' is available on the index-page
      // because of the script tag above.

      async function run(){
        const model = await tf.loadLayersModel('./tfjs_model/model.json');
        const x = tf.browser.fromPixels(document.getElementById('input_image'), 1).reshape([1, 28, 28, 1]).div(tf.scalar(255));
        const y = model.predict(x); // [1, 10]
        document.getElementById('pred').textContent = y.reshape([-1]).argMax().arraySync();
      }
      run();
    </script>
  </body>
</html>
先程の画像読み込み部分のコードが、随分スッキリしました。
tf.browser.fromPixels(document.getElementById('input_image'), 1)
これだけで、<img> タグの画像が [height, width, 1] のTensorとして取得できます。デフォルトではチャンネル数が3 (RGB) で取得されますが、引数に 1 を指定することで最初の1チャンネル (R) だけを得ることができます。
あとは reshape でサンプルの次元を付け足して、255で割るだけ。簡単ですね。