概要
普段は耳鼻科の開業医をしています。
今回AutoML Visionで作成した鼓膜画像分類モデルを使った鼓膜画像判別Botを作ってみました。Botが診断するのは法的にまずいので公開はしない予定ですが、名前は鼓膜占いボットということにしておきました(占いならよさそうなので)。
前回までの記事はこちら
GCP Cloud AutoML Vision を使った鼓膜画像分類
Node.jsからAutoML Vision の鼓膜画像分類モデルを使ってみる
完成動画
AutoMLを使った鼓膜占いBot pic.twitter.com/Vye3d3Bj5K
— 病気のセルフチェック (@Selfcheckhealt1) March 20, 2020
概念図

作成
1.必要なパッケージのインストール
npm install --save fetch-base64
2.プログラムの作成
aombot.js
'use strict';
require('dotenv').config();
const fetch = require('fetch-base64');
const express = require('express');
const line = require('@line/bot-sdk');
const PORT = process.env.PORT || 3000;

const config = {
  channelSecret: "自分のチャンネルシークレット",
  channelAccessToken: "自分のアクセストークン"
};

const automl = require('@google-cloud/automl');

// Create client for prediction service.
const mlclient = new automl.PredictionServiceClient();

const projectId = "自分のプロジェクト名";
const computeRegion = "us-central1";
const modelId = "自分のモデルID";
const scoreThreshold = "0.5";

// Get the full path of the model.
const modelFullId = mlclient.modelPath(projectId, computeRegion, modelId);

const aomLabels = {
  "aom": "急性中耳炎",
  "ome": "滲出性中耳炎",
  "normal": "正常鼓膜",
};

const app = express();
app.use(express.static('public')); //追加

app.get('/', (req, res) => res.send('Hello LINE BOT!(GET)')); //ブラウザ確認用(無くても問題ない)


app.post('/webhook', line.middleware(config), (req, res) => {
  console.log(req.body.events);

  //ここのif分はdeveloper consoleの"接続確認"用なので削除して問題ないです。
  if (req.body.events[0].replyToken === '00000000000000000000000000000000' && req.body.events[1].replyToken === 'ffffffffffffffffffffffffffffffff') {
    res.send('Hello LINE BOT!(POST)');
    console.log('疎通確認用');
    return;
  }

  Promise
    .all(req.body.events.map(event => handleEvent(event, req)))
    .then((result) => res.json(result));
});


const client = new line.Client(config);

async function handleEvent(event, req) {
  console.log(req);
  if (event.type !== 'message' || (event.message.type !== 'text' && event.message.type !== 'image')) {
    return Promise.resolve(null);
  }
  const params = {};
  params.score_threshold = scoreThreshold;

  // Read the file content for prediction.
  const data = await fetch.remote({
    url: `https://api-data.line.me/v2/bot/message/${event.message.id}/content`,
    headers: {
      'Authorization': `Bearer ${process.env.CHANNEL_ACCESS_TOKEN}`
    }
  });

  const payload = {};
  payload.image = { imageBytes: data[0] };

  // params is additional domain-specific parameters.
  // currently there is no additional parameters supported.
  const [response] = await mlclient.predict({
    name: modelFullId,
    payload: payload,
    params: params,
  });


  if (response.payload.length === 0) {
    return client.replyMessage(event.replyToken, {
      type: 'text',
      text: `ちょっとわかりませんね・・・`
    });
  }
  return client.replyMessage(event.replyToken, {
    type: 'text',
    text: `出ました!占いではあなたの耳は${aomLabels[response.payload[0].displayName]}と出ています。`
  });
}

app.listen(PORT);
console.log(`Server running at ${PORT}`);
.envはこちら
GOOGLE_APPLICATION_CREDENTIALS=./ダウンロードしたJsonファイル名
CHANNEL_ACCESS_TOKEN=自分のチャンネルアクセストークン
考察
AutoML Visionで作成した鼓膜画像分類モデルを使った鼓膜画像認識Botを作成することが出来ました。実際テストすると急性中耳炎・滲出性中耳炎・正常鼓膜の判別は9割ほどの正解率でした。
最初は信頼度(0~1の間の数字で表される)も同時に表示しようとしたのですが下のねこの写真のように鼓膜以外の写真を送った場合でも高い信頼度(下の写真では1)が表示されてしまいます。
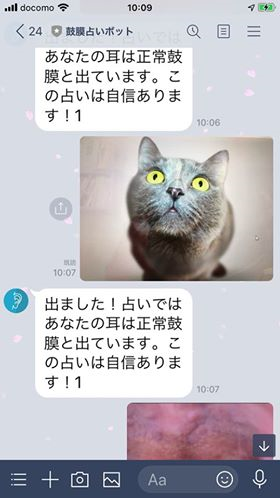
これはモデルは急性中耳炎と滲出性中耳炎と正常鼓膜の3つタグだけで鼓膜以外の画像を教師データとして登録していないためと思われます。
実用性を求めるなら1段回目として鼓膜画像検出を行い(ここに鼓膜以外の教師データを入れる)、2段階目として中耳炎の判定を行うような構成が必要と思われました。