画像、音声、テキストを用いたマルチモーダル・ディープラーニング
マルチモーダル学習は複数種類のデータを入力とし、統合的に処理する機械学習です。
あるコンテンツを構成するデータとしてテーブルデータ、画像、テキスト、音声、動画等々があります。例えばYoutubeのような動画の場合、動画、音声、スクリーンショット、テキスト、再生回数、再生者、投稿者、投稿日等々のデータで構成されています。これらのデータを用いて機械学習により分類や回帰を行うのがマルチモーダル学習です。人間は五感から情報を得ていますが、機械学習でも同様に複数種類のデータから学習して、判定器を作るというものになります。
今回は画像、音声、テキストを用いてマルチモーダル・ディープラーニングの分類器をKerasで作ります。
データセットはフリーで公開されているものを組み合わせて独自に(無理やり)作りました。
- Caltech256から抜粋
- ESC-50から抜粋
- Wikipedia(日本語)から抜粋
独自に組み合わせを作っている理由は、ちょうど良いデータセットを探すのが面倒だったためです。
手順
以下の手順でマルチモーダル・ディープラーニングをやってみます。
- データセットを入手する
- データセットを組み合わせる
- データの前処理
- モデルを定義する
- 学習する
- 評価する
マルチモーダルだからといって、機械学習に特別な手順が加わるということはありません。
強いて言えば、独自にデータセットを作るために 2. データセットを組み合わせる というのが追加されているくらいです。
しかし実際にマルチモーダルで機械学習を実施してみるときにも、データ自体がいろいろな場所に散らばっている、ということは頻繁あることです。
組み合わせを作ることもマルチモーダルの1手順と考えて良いと思います。
1. データセットを入手する
まずは画像と音声のデータを入手します。
Caltech256とESC-50のデータはそれぞれ以下で公開されているので、ダウンロードして整理すれば良いです。
- Caltech256: http://www.vision.caltech.edu/Image_Datasets/Caltech256/
- ESC-50: https://github.com/karoldvl/ESC-50
まずはCaltech256を整理します。
ダウンロードして解凍した.jpgデータをnumpy.arrayに変換して.npzで保存します。
Caltech256は名前のとおり、256種類(ラベル)の画像データが揃っています。
各ラベルの画像数はまちまちで、数十から数百枚ずつあります。
import os
import random
import numpy as np
import pandas as pd
import librosa
import librosa.display
import matplotlib.pyplot as plt
import seaborn as sn
from sklearn import model_selection
from sklearn import preprocessing
import IPython.display as ipd
from io import BytesIO
from PIL import Image
import cv2
import re
import unicodedata
import librosa
import librosa.display
from keras import utils

# define directories
base_dir = "./"

oc256_dir = "./256_ObjectCategories"
oc256_dirs = [os.path.join(oc256_dir, x) for x in os.listdir(oc256_dir)]
oc256_files = [[os.path.join(x,y) for y in os.listdir(x)] for x in oc256_dirs]
# make a dict of label num to category name
oc_class_dict = {int(x.split("/")[-1].split(".")[0]): x.split("/")[-1].split(".")[1] for x in oc256_dirs}

def convert2dgray_to_3dgray(img_array):
    return np.array([[[y,y,y] for y in x] for x in img_array])

def resize_image_array(img_array, image_size=(299, 299)):
    if img_array is None:
        return None
    return cv2.resize(img_array, image_size)

# save image data in npz
def save_np_256_oc_data(x, data_type="train"):
    data_dir = "256_" + data_type
    if not os.path.exists(data_dir):
        os.makedirs(data_dir)
    for _,c in enumerate(x):
        for _,f in enumerate(c):
            image_name = f.split("/")[3].split(".")[0]
            image_path = os.path.join(data_dir, image_name)
            if not os.path.exists(image_path):
                y = f.split("/")[2].split(".")[0]
                img = Image.open(os.path.join(f))
                img = np.asarray(img)
                if len(img.shape) == 2:
                    img = convert2dgray_to_3dgray(img)
                img = resize_image_array(img, image_size=(299, 299))
                np.savez(image_path, img=img, y=y)

save_np_256_oc_data(oc256_files,  data_type="all")
続いてESC-50です。
こちらは解凍したデータのメタデータを整理するのみです。
ESC-50のデータは5秒の自然音(人の声ではないもの)を集めたものです。
ラベル数は50で、各ラベルに40個の.wavデータが用意されています。
ESC-50の音声分類は以前、以下で扱ったことがあるので、ご参照ください。
https://qiita.com/cvusk/items/61cdbce80785eaf28349
esc_dir = os.path.join(base_dir, "ESC-50-master")
meta_file = os.path.join(esc_dir, "meta/esc50.csv")
audio_dir = os.path.join(esc_dir, "audio/")

# load metadata
meta_data = pd.read_csv(meta_file)

# get data size
data_size = meta_data.shape
print(data_size)

# make a dict of label num to category name
esc_class_dict = {}
for i in range(data_size[0]):
    if meta_data.loc[i,"target"] not in esc_class_dict.keys():
        esc_class_dict[meta_data.loc[i,"target"]] = meta_data.loc[i,"category"]

# load a wave data
def load_wave_data(audio_dir, file_name):
    file_path = os.path.join(audio_dir, file_name)
    x, fs = librosa.load(file_path, sr=44100)
    return x,fs

# change wave data to mel-stft
def calculate_melsp(x, n_fft=1024, hop_length=128):
    stft = np.abs(librosa.stft(x, n_fft=n_fft, hop_length=hop_length))**2
    log_stft = librosa.power_to_db(stft)
    melsp = librosa.feature.melspectrogram(S=log_stft,n_mels=128)
    return melsp
いずれのデータセットも違う目的で作られたものです。そのため、すべてが同じラベルで同じ数のデータが揃っているわけではありません。
今回はマルチモーダルをやりたいため、偶然似たラベル名のものをランダムに組み合わせて画像・音声のデータを作ります。
似た文字列を収集するため、difflibというライブラリで似た組み合わせを探索します。
前処理でCaltech256とESC-50それぞれのラベル番号とカテゴリ名のdictを作っておいたので、それらを比較していきます。
カテゴリ名が60%以上類似している組み合わせをを探します。
import difflib

# look for label that spells similar from the image and sound to make combinations
close_values = []
for ok,ov in oc_class_dict.items():
    for ek,ev in esc_class_dict.items():
        r = difflib.SequenceMatcher(None, ov, ev).ratio()
        if r > 0.6: # category names as close as 60% is considered close
            close_values.append([ok,ov,ek,ev,r])
for l in close_values:
    print(l)

"""
[228, 'triceratops', 13, 'crickets', 0.631578947368421]
[58, 'doorknob', 30, 'door_wood_knock', 0.6086956521739131]
[158, 'penguin', 44, 'engine', 0.7692307692307693]
[102, 'helicopter-101', 40, 'helicopter', 0.8333333333333334]
[239, 'washing-machine', 35, 'washing_machine', 0.9333333333333333]
[25, 'cactus', 5, 'cat', 0.6666666666666666]
[152, 'owl', 3, 'cow', 0.6666666666666666]
[245, 'windmill', 16, 'wind', 0.6666666666666666]
[142, 'microwave', 9, 'crow', 0.6153846153846154]
[113, 'hummingbird', 14, 'chirping_birds', 0.64]
[20, 'brain-101', 10, 'rain', 0.6153846153846154]
[7, 'bat', 5, 'cat', 0.6666666666666666]
[210, 'syringe', 28, 'snoring', 0.7142857142857143]
[170, 'rainbow', 45, 'train', 0.6666666666666666]
[170, 'rainbow', 10, 'rain', 0.7272727272727273]
[89, 'goose', 1, 'rooster', 0.6666666666666666]
[73, 'fireworks', 48, 'fireworks', 1.0]
[133, 'lightning', 26, 'laughing', 0.7058823529411765]
[251, 'airplanes-101', 47, 'airplane', 0.7619047619047619]
[56, 'dog', 0, 'dog', 1.0]
[43, 'coin', 24, 'coughing', 0.6666666666666666]
[72, 'fire-truck', 48, 'fireworks', 0.631578947368421]
[220, 'toaster', 1, 'rooster', 0.7142857142857143]
[30, 'canoe', 34, 'can_opening', 0.625]
[80, 'frog', 4, 'frog', 1.0]
"""
上記のうち、実際に同じカテゴリの組み合わせとして、以下を11点を選出しました。
# These labels seem similar.
# Let's choose these labels as the dataset.
chosen_oc_esc = {
    58:30, #[58, 'doorknob', 30, 'door_wood_knock', 0.6086956521739131]
    102:40, #[102, 'helicopter-101', 40, 'helicopter', 0.8333333333333334]
    239:35, #[239, 'washing-machine', 35, 'washing_machine', 0.9333333333333333]
    245:16, #[245, 'windmill', 16, 'wind', 0.6666666666666666]
    113:14, #[113, 'hummingbird', 14, 'chirping_birds', 0.64]
    170:10, #[170, 'rainbow', 10, 'rain', 0.7272727272727273]
    89:1, #[89, 'goose', 1, 'rooster', 0.6666666666666666]
    73:48, #[73, 'fireworks', 48, 'fireworks', 1.0]
    251:47, #[251, 'airplanes-101', 47, 'airplane', 0.7619047619047619]
    56:0, #[56, 'dog', 0, 'dog', 1.0]
    80:4 #[80, 'frog', 4, 'frog', 1.0]
}
最後にテキストデータを用意します。
上記でカテゴリは決まったので、テキストはWikipedia(日本語)から適当にコピペして集めてきます。
各カテゴリのファイルに保存して、テキストデータは準備完了です。
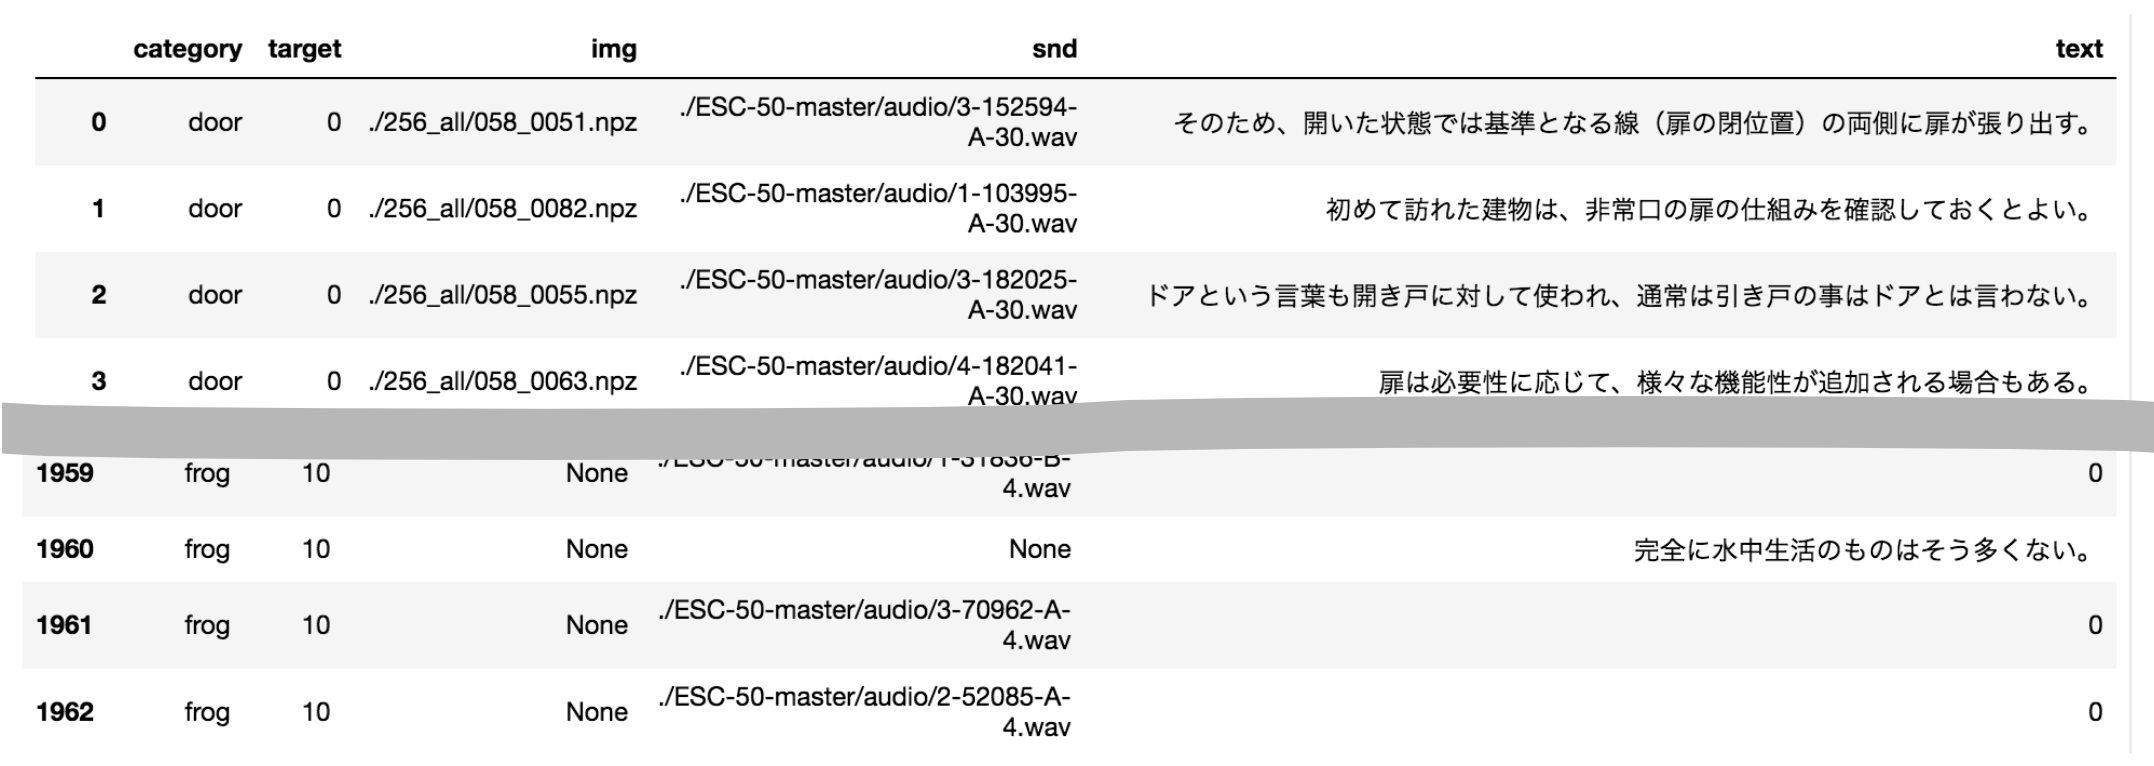
2. データセットを組み合わせる
各カテゴリのデータは入手したので、次は組み合わせを作ります。
Caltech256、ESC-50、Wikipediaはまったく違う目的で作られているデータです。
理由のある組み合わせ方は考えつかないので、同一カテゴリのデータを適当にランダムに組み合わせます。
ここでオリジナリティのため、少し検証をします。
普通にマルチモーダルなデータを作るのではつまらないので、今回は一部のモードが存在しないデータを作ります。
例として、一部のデータは画像・音声のみ存在し、テキストはNoneになっているデータを作ります。
不在になるモードはランダムで、0〜2個のモードが欠損になります。
つまり以下の種類のデータが作られます。
- 3モードすべて存在するデータ
- 2モードのみが存在し、1モードは欠損となるデータ
- 1モードのみが存在し、2モードは欠損となるデータ
欠損となるデータは一律Noneにします。
# Generate a compound of image, sound and text for each targets
esc_np_dir = "./ESC-50-master/audio/"
oc_np_dir = "./256_all"

texts_data_train = []
img_data_train = []
snd_data_train = []
target_train = []
category_train = []

texts_data_test = []
img_data_test = []
snd_data_test = []
target_test = []
category_test = []
t = 0

for ok,c in chosen_kv.items():
    oc_list = [os.path.join(oc_np_dir, x) for x in os.listdir(oc_np_dir) if int(x.split("_")[0])==ok]
    esc_list = [os.path.join(esc_np_dir, x) for x in os.listdir(esc_np_dir) if int(x.split("-")[-1].split(".")[0])==chosen_oc_esc[ok]]

    # choose test dataset
    test_text = random.sample(range(len(oc_txt_dict[ok])), 8) # list of test text index
    test_img = random.sample(range(len(oc_list)), 8) # list of test image index
    test_snd = random.sample(range(len(esc_list)), 8) # list of test sound index
    # make compound test data
    target_test.extend([t]*8)
    texts_data_test.extend([v for i,v in enumerate(oc_txt_dict[ok]) if i in test_text])
    img_data_test.extend([v for i,v in enumerate(oc_list) if i in test_img])
    snd_data_test.extend([v for i,v in enumerate(esc_list) if i in test_snd])
    category_test.extend([c]*8)

    # make test data with one element missing
    missing = random.choices([0,1,2], k=8)
    for _,p in enumerate(missing):
        tt = [0] if p==0 else [oc_txt_dict[ok][random.choice(test_text)]]
        it = [None] if p==1 else [oc_list[random.choice(test_img)]]
        st = [None] if p==2 else [esc_list[random.choice(test_snd)]]
        texts_data_test.extend(tt)
        img_data_test.extend(it)
        snd_data_test.extend(st)
        target_test.extend([t])
        category_test.extend([c])

    # make test data with two elements missing
    have = random.choices([0,1,2], k=8)
    for _,p in enumerate(have):
        tt = [oc_txt_dict[ok][random.choice(test_text)]] if p==0 else [0]
        it = [oc_list[random.choice(test_img)]] if p==1 else [None]
        st = [esc_list[random.choice(test_snd)]] if p==2 else [None]
        texts_data_test.extend(tt)
        img_data_test.extend(it)
        snd_data_test.extend(st)
        target_test.extend([t])
        category_test.extend([c])


    # make compound dataset for training
    train_text = [v for i,v in enumerate(oc_txt_dict[ok]) if i not in test_text] # list of training text
    train_img = [v for i,v in enumerate(oc_list) if i not in test_img] # list of training img
    train_snd = [v for i,v in enumerate(esc_list) if i not in test_snd] # list of training sound
    # allowing some duplicates
    target_train.extend([t]*60)
    texts_data_train.extend(random.choices(train_text, k=60))
    img_data_train.extend(random.choices(train_img, k=60))
    snd_data_train.extend(random.choices(train_snd, k=60))
    category_train.extend([c]*60)

    # make train data with one element missing
    missing = random.choices([0,1,2], k=60)
    for _,p in enumerate(missing):
        tt = [0] if p==0 else [random.choice(train_text)]
        it = [None] if p==1 else [random.choice(train_img)]
        st = [None] if p==2 else [random.choice(train_snd)]
        texts_data_train.extend(tt)
        img_data_train.extend(it)
        snd_data_train.extend(st)
        target_train.extend([t])
        category_train.extend([c])

    # make train data with two elements missing
    have = random.choices([0,1,2], k=60)
    for _,p in enumerate(have):
        tt = [random.choice(train_text)] if p==0 else [0]
        it = [random.choice(train_img)] if p==1 else [None]
        st = [random.choice(train_snd)] if p==2 else [None]
        texts_data_train.extend(tt)
        img_data_train.extend(it)
        snd_data_train.extend(st)
        target_train.extend([t])
        category_train.extend([c])

    t+=1
ごちゃごちゃいろいろやっていますが、要点は以下です。
- カテゴリを選ぶ
- テストデータを選ぶ
- ランダムに画像、音声、テキストの組み合わせを作る
- ただし、0〜2のモードをランダムに
Noneにする
- テストデータ以外からトレーニングデータを用意する
- ランダムに画像、音声、テキストの組み合わせを作る
- 0〜2のモードをランダムに
Noneにする
- 全カテゴリに同様の処理を行う
これで以下のような学習、テスト用のデータセットが作られます。
# make pandas dataframe for better looking
dataset_train = pd.DataFrame({
    "category":category_train,
    "target":target_train,
    "img":img_data_train,
    "snd":snd_data_train,
    "text":texts_data_train
})
dataset_train.to_csv("./dataset_train.csv")
3. データの前処理
画像、音声、テキストデータの前処理を行い、ロードします。
Kerasを使うため、すべてのデータはnumpy.arrayでロードする必要があります。
しかし学習時に生データに対してAugmentationを実施したいので、学習データは生データのまま(numpy.arrayに変換しないまま)にして、テストデータのみKerasのモデルに直接入力できるようにnumpy.arrayに変換します。
# IMAGES
x_train_img_path = dataset_train["img"].values
x_test_img_path = dataset_test["img"].values
# load training images
x_train_img = np.zeros((len(x_train_img_path), 299,299,3))
for i,p in enumerate(x_train_img_path):
    if p is not None:
        x_train_img[i] = np.load(p)["img"]
# no normalize for training images, since they will be augmented and normalized during training

# load test images
x_test_img = np.zeros((len(x_test_img_path), 299,299,3))
for i,p in enumerate(x_test_img_path):
    if p is not None:
        x_test_img[i] = np.load(p)["img"]
# normalize
x_test_img = x_test_img.astype('float32')
x_test_img /= 255

# SOUNDS
# change wave data to mel-stft
def calculate_melsp(x, n_fft=1024, hop_length=128):
    stft = np.abs(librosa.stft(x, n_fft=n_fft, hop_length=hop_length))**2
    log_stft = librosa.power_to_db(stft)
    melsp = librosa.feature.melspectrogram(S=log_stft,n_mels=128)
    return melsp

# load a wave data
def load_wave_data(filepath):
    x, _ = librosa.load(filepath, sr=44100)
    return x,_

x_train_snd_path = dataset_train["snd"].values
x_test_snd_path = dataset_test["snd"].values

freq = 128
time = 1723

# load test sounds
x_test_snd = np.zeros((len(x_test_snd_path), freq,time))
for i,p in enumerate(x_test_snd_path):
    if p is not None:
        s,_ = load_wave_data(p)
        x_test_snd[i] = calculate_melsp(s)

x_test_snd = x_test_snd.reshape(len(x_test_snd), freq,time, 1)

# TEXTS
# convert Japanese characters to unicode
# delete a character randomly with del_rate
def convert_text_to_unicode(s,del_rate=0.001):
    if s == 0:
        return [0]
    else:
        return [ord(x) for  x in str(s).strip() if random.random() > del_rate]

def reshape_text(s, max_length=200,del_rate=0.001):
    s_ = convert_text_to_unicode(s,del_rate=del_rate)
    s_ = s_[:max_length]
    if len(s_) < max_length:
        s_ += ([0] * (max_length - len(s_)))
    return s_

txt_length = 200

# load texts
x_train_text = dataset_train["text"].values
x_test_text = np.array([reshape_text(t, max_length=txt_length,del_rate=0) for t in dataset_test["text"].values])

# TARGET LABELS
y_train = dataset_train["target"].values
y_test = dataset_test["target"].values

y_train = utils.to_categorical(y_train)
y_test = utils.to_categorical(y_test)
これでデータが用意できました。
4. モデルを定義する
次にマルチモーダル・ディープラーニングのモデルを定義します。
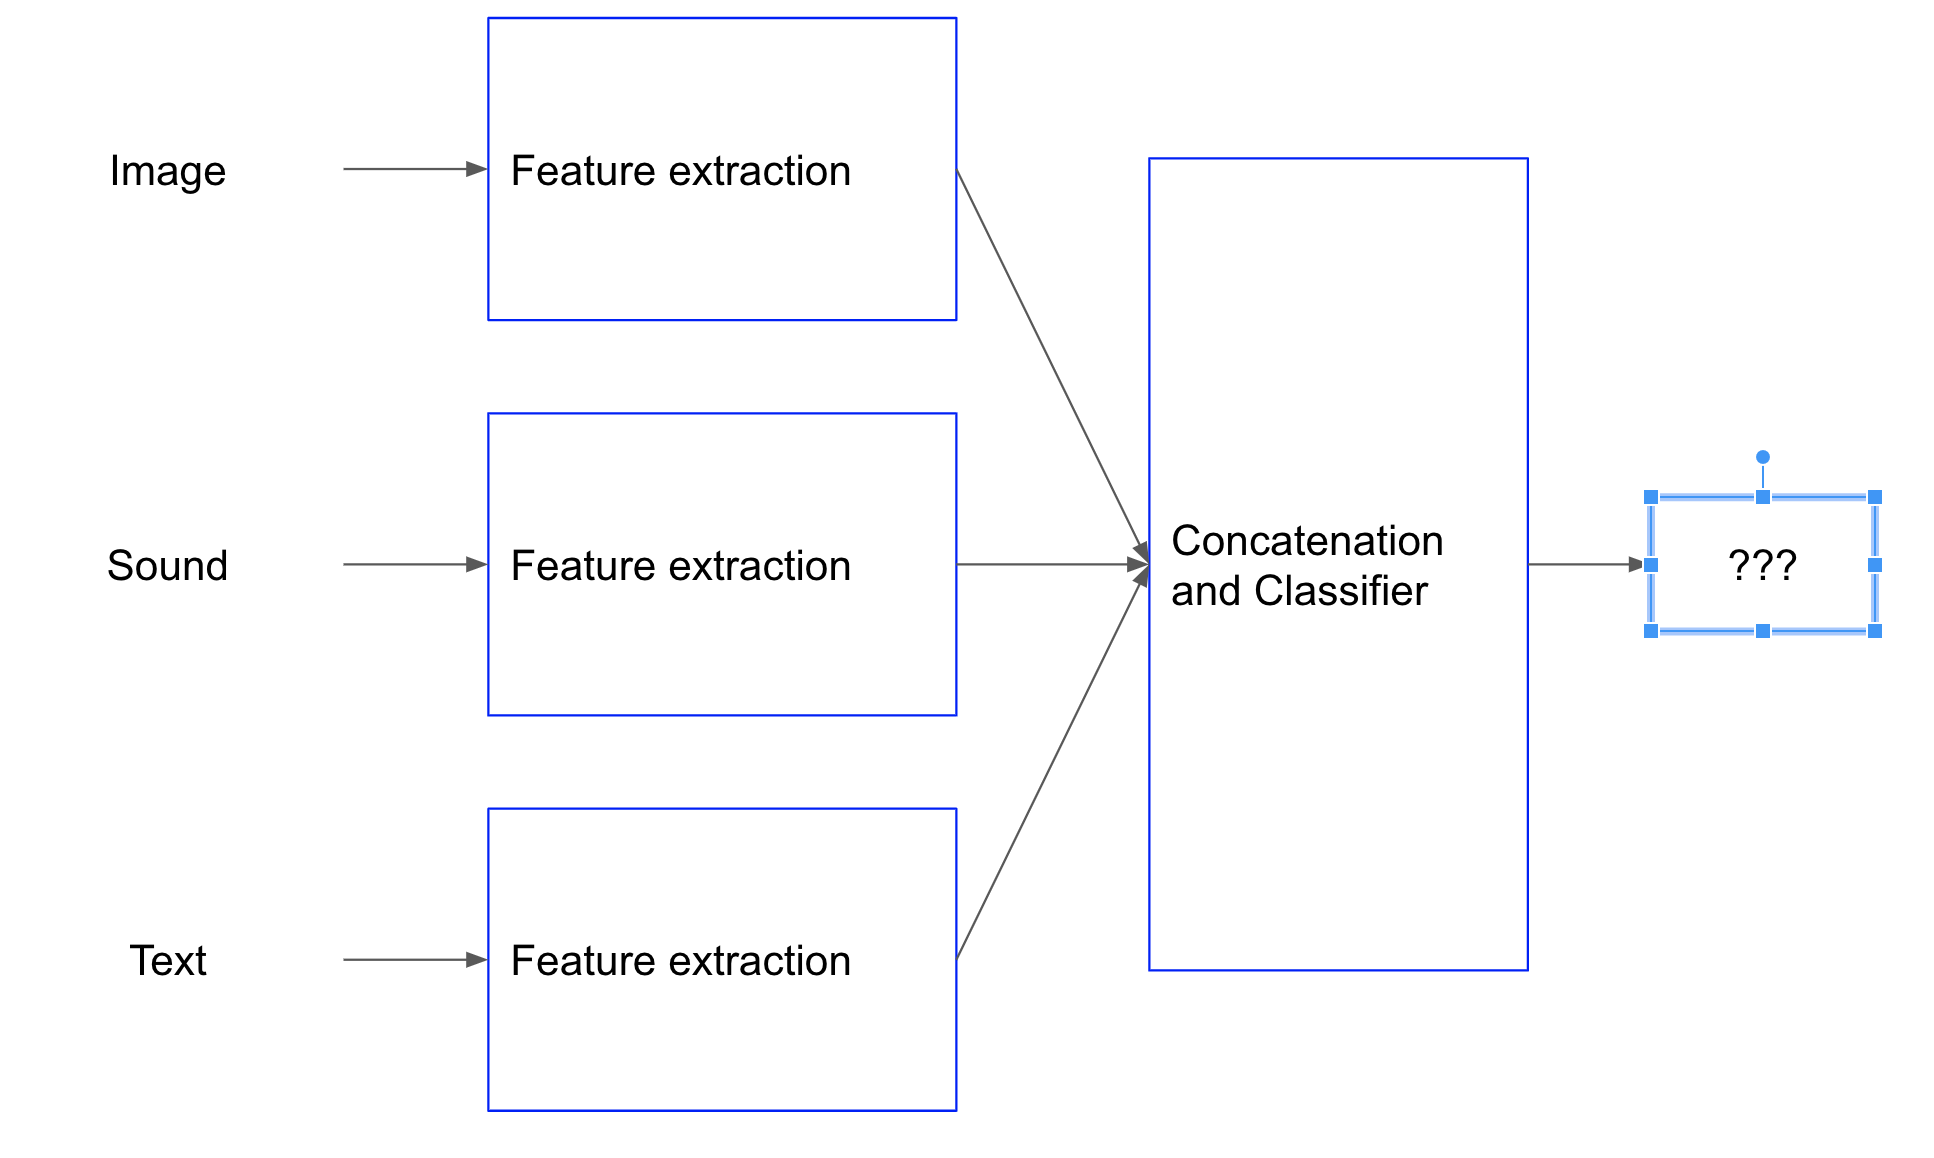
今回は画像、音声、テキストの特徴抽出をすべてCNNで学習します。
まずはそれぞれの特徴抽出層を定義します。
import keras
from keras import backend as K
from keras import Model, Input
from keras.layers import Dense,GlobalAveragePooling2D
from keras.preprocessing.image import ImageDataGenerator
from keras.optimizers import Adam
from keras.losses import categorical_crossentropy
from keras.callbacks import EarlyStopping, ReduceLROnPlateau, ModelCheckpoint
from keras.models import save_model, load_model
from keras.layers import Activation, Dropout, AlphaDropout, Conv1D, Conv2D, Reshape, Lambda
from keras.layers import GlobalMaxPooling1D, MaxPool2D, MaxPool1D, GlobalMaxPooling2D
from keras.layers import BatchNormalization, Embedding, Concatenate, Maximum,Add

# character level cnn for text feature extraction
input_text = Input(shape=(txt_length,), name='input_text')
def clcnn(input_text):
    filter_sizes = (2,3,4,5)

    clx = Embedding(0xffff, 256, name='clx_emb')(input_text)
    convs = []
    for i in range(len(filter_sizes)):
        _clx = Conv1D(filters=256, kernel_size=filter_sizes[i],
                      strides=(filter_sizes[i]//2), padding="same",
                      name='clx_conv1d_{0}'.format(str(i)))(clx)
        _clx = Activation("tanh",
                      name='clx_act1_{0}'.format(str(i)))(_clx)
        _clx = GlobalMaxPooling1D(name='clx_gmp1d_{0}'.format(str(i)))(_clx)
        convs.append(_clx)
    clx = Concatenate(name='clx_concat')(convs)
    clx = Dense(1024, activation="selu",  kernel_initializer="lecun_normal", name="clx_selu_0")(clx)
    clx = Dropout(0.1, name="clx_dr_0")(clx)
    clx = Dense(256, activation="selu", kernel_initializer="lecun_normal", name="clx_selu_1")(clx)
    return clx

# xception for image feature extraction
input_img = Input(shape=(299, 299, 3), name="input_tensor")
def xception(input_img):
    cnn = keras.applications.Xception(input_tensor=input_img, include_top=False, weights='imagenet')
    xcp = cnn.output
    xcp = GlobalAveragePooling2D(name="xcp_gap2d")(xcp)
    xcp = Dense(256, activation='relu', name="xcp_dense_relu")(xcp)
    return xcp

# cnn for sound feature extraction
input_snd = Input(shape=(freq, time, 1), name="input_snd")
def snd_cnn(input_snd):
    freq = 128
    time = 1723
    def cba(inputs, filters, kernel_size, strides, name):
        x = Conv2D(filters, kernel_size=kernel_size, strides=strides, padding='same', name="snd_conv_{0}".format(name))(inputs)
        x = BatchNormalization(name="snd_bn_{0}".format(name))(x)
        x = Activation("relu", name="snd_relu_{0}".format(name))(x)
        return x

    x_1 = cba(input_snd, filters=32, kernel_size=(1,8), strides=(1,2), name="1_0")
    x_1 = cba(x_1, filters=32, kernel_size=(8,1), strides=(2,1), name="1_1")
    x_1 = cba(x_1, filters=64, kernel_size=(1,8), strides=(1,2), name="1_2")
    x_1 = cba(x_1, filters=64, kernel_size=(8,1), strides=(2,1), name="1_3")

    x_2 = cba(input_snd, filters=32, kernel_size=(1,16), strides=(1,2), name="2_0")
    x_2 = cba(x_2, filters=32, kernel_size=(16,1), strides=(2,1), name="2_1")
    x_2 = cba(x_2, filters=64, kernel_size=(1,16), strides=(1,2), name="2_2")
    x_2 = cba(x_2, filters=64, kernel_size=(16,1), strides=(2,1), name="2_3")

    x_3 = cba(input_snd, filters=32, kernel_size=(1,32), strides=(1,2), name="3_0")
    x_3 = cba(x_3, filters=32, kernel_size=(32,1), strides=(2,1), name="3_1")
    x_3 = cba(x_3, filters=64, kernel_size=(1,32), strides=(1,2), name="3_2")
    x_3 = cba(x_3, filters=64, kernel_size=(32,1), strides=(2,1), name="3_3")

    x_4 = cba(input_snd, filters=32, kernel_size=(1,64), strides=(1,2), name="4_0")
    x_4 = cba(x_4, filters=32, kernel_size=(64,1), strides=(2,1), name="4_1")
    x_4 = cba(x_4, filters=64, kernel_size=(1,64), strides=(1,2), name="4_2")
    x_4 = cba(x_4, filters=64, kernel_size=(64,1), strides=(2,1), name="4_3")

    x_snd = Add(name="snd_add")([x_1, x_2, x_3, x_4])

    x_snd = cba(x_snd, filters=128, kernel_size=(1,16), strides=(1,2), name="5_0")
    x_snd = cba(x_snd, filters=128, kernel_size=(16,1), strides=(2,1), name="5_1")

    x_snd = GlobalAveragePooling2D(name="snd_gap")(x_snd)
    snd = Dense(256, activation='relu', name="snd_dense")(x_snd)
    return snd

clx = clcnn(input_text)
xcp = xception(input_img)
snd = snd_cnn(input_snd)
以上がテキスト、画像、音声それぞれの特徴抽出になります。
マルチモーダルでは特徴抽出されたベクトルを結合して分類層に入力します。
結合方法はいろいろありますが(Concatenate、Add、Maxpool等々)今回は単純にConcatenateします。
Concatenateを選んだ理由は、一部のデータがNone(0)となっている可能性があるため、存在するデータを選別せずに残す目的です(本当はいろいろ試した結果、単純なConkatenateが一番Accuracyが良かったからです)。
# leave only maximum features to eliminate null inputs
clxcpsnd = Concatenate()([clx, xcp, snd])
clxcpsnd = Dense(256, activation='relu', name="last_dense")(clxcpsnd)

# classification layer
clxcpsnd = Dropout(0.5)(clxcpsnd)
clxcpsnd = Dense(y_train.shape[1], activation='softmax', name="softmax")(clxcpsnd)

model = Model([input_text, input_img, input_snd], clxcpsnd)

# optimization
model.compile(optimizer=Adam(lr=1e-4, decay=1e-6, amsgrad=True),
             loss=categorical_crossentropy,
             metrics=['accuracy'])
5. 学習する
続いて学習します。
複数のモードが入力となるので、学習の入力にはIteratorを用意する必要があります。
Iteratorの中でデータのAugmentationを同時に行います。
まずはAugmentationとデータローダーを定義します。
# SOUNDS
# change wave data to mel-stft
def calculate_melsp(x, n_fft=1024, hop_length=128):
    stft = np.abs(librosa.stft(x, n_fft=n_fft, hop_length=hop_length))**2
    log_stft = librosa.power_to_db(stft)
    melsp = librosa.feature.melspectrogram(S=log_stft,n_mels=128)
    return melsp

# load a wave data
def load_wave_data(filepath):
    x, _ = librosa.load(filepath, sr=44100)
    return x,_

# data augmentation: add white noise
def add_white_noise(x, rate=0.002):
    return x + rate*np.random.randn(len(x))

# data augmentation: shift sound in timeframe
def shift_sound(x, rate=2):
    return np.roll(x, int(len(x)//rate))

# data augmentation: stretch sound
def stretch_sound(x, rate=1.1):
    input_length = len(x)
    x = librosa.effects.time_stretch(x, rate)
    if len(x)>input_length:
        return x[:input_length]
    else:
        return np.pad(x, (0, max(0, input_length - len(x))), "constant")

# IMAGES
# random erasing for image
def get_random_eraser(p=0.5, s_l=0.02, s_h=0.4, r_1=0.3, r_2=1/0.3, v_l=0, v_h=255):
    def eraser(input_img):
        img_h, img_w, _ = input_img.shape
        p_1 = np.random.rand()

        if p_1 > p:
            return input_img

        while True:
            s = np.random.uniform(s_l, s_h) * img_h * img_w
            r = np.random.uniform(r_1, r_2)
            w = int(np.sqrt(s / r))
            h = int(np.sqrt(s * r))
            left = np.random.randint(0, img_w)
            top = np.random.randint(0, img_h)

            if left + w <= img_w and top + h <= img_h:
                break

        c = np.random.uniform(v_l, v_h)
        input_img[top:top + h, left:left + w, :] = c

        return input_img

    return eraser

# TEXTS
# convert Japanese characters to unicode
# delete a character randomly with del_rate
def convert_text_to_unicode(s,del_rate=0.001):
    if s == 0:
        return [0]
    else:
        return [ord(x) for  x in str(s).strip() if random.random() > del_rate]

def reshape_text(s, max_length=200,del_rate=0.001):
    s_ = convert_text_to_unicode(s,del_rate=del_rate)
    s_ = s_[:max_length]
    if len(s_) < max_length:
        s_ += ([0] * (max_length - len(s_)))
    return s_
続いてIteratorです。
# input data iterator for training
class MultiModalIterator():
    def __init__(self,
                 x_train_img,
                 x_train_snd_path,
                 x_train_text,
                 y_train,
                 batch_size=8,
                 shuffle=True,
                 datagen=ImageDataGenerator(
                     rotation_range=180,
                     width_shift_range=0.2,
                     height_shift_range=0.2,
                     shear_range=10,
                     zoom_range=0.3,
                     horizontal_flip=True,
                     vertical_flip=True,
                     channel_shift_range=5.,
                     brightness_range=[0.3, 1.0],
                     preprocessing_function=get_random_eraser(v_l=0,
                                                              v_h=255))):

        self.x_train_img = x_train_img
        self.x_train_snd_path = x_train_snd_path
        self.x_train_text = x_train_text
        self.y_train = y_train
        self.batch_size = batch_size
        self.shuffle = shuffle
        self.sample_num = len(self.y_train)
        self.datagen = datagen

    def __call__(self):
        while True:
            indexes = self.__get_exploration_order()
            itr_num = int(len(indexes) // (self.batch_size))

            for i in range(itr_num):
                batch_ids = indexes[i * self.batch_size:(i + 1) * self.batch_size]
                x_text, x_img, x_snd, y = self.__data_generation(batch_ids)

                yield [x_text, x_img, x_snd], y

    def __get_exploration_order(self):
        indexes = np.arange(self.sample_num)

        if self.shuffle:
            np.random.shuffle(indexes)

        return indexes

    def __load_text(self,batch_ids):
        # convert Japanese characters to unicode, with random deletion of del_rate
        txt_length = 200
        x_train_text = np.array([reshape_text(t, max_length=txt_length, del_rate=0.001) for t in self.x_train_text[batch_ids]])
        return x_train_text

    def __load_snd(self, batch_ids):
        freq = 128
        time = 1723
        # load sound data
        x_train_snd = np.zeros((self.batch_size, freq,time))
        for i,p in enumerate(self.x_train_snd_path[batch_ids]):
            if p is not None:
                # load from .wav format
                _x,_ = load_wave_data(p)
                # randomly add augmentation
                if np.random.choice((True,False)):
                    # add white noise
                    _x = add_white_noise(x=_x, rate=np.random.randint(1,50)/1000)
                _t = np.random.choice([0,1,2])
                if _t==1:
                    # shift sound
                    _x = shift_sound(x=_x, rate=np.random.choice(np.arange(2,6)))
                elif _t==2:
                    # stretch sound
                    _x = stretch_sound(x=_x, rate=np.random.choice(np.arange(80,120))/100)
                # convert to melsp numpy array
                x_train_snd[i] = calculate_melsp(_x)
        x_train_snd = x_train_snd.reshape(self.batch_size, freq, time, 1)
        return x_train_snd

    def __data_generation(self, batch_ids):
        x_text = self.__load_text(batch_ids)

        x_img = self.x_train_img[batch_ids]
        x_img = x_img.astype('float32')
        for i in range(self.batch_size):
            x_img[i] = self.datagen.random_transform(x_img[i])
            x_img[i] = self.datagen.standardize(x_img[i])
        x_img /= 255

        x_snd = self.__load_snd(batch_ids)

        y = self.y_train[batch_ids]

        return x_text, x_img, x_snd, y

batch_size = 8
epochs = 40

training_iterator = MultiModalIterator(
    x_train_img,
    x_train_snd_path,
    x_train_text,
    y_train,
    batch_size=batch_size)()
上記では、__load_text()と__load_snd()でそれぞれテキスト、音声のロード、Augmentation、入力形式への変換を行っています。
テキストも音声も、生データでAugmentationを行う必要があるため、Iteratorで全処理を実施します。
- テキストのロード
- 日本語文をロードする
- ランダムに文字を脱字にする(Augmentation)
- unicodeに変換し、長さを200字に揃える
- 音声のロード
- .wavファイルをロードする
- ノイズ、シフト、ストレッチをランダムに実施(Augmentation)
- メルスペクトログラムに変換
画像については__data_generation()でKeras標準のImage Generatorにランダムイレースを追加しています。
上記Iteratorを定義することで、fit_generator()で学習することで__call__()が実行され、バッチ学習毎に各データをロードすることが可能になります。
欠損になっているモードについては全要素が0のベクトルが投入されます。
テーブルデータであれば欠損値は平均値や中央値で埋めることができますが、非構造化データを扱う場合は欠損値は欠損のままになります。Noneではエラーになるので、欠損値は全要素が0のベクトルとして扱っています。
fit_generator()で学習を実行します。
model_dir = "./model/"
os.makedirs(model_dir, exist_ok=True)
chkpt = os.path.join(model_dir, 'multimodal.{epoch:02d}_{loss:.4f}_{val_loss:.4f}.hdf5')

# train
model.fit_generator(
        training_iterator,
        steps_per_epoch=len(y_train)//batch_size,
        epochs=epochs,
        validation_data=([x_test_text, x_test_img, x_test_snd], y_test),
        workers=6,
        use_multiprocessing=True,
        callbacks=[EarlyStopping(monitor='val_loss', patience=5, verbose=1, mode='auto'),
                    ReduceLROnPlateau(monitor='val_loss', factor=0.2, patience=2, verbose=1, min_lr=1e-8),
                    ModelCheckpoint(filepath = chkpt, monitor='val_loss', verbose=1, save_best_only=True, mode='auto')])
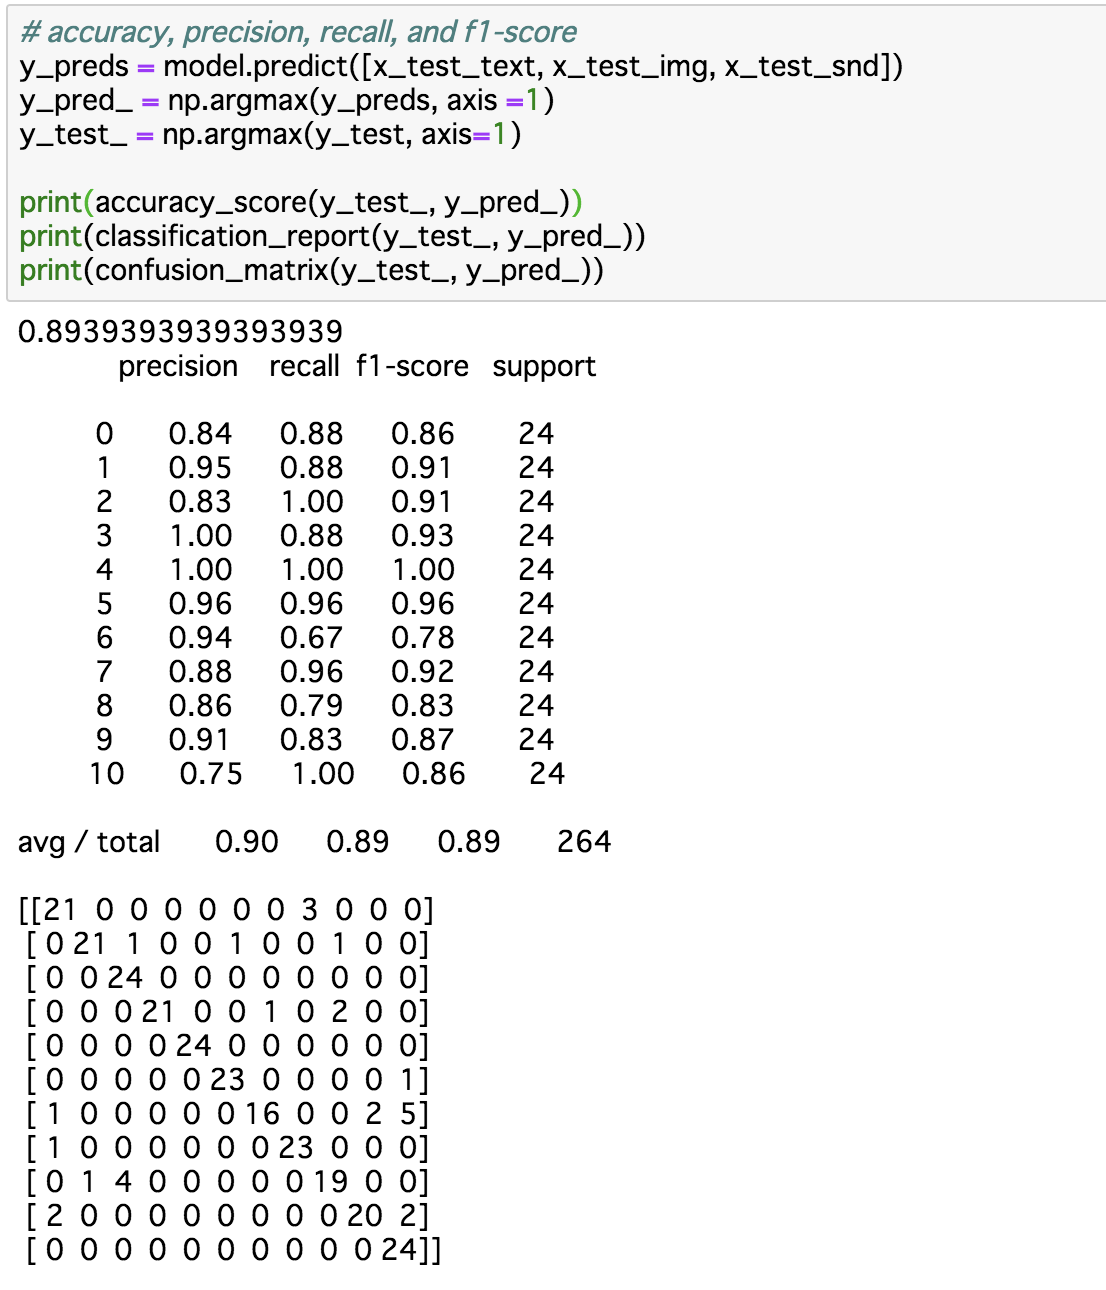
6. 評価する
最後にモデルを評価します。
# accuracy, precision, recall, and f1-score
y_preds = model.predict([x_test_text, x_test_img, x_test_snd])
y_pred_ = np.argmax(y_preds, axis =1)
y_test_ = np.argmax(y_test, axis=1)

print(accuracy_score(y_test_, y_pred_))
print(classification_report(y_test_, y_pred_))
print(confusion_matrix(y_test_, y_pred_))
このくらいの評価になりました。
一部欠損値のあるデータで学習、評価していますが、まあまあ悪くないです。
コード全文