要約
ディープラーニングやりたいけど、細かいコードの書き方がわからないという方向けに、scikit-learn のインターフェースを用いて簡単にディープニューラルネットワークの訓練・推論ができるライブラリ chainer_sklearn を、Digit Recognizerタスク挑戦しながらハンズオン形式で紹介します。
コードは以下のKernelでも公開しています。
はじめに
日本Kaggle slackで、KaggleのAdvent calendarが過疎っていると聞いたので、今回初めてQiitaに寄稿してみます(普段は自分のブログで記事書いてます)。
- これからKaggleを始めてみたい人
- これからDeep learningを始めてみたい人
むけに入門用の記事を書いてみようと思います。また、次ステップとして、Kaggle Digit Recognizer にCNNで挑戦、公開Kernelの中で最高精度を目指すという記事も書いてみました。
Digit Recognizer Competition とは
Kaggle のページはこちら
Kaggleでは賞金のでるランキングを競うCompetitionが多いですが、Getting started というチュートリアル用のカテゴリーもあり、Digit Recognizer はこの中にふくまれます。
MNISTと呼ばれる 0 ~ 9 の手書き文字画像のデータセットを用いて、そのラベル(どの数字が書かれているか)を分類するタスクです。
MNISTデータセットの分類は機械学習における"Hello world"として取り上げられることもあり、入門タスクとして最適です。
画像サイズが28 x 28 px と、他の画像認識タスクと比べても小さく、計算資源がリッチでなくても比較的取り組みやすいという特徴もあります。
今回は、このCompetitionにディープラーニングを用いて挑戦してみます。
使用するライブラリの紹介
Chainerとは
ディープラーニングフレームワークの一つです。
- Chainer: A Powerful, Flexible, and Intuitive Framework for Neural Networks
- Github page: chainer/chainer
ディープラーニングフレームワークは現在、数多く存在しています。Kaggleでは、Google が公開しているtensorflowや、それらをbackend としてラップしてさらに使いやすくした keras などもよく使用されているのを目にします。
今回は、Chainerを使ってディープラーニングに取り組んでいきます。私はChainerを用いるメリットとしては、以下のようなものがあると感じています。
- モデル(ニューラルネットワーク)の定義が直感的にできる
- デバッグが容易
- 勉強・コードリーディングがしやすい
1.に関しては、"Define by run" という動的に計算グラフを構築するというコンセプトでライブラリが設計されており、ユーザー側でのプログラミングが直感的に行えます。
2., 3. に関しては、ChainerはほとんどのコードがPythonのみで書かれているため(tensorflow など他のフレームワークはバックエンド部分はC++で書かれていることが多い)、エラーが起こった際のメッセージがわかりやすくデバッグがしやすかったり、自分でライブラリのコードリーディングをする際も比較的追いやすい→自作関数を定義したくなった場合なども変更部分がわかりやすいというメリットがあります。
Chainerは柔軟性が高く、素早くプロトタイピングを作り実験してみるという研究用途やKaggleなどのCompetitionに向いているのではないかと思います。
scikit-learn とは
Python で機械学習ライブラリといえば scikit-learn が従来から広く利用されています。これまで使用されてきたAPIは一種のデファクトスタンダードになっており、最近出てきたアルゴリズムの実装ライブラリ(例:XGBoost, kerasなど)も、scikit-learnのインターフェースをサポートしているものは多いです。
インターフェースとしては、例えば、分類問題を解くためのモデル model に対して以下のようなメソッドが使えます。
-
model.fit(train_x, train_y)でmodelを訓練データ(train_x, train_y)に対して学習させる。 -
test_y = model.predict(test_x)で訓練済みのmodelに対してtest_xの分類予測test_yを得る。 -
test_prob = model.predict_proba(test_x)で訓練済みのmodelに対してtest_xの分類予測確率test_probを得る。
といったようなものがあります。
chainer_sklearn とは
自作ライブラリの宣伝です。
chainer_sklearn は Chainerで作成したモデルに対して、 scikit-learnのインターフェースが使えるようにしたExtension ライブラリとなっています。
以下のGithubレポジトリでコード公開しています。
PyPIに登録したので、インストールは以下のコマンドでできるはずです。
pip install chainer_sklearn
データの前処理
前置きが長くなってしまいましたが、ここからDigit Recognizerに取り組んでいきます。
Dataはcsv形式で配布されているので、これをダウンロードしてきます。
train.csvに画像とラベルの情報が入った訓練用のデータ、test.csvに、画像のみでラベルの情報は含まれていない提出用のデータが含まれています。
import pandas as pd

# --- Load & build data ---
print('Loading data...')
DATA_DIR = '../input'
train = pd.read_csv(os.path.join(DATA_DIR, 'train.csv'))
test = pd.read_csv(os.path.join(DATA_DIR, 'test.csv'))

train_x = train.iloc[:, 1:].values.astype('float32')
train_y = train.iloc[:, 0].values.astype('int32')
test_x = test.values.astype('float32')

print('train_x shape {}'.format(train_x.shape))
print('train_y shape {}'.format(train_y.shape))
print('test_x shape {}'.format(test_x.shape))
このコードでは、それぞれのcsvファイルをPandasのデータフレームとして読み込んでからデータを取り出しています。train.csv では、0列目にラベルの情報が入っているのでそれを train_y として取り出し、1列目から784列目に(縦x横)が(28x28=784) の画像に相当するデータが入っているのでこれをtrain_x として取り出しています。
test.csvにはラベル情報がなく、0列目から783列目に(縦x横)が(28x28=784) の画像に相当するデータが入っているのでこれをtest_x として取り出します。
なお今回は入力が784 個の独立した特徴量を持つものであると考えて、MLPを用いて問題を解きます。このアプローチでは各ピクセルの位置関係といったものは考慮されません。
次回のブログで、入力を28x28 ピクセルの画像と扱い、その位置関係を考慮するCNNの扱い方を紹介します。
モデルの作成
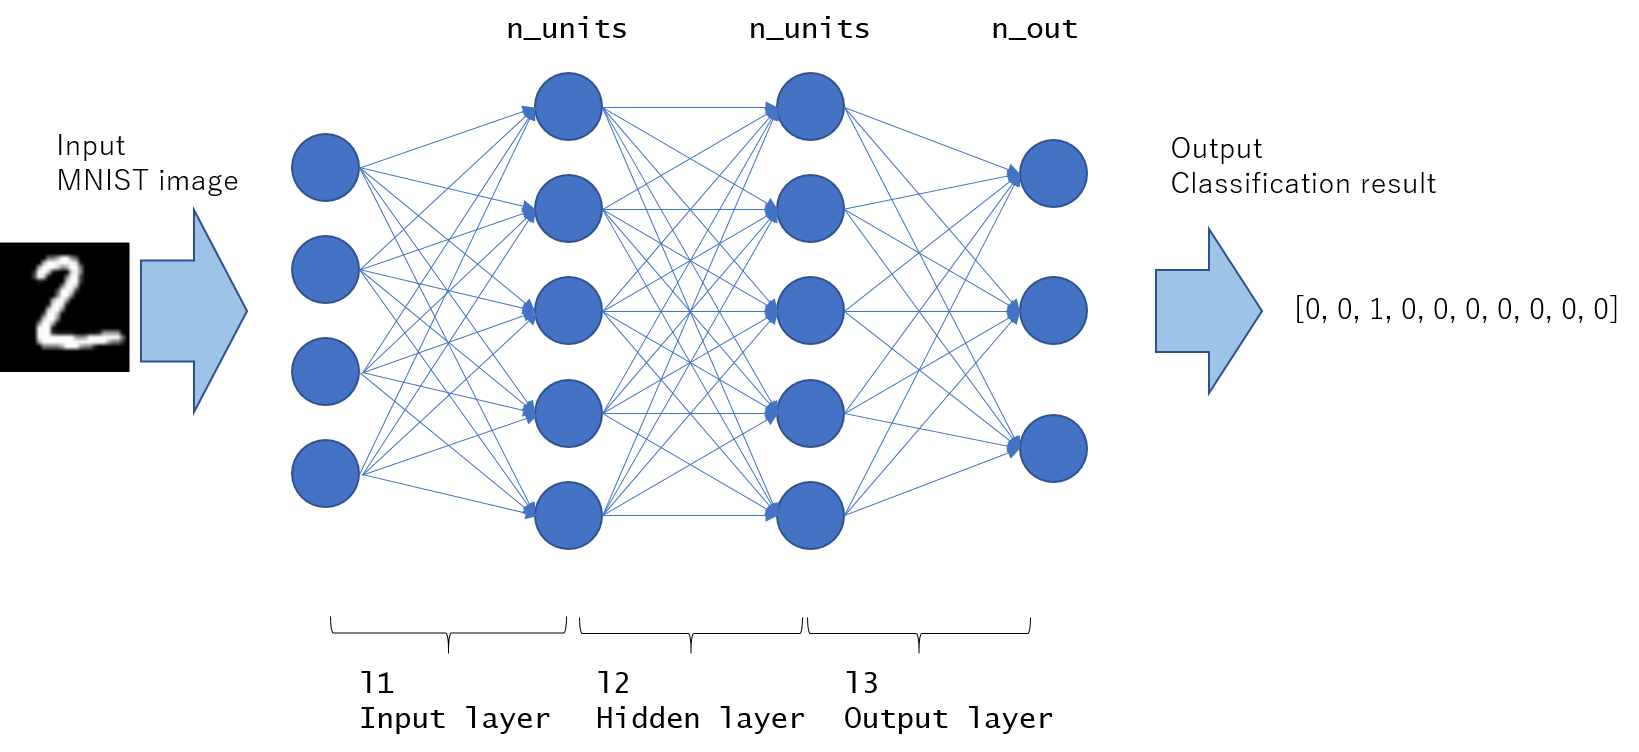
ディープニューラルネットワークの入門的モデルとしてMLP (Multi Layer Perceptron)を紹介します。これは入力層→隠れ層→最終層のネットワーク構築に全結合層(ChainerではL.Linear)を用いるもので、各層の間に非線形関数 (シグモイド関数 F.sigmoid, Rectified Linear関数 F.reluなどが良く使われます) を挟むことにより、複雑な非線形変換を表現できるようにしたモデルです。
Chainerでは、ネットワークを以下のように定義することができます。(Chainer version 2以降の書き方を紹介)
-
chainer.Chainを継承したクラスを作成 -
__init__()部分で初期化コードを書く。
ネットワークのうち、学習するパラメータを持っている層 (chainer.links クラスに相当)は、with self.init_scope(): ブロック内で初期化を行っておくこと。
3. __call__() メソッドに実際の計算を書く。
import chainer
import chainer.links as L
import chainer.functions as F


# --- Define Multi Layer Perceptron (MLP) Network ---
class MLP(chainer.Chain):
    """
    This is 3-layer MLP model definition
    where ReLU is used for nonlinear activation.

    Try changing non-linear activation (F.relu to F.sigmoid etc),
    or adding new Linear layer to make deeper network to see the performance!
    """

    def __init__(self, n_units, n_out):
        super(MLP, self).__init__()
        with self.init_scope():
            # input size of each layer will be inferred when set to None
            self.l1 = L.Linear(None, n_units)  # n_in -> n_units
            self.l2 = L.Linear(None, n_units)  # n_units -> n_units
            self.l3 = L.Linear(None, n_out)  # n_units -> n_out

    def __call__(self, x):
        h = F.relu(self.l1(x))
        h = F.relu(self.l2(h))
        return self.l3(h)

# --- Construct a model ---
print('Constructing model...')
hidden_dim = 32  # Hidden dim for neural network
out_dim = 10     # Number of labels to classify, it is 10 for MNIST task.
# Note that input dimension is not necessary to set.
# Chainer model automatically infer input dimension.
mlp_model = MLP(hidden_dim, out_dim)
今回は0 ~ 9の計10クラスのラベル分類を行うので out_dim=10 となります。 hidden_dim は大きければ大きいほどモデルの表現力が増しますが、計算量が大きくなったり、過学習しやすくなるというトレードオフがあるのでいろいろ変えて試してみてください!
chainer_sklearn を用いたモデルの訓練
データセットとモデルがそろったので、とうとう訓練(モデルの学習)に進みます。
上記のMLPモデル定義の際にはまだ入出力を書いたのみで、どのようにロスを取って訓練させるのかということを書いていませんでした。
chainer_sklearnでは、
- 分類問題:
SklearnWrapperClassifier - 回帰問題:
SklearnWrapperRegressor
を用いることでそれぞれの問題に対応することができます。
今回は分類問題なので SklearnWrapperClassifier を用います。
from chainer import optimizers, serializers
from chainer_sklearn.links import SklearnWrapperClassifier

# You may set device=-1 to use CPU,
# or GPU device id (positive number) to use GPU.
model = SklearnWrapperClassifier(mlp_model, device=-1)

# --- Training ---
print('Training start...')
model.fit(train_x, train_y,
          batchsize=16,
          epoch=20,
          progress_report=True,  # Set to False if you use PyCharm
          # You may use other optimizers, for example
          # optimizer=optimizers.MomentumSGD(lr=0.0001))
          optimizer=optimizers.Adam())
使用する際は作成したMLP モデルのインスタンスをSklearnWrapperClassifierに渡すだけです。SklearnWrapperClassifier はコンストラクタの引数に lossfun がありロス関数を指定することができますが、これはDefault で、Softmax cross entropyを使用するようになっているので、通常のクラス分類問題を解きたい場合は特に設定する必要はありません。
訓練の実行は model.fit(train_x, train_y) を呼ぶだけです! batch_sizeやepoch, optimizerといったハイパーパラメータを指定することも可能です。
※ 今回は一番簡単なチュートリアルということで、TrainデータをValidation データと分けて、評価を行うという処理は省略しました。これは次回のブログで書こうと思います。
[Note] optimizerはどれを選べばいいか?
optimizerは ChainerでサポートされているOptimizerをどれでも使用することができますが、自分の周りでは Adam や MomentumSGD が使われているのをよく見ます。
いっぱいあってどれを選べばいいのかわからない、という初心者の方には Adam がおすすめです。理由としては、Adamは毎回パラメータが更新される上限が alphaというパラメータで決まっているため不安定な挙動をすることが比較的少ないです。
MomentumSGDなどは、learning rate lrを大きくしすぎると、いきなりパラメータが大きく飛んでしまい、学習中に値が急にNaNになってしまうなど不安定な動作をすることもあります。
chainer_sklearn を用いた訓練済みモデルの予測
model の訓練が終わったら、最後は予測を行います。
SklearnWrapperClassifierはSklearnのインターフェースである predictやpredict_proba をサポートしているので、この関数を呼ぶだけです。
# --- Predict ---
print('Predicting...')
test_y = model.predict(test_x)
test_y = test_y.ravel()
これで、test_x のテスト画像に対するラベル予測 test_y を得ることができました。
後は、予測した値を提出用CSVファイルに書き込んで終了です!
# --- Save to submission file ---
submission_filepath = os.path.join(out_dir,
                                   'submission_mlp_chainer_sklearn.csv')
print('Saving submission file to {}...'.format(submission_filepath))
result_dict = {
    'ImageId': np.arange(1, len(test_y) + 1),
    'Label': test_y
}
df = pd.DataFrame(result_dict)
df.to_csv(submission_filepath, index_label=False, index=False)
できた提出用ファイルをKaggleの提出フォームからで提出してみてください。
スコアどのくらい取れましたか?
補足:モデルの保存と読み込み
訓練済みモデルをSaveしたり、他のスクリプトからLoadしたりしたい場合はChainerの serializers を使うことで対応できます。
- 保存
from chainer import serializers

# Trained model can be saved as follows,
out_dir = '.'
serializers.save_npz(os.path.join(out_dir, 'mlp_model.npz'), model)
- 読み込み
from chainer import serializers

# Saved model can be loaded as follows,
serializers.load_npz('result/mlp_model.npz', model)
コード
上記で紹介したコードを一つにまとめると以下のようになります。
今回はチュートリアルだったので、モデルの精度は特に気にしていません。今回のコードを改良して分類精度を上げるためには以下のようなことを試してみることができます。
- モデル
MLPの定義を変える(非線形変換の関数を変える、層を深くしたモデルを作る、など) -
batch_size,epoch,optimizerの種類,optimizerのlearning_rateなどのハイパーパラメータ調整をする
実際に変えてみると、いろいろと感覚がつかめてくるようになると思うので、是非実際にコードをいじって動かして結果を試してみてください。
"""
[Introduction]
1. chainer is deep learning framework written in python.
It supports dynamic graph construction (define-by-run).
Chainer is used in research field as well, since it is quite flexible library.
https://github.com/chainer/chainer

2. chainer_sklearn is extension module (library) to support sklearn-like interface
on top of chainer.
https://github.com/corochann/chainer_sklearn

This script provides quick & easy example for deep learning classification
using chainer & chainer_sklearn.
I hope the code is useful for Deep learning beginners to start with!


[Quick explanation of the code]
The neural network model can be defined as class (here, `MLP` class) in chainer.

When the mlp model class is defined, it can be instantiated and wrapped by
`SklearnWrapperClassifier` to solve classification task.

After that, training and predict interface is quite same with sklearn model,
you can just call `fit` to train the model, and call `predict_proba` for predict
probability for test data.


[How to install module]
Please install following module to run this script.
$ pip install chainer
$ pip install chainer_sklearn

If you want to utilize GPU, please install cupy as well.
$ pip install cupy
"""
import os
import numpy as np
import pandas as pd

import chainer
from chainer import optimizers, serializers
import chainer.links as L
import chainer.functions as F
from chainer_sklearn.links import SklearnWrapperClassifier


# --- Define Multi Layer Perceptron (MLP) Network ---
class MLP(chainer.Chain):
    """
    This is 3-layer MLP model definition
    where ReLU is used for nonlinear activation.

    Try changing non-linear activation (F.relu to F.sigmoid etc),
    or adding new Linear layer to make deeper network to see the performance!
    """

    def __init__(self, n_units, n_out):
        super(MLP, self).__init__()
        with self.init_scope():
            # input size of each layer will be inferred when set to None
            self.l1 = L.Linear(None, n_units)  # n_in -> n_units
            self.l2 = L.Linear(None, n_units)  # n_units -> n_units
            self.l3 = L.Linear(None, n_out)  # n_units -> n_out

    def __call__(self, x):
        h = F.relu(self.l1(x))
        h = F.relu(self.l2(h))
        return self.l3(h)


# --- Load & build data ---
print('Loading data...')
DATA_DIR = '../input'
train = pd.read_csv(os.path.join(DATA_DIR, 'train.csv'))
test = pd.read_csv(os.path.join(DATA_DIR, 'test.csv'))

train_x = train.iloc[:, 1:].values.astype('float32')
train_y = train.iloc[:, 0].values.astype('int32')
test_x = test.values.astype('float32')

print('train_x shape {}'.format(train_x.shape))
print('train_y shape {}'.format(train_y.shape))
print('test_x shape {}'.format(test_x.shape))

# --- Construct a model ---
print('Constructing model...')
hidden_dim = 32  # Hidden dim for neural network
out_dim = 10     # Number of labels to classify, it is 10 for MNIST task.
# Note that input dimension is not necessary to set.
# Chainer model automatically infer input dimension.
mlp_model = MLP(hidden_dim, out_dim)

# `chainer_sklearn` library is extension library for chainer to support
# sklearn interface.
# `SklearnWrapperClassifier` can be used for classification task

# You may set device=-1 to use CPU,
# or GPU device id (positive number) to use GPU.
model = SklearnWrapperClassifier(mlp_model, device=-1)

# --- Training ---
print('Training start...')
model.fit(train_x, train_y,
          batchsize=16,
          epoch=20,
          progress_report=True,  # Set to False if you use PyCharm
          # You may use other optimizers, for example
          # optimizer=optimizers.MomentumSGD(lr=0.0001))
          optimizer=optimizers.Adam())


# Now model training has finished.
# Trained model can be saved as follows,
out_dir = '.'
serializers.save_npz(os.path.join(out_dir, 'mlp_model.npz'), model)

# Saved model can be loaded as follows,
# serializers.load_npz('result/mlp_model.npz', model)

# --- Predict ---
print('Predicting...')
test_y = model.predict(test_x)
test_y = test_y.ravel()

# --- Save to submission file ---
submission_filepath = os.path.join(out_dir,
                                   'submission_mlp_chainer_sklearn.csv')
print('Saving submission file to {}...'.format(submission_filepath))
result_dict = {
    'ImageId': np.arange(1, len(test_y) + 1),
    'Label': test_y
}
df = pd.DataFrame(result_dict)
df.to_csv(submission_filepath, index_label=False, index=False)
その他参考文献
今回をきっかけにディープラーニングライブラリ、Chainerを学びたいという方に以下のチュートリアルを紹介します。
-
Chainer v3 ビギナー向けチュートリアル
2017年12月時点での最新バージョン Chainer v3 に対応した記事です。とても分かりやすく書かれています。 -
Deep learning tutorial with Chainer
自分のブログにて、英語でChainerの使い方を紹介しています。


