
第13章で新規登録に付けた入力チェックを、社員の変更画面にも付けます。変更のフォームクラスは新規登録のものを継承しているので、書き足すところはわずかです。
この章で学ぶこと
- 変更画面に入力チェックを付ける方法
- フォームクラスを継承して、入力チェックとメッセージを登録と変更で共用する利点
14.1 この章でやること
変更画面の UpdateForm は、新規登録の RegisterForm を継承しています(第12章)。第13章で RegisterForm に付けたアノテーション(@NotBlank など)と、messages.properties に書いたエラーメッセージは、変更画面でもそのまま使えます。
そのため、この章で書き足すのは次の2つだけです。
| ファイル | 変更内容 |
|---|---|
EmployeeUpdateController.java |
confirm メソッドで入力チェックを行う |
templates/employee/update/input.html |
エラーメッセージを表示する |
| ファイル | 第13章で作ったもの | この章での扱い |
|---|---|---|
RegisterForm.java |
入力チェックのアノテーション | 変更しない(そのまま使う) |
messages.properties |
エラーメッセージ | 変更しない(そのまま使う) |
14.2 Controller に入力チェックを追加する
EmployeeUpdateController の confirm メソッドを、次のように変更します。第13章で新規登録の confirm に行った変更と同じ形です。
import org.springframework.stereotype.Controller;
import org.springframework.ui.Model;
import org.springframework.validation.BindingResult;
import org.springframework.validation.annotation.Validated;
// …(ほかの import は変更なし)…

    /** 社員変更の確認画面を表示
     * @param updateForm 入力された社員情報
     * @param bindingResult 入力チェックの結果
     * @param model 表示する部署情報
     * @return 正常:社員変更の確認画面
     *         エラー:社員変更の入力画面 */
    @PostMapping("/employees/{empId}/edit/confirm")
    public String confirm(@Validated @ModelAttribute UpdateForm updateForm,
            BindingResult bindingResult, Model model) {
        // 入力チェックでエラーがあれば、エラーメッセージを付けて入力画面に戻す
        if (bindingResult.hasErrors()) {
            List<Department> departments = departmentRepository.findAllByOrderByDeptIdAsc();
            model.addAttribute("departments", departments);
            return "employee/update/input";
        }
        Department department = departmentRepository.findByDeptId(updateForm.getDeptId());
        model.addAttribute("department", department);
        return "employee/update/confirm";
    }
-
import文にBindingResultとValidatedを追加します(@ValidatedとBindingResultを補完(Ctrl + Space)で入力すれば、import 文は自動で追加されます(第4章「入力は補完で行う」))。 -
@ModelAttributeの前に@Validatedを付けます。 -
UpdateForm updateFormの すぐ後ろ にBindingResult bindingResultを追加します。 - メソッドの最初に、
hasErrors()のifブロックを追加します。 - Ctrl + S で保存します。
【ご注意】BindingResult の位置に注意
BindingResult は、チェックしたいフォームの引数の すぐ後ろ に書く決まりです。間に別の引数をはさむと、チェックエラーのときに入力画面に戻らず、Whitelabel エラー画面(400 Bad Request)になってしまいます。
14.3 変更画面にエラーメッセージを表示する
templates/employee/update/input.html の各入力欄の下に、エラーメッセージを表示する div を追加します。第13章で register/input.html に追加したものと同じです。
<!DOCTYPE html>
<html xmlns:th="http://www.thymeleaf.org">
<head>
<meta charset="UTF-8">
<title>社員変更</title>
<link rel="stylesheet" th:href="@{/css/app.css}">
</head>
<body>
  <h1>社員変更</h1>

  <form th:action="@{/employees/{empId}/edit/confirm(empId=${updateForm.empId})}" th:object="${updateForm}" method="post">
    <table>
      <tr>
        <th>社員ID</th>
        <td th:text="*{empId}"></td>
      </tr>
      <tr>
        <th>氏名</th>
        <td>
          <input type="text" th:field="*{name}">
          <div class="error" th:if="${#fields.hasErrors('name')}" th:errors="*{name}"></div>
        </td>
      </tr>
      <tr>
        <th>性別</th>
        <td>
          <label><input type="radio" th:field="*{gender}" value="1"> 男</label>
          <label><input type="radio" th:field="*{gender}" value="2"> 女</label>
          <div class="error" th:if="${#fields.hasErrors('gender')}" th:errors="*{gender}"></div>
        </td>
      </tr>
      <tr>
        <th>年齢</th>
        <td>
          <input type="text" th:field="*{age}">
          <div class="error" th:if="${#fields.hasErrors('age')}" th:errors="*{age}"></div>
        </td>
      </tr>
      <tr>
        <th>生年月日</th>
        <td>
          <input type="date" th:field="*{birthDate}">
          <div class="error" th:if="${#fields.hasErrors('birthDate')}" th:errors="*{birthDate}"></div>
        </td>
      </tr>
      <tr>
        <th>部署</th>
        <td>
          <select th:field="*{deptId}">
            <option value="">選択してください</option>
            <option th:each="department : ${departments}"
                    th:value="${department.deptId}"
                    th:text="${department.deptName}"></option>
          </select>
          <div class="error" th:if="${#fields.hasErrors('deptId')}" th:errors="*{deptId}"></div>
        </td>
      </tr>
      <tr>
        <th>住所(都道府県)</th>
        <td>
          <input type="text" th:field="*{address}">
          <div class="error" th:if="${#fields.hasErrors('address')}" th:errors="*{address}"></div>
        </td>
      </tr>
    </table>
    <button type="submit">確認</button>
  </form>

  <p><a th:href="@{/employees}">一覧へ戻る</a></p>
</body>
</html>
社員ID の行は画面に表示するだけで入力欄ではないため、エラー表示は付けません。
14.4 動作確認
- アプリを停止して起動し直し、Chrome で
http://localhost:8080/employeesを開きます。 - 院照 心愛(社員ID 2)の行の「変更」ボタンを押します。
- 変更画面で、氏名を空 にし、年齢を 10 に書き換えて、「確認」ボタンを押します。
- 確認画面には進まず、変更画面に次のようなエラーメッセージが表示されれば成功です。
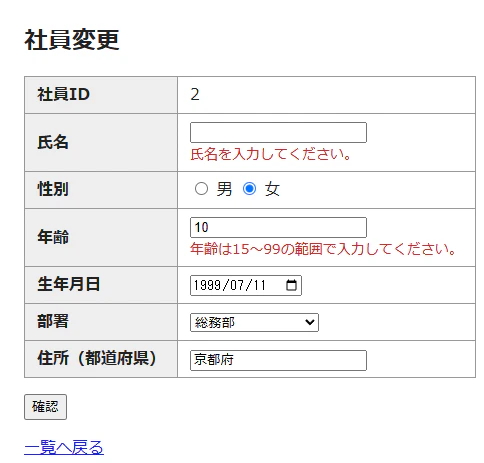
図14-1 変更画面の入力チェック
- 氏名を「院照 心愛」、年齢を「27」に戻して、もう一度「確認」ボタンを押します。今度は確認画面に進めます。
- 確認できたら、変更はしなくてかまいません。確認画面の「戻る」ボタンで変更画面に戻り、「一覧へ戻る」リンクで一覧に戻ります。
【知識メモ】アドレス欄の URL
エラーのときは、Controller が確認画面ではなく変更画面のテンプレートを返すので、アドレス欄は …/2/edit/confirm のまま、画面は変更画面になります。第13章の新規登録と同じ動きです。
14.5 解説
フォームクラスを継承してチェックを引き継ぐ
この教材では、変更の UpdateForm が、新規登録の RegisterForm を継承しています。入力チェックのルールは RegisterForm に書いてあるので、次のような利点があります。
- チェックのルールを 1か所 に書けばよい(登録と変更でルールがずれない)
- 変更画面に入力チェックを付けるとき、Controller とテンプレートだけを直せばよい
【便利な使い方】登録と変更でチェック内容を変えたくなったら
業務によっては、「登録のときだけ必須」「変更では書き換えられない項目がある」のように、登録と変更でチェックの内容を変えたいことがあります。そのような場合は、UpdateForm 側にアノテーションを書き足す、継承せずに別々のフォームクラスにする、などの方法があります。この教材では扱いませんが、継承で共用できるかどうかは、画面の項目とルールを見て判断しましょう。
メッセージは1か所で管理できる
エラーメッセージは messages.properties にまとめて書いてあります。ここを直せば、新規登録と変更の 両方の画面 に反映されます。実際に試してみましょう。
-
src/main/resources/messages.propertiesを開き、name.notBlankの行を次のように書き換えて保存します。src/main/resources/messages.properties(1行だけ変更)name.notBlank=氏名は必ず入力してください。 -
アプリを停止してから、もう一度起動します。
-
新規登録画面と変更画面で、それぞれ氏名を空にして「確認」を押します。どちらの画面でも「氏名は必ず入力してください。」と表示されることを確かめます。
-
確かめたら、元の「氏名を入力してください。」に戻して保存し、アプリを再起動しておきます。
【便利な使い方】現場では
画面に表示する文言をプログラムの中に直接書かず、properties ファイルにまとめておくと、文言の修正や見直しがしやすくなります。お客様から「メッセージの表現を変えてほしい」と頼まれたときも、Java のコードを触らずに対応できます。
14.6 よくあるエラー
| 症状 | 主な原因 | 対処 |
|---|---|---|
| 空欄のまま「確認」を押すと、確認画面に進んでしまう |
@Validated を付け忘れている |
confirm メソッドの @ModelAttribute の前に @Validated を付ける |
| エラーのときに Whitelabel エラー画面(400 Bad Request)になる |
BindingResult がフォームの引数のすぐ後ろにない、または書き忘れている |
UpdateForm updateForm のすぐ後ろに BindingResult bindingResult を書く |
| エラーのとき、部署のプルダウンが空になる | エラーのときに、部署の一覧を Model に入れていない |
hasErrors() の if ブロックの中に、部署の一覧を Model に入れる2行を書く |
| エラーメッセージが表示されない(確認画面にも進まない) |
update/input.html にエラー表示の div を追加していない |
14.3 のとおり、各入力欄の下に th:errors の div を追加する |
14.7 まとめと確認問題
まとめ
-
UpdateFormはRegisterFormを継承しているため、アノテーションとmessages.propertiesはそのまま使える - 変更の
confirmメソッドに@ValidatedとBindingResultを追加し、エラーがあれば変更画面に戻す - メッセージは
messages.propertiesの1か所を直せば、登録と変更の両方の画面に反映される
確認問題
問1 変更画面に入力チェックを付けるとき、RegisterForm と messages.properties を変更しなくてよいのはなぜですか。
解答を見る
変更画面の UpdateForm は RegisterForm を継承しているからです。第13章で RegisterForm に付けたアノテーションと、messages.properties に書いたメッセージが、変更画面でもそのまま使われます。
問2 BindingResult の引数は、どこに書く必要がありますか。
解答を見る
チェックするフォームの引数(UpdateForm updateForm)の すぐ後ろ に書く必要があります。