関連記事
ここまでの道のりが長くもはや何だか分からないが、自分のための参考サイトをまとめた資料として残したい。
raspberryPiとjulus(音声認識)を使用する。①マイク編
raspberryPiでjulius(音声認識)を使用する。②インストール編
raspberryPiとJulius(音声認識)を使用する。③辞書作成編
raspberryPiとJulius(音声認識)を使用する。④Lチカ編
raspberryPiとJulius(音声認識)を使用する。⑤i2cキャラクタディスプレイ編
使用するもの
AQM0802(i2c接続小型ディスプレイ完成版を使用)
ジャンパワイヤ(オス‐メス)4-5本
raspberryPi 3B+
USBマイク
AQM0802を接続する
ラズパイのi2c利用設定はやっておく。
ピン配置は上からUDD、RESET、SCL、SDA、GNDなので、下の画像を参考に配線する。
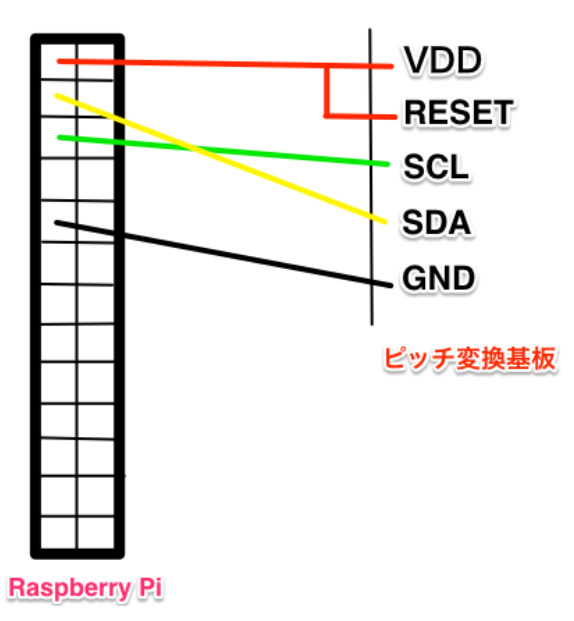
Raspberry Pi で LCD モジュールを使うより引用
接続を確認する。
$ sudo i2cdetect -y 1

3eで接続されているのが確認できた。
試しにファイルを作成してディスプレイ表示させる
``` $ sudo apt-get -y install i2c-tools $ nano I2C_LCD_TEST.sh ``` ```I2C_LCD_TEST.sh # !/bin/shAQM0802A Raspberry Pi I2C control
http://www.neko.ne.jp/~freewing/
http://akizukidenshi.com/catalog/g/gP-06669/
sudo nano I2C_LCD_TEST.sh
sudo chmod 755 I2C_LCD_TEST.sh
./I2C_LCD_TEST.sh
AQM0802A LCD初期化
0x38 0x39 Function Set
i2cset -y 1 0x3e 0x00 0x38 0x39 i
0x10 Bias selection/Internal OSC frequency adjust
0x70 Contrast set(low byte)
0x56 Power/ICON control/Contrast set(high byte)
0x6C Follower control
i2cset -y 1 0x3e 0x00 0x10 0x70 0x56 0x6C i
sleep 0.3
0x38 Function Set
i2cset -y 1 0x3e 0x00 0x38 i
0x02 Return Home
i2cset -y 1 0x3e 0x00 0x02 i
0x0C Display ON/OFF control
i2cset -y 1 0x3e 0x00 0x0C i
0x0F Display ON/OFF control
i2cset -y 1 0x3e 0x00 0x0F i
0x01 Clear Display
i2cset -y 1 0x3e 0x00 0x01 i
sleep 0.5
0x40 CGRAM addres = 0x00 CHARACTER CODE = 0x00
i2cset -y 1 0x3e 0x00 0x40 b
i2cset -y 1 0x3e 0x40 0x01 0x02 0x03 0x04 0x05 0x06 0x07 0x08 i
0x40 CGRAM addres = 0x08 CHARACTER CODE = 0x01
i2cset -y 1 0x3e 0x00 0x48 b
i2cset -y 1 0x3e 0x40 0x1F 0x1E 0x1D 0x1C 0x1B 0x1A 0x19 0x18 i
1行目 DDRAM addres = 0x00
i2cset -y 1 0x3e 0x00 0x80 b
"=FREE =="
i2cset -y 1 0x3e 0x40 0x3D 0x46 0x52 0x45 0x45 0x20 0x3D 0x3D i
sleep 0.5
2行目 DDRAM addres = 0x40
i2cset -y 1 0x3e 0x00 0xc0 b
"== WING="
i2cset -y 1 0x3e 0x40 0x3D 0x3D 0x20 0x57 0x49 0x4E 0x47 0x3D i
$ chmod 755 I2C_LCD_TEST.sh
$ sudo ./I2C_LCD_TEST.sh
[Raspberry Pi 3の GPIOに I2C通信方式の液晶モジュール AQM0802Aを接続する方法](http://www.neko.ne.jp/~freewing/raspberry_pi/raspberry_pi_3_i2c_lcd_aqm0802a/)をそのまま試している。
ディスプレイが動作することは確認できる。


## コマンドについてメモ
#画面初期化
$ i2cset -y 1 0x3e 0x00 0x38 0x39 0x14 0x70 0x56 0x6c i
$ i2cset -y 1 0x3e 0x00 0x38 0x0c 0x01 i
$ i2cset -y 1 0x3e 0x00 0x80
全部消して1行目の最初にカーソル移動
sudo i2cset -y 1 0x3e 0 0x38 0x0d 0x01 i
指定したデータを連続して表示
sudo i2cset -y 1 0x3e 0x40 [data1] [data2] [data3] i
改行してカーソルを先頭に移動
sudo i2cset -y 1 0x3e 0x00 0xc0 i
0x3eが書き込み対象(I2CBUS)。
i は「block data」、連続してデータを書き込む指定。
b はバイトでの通常書き込みのこと。
[AQM0802の文字表示](https://www.junk-works.science/specification-aqm0802/)引用
[Raspberry Pi zeroでLCDディスプレイに文字を表示する](http://monqy.blogspot.com/2019/11/raspberry-pi-zerolcd.html)
[RasberryPIのI2Cコマンド詳解](http://www.hogetan.net/note/memo/pi_i2ccmd.html)

言葉の表示はAQM0802のcharacter patternsを参照して作成する。
アリガトウ
sudo i2cset -y 1 0x3e 0x40 0xb1 0xd8 0xb6 0xde 0xc4 0xb3 i
ア リ カ ゛ ト ウ
コンニチハ
sudo i2cset -y 1 0x3e 0x40 0xba 0xdd 0xc6 0xc1 0xca i
コ ン ニ チ ハ
<h2>JuliusとAQM0802を連携させて動かしてみる</h2>
### 話したことに対して、用意された文字を表示する。
モジュールモードでJuliusを起動して、下記ファイルを実行。

```test_i2c001.py
# !usr/bin/env python
# -*- coding: utf-8 -*-
import smbus
import time
import subprocess
import socket
import string

i2c = smbus.SMBus(1) # 1 is bus number
addr02=0x3e #lcd
_command=0x00
_data=0x40
_clear=0x01
_home=0x02
display_On=0x0f
LCD_2ndline=0x40+0x80

# LCD AQM0802/1602
def command( code ):
        i2c.write_byte_data(addr02, _command, code)
        time.sleep(0.1)

def writeLCD( message ):
        mojilist=[]
        for moji in message:
                mojilist.append(ord(moji))
        i2c.write_i2c_block_data(addr02, _data, mojilist)
        time.sleep(0.1)

def init ():
        command(0x38)
        command(0x39)
        command(0x14)
        command(0x73)
        command(0x56)
        command(0x6c)
        command(0x38)
        command(_clear)
        command(display_On)

def ari ():
        arigatoulist=[0xb1, 0xd8, 0xb6, 0xde, 0xc4, 0xb3]
        i2c.write_i2c_block_data(addr02, _data, arigatoulist)
        time.sleep(0.1)
        print(arigatoulist)

def konnichiha():
        konnichihalist=[0xba, 0xdd, 0xc6, 0xc1, 0xca]
        i2c.write_i2c_block_data(addr02, _data, konnichihalist)
        time.sleep(0.1)

HOST = '127.0.0.1'   # juliusサーバーのIPアドレス
PORT = 10500         # juliusサーバーの待ち受けポート
DATESIZE = 1024     # 受信データバイト数

class Julius:

    def __init__(self):

        self.sock = None

    def run(self):

        # socket通信でjuliusサーバーに接続
        with socket.socket(socket.AF_INET, socket.SOCK_STREAM) as self.sock:
            self.sock.connect((HOST, PORT))

            strTemp = "" # 話した言葉を格納する変数
            fin_flag = False # 話終わりフラグ

            while True:

                # juliusサーバからデータ受信
                data = self.sock.recv(DATESIZE).decode('utf-8')

                for line in data.split('\n'):
                    # 受信データから、<WORD>の後に書かれている言葉を抽出して変数に格納する。
                    # <WORD>の後に、話した言葉が記載されている。
                    index = line.find('WORD="')
                    if index != -1:
                        # strTempに話した言葉を格納
                        strTemp = strTemp + line[index+6:line.find('"',index+6)]

                    # 受信データに</RECOGOUT>'があれば、話終わり ⇒ フラグをTrue
                    if '</RECOGOUT>' in line:
                        fin_flag = True

                # 話した言葉毎に、print文を実行
                if fin_flag == True:
                    if 'ありがとう' in strTemp:
                        print("どういたしまして")
                        init ()
                        command(_clear)
                        ari()
                    elif 'こんにちは' in strTemp:
                        print("こんばんは")
                        init ()
                        command(_clear)
                        konichiwa()
                    else:
                        print("話した言葉:" + strTemp)

                    fin_flag = False
                    strTemp = ""

if __name__ == "__main__":

    julius = Julius()
    julius.run()
話したことを変換してオウム返し表示する。(julius独自辞書の言葉のみ)
AQM0802のcharacter patternsに則って日本語辞書ファイルを作成。
nihongo = {"あ":0xb1,
          "い":0xb2,
          "う":0xb3,
          "え":0xb4,
          "お":0xb5,
          "か":0xb6,
          "き":0xb7,
          "く":0xb8,
          "け":0xb9,
          "こ":0xba,
          "さ":0xbb,
          "し":0xbc,
          "す":0xbd,
          "せ":0xbe,
          "そ":0xbf,
          "た":0xc0,
          "ち":0xc1,
          "つ":0xc2,
          "て":0xc3,
          "と":0xc4,
          "な":0xc5,
          "に":0xc6,
          "ぬ":0xc7,
          "ね":0xc8,
          "の":0xc9,
          "は":0xca,
          "ひ":0xcb,
          "ふ":0xcc,
          "へ":0xcd,
          "ほ":0xce,
          "ま":0xcf,
          "み":0xd0,
          "む":0xd1,
          "め":0xd2,
          "も":0xd3,
          "や":0xd4,
          "ゆ":0xd5,
          "よ":0xd6,
          "ら":0xd7,
          "り":0xd8,
          "る":0xd9,
          "れ":0xda,
          "ろ":0xdb,
          "わ":0xdc,
          "ん":0xdd,
          "を":0xa6,
          "ぁ":0xa7,
          "ぃ":0xa8,
          "ぅ":0xa9,
          "ぇ":0xaa,
          "ぉ":0xab,
          "ゃ":0xac,
          "ゅ":0xad,
          "ょ":0xad,
          "っ":0xaf,
          "が":"182 222",
          "ぎ":"183 222",
          "ぐ":"184 222",
          "げ":"185 222",
          "ご":"186 222",
          "ざ":"187 222",
          "じ":"188 222",
          "ず":"189 222",
          "ぜ":"190 222",
          "ぞ":"191 222",
          "だ":"192 222",
          "ぢ":"193 222",
          "づ":"194 222",
          "で":"195 222",
          "ど":"196 222",
          "ば":"202 222",
          "び":"203 222",
          "ぶ":"204 222",
          "べ":"205 222",
          "ぼ":"206 222",
          "ぱ":"202 223",
          "ぴ":"203 223",
          "ぷ":"204 223",
          "ぺ":"205 223",
          "ぽ":"206 223"
           }
# !usr/bin/env python
# -*- coding: utf-8 -*-
import smbus
import time
import subprocess
import socket
import string
from nihongo import nihongo

i2c = smbus.SMBus(1) # 1 is bus number
addr02=0x3e #lcd
_command=0x00
_data=0x40
_clear=0x01
_home=0x02
display_On=0x0f
LCD_2ndline=0x40+0x80

# LCD AQM0802/1602
def command( code ):
        i2c.write_byte_data(addr02, _command, code)
        time.sleep(0.1)

def word( message ):
        kotoba = []
        for moji in message:
            kotoba.append(moji)

        wordlist = []
        for idx in range(0, len(kotoba)):
            a = kotoba[idx]
            val = nihongo[a]
            if type(val) is int:
                wordlist.append(val)
            else:
                nums = val.split()
                for i in range(2):
                    wordlist.append(int(nums[i]))
        print(wordlist)
        i2c.write_i2c_block_data(addr02, _data, wordlist)
        time.sleep(0.1)

def init ():
        command(0x38)
        command(0x39)
        command(0x14)
        command(0x73)
        command(0x56)
        command(0x6c)
        command(0x38)
        command(_clear)
        command(display_On)


HOST = '127.0.0.1'   # juliusサーバーのIPアドレス
PORT = 10500         # juliusサーバーの待ち受けポート
DATESIZE = 1024     # 受信データバイト数

class Julius:

    def __init__(self):

        self.sock = None

    def run(self):

        # socket通信でjuliusサーバーに接続
        with socket.socket(socket.AF_INET, socket.SOCK_STREAM) as self.sock:
            self.sock.connect((HOST, PORT))

            strTemp = "" # 話した言葉を格納する変数
            fin_flag = False # 話終わりフラグ

            while True:

                # juliusサーバからデータ受信
                data = self.sock.recv(DATESIZE).decode('utf-8')

                for line in data.split('\n'):
                    # 受信データから、<WORD>の後に書かれている言葉を抽出して変数に格納する。
                    # <WORD>の後に、話した言葉が記載されている。
                    index = line.find('WORD="')
                    if index != -1:
                        # strTempに話した言葉を格納
                        strTemp = strTemp + line[index+6:line.find('"',index+6)]

                    # 受信データに</RECOGOUT>'があれば、話終わり ⇒ フラグをTrue
                    if '</RECOGOUT>' in line:
                        fin_flag = True

                # 話した言葉毎に、print文を実行
                if fin_flag == True:
                    print(strTemp[4:-3])
                    init ()
                    command(_clear)
                    word(strTemp[4:-3])

                    fin_flag = False
                    strTemp = ""

if __name__ == "__main__":

    julius = Julius()
    julius.run()