概要
GitHubの登録が完了したらローカル環境に反映するためGitコマンドをインストール・設定します。
インストール手順
1.確認
Gitがインストールされているか、また、Windows側のgitを参照していないかインストールディレクトリを確認します。。windowsマウント先のパスが表示されている場合はWSL側にインストールします。
$ which git
/mnt/c/xxxx
※インストールされていない場合はなにも出力されません。
2.インストール
下記コマンドを実行します。
$ sudo apt update && sudo apt upgrade -y && sudo apt autoremove -y
$ sudo apt install -y git
3.windows側のパスを無視する設定
Windows側の参照の参照よりもWSL側のgitコマンドを優先する為、bashrcを編集します。
※本来は実行コマンドを混乱させないためにもWindows側はアンインストールするかWSLからWindowsコマンドの実行を禁止すべきだと思います。
$ sudo vim /etc/profile.d/binpath.sh

---- 下記の通り編集
# !/bin/env bash
export PATH=/usr/bin:${PATH}
----

$ sudo chmod 775 /etc/profile.d/binpath.sh
$ source /etc/profile.d/binpath.sh
4.確認
$ git --version
git version 2.25.1

$ which git
/usr/bin/git
ローカル初期設定
1.GitHubプロジェクト取得
まず、対象のプロジェクトを取得します。
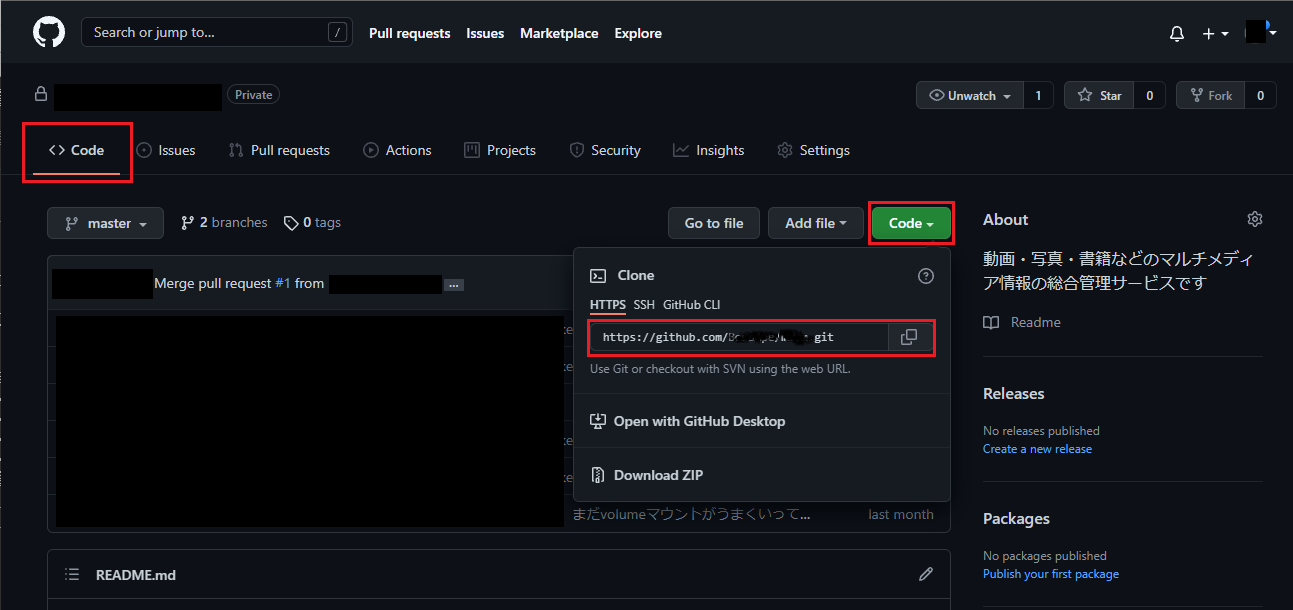
1-1.GitHubサイトからURLをコピーします。
コードタブ⇒コードプルダウン⇒コピーボタン
でコピーできます。
1-2.プロジェクトのクローン
WSL端末で以下のコマンドを実行します。ここでは「/var/docker」以下にクローンします。
$ mkdir -p /var/docker
$ cd /var/docker/
$ git clone <コピーしたURL>
Username for 'https://github.com': <GitHubユーザ>
Password for 'https://masaki-nohara@github.com':<[2.1.GitHub登録]時に取得したToken>
2.メインユーザ以外のユーザを使用する場合
複数のプロジェクトを取り扱う場合、プロジェクトごとにユーザが違う場合があります。その場合はクローンしてきたディレクトリで使用するユーザを設定しておきます。
$ cd /var/docker/<Gitプロジェクト名>
$ git config --local user.name "<GitHubユーザ名>"
$ git config --local user.email "<GitHubメールアドレス>"
# Tokenを何度も入力しないようにするため認証情報を保存する設定をします
$ git config credential.helper store
$ git config --global color.ui auto
例) gitに登録しているプロジェクトmmmm、作業をするOSユーザdevelop、GitHubユーザ名piyopiyo、GitHubメールアドレスpiyo@poyo.co.jpの場合
$ sudo mkdir -p /var/docker/mmmm
$ sudo chown develop:root /var/docker/mmmm
$ cd /var/docker/mmmm
$ git config --local user.name "piyopiyo"
$ git config --local user.email "piyo@poyo.co.jp"
$ git config credential.helper store
$ git config --global color.ui auto

# ユーザ情報確認
$ git config -l
3.新規ブランチを作成してチェックアウト
現在、ブランチはmasterブランチになっていると思います。masterブランチは通常リリース時のブランチですのでdevelopブランチを作成し、チェックアウトします。
細かいルールはGitHubフローに従ってください。
$ git checkout -b origin/develop
# 初めてのチェックアウトの場合はpasswordの入力を求められますが、2度目以降の入力は省略されます。

※または、下記の様に2コマンド実行しても同じです。
$ git branch origin/develop
$ git checkout origin/develop
これで環境を構築するための開発環境の構築が出来ました。次章からは実際にDockerを使用して環境構築のためのコードを書いていきます。
2.1.GitHub登録 < 前 **2.2.gitインストール・設定** 次 > 3.Docker in WSL環境構築
