11/29更新
本記事はMac向けの記事として、Linuxへのセットアップは以下に記事を書きました。
http://qiita.com/azzeten/items/9b66df6569aa2fe282af
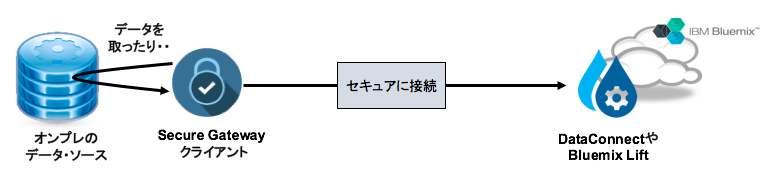
Bluemixのサービスで、Bluemix LiftやDataConnectを使う際に、オンプレ環境とクラウドとをやり取りさせたい場面に使うのがSecure Gatewayです。
勝手にBluemix上のサービスから自分のオンプレ環境に接続されてきたら気持ち悪いですから、砦になってくれるのがこのサービスのようです。
この記事ではSecureGatewayのインストールと設定の仕方を紹介します。今回はMacラップトップに入れましたが、おそらく本当に運用とかを考えた場合にはそれ用にサーバを用意するのだと思います(ま、手元でやる分にはPCで・・)
過去記事では、この辺でSecure Gatewayを使用したりしています。
http://qiita.com/azzeten/items/c58ab2b1f0fa2b5ea877
http://qiita.com/azzeten/items/a0b604c67d993387ff5e
インストール
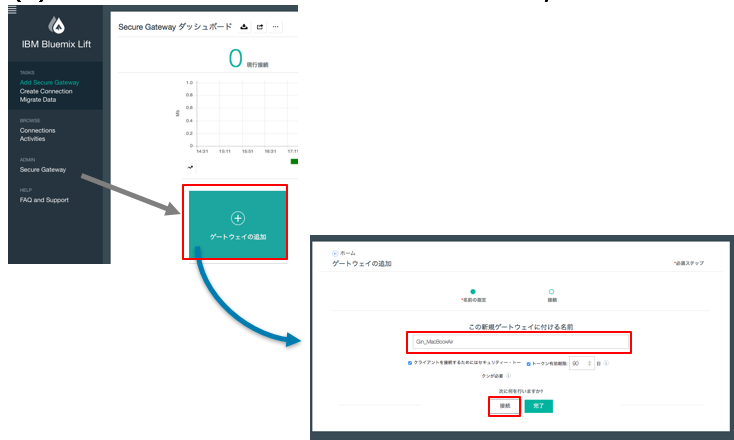
・LiftもしくはDataConnectのWEB画面から、SecureGatewayをクリック
・PCにインストールするモジュールをダウンロードして解凍します。このときに「ゲートウェイID」と「セキュリティトークン」というのが表示されますが、これはこの後使う情報なのでテキストエディタとかにコピペしておきます。
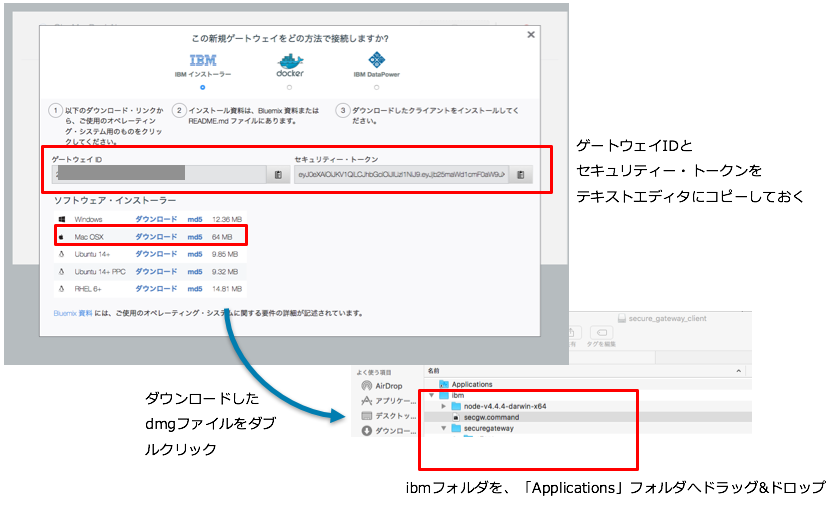
・PCのターミナルに入りコマンドを実行します。
gatewayIDとかを聞かれるので、さっきコピペした内容を貼り付けます。
$ cd /Applications/ibm
$./secgw.command
Enter the gateway IDs, separated by spaces: 2prxxxxxxxxxxx
INFO:
INFO: The gateway ID for this install is: 2prLJMMdhU5_prod_ng

Enter the gateway ID security tokens separated by spaces,
enter 'none' for no security token: eyJ0eXAxxxxxxxxxxxxxxxxxxxxxxxxxxxxxxxxxxxxxx
INFO:
npm WARN package.json ibm-bluemix-secure-gateway-client@1.5.0 No repository field.
npm WARN package.json ibm-bluemix-secure-gateway-client@1.5.0 No README data
IBM Bluemix Secure Gateway Client Version 1.5.0
************************************************************************************************
(中略)
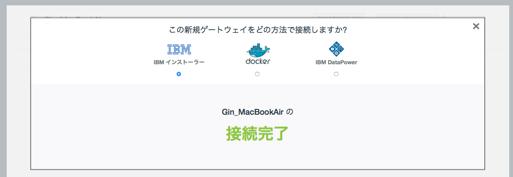
で、WEBブラウザのさっきの画面でこんな表示が出てくればOKです。
セッティング
コンソールが以下のように、"gateway ID > "みたいになっていることを確認してください(なってない場合はEnterとかを押してみる)
2prxxxxxx>
で、どのIPアドレスへの接続を許可するかを書きます。Macに乗っかっているDBやVMへの接続を全部許可したいので、ここではとりあえず「all△allow△:」にします。△は半角スペースです。
本来はもっとセキュアにしたいとおもうので、IPアドレスを指定するようにしてください。
2prxxxxxx> acl allow :
[2016-xx-xx 01:49:48.306] [WARN] (Client ID 2prxxxxxx) A valid acl allow command of ':' without a hostname or port has been entered, this is not recommended!

[2016-xx-xx 01:49:48.310] [WARN] (Client ID 2prxxxxxx) The Access Control List has been disabled, the ACL Deny All flag is set to: false
設定ができたかを確認します。大文字の「S」を打ちます。
ちなみにコマンドの詳細は「h」を押すとヘルプが見れます。
2prxxxxxx> S
2prxxxxxx>
---------------------------------------------------------------------
           -- Secure Gateway Client Access Control List –
hostname                               port                  value
ALL                                     ALL                  Allow
---------------------------------------------------------------------
これで定義完了です。
あとはDataConnectやBluemix Liftを使うときにオンプレへ接続したいときはuse secure gatewayとかにチェックを入れると出来ます。
bluemixのサービスを使いたいときはこのsecure gatewayはちょくちょく見かけるので一度セットアップしておくと後々良さげです。