※この記事はAE2100のCentOSコンテナ(centos7_openvino_2019R31_1.tgz)を対象としています。
以下はUbuntuコンテナ版の記事です。
OKI AI エッジコンピューター「AE2100」でOpenVINOのサンプルプログラムを動かしてみよう Ubuntuコンテナ版 (2)
はじめに
OpenVINOにはSamplesとDemosアプリケーションのソースが付属しています。
このうちDemosは特定のユースケースを解決するために推論エンジンを
どのように使用するのかのアプリケーション例です。
今回はDemosのビルドを行いAE2100上で実行してみたいと思います。
●Inference Engine Demosの一覧
https://docs.openvinotoolkit.org/2019_R3.1/_demos_README.html
環境
AE2100のコンテナバージョンは「centos7_openvino_2019R31_1.tgz」とします。
開発環境でDemosのビルドをおこない、AE2100で実行します。
開発環境の構築は「AE2100 シリーズ SDK 取扱説明書 ーDeepLearning 編ー」P.10を参考にしてください。
なお、第1回目の記事に従ってウインドウズPC上にVcXsrvの導入が済んでいることを前提とします。
OKI AI エッジコンピューター「AE2100」でOpenVINOのサンプルプログラムを動かしてみよう(1)
Demosのビルド(開発環境側)
開発環境でOpenVINO付属のdemosのビルドをおこないます
OpenVINOをデフォルトのままインストールした場合、Demosは以下の場所に存在します。
/opt/intel/openvino/inference_engine/demos
ビルド時の注意点としては、build_demos.shをそのまま実行すると開発環境のプロセッサーに最適化され
AE2100搭載のAtomプロセッサーでは動作できない実行ファイルが作成されてしまいます。
そのため build_demos.sh を書き換える必要があります。
build_demos.sh を 編集しcmakeの引数に ”-DENABLE_AVX2=OFF” を追加します。
cd $build_dir
cmake -DCMAKE_BUILD_TYPE=Release $DEMOS_PATH -DENABLE_AVX2=OFF
make $NUM_THREADS
OpenVINOの環境変数を設定します。
source /opt/intel/openvino/bin/setupvars.sh
build_demos.shを書き換えたらビルドをおこないます。
# ./build_demos.sh
ビルドをおこなうと実行ファイルが以下のディレクトリに出力されます。
/root/omz_demos_build/intel64/Release
モデルファイルのダウンロード(開発環境側)
ここではOpenVINO付属のmodel_downloaderを使ってモデルファイルのダウンロードをおこないます。
※下記サイトからブラウザで直接モデルファイルをダウンロードしても構いません。
https://download.01.org/opencv/2019/open_model_zoo/R3/20190905_163000_models_bin/human-pose-estimation-0001/FP16/
model_downloaderがあるディレクトリに移動します。
# cd /opt/intel/openvino/deployment_tools/tools/model_downloader
python の仮想環境をアクティブにします。
※「AE2100 シリーズ SDK 取扱説明書 ーDeepLearning 編ー」P.13でPythonの仮想環境を作成した場合。
# source /opt/intel/openvino/deployment_tools/model_optimizer/venv/bin/activate
model_downloaderの動作に必要なpythonパッケージの導入をおこないます。
(venv)# pip3 install -r requirements.in
OpenVINOの環境変数を設定します。
(venv)# source /opt/intel/openvino/bin/setupvars.sh
model_downloaderで取得可能なモデルファイルの一覧を出力してみます。
(venv)# python3 downloader.py --print_all
action-recognition-0001-decoder
action-recognition-0001-encoder
age-gender-recognition-retail-0013
driver-action-recognition-adas-0002-decoder
driver-action-recognition-adas-0002-encoder
emotions-recognition-retail-0003
face-detection-adas-0001
face-detection-adas-binary-0001
face-detection-retail-0004
face-detection-retail-0005
face-reidentification-retail-0095
今回は”human-pose-estimation-0001”をダウンロードしてみます。
(venv)# python3 downloader.py --name human-pose-estimation-0001 --precisions FP16
モデルファイルは以下の場所に出力されます。
./intel/human-pose-estimation-0001
AE2100へのファイルコピー
今回はDomosの中から”Human Pose Estimation C++ Demo” をAE2100上で動作させてみます。
Human Pose は人物の骨格推定をおこなう処理です。
※デモの詳細は以下を参照してください。
https://docs.openvinotoolkit.org/2019_R3.1/_demos_human_pose_estimation_demo_README.html
ビルドを行った実行ファイルとモデルをフォルダに移動させます。
# cd
# mkdir human_pose
# cd human_pose
# cp /root/omz_demos_build/intel64/Release/human_pose_estimation_demo ./
# cp /opt/intel/openvino/deployment_tools/tools/model_downloader/intel/human-pose-estimation-0001/FP16/* ./
動画ファイルをダウンロードします。
# wget https://github.com/intel-iot-devkit/sample-videos/raw/master/one-by-one-person-detection.mp4
tarアーカイブを作成します。
# cd ..
# tar cvf human_pose.tar  human_pose
TeraTermでAE2100にログインし、上記のtarファイルをドラッグ&ドロップでAE2100に転送します。
コンテナにファイルのコピーをおこないます。
root@ae2100:~# docker cp human_pose.tar centos-openvino:/root/
以下のコマンドでコンテナに入ります。
(コンテナが起動していない場合、「AE2100 シリーズ SDK 取扱説明書 ーDeepLearning 編ー」P.20を参考に起動させてください。)
root@ae2100:~# docker exec -it centos-openvino /bin/bash
tarを展開します。
# cd
# tar xvf human_pose.tar
依存パッケージのインストール(AE2100側)
※既に実施済みでしたら読み飛ばしてください
デモ実行にffmpegやGTK+が必要なため、依存パッケージの導入をおこなっていないようでしたらインストールをおこないます。
インターネットへの接続が必要です
# cd /opt/intel/openvino/install_dependencies
# yum clean all
# ./install_openvino_dependencies.sh
lib_cpu_extensionはSSE4.x用のものをリネームコピーします。
# cd /opt/intel/openvino/inference_engine/lib/intel64
# cp libcpu_extension_sse4.so libcpu_extension.so
Human Pose Estimationの実行(AE2100側)
OpenVINOの環境変数を設定します。
# source /opt/intel/openvino/bin/setupvars.sh
ウインドウ表示先のIPアドレスを設定します。PCのIPアドレスを指定します。
# export DISPLAY=192.168.100.101:0.0
準備が整いましたのでDomosの中から今回は” Human Pose Estimation” を実行してみたいと思います。
※ 事前に前回の記事に従ってWindows PC側のXlaunchを起動しておいてください。
実行ディレクトリに移動します。
# cd
# cd human_pose
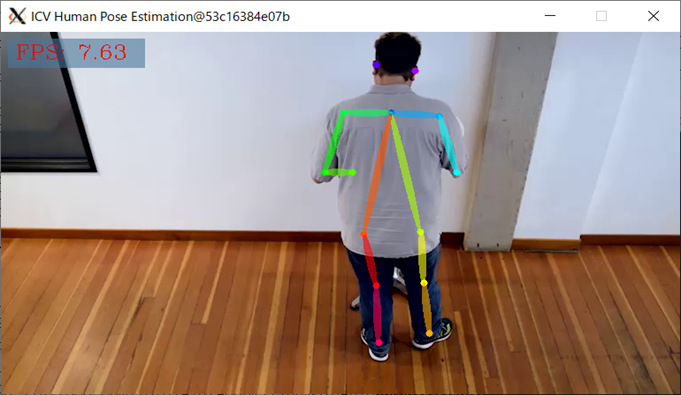
まずは内蔵GPUで実行してみます。
# ./human_pose_estimation_demo -i one-by-one-person-detection.mp4 -m human-pose-estimation-0001.xml -d GPU
次にデバイスをかえてHDDLで実行してみます。
# ./human_pose_estimation_demo -i one-by-one-person-detection.mp4 -m human-pose-estimation-0001.xml -d HDDL
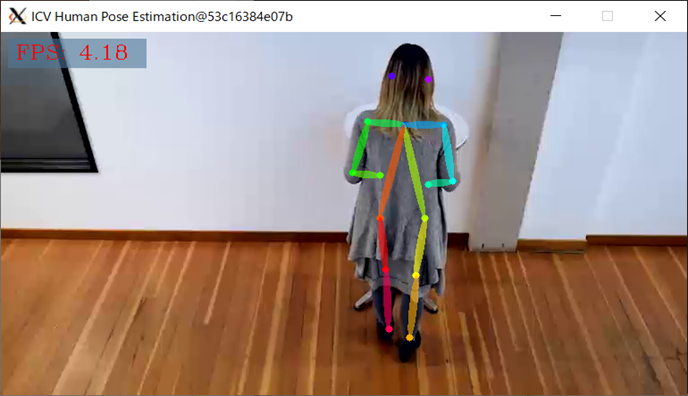
4.2FPSぐらいした。ウインドウ上で"ESC"キーで押すと処理が終了できます。

HDDLの方が遅い結果になったのは、OpenVINO2019R3.1付属の”human_pose_estimation_demo”が
AE2100に搭載しているMyriad X 2チップに適した実装になっていないためです。
パフォーマンスの引き出すための実装方法は、今後機会を設けて紹介したいと思います。
まとめ
今回はDomosのビルド方法とAE2100上での実行をおこないました。
次回はAE2100にWebカメラを接続して物体検出に挑戦してみます。
