MobileNet-SSD-RealSense 
◆ 前回記事
デプスカメラRealSenseD435で "紫色のイカ" や "オレンジ色の玉ねぎ" を切り取ったり "金髪の人" を追っかけて距離を測る(1) with Ubuntu16.04
の続き
◆ はじめに
さて、今回は Intel Movidius Neural Compute Stick で RaspberryPi3 をゴリゴリにドーピングした状態で MobileNet-SSD による物体検出をしつつ、 RealSense D435 で対象物までの距離も測定してしまおうと思う。
あらゆる要素乗っけ盛りでいく。
ドラゴン○ の スカウター みたいに、マルチで物体を捕捉しながら距離を計測する。
断っておくが、別に Intel の信者ではない。
シングルスティック かつ シングルスレッド で適当に実装。
マルチスティックはまた今度。
RealSense非対応だが、マルチスティック かつ マルチスレッド の Python実装イメージの記事はこちら。
枠が少しズレることを許容できるならクソ速い。
環境の構築方法は、 前回の記事 を参照されたい。
そして、先に結果のGIF画像を公開しておく。
サイズ圧縮のため、下記GIF画像のフレームレートは 3FPS まで落としてある。
YouTube動画を見ていただくと分かると思うが、ラズパイ かつ Python単体 かつ Stick1本 でも、想像していたよりかなりレスポンスが良くてビックリした。
【YouTube動画】 https://youtu.be/77cV9fyqJ1w
【Github】 https://github.com/PINTO0309/MobileNet-SSD-RealSense
実際は 6.5 FPS
◆ 環境
1.RaspberryPi3 + Raspbian Stretch (USB2.0 Port)
2.Intel RealSense D435
3.Intel Movidius Neural Compute Stick 1本
4.OpenCV3.4.1
5.TBB (Intel Threading Building Blocks)
6.Numpy
7.Python3.5
8.NCSDK v1.12.00
9.OpenGL Driver ← 今回は無効にした
10.HDMIディスプレイ
◆ MobileNet-SSDの実行手順
1.OpenGL Driver を無効化する
$ sudo raspi-config
"7.Advanced Options" - "A7 GL Driver" - "G3 Legacy"
2.下記コマンドを実行し、graphファイルをダウンロードする
$ cd ~
$ wget https://github.com/PINTO0309/MobileNet-SSD/raw/master/graph
3.下記のPythonプログラムを作成する。 ファイル名はお好きな名前でどうぞ。
$ cd ~
$ nano SingleStickSSDwithRealSense.py
import sys
graph_folder="./"
if sys.version_info.major < 3 or sys.version_info.minor < 4:
    print("Please using python3.4 or greater!")
    exit(1)

if len(sys.argv) > 1:
    graph_folder = sys.argv[1]

import pyrealsense2 as rs
import numpy as np
import cv2
from mvnc import mvncapi as mvnc
from os import system
import io, time
from os.path import isfile, join
import re

LABELS = ('background',
          'aeroplane', 'bicycle', 'bird', 'boat',
          'bottle', 'bus', 'car', 'cat', 'chair',
          'cow', 'diningtable', 'dog', 'horse',
          'motorbike', 'person', 'pottedplant',
          'sheep', 'sofa', 'train', 'tvmonitor')

mvnc.SetGlobalOption(mvnc.GlobalOption.LOG_LEVEL, 2)
devices = mvnc.EnumerateDevices()
if len(devices) == 0:
    print("No devices found")
    quit()
print(len(devices))

devHandle   = []
graphHandle = []

with open(join(graph_folder, "graph"), mode="rb") as f:
    graph = f.read()

for devnum in range(len(devices)):
    devHandle.append(mvnc.Device(devices[devnum]))
    devHandle[devnum].OpenDevice()
    graphHandle.append(devHandle[devnum].AllocateGraph(graph))
    graphHandle[devnum].SetGraphOption(mvnc.GraphOption.ITERATIONS, 1)
    iterations = graphHandle[devnum].GetGraphOption(mvnc.GraphOption.ITERATIONS)

print("\nLoaded Graphs!!!")


# Configure depth and color streams
pipeline = rs.pipeline()
config = rs.config()
config.enable_stream(rs.stream.depth, 640, 480, rs.format.z16, 30)
config.enable_stream(rs.stream.color, 640, 480, rs.format.bgr8, 30)

# Start streaming
pipeline.start(config)

try:
    while True:

        # Wait for a coherent pair of frames: depth and color
        frames = pipeline.wait_for_frames()
        depth_frame = frames.get_depth_frame()
        color_frame = frames.get_color_frame()
        if not depth_frame or not color_frame:
            continue

        # Convert images to numpy arrays
        depth_image = np.asanyarray(depth_frame.get_data())
        color_image = np.asanyarray(color_frame.get_data())

        #dnn
        im = cv2.resize(color_image, (300, 300))
        im = im - 127.5
        im = im * 0.007843
        graphHandle[0].LoadTensor(im.astype(np.float16), None)
        out, userobj = graphHandle[0].GetResult()

        # Show images
        height = color_image.shape[0]
        width = color_image.shape[1]
        num_valid_boxes = int(out[0])

        if num_valid_boxes > 0:

            for box_index in range(num_valid_boxes):
                base_index = 7+ box_index * 7
                if (not np.isfinite(out[base_index]) or
                    not np.isfinite(out[base_index + 1]) or
                    not np.isfinite(out[base_index + 2]) or
                    not np.isfinite(out[base_index + 3]) or
                    not np.isfinite(out[base_index + 4]) or
                    not np.isfinite(out[base_index + 5]) or
                    not np.isfinite(out[base_index + 6])):
                    continue

                x1 = max(0, int(out[base_index + 3] * height))
                y1 = max(0, int(out[base_index + 4] * width))
                x2 = min(height, int(out[base_index + 5] * height))
                y2 = min(width, int(out[base_index + 6] * width))

                object_info_overlay = out[base_index:base_index + 7]

                min_score_percent = 60
                source_image_width = width
                source_image_height = height

                base_index = 0
                class_id = object_info_overlay[base_index + 1]
                percentage = int(object_info_overlay[base_index + 2] * 100)
                if (percentage <= min_score_percent):
                    continue

                box_left = int(object_info_overlay[base_index + 3] * source_image_width)
                box_top = int(object_info_overlay[base_index + 4] * source_image_height)
                box_right = int(object_info_overlay[base_index + 5] * source_image_width)
                box_bottom = int(object_info_overlay[base_index + 6] * source_image_height)
                meters = depth_frame.as_depth_frame().get_distance(box_left+int((box_right-box_left)/2), box_top+int((box_bottom-box_top)/2))
                #print(meters)
                label_text = LABELS[int(class_id)] + " (" + str(percentage) + "%)"+ " {:.2f}".format(meters) + " meters away"

                box_color = (255, 128, 0)
                box_thickness = 1
                cv2.rectangle(color_image, (box_left, box_top), (box_right, box_bottom), box_color, box_thickness)

                label_background_color = (125, 175, 75)
                label_text_color = (255, 255, 255)

                label_size = cv2.getTextSize(label_text, cv2.FONT_HERSHEY_SIMPLEX, 0.5, 1)[0]
                label_left = box_left
                label_top = box_top - label_size[1]
                if (label_top < 1):
                    label_top = 1
                label_right = label_left + label_size[0]
                label_bottom = label_top + label_size[1]
                cv2.rectangle(color_image, (label_left - 1, label_top - 1), (label_right + 1, label_bottom + 1), label_background_color, -1)
                cv2.putText(color_image, label_text, (label_left, label_bottom), cv2.FONT_HERSHEY_SIMPLEX, 0.5, label_text_color, 1)

        cv2.namedWindow('RealSense', cv2.WINDOW_AUTOSIZE)
        cv2.imshow('RealSense', cv2.resize(color_image,(width, height)))
        if cv2.waitKey(1)&0xFF == ord('q'):
            break

except:
    import traceback
    traceback.print_exc()

finally:

    # Stop streaming
    pipeline.stop()
    for devnum in range(len(devices)):
        graphHandle[devnum].DeallocateGraph()
        devHandle[devnum].CloseDevice()
    print("\n\nFinished\n\n")
    sys.exit()
4.RealSense D435 と Neural Compute Stick を RaspberryPi3 のUSBポートへ接続する
5.Pythonプログラムを実行する
$ python3 SingleStickSSDwithRealSense.py
そう、何を隠そうたったのこれだけ。
はじめに へ掲載のとおりの動きとなる。
次は OpenVINO の導入にチャレンジしてみたい。
※中間バイナリを生成することで、Neural Compute Stick でも Tensorflow のモデルが使えるようになる、らしい。現状は Caffe ベース。
【2018/07/07追記】
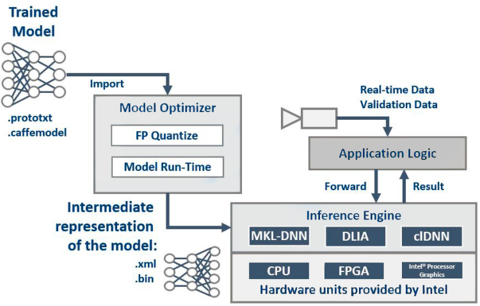
OpenVINO は Caffe, TensorFlow, MXNet, Kaldi, ONNX でそれぞれ生成したモデルを、共通フォーマットの中間バイナリ(IR [Intermediate representation of the model])へ変換し、推論エンジンAPI(Inference Engine)を経由して共通的に実行できる、というもの。
ただ、 ARMアーキテクチャ に対応していなかった。
実行基盤は Intel の CPU にしか対応していない。
Ubuntu 16.04 x86/64 ではすぐに使えたけど記事にするほどでもなく、RaspberryPiで使えないなら、とってもツマラナイ。
リクエストをいただいたり、気が向いたりしたら、Ubuntuでの記事を書こうと思う。
https://software.intel.com/en-us/openvino-toolkit
https://software.intel.com/en-us/articles/OpenVINO-Install-Linux
https://ncsforum.movidius.com/discussion/746/is-it-possible-to-use-tensorflow-ssd-mobilenet-on-ncs
https://software.intel.com/en-us/articles/OpenVINO-InferEngine#inpage-nav-8
https://software.intel.com/en-us/articles/accelerate-deep-learning-inference-with-integrated-intel-processor-graphics-rev-2-0
.
https://github.com/intel/mkl-dnn
https://github.com/intel/clDNN