MobileNet-SSD-RealSense 
I wrote it in English in the comment section.
スマホで閲覧すると画像が激重なためPCでの閲覧を推奨
◆はじめに
Intelのアーキテクト AshwinVijayakumar(アシュウィンヴィジャヤクマール) から、「仲間が頑張っているのを見るととても嬉しい。MobileNet SSDもなかなかCOOLだぜ。調べてみなよ。」というニュアンスの、押しつけがましい有難いコメントをいただいたため、早速、速度と精度の観点でRaspberryPiでどれほどのパフォーマンスが得られるか、を検証する。
SSD は Yoloより遅い、と今まで思い込んでいたが、はたしてどうかな?
◆いきなり結果
あまりの速さと精度で検出されるため、あっけにとられてしまった。
今までYoloで頑張っていた自分は一体なんだったのか、と、軽い怒りすら覚えるレベル。
前回記事 https://qiita.com/PINTO/items/db3ab44a3e2bcd87f2d8
「YoloV2+Neural Compute Stick(NCS)+Raspberry Piの限界性能に挑戦」
の性能限界をあっさり超えてしまった。
TinyYoloV2の2倍の速度 かつ 数倍の検出精度。
しかも、今回はPythonファイルとOpenGLのみで動く。
裏でコソコソとCのバイナリやPythonのラッパーを動かしたりしない。
一応、マルチスティック対応 (Multi Stick) のまま。
もちろん大型ディスプレイへのフルスクリーン表示のまま。
使用した Neural Compute Stick は1本。
無理してMulti Stickでパフォーマンスを上げる意義すら疑わしい。。。
Intelの立場からしたら売り上げ減少という自爆必至のネガティブキャンペーンとなってしまうのでは?
念のため、Stick 3本での動画撮影はまた後日やろうと思う。
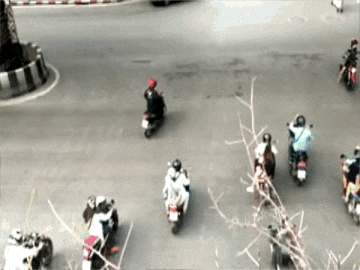
2018/03/17 Stick3本構成での動画を公開。やっぱり3本にすると異様に速かった。拾い過ぎて気持ち悪い。
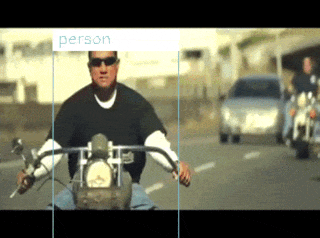
1枚目:MobileNet SSD (Stick 1本構成、Youtube参照を推奨)
2枚目:TinyYolo

3枚目:MobileNet SSD (Stick 3本構成、動きがマイルドな動画版、Youtube参照を推奨)

4枚目:MobileNet SSD (Stick 3本構成、動きが激しい動画版、Youtube参照を推奨)
MobileNetSSD Youtube動画 Single Stick(1本) https://youtu.be/u03hueUVbek
MobileNetSSD Youtube動画 Multi Stick(3本/Mild) https://youtu.be/NvlaVeHVYgA
MobileNetSSD Youtube動画 Multi Stick(3本/Hard) https://youtu.be/sQnFbRSqIA8
画面表示サイズ:1920x1080
動画再生フレームレート:約 15FPS(動画再生とプレディクションは非同期実行)
プレディクションレート:約 8FPS以上
Movidius Neural Compute Stick の本数:1本
Neural Compute Stickによる推論+OpenCVによる加工処理の合計処理時間:0.12秒
この記事の2倍のパフォーマンスを達成した記事はこちら。
MultiThread ではなく、 MultiProcessing で 4Core ブースト。
Intelさんがまた褒めてくれたヽ(゚∀゚)ノイエァ RaspberryPi3でMobileNet-SSD(MobileNetSSD)物体検出と測距 再生フレームレート25FPS以上 + 予測レート12FPSを達成したよ
さらに上記記事よりも高速ブーストした記事は下記。
Stick 5本 で 30FPS の検出レートを獲得。
[検出レート約30FPS] RaspberryPi3 Model B(プラスなし) で TX2 "より少し遅い" MobilenetSSDの物体検出レートを獲得しつつ MultiModel (VOC+WIDER FACE) に対応する
◆環境
・RaspberryPi 3 + Raspbian Stretch
・NCSDK v1.12.00
・Intel Movidius Neural Compute Stick 1本
・OpenCV 3.4.0
・OpenGL
・numpy
・Samba
・UVC対応のUSB-Webカメラ
◆素材
graphファイル
wget https://github.com/PINTO0309/MobileNet-SSD/raw/master/graph
※SBCなどの軽量・ロースペック端末での利用をターゲットにした学習データとロジックのため、高解像度ではうまく認識されない点に注意。目安はQVGA 320x240
◆レシピ
1.下記コードをコピペして任意のパスへファイル作成。
**MultiStickSSD.py**
import sys
graph_folder="./"
if sys.version_info.major < 3 or sys.version_info.minor < 4:
    print("Please using python3.4 or greater!")
    exit(1)

if len(sys.argv) > 1:
    graph_folder = sys.argv[1]

from mvnc import mvncapi as mvnc
import numpy as np
import cv2
from os import system
import io, time
from os.path import isfile, join
from queue import Queue
from threading import Thread, Event, Lock
import re
from time import sleep

from OpenGL.GL import *
from OpenGL.GLU import *
from OpenGL.GLUT import *

mvnc.SetGlobalOption(mvnc.GlobalOption.LOG_LEVEL, 2)

devices = mvnc.EnumerateDevices()
if len(devices) == 0:
    print("No devices found")
    quit()
print(len(devices))

devHandle   = []
graphHandle = []

with open(join(graph_folder, "graph"), mode="rb") as f:
    graph = f.read()

for devnum in range(len(devices)):
    devHandle.append(mvnc.Device(devices[devnum]))
    devHandle[devnum].OpenDevice()
    graphHandle.append(devHandle[devnum].AllocateGraph(graph))
    graphHandle[devnum].SetGraphOption(mvnc.GraphOption.ITERATIONS, 1)
    iterations = graphHandle[devnum].GetGraphOption(mvnc.GraphOption.ITERATIONS)

print("\nLoaded Graphs!!!")

cam = cv2.VideoCapture(0)
# cam = cv2.VideoCapture('/home/pi/SSD_MobileNet/xxxx.mp4')

if cam.isOpened() != True:
    print("Camera/Movie Open Error!!!")
    quit()

windowWidth = 320
windowHeight = 240
cam.set(cv2.CAP_PROP_FRAME_WIDTH, windowWidth)
cam.set(cv2.CAP_PROP_FRAME_HEIGHT, windowHeight)

lock = Lock()
frameBuffer = []
results = Queue()
lastresults = None

LABELS = ('background',
          'aeroplane', 'bicycle', 'bird', 'boat',
          'bottle', 'bus', 'car', 'cat', 'chair',
          'cow', 'diningtable', 'dog', 'horse',
          'motorbike', 'person', 'pottedplant',
          'sheep', 'sofa', 'train', 'tvmonitor')

def init():
    glClearColor(0.7, 0.7, 0.7, 0.7)

def idle():
    glutPostRedisplay()

def resizeview(w, h):
    glViewport(0, 0, w, h)
    glLoadIdentity()
    glOrtho(-w / 1920, w / 1920, -h / 1080, h / 1080, -1.0, 1.0)

def keyboard(key, x, y):
    key = key.decode('utf-8')
    if key == 'q':
        lock.acquire()
        while len(frameBuffer) > 0:
            frameBuffer.pop()
        lock.release()
        for devnum in range(len(devices)):
            graphHandle[devnum].DeallocateGraph()
            devHandle[devnum].CloseDevice()
        print("\n\nFinished\n\n")
        sys.exit()


def camThread():
    global lastresults

    s, img = cam.read()

    if not s:
        print("Could not get frame")
        return 0

    lock.acquire()
    if len(frameBuffer)>10:
        for i in range(10):
            del frameBuffer[0]
    frameBuffer.append(img)
    lock.release()
    res = None

    if not results.empty():
        res = results.get(False)
        img = overlay_on_image(img, res)
        img = cv2.cvtColor(img, cv2.COLOR_BGR2RGB)
        h, w = img.shape[:2]
        glTexImage2D(GL_TEXTURE_2D, 0, GL_RGB, w, h, 0, GL_RGB, GL_UNSIGNED_BYTE, img)
        lastresults = res
    else:
        imdraw = overlay_on_image(img, lastresults)
        imdraw = cv2.cvtColor(imdraw, cv2.COLOR_BGR2RGB)
        h, w = imdraw.shape[:2]
        glTexImage2D(GL_TEXTURE_2D, 0, GL_RGB, w, h, 0, GL_RGB, GL_UNSIGNED_BYTE, imdraw)


    glClear(GL_COLOR_BUFFER_BIT | GL_DEPTH_BUFFER_BIT)
    glColor3f(1.0, 1.0, 1.0)
    glEnable(GL_TEXTURE_2D)
    glTexParameteri(GL_TEXTURE_2D, GL_TEXTURE_MIN_FILTER, GL_LINEAR)
    glTexParameteri(GL_TEXTURE_2D, GL_TEXTURE_MAG_FILTER, GL_LINEAR)
    glBegin(GL_QUADS)
    glTexCoord2d(0.0, 1.0)
    glVertex3d(-1.0, -1.0,  0.0)
    glTexCoord2d(1.0, 1.0)
    glVertex3d( 1.0, -1.0,  0.0)
    glTexCoord2d(1.0, 0.0)
    glVertex3d( 1.0,  1.0,  0.0)
    glTexCoord2d(0.0, 0.0)
    glVertex3d(-1.0,  1.0,  0.0)
    glEnd()
    glFlush()
    glutSwapBuffers()

def inferencer(results, lock, frameBuffer, handle):
    failure = 0
    sleep(1)
    while failure < 100:

        lock.acquire()
        if len(frameBuffer) == 0:
            lock.release()
            failure += 1
            continue

        img = frameBuffer[-1].copy()
        del frameBuffer[-1]
        failure = 0
        lock.release()

        now = time.time()
        im = preprocess_image(img)
        handle.LoadTensor(im.astype(np.float16), None)
        out, userobj = handle.GetResult()
        results.put(out)
        print("elapsedtime = ", time.time() - now)


def preprocess_image(src):

    img = cv2.resize(src, (300, 300))
    img = img - 127.5
    img = img * 0.007843

    return img


def overlay_on_image(display_image, object_info):

    if isinstance(object_info, type(None)):
        return display_image

    num_valid_boxes = int(object_info[0])
    img_cp = display_image.copy()

    if num_valid_boxes > 0:

        for box_index in range(num_valid_boxes):
            base_index = 7+ box_index * 7
            if (not np.isfinite(object_info[base_index]) or
                not np.isfinite(object_info[base_index + 1]) or
                not np.isfinite(object_info[base_index + 2]) or
                not np.isfinite(object_info[base_index + 3]) or
                not np.isfinite(object_info[base_index + 4]) or
                not np.isfinite(object_info[base_index + 5]) or
                not np.isfinite(object_info[base_index + 6])):
                continue

            x1 = max(0, int(object_info[base_index + 3] * img_cp.shape[0]))
            y1 = max(0, int(object_info[base_index + 4] * img_cp.shape[1]))
            x2 = min(img_cp.shape[0], int(object_info[base_index + 5] * img_cp.shape[0]))
            y2 = min(img_cp.shape[1], int(object_info[base_index + 6] * img_cp.shape[1]))

            x1_ = str(x1)
            y1_ = str(y1)
            x2_ = str(x2)
            y2_ = str(y2)

            #print('box at index: ' + str(box_index) + ' : ClassID: ' + LABELS[int(object_info[base_index + 1])] + '  '
            #      'Confidence: ' + str(object_info[base_index + 2]*100) + '%  ' +
            #      'Top Left: (' + x1_ + ', ' + y1_ + ')  Bottom Right: (' + x2_ + ', ' + y2_ + ')')

            object_info_overlay = object_info[base_index:base_index + 7]

            min_score_percent = 10
            source_image_width = img_cp.shape[1]
            source_image_height = img_cp.shape[0]

            base_index = 0
            class_id = object_info_overlay[base_index + 1]
            percentage = int(object_info_overlay[base_index + 2] * 100)
            if (percentage <= min_score_percent):
                continue

            label_text = LABELS[int(class_id)] + " (" + str(percentage) + "%)"
            box_left = int(object_info_overlay[base_index + 3] * source_image_width)
            box_top = int(object_info_overlay[base_index + 4] * source_image_height)
            box_right = int(object_info_overlay[base_index + 5] * source_image_width)
            box_bottom = int(object_info_overlay[base_index + 6] * source_image_height)

            box_color = (255, 128, 0)
            box_thickness = 1
            cv2.rectangle(img_cp, (box_left, box_top), (box_right, box_bottom), box_color, box_thickness)

            label_background_color = (125, 175, 75)
            label_text_color = (255, 255, 255)

            label_size = cv2.getTextSize(label_text, cv2.FONT_HERSHEY_SIMPLEX, 0.5, 1)[0]
            label_left = box_left
            label_top = box_top - label_size[1]
            if (label_top < 1):
                label_top = 1
            label_right = label_left + label_size[0]
            label_bottom = label_top + label_size[1]
            cv2.rectangle(img_cp, (label_left - 1, label_top - 1), (label_right + 1, label_bottom + 1), label_background_color, -1)
            cv2.putText(img_cp, label_text, (label_left, label_bottom), cv2.FONT_HERSHEY_SIMPLEX, 0.5, label_text_color, 1)

    return img_cp

glutInitWindowPosition(0, 0)
glutInit(sys.argv)
glutInitDisplayMode(GLUT_RGBA | GLUT_DOUBLE )
glutCreateWindow("DEMO")
glutFullScreen()
glutDisplayFunc(camThread)
glutReshapeFunc(resizeview)
glutKeyboardFunc(keyboard)
init()
glutIdleFunc(idle)

print("press 'q' to quit!\n")

threads = []

for devnum in range(len(devices)):
  t = Thread(target=inferencer, args=(results, lock, frameBuffer, graphHandle[devnum]))
  t.start()
  threads.append(t)

glutMainLoop()
2.「素材」セクションのリンクからgraphファイルをダウンロードし、MultiStickSSD.py と同じフォルダパスへ配置。
3.MultiStickSSD.py 実行前にRaspberry Piのターミナルで下記コマンドを順に実行し、OpenGLの開発環境を導入する。
$ sudo apt-get install python-opengl
$ sudo -H pip3 install pyopengl
$ sudo -H pip3 install pyopengl_accelerate
$ sudo raspi-config
4.「7.Advanced Options」-「A7 GL Driver」-「G2 GL (Fake KMS)」の順に選択し、Raspberry Pi のOpenGL Driver を有効にする。
5.Raspberry Pi を再起動する。
6.MultiStickSSD.py を実行する。
◆参考にさせていただいたサイト
https://github.com/movidius/ncappzoo/tree/master/caffe/SSD_MobileNet
https://github.com/FreeApe/VGG-or-MobileNet-SSD
https://github.com/chuanqi305/MobileNet-SSD
◆最後に
ふざけて、いや、真面目に Stick3本も買ってしまったじゃないか!!
どうしてくれるんだよ!? Intel !!!
はぁ…いい加減論文読むか…。専門用語バリバリの日本語も英語も読めないけど。
地球のみんな!
オラに「いいね」を分けてくれ!
2018/03/14追記
みなさん、ドラゴン〇好きなんですね。
まさか、これしきの記事がトップフィードに表示されるなんて思いもよりませんでした。
恐るべし、元気〇
不用意に「いいね」を押してしまったそこのあなた。同世代であることが丸わかりですよ。
次は論文読み込みの前にTBB導入にチャレンジして更にパフォーマンスアップできないか試してみます。
2018/03/15追記
TBB(Intel Threading Building Blocks)をOpenCVに組み込んでも性能改善は全くありませんでした。
一応、TBBの導入パッケージを作成しましたので、気になる方・OpenCVへの導入を考えている方は →こちら← がご参考になれば幸いです。
2018/03/29追記
Githubに公開、何やらcloneされているようなのでそれなりに需要はあるんですね。
https://github.com/PINTO0309/MobileNet-SSD
https://github.com/PINTO0309/MobileNet-SSD-RealSense