I wrote it in English in the comment section.
◆はじめに
題名のとおり、Raspberry Pi 3 と Movidius Neural Compute Stickの組み合わせでの限界性能に挑戦する。
見世物として大型のディスプレイにフルスクリーンでレンダリングしたくなったため、大画面対応 かつ 多少の精度劣化はいとわず、処理速度を追求してどこまで使い物になるかを検証。
最終的にはエッジのSBCで一定の性能を確保することが目的のため、SBCに比べてCPU性能の良いPCでは検証しない。
TX2やUPBoardなどのハイエンドSBCなら更に爆速になるはず。
やりたいことは色々あるのにGPUを持っていないため、自前で所有している人がうらやましい。。。
2018/03/11追記
次回の実装は今回の実装の更に2倍以上パフォーマンスが出る。MobileNet SSD
https://qiita.com/PINTO/items/b97b3334ed452cb555e2
◆いきなり結果
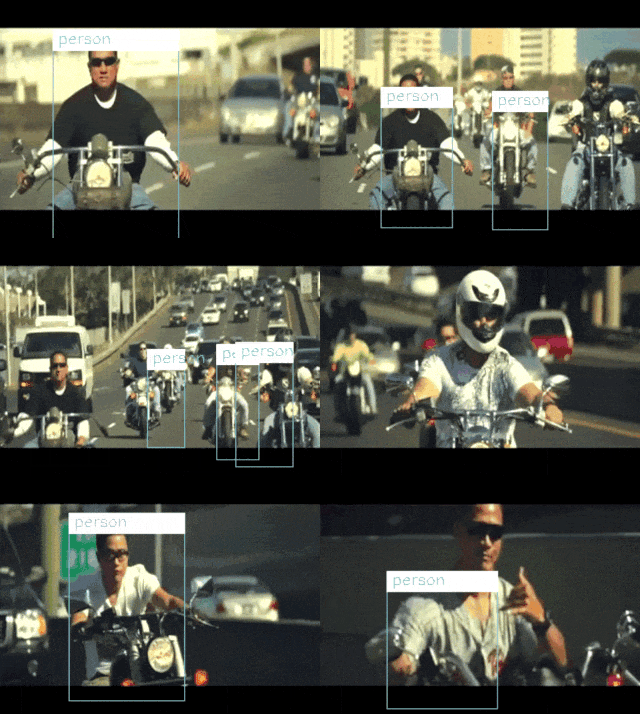
フルスクリーン表示にも関わらず思いのほか速いうえ、取りこぼしは多いがStick1本でもそこそこ検出してくれている。
シャレ程度に客引きのオモチャとしては使えそうな予感。
ラズパイのくせに、生意気だ。
画像処理系はOpenCVとSkimageだけでは非力すぎたため、レンダリング部のみ OpenGL を採用。
今回は Raspberry pi 側の性能もちゃんと活用。
学習データは320x320の入力サイズで、darknetを使ってイチから新しく学習し直したものを使用。
学習量は Google Cloud Platform の NVIDIA Tesla K80 GPU × 4機 (無料)にて、
400,000 epoch / 4日
学習終了時の損失値 14.0 前後
IOU値 平均 0.7 前後
Recall値 平均 0.8 前後
20クラス
クラス分類性能 0.88前後
オブジェクト検出性能 0.35前後
教師データ 約14,000枚
Youtube動画210,000epoch https://youtu.be/akIb2WbXK6w
Youtube動画400,000epoch https://youtu.be/L4RvVLyo8Rc

オッサンが最後にバッチリとポーズを決めているところで動画が終わっていることに他意はない。
画面表示サイズ:1920x1080
動画再生フレームレート:約 30FPS(動画再生とプレディクションは非同期実行)
プレディクションレート:約 4FPS
Movidius Neural Compute Stick の本数:1本
Stick推論1回あたり0.1秒前後 + OpenCVによる画像加工処理0.15秒前後
ご本家の動画背景に写っているディスプレイ映像のレイテンシと比べてみると。。。
Youtube動画 https://www.youtube.com/watch?v=jMcrbhIa9EA
Stick無し、ラズパイのCPUのみで処理、入力サイズ416x416、シングルスレッドの場合に比べ、およそ30倍以上高速に動作する。
◆環境
・Raspbian Stretch
・NCSDK v1.12.00
・Intel Movidius Neural Compute Stick 1本
・OpenCV 3.4.0
・OpenGL
・Samba
・tinyYoloV2+NCS実行環境、構築手順は下記
(1)https://qiita.com/PINTO/items/b084fe3dc716c42e2867
(2)https://qiita.com/PINTO/items/7f13fcb7c894c27691b2
◆素材
460,000epoch 320x320 weightsファイル
https://drive.google.com/open?id=136LAU7ghyXTFa8_x8U1clBFOwZhcCZSX
cfgファイル
https://drive.google.com/open?id=1ug0Rn1BCos9E7wojt5XxtQxNmAWGqAM5
dataファイル
https://drive.google.com/open?id=1DAct_48spVxkTm1GrmYj7l4ePUmsZIzj
460,000epoch graphファイル
https://drive.google.com/open?id=1C08mgr2Y8b4_pSgBSHQDknjNQqZqCMdx
◆レシピ
*2018/03/31追記 Githubへも公開
https://github.com/PINTO0309/TinyYolo.git
1.前回 https://qiita.com/PINTO/items/7f13fcb7c894c27691b2 のMultiStick対応の要素は生かしつつ、マルチスレッドの画面描画系をOpenGLへ総入れ替え。
import sys
graph_folder="./"
if sys.version_info.major < 3 or sys.version_info.minor < 4:
    print("Please using python3.4 or greater!")
    exit(1)

if len(sys.argv) > 1:
    graph_folder = sys.argv[1]

from mvnc import mvncapi as mvnc
import numpy as np
import cv2
from os import system
import io, time
from os.path import isfile, join
from queue import Queue
from threading import Thread, Event, Lock
import re
from time import sleep
from Visualize import *
from libpydetector import YoloDetector

from OpenGL.GL import *
from OpenGL.GLU import *
from OpenGL.GLUT import *

mvnc.SetGlobalOption(mvnc.GlobalOption.LOG_LEVEL, 2)

devices = mvnc.EnumerateDevices()
if len(devices) == 0:
    print("No devices found")
    quit()
print(len(devices))

devHandle   = []
graphHandle = []

with open(join(graph_folder, "graph"), mode="rb") as f:
    graph = f.read()

for devnum in range(len(devices)):
    devHandle.append(mvnc.Device(devices[devnum]))
    devHandle[devnum].OpenDevice()

    graphHandle.append(devHandle[devnum].AllocateGraph(graph))
    graphHandle[devnum].SetGraphOption(mvnc.GraphOption.ITERATIONS, 1)
    iterations = graphHandle[devnum].GetGraphOption(mvnc.GraphOption.ITERATIONS)

    dim = (320,320)
    blockwd = 9
    targetBlockwd = 9
    wh = blockwd*blockwd
    classes = 20
    threshold = 0.3
    nms = 0.4

print("\nLoaded Graphs!!!")

cam = cv2.VideoCapture(0)
# cam = cv2.VideoCapture('/home/pi/YoloV2NCS/detectionExample/xxxx.mp4')

if cam.isOpened() != True:
    print("Camera/Movie Open Error!!!")
    quit()

widowWidth = 320
windowHeight = 240
cam.set(cv2.CAP_PROP_FRAME_WIDTH, widowWidth)
cam.set(cv2.CAP_PROP_FRAME_HEIGHT, windowHeight)

lock = Lock()
frameBuffer = []
results = Queue()
lastresults = None
detector = YoloDetector(1)


def init():
    glClearColor(0.7, 0.7, 0.7, 0.7)

def idle():
    glutPostRedisplay()

def resizeview(w, h):
    glViewport(0, 0, w, h)
    glLoadIdentity()
    glOrtho(-w / 1920, w / 1920, -h / 1080, h / 1080, -1.0, 1.0)

def keyboard(key, x, y):
    key = key.decode('utf-8')
    if key == 'q':
        lock.acquire()
        while len(frameBuffer) > 0:
            frameBuffer.pop()
        lock.release()
        for devnum in range(len(devices)):
            graphHandle[devnum].DeallocateGraph()
            devHandle[devnum].CloseDevice()
        print("\n\nFinished\n\n")
        sys.exit()


def camThread():
    global lastresults

    s, img = cam.read()

    if not s:
        print("Could not get frame")
        return 0

    lock.acquire()
    if len(frameBuffer)>10:
        for i in range(10):
            del frameBuffer[0]
    frameBuffer.append(img)
    lock.release()
    res = None

    if not results.empty():
        res = results.get(False)
        if res == None:
            if lastresults == None:
                img = cv2.cvtColor(img, cv2.COLOR_BGR2RGB)
                h, w = img.shape[:2]
                glTexImage2D(GL_TEXTURE_2D, 0, GL_RGB, w, h, 0, GL_RGB, GL_UNSIGNED_BYTE, img)
            else:
                imdraw = Visualize(img, lastresults)
                imdraw = cv2.cvtColor(imdraw, cv2.COLOR_BGR2RGB)
                h, w = imdraw.shape[:2]
                glTexImage2D(GL_TEXTURE_2D, 0, GL_RGB, w, h, 0, GL_RGB, GL_UNSIGNED_BYTE, imdraw)
        else:
            img = Visualize(img, res)
            img = cv2.cvtColor(img, cv2.COLOR_BGR2RGB)
            h, w = img.shape[:2]
            glTexImage2D(GL_TEXTURE_2D, 0, GL_RGB, w, h, 0, GL_RGB, GL_UNSIGNED_BYTE, img)
            lastresults = res
    else:
        if lastresults == None:
            img = cv2.cvtColor(img, cv2.COLOR_BGR2RGB)
            h, w = img.shape[:2]
            glTexImage2D(GL_TEXTURE_2D, 0, GL_RGB, w, h, 0, GL_RGB, GL_UNSIGNED_BYTE, img)
        else:
            imdraw = Visualize(img, lastresults)
            imdraw = cv2.cvtColor(imdraw, cv2.COLOR_BGR2RGB)
            h, w = imdraw.shape[:2]
            glTexImage2D(GL_TEXTURE_2D, 0, GL_RGB, w, h, 0, GL_RGB, GL_UNSIGNED_BYTE, imdraw)

    glClear(GL_COLOR_BUFFER_BIT | GL_DEPTH_BUFFER_BIT)
    glColor3f(1.0, 1.0, 1.0)
    glEnable(GL_TEXTURE_2D)
    glTexParameteri(GL_TEXTURE_2D, GL_TEXTURE_MIN_FILTER, GL_LINEAR)
    glTexParameteri(GL_TEXTURE_2D, GL_TEXTURE_MAG_FILTER, GL_LINEAR)
    glBegin(GL_QUADS)
    glTexCoord2d(0.0, 1.0)
    glVertex3d(-1.0, -1.0,  0.0)
    glTexCoord2d(1.0, 1.0)
    glVertex3d( 1.0, -1.0,  0.0)
    glTexCoord2d(1.0, 0.0)
    glVertex3d( 1.0,  1.0,  0.0)
    glTexCoord2d(0.0, 0.0)
    glVertex3d(-1.0,  1.0,  0.0)
    glEnd()
    glFlush()
    glutSwapBuffers()

def inferencer(results, lock, frameBuffer, handle):
    failure = 0
    sleep(1)
    while failure < 100:

        lock.acquire()
        if len(frameBuffer) == 0:
            lock.release()
            failure += 1
            continue

        img = frameBuffer[-1].copy()
        del frameBuffer[-1]
        failure = 0
        lock.release()

        start = time.time()
        imgw = img.shape[1]
        imgh = img.shape[0]

        now = time.time()
        im,offx,offy = PrepareImage(img, dim)
        handle.LoadTensor(im.astype(np.float16), 'user object')
        out, userobj = handle.GetResult()
        out = Reshape(out, dim)
        internalresults = detector.Detect(out.astype(np.float32), int(out.shape[0]/wh), blockwd, blockwd, classes, imgw, imgh, threshold, nms, targetBlockwd)
        pyresults = [BBox(x) for x in internalresults]
        results.put(pyresults)
        print("elapsedtime = ", time.time() - now)

def PrepareImage(img, dim):
    imgw = img.shape[1]
    imgh = img.shape[0]
    imgb = np.empty((dim[0], dim[1], 3))
    imgb.fill(0.5)

    newh = dim[1]
    neww = dim[0]
    offx = int((dim[0] - neww)/2)
    offy = int((dim[1] - newh)/2)

    imgb[offy:offy+newh,offx:offx+neww,:] = cv2.resize(img.copy()/255.0,(newh,neww))
    im = imgb[:,:,(2,1,0)]

    return im,offx,offy

def Reshape(out, dim):
    shape = out.shape
    out = np.transpose(out.reshape(wh, int(shape[0]/wh)))
    out = out.reshape(shape)
    return out

class BBox(object):
    def __init__(self, bbox):
        self.left = bbox.left
        self.top = bbox.top
        self.right = bbox.right
        self.bottom = bbox.bottom
        self.confidence = bbox.confidence
        self.objType = bbox.objType
        self.name = bbox.name


glutInitWindowPosition(0, 0)
glutInit(sys.argv)
glutInitDisplayMode(GLUT_RGBA | GLUT_DOUBLE )
glutCreateWindow("DEMO")
glutFullScreen()
glutDisplayFunc(camThread)
glutReshapeFunc(resizeview)
glutKeyboardFunc(keyboard)
init()
glutIdleFunc(idle)

print("press 'q' to quit!\n")

threads = []

for devnum in range(len(devices)):
  t = Thread(target=inferencer, args=(results, lock, frameBuffer, graphHandle[devnum]))
  t.start()
  threads.append(t)

glutMainLoop()
2.MultiStick.py 実行前にRaspberry Piのターミナルで下記コマンドを順に実行し、OpenGLの開発環境を導入する。
$ sudo apt-get install python-opengl
$ sudo -H pip3 install pyopengl
$ sudo -H pip3 install pyopengl_accelerate
$ sudo raspi-config
3.「7.Advanced Options」-「A7 GL Driver」-「G2 GL (Fake KMS)」の順に選択し、Raspberry Pi のOpenGL Driver を有効にする。
4.Raspberry Pi を再起動する。
5.MultiStick.py を実行する。
◆参考にさせていただいたサイト
https://qiita.com/halhorn/items/87d678f64464431ef027
https://qiita.com/Giita2000/items/39eba7616036fdd6fd36
https://cloud.google.com/compute/?hl=ja