

はじめに
Godot 4.xで脱出ゲームを作る連載の第7回です。
- 第1回:環境構築とプロジェクト作成
- 第2回:Claude Code + godot-mcpのセットアップ
- 第3回:Claude CodeとMCPでスプラッシュ画面を実装する
- 第4回:Claude CodeとMCPでタイトル画面を実装してシーンを遷移する
- 第5回:背景の特定領域をタップしてフェード遷移する
- 第6回:再利用可能なモーダルポップアップを作る
- 第7回:スプライトシートを使ったダイヤル錠ギミックを実装する(今回)
前回はポップアップコンポーネントを実装しました。今回はそのポップアップ内にダイヤル錠を組み込む謎解きギミックを実装します。
今回の実装は若干の手抜きで、以前Axmol Engineで作成したダイヤル錠(参考記事)をGodotに移植する形で進めます。Claude Codeへの指示もその参考記事のURLを渡す形で始めています。スプライトシートの作成に興味のある方もぜひご覧ください。
この記事で作るもの
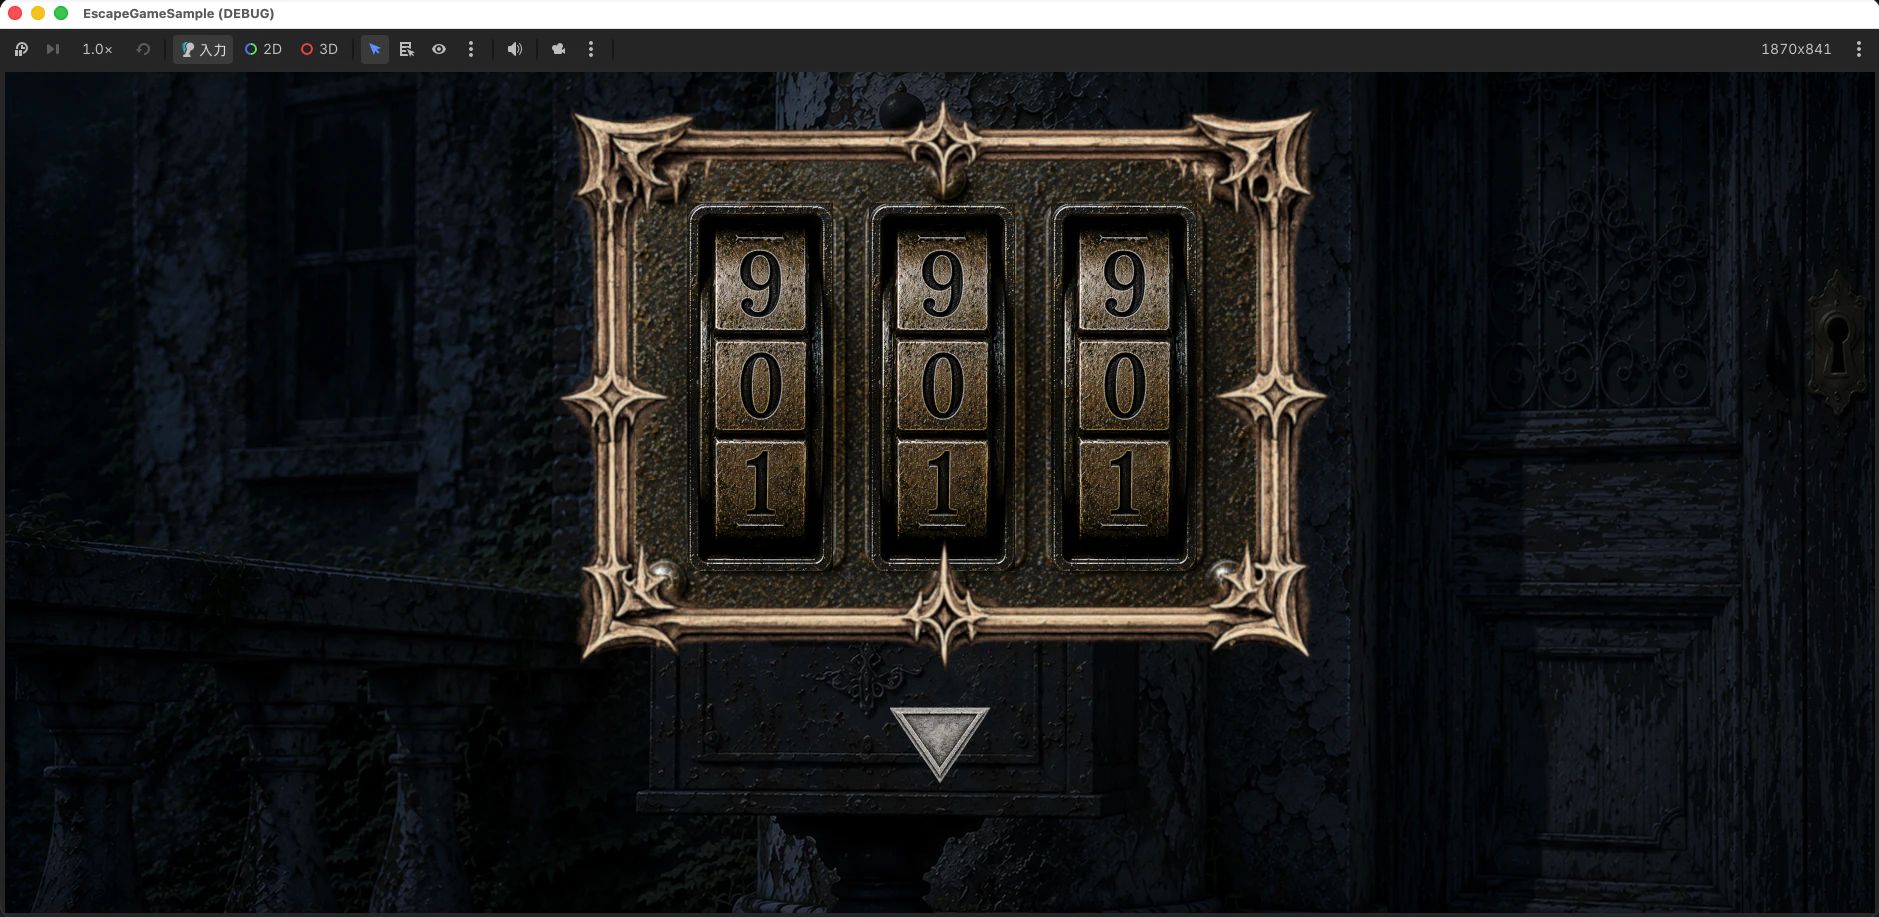
スプライトシート(spritesheet.png)から AtlasTexture で各数字フレームを切り出し、タップするたびに 0→1→…→9→0 とループする単体ダイヤルコンポーネント(dial.tscn)を作ります。それを base.png の上に3つ並べたダイヤル錠コンポーネント(dial_lock.tscn)に組み上げ、最終的にポップアップ内へ組み込んで謎解きギミックとして動作させるところまでやります。
前提条件
Claude Code + godot-mcpのセットアップが完了していること(第2回参照)、scenes/components/popup.tscn が作成済みであること(第6回参照)が前提です。以下の素材も assets/images/dial/ に配置済みとします。
| ファイル | 内容 |
|---|---|
spritesheet.png |
数字0〜9の画像をまとめたスプライトアトラス |
spritesheet.json |
フレーム定義(TexturePacker JSON Array形式)参考記事 |
base.png |
ダイヤル錠の背景画像(640×480px)前回配置済み |
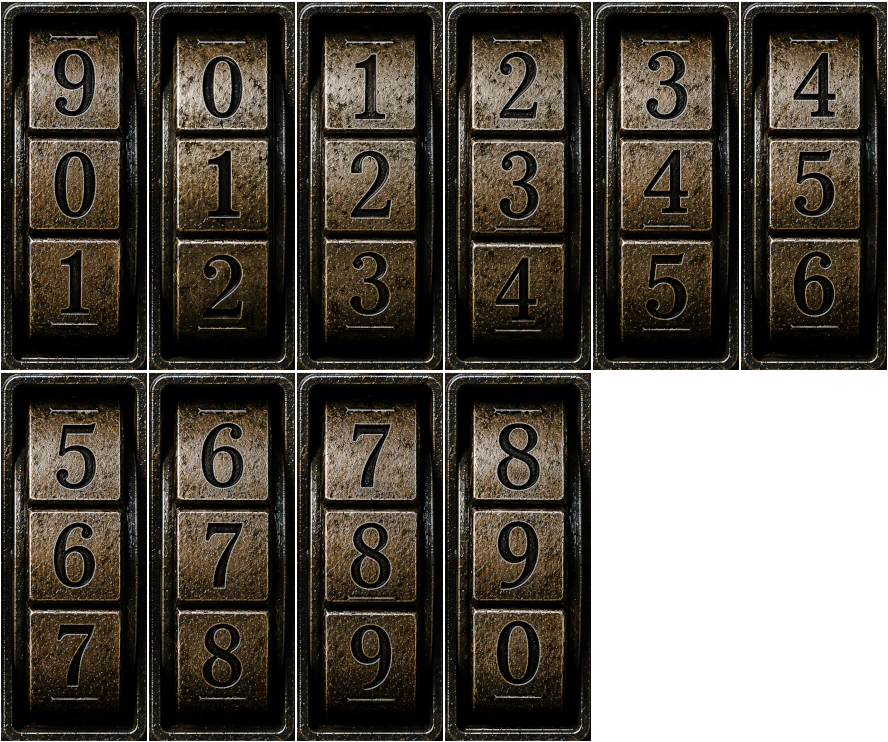
1枚の画像にまとめたスプライトアトラスが spritesheet.png です。
今回も段階的に追加指示を出しながら調整しています。その試行錯誤の過程もそのまま記録しています。
ファイル構成
scenes/components/
  dial.tscn          ← 今回作成(単体ダイヤル、再利用可能)
  dial_lock.tscn     ← 今回作成(base.png + 3ダイヤルのセット)
  popup.tscn         ← 前回作成(ダイヤル錠を組み込む)
scripts/components/
  dial.gd            ← 今回作成
  dial_lock.gd       ← 今回作成
assets/images/dial/
  spritesheet.png    ← 0〜9の数字フレームをまとめたアトラス
  spritesheet.json   ← フレーム定義
  base.png           ← ダイヤル錠の背景
1. スプライトシートの構造を把握する
たまには楽をしよう、ということで自分が書いたAxmol Engineでのギミック実装を参考に進めることにしました。
私が書いたaxmol engine での実装、https://qiita.com/OnuuuumaX/items/2ca44f4be64fbe9d1745 を参考にgodotで実装してください
まずClaude Codeが spritesheet.json を読み込み、フレーム座標を確認しました。
{
  "frames": [
    { "filename": "btn_1_0.png", "frame": { "x": 1,   "y": 1,   "w": 146, "h": 369 } },
    { "filename": "btn_1_1.png", "frame": { "x": 149, "y": 1,   "w": 146, "h": 369 } },
    { "filename": "btn_1_2.png", "frame": { "x": 297, "y": 1,   "w": 146, "h": 369 } },
    { "filename": "btn_1_3.png", "frame": { "x": 445, "y": 1,   "w": 146, "h": 369 } },
    { "filename": "btn_1_4.png", "frame": { "x": 593, "y": 1,   "w": 146, "h": 369 } },
    { "filename": "btn_1_5.png", "frame": { "x": 741, "y": 1,   "w": 146, "h": 369 } },
    { "filename": "btn_1_6.png", "frame": { "x": 1,   "y": 372, "w": 146, "h": 369 } },
    { "filename": "btn_1_7.png", "frame": { "x": 149, "y": 372, "w": 146, "h": 369 } },
    { "filename": "btn_1_8.png", "frame": { "x": 297, "y": 372, "w": 146, "h": 369 } },
    { "filename": "btn_1_9.png", "frame": { "x": 445, "y": 372, "w": 146, "h": 369 } }
  ]
}
各フレームは146×369px。2段構成で0〜5が1行目、6〜9が2行目に並んでいます。
Axmolではカスタム JsonArraySpriteSheetLoader を実装してフレームキャッシュに登録し、setSpriteFrame() でUV座標のみを切り替えていました。Godotでは AtlasTexture が同じ役割を果たします。フレームの切り替えは AtlasTexture.region の差し替え、タップ検出は TextureButton.pressed シグナル、数字のループは (_digit + 1) % 10、ダイヤル間隔は HBoxContainer の separation、描画順(z軸)はシーンツリーの並び順、という対応関係になります。
2. 単体ダイヤルコンポーネントの実装(dial.tscn)
生成されたシーンはこちらです。
[gd_scene format=3]

[ext_resource type="Script" path="res://scripts/components/dial.gd" id="1_dial"]

[node name="Dial" type="TextureButton"]
custom_minimum_size = Vector2(146, 369)
script = ExtResource("1_dial")
ルートを TextureButton にすることで、タップの検出を pressed シグナルに任せられます。custom_minimum_size でスプライトシートのフレームと同サイズを確保します。
スクリプト(dial.gd)は以下の通りです。
extends TextureButton

signal digit_changed(digit: int)

const _SPRITESHEET := preload("res://assets/images/dial/spritesheet.png")
const _REGIONS: Array[Rect2] = [
    Rect2(1,   1,   146, 369),  # 0
    Rect2(149, 1,   146, 369),  # 1
    Rect2(297, 1,   146, 369),  # 2
    Rect2(445, 1,   146, 369),  # 3
    Rect2(593, 1,   146, 369),  # 4
    Rect2(741, 1,   146, 369),  # 5
    Rect2(1,   372, 146, 369),  # 6
    Rect2(149, 372, 146, 369),  # 7
    Rect2(297, 372, 146, 369),  # 8
    Rect2(445, 372, 146, 369),  # 9
]

var _digit: int = 0
var _textures: Array[AtlasTexture] = []

func _ready() -> void:
    for region in _REGIONS:
        var atlas := AtlasTexture.new()
        atlas.atlas = _SPRITESHEET
        atlas.region = region
        _textures.append(atlas)
    texture_normal = _textures[0]
    pressed.connect(_on_pressed)

func _on_pressed() -> void:
    _digit = (_digit + 1) % 10
    texture_normal = _textures[_digit]
    digit_changed.emit(_digit)

func get_digit() -> int:
    return _digit

func set_digit(value: int) -> void:
    _digit = clampi(value, 0, 9)
    if not _textures.is_empty():
        texture_normal = _textures[_digit]
10枚の AtlasTexture は起動時(_ready())にまとめて生成して _textures 配列に保持しています。タップのたびに新規生成するのではなく配列の参照を差し替えるだけなので効率的で、Axmolのフレームキャッシュと同じ考え方です。数字のループは (_digit + 1) % 10 というAxmol実装と全く同じロジックで、%(剰余)演算子で9の次が0に戻ります。set_digit() はゲームのセーブデータから値を復元したい場合などを想定して、外部からダイヤルの値を設定できるようにしたものです。
3. ダイヤル錠コンポーネントの実装(dial_lock.tscn)
生成されたシーンはこちらです。
[gd_scene format=3]

[ext_resource type="Texture2D" path="res://assets/images/dial/base.png" id="1_base"]
[ext_resource type="Script" path="res://scripts/components/dial_lock.gd" id="2_dial_lock"]
[ext_resource type="PackedScene" path="res://scenes/components/dial.tscn" id="3_dial"]

[node name="DialLock" type="Control"]
script = ExtResource("2_dial_lock")

[node name="Base" type="TextureRect" parent="."]
layout_mode = 0
texture = ExtResource("1_base")

[node name="Dials" type="HBoxContainer" parent="."]
layout_mode = 0
offset_left = 61.0
offset_top = 62.0
offset_right = 580.0
offset_bottom = 433.0
theme_override_constants/separation = 36

[node name="Dial1" parent="Dials" instance=ExtResource("3_dial")]
layout_mode = 2

[node name="Dial2" parent="Dials" instance=ExtResource("3_dial")]
layout_mode = 2

[node name="Dial3" parent="Dials" instance=ExtResource("3_dial")]
layout_mode = 2
スクリプト(dial_lock.gd)はこちらです。
extends Control

signal combination_changed(digits: Array[int])

func _ready() -> void:
    for dial in $Dials.get_children():
        dial.digit_changed.connect(_on_digit_changed)

func _on_digit_changed(_digit: int) -> void:
    combination_changed.emit(get_combination())

func get_combination() -> Array[int]:
    var result: Array[int] = []
    for dial in $Dials.get_children():
        result.append(dial.get_digit())
    return result
Dial1〜Dial3 は HBoxContainer(Dials)の子ノードなので、個別に offset で位置を指定することはできません(コンテナが子の位置を管理するため)。ダイヤルの間隔は theme_override_constants/separation で制御します。ダイヤル幅が146pxでダイヤル間の目標間隔が182pxの場合、separation = 目標間隔 - ダイヤル幅 = 182 - 146 = 36px という計算になります。
combination_changed シグナルは、いずれかのダイヤルが変化するたびに3桁全体を Array[int] でまとめて通知します。呼び出し側は combination_changed を購読するだけで現在の組み合わせを取得できます。
4. ポップアップへの組み込み
ここまでは部品として実装しただけだったので、実際に配置するようお願いしました。
ポップアップ内、frame_popup.pngのz軸の下に組み込んでください
Godotではノードリストの後方にあるものが手前(上)に描画されます。DialLock を Content(frame_popup.png を含む VBoxContainer)より前に置くことで、frame_popup.pngの奥にダイヤル錠を配置できます。
Popup (Control)
├── Blocker      ← 最背面(半透明黒・タップブロック)
├── DialLock     ← frame_popup.png の奥に描画
└── Content (VBoxContainer)
    ├── Frame    ← frame_popup.png(最前面)
    └── BtnBack
生成された差分(popup.tscn)は以下の通りです。
[ext_resource type="PackedScene" path="res://scenes/components/dial_lock.tscn" id="4_dial_lock"]

[node name="DialLock" parent="." instance=ExtResource("4_dial_lock")]
layout_mode = 1
anchors_preset = 8
anchor_left = 0.5
anchor_top = 0.5
anchor_right = 0.5
anchor_bottom = 0.5
offset_left = -314.0
offset_top = -352.5
grow_horizontal = 2
grow_vertical = 2
DialLock は Popup(plain Control)の子なので、アンカーとオフセットで位置を手動指定できます。中央アンカー(anchors_preset = 8、CENTER)を起点に、offset_left・offset_top で微調整しています。
5. ダイヤル位置の微調整
実際に表示確認したところ、下記のようにずれていました。
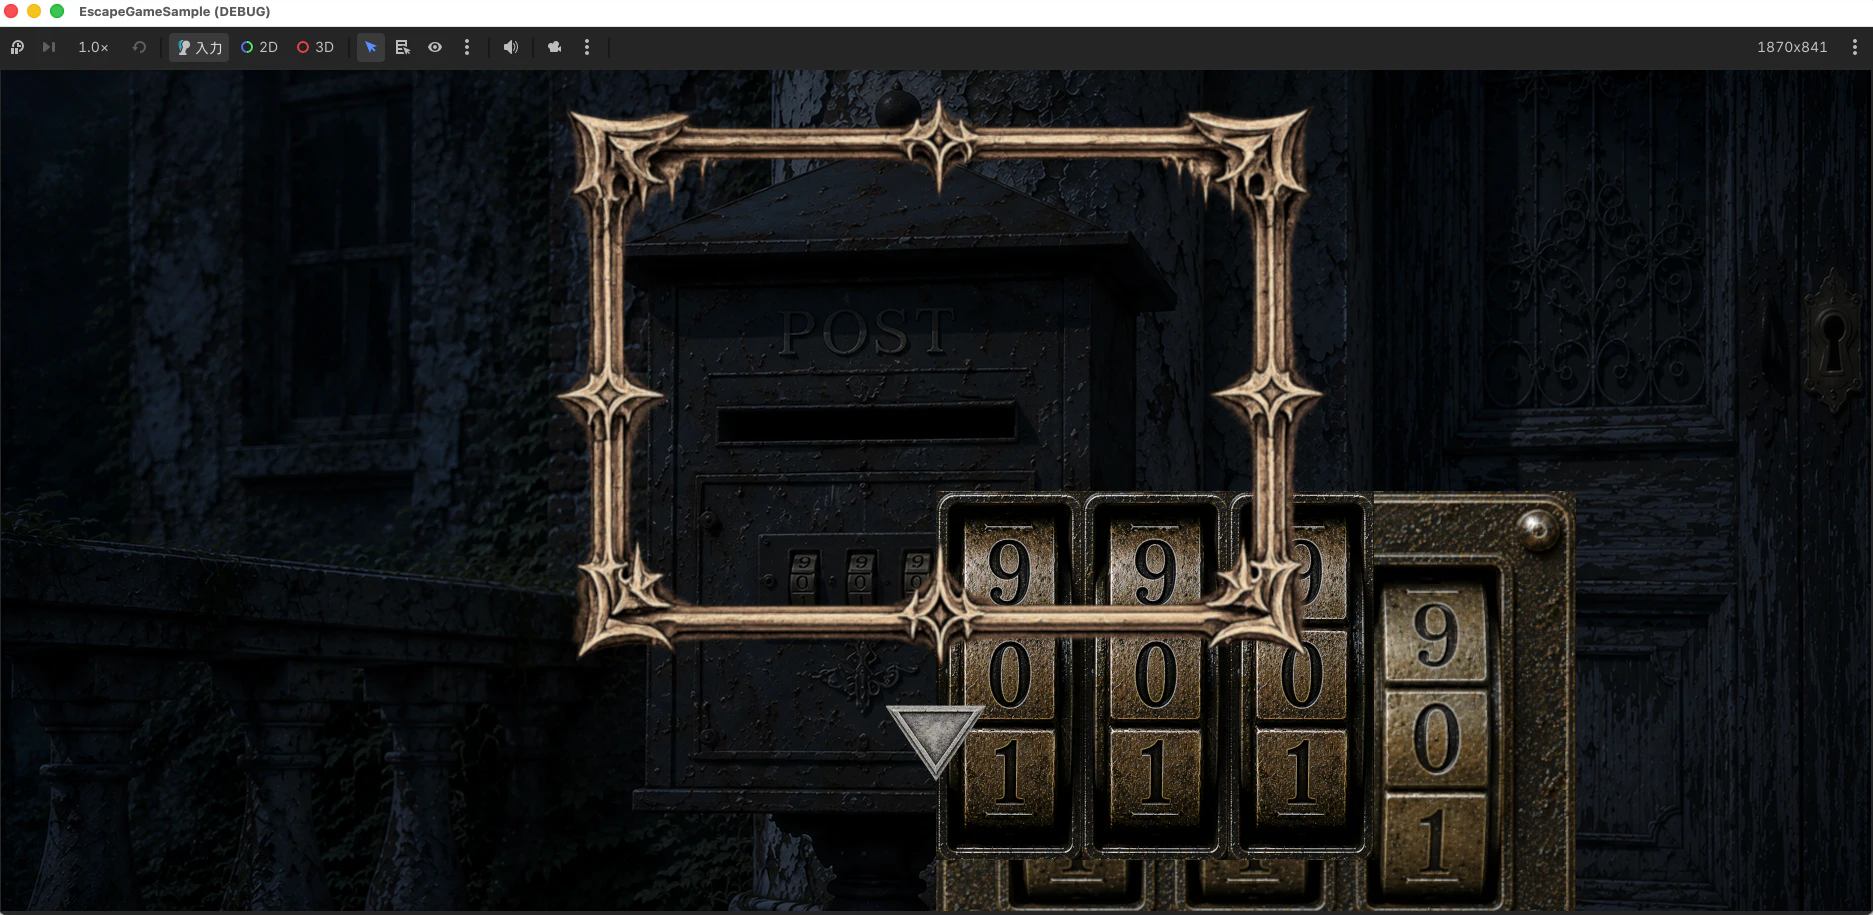
Godotのエディタで位置調整を試みます。
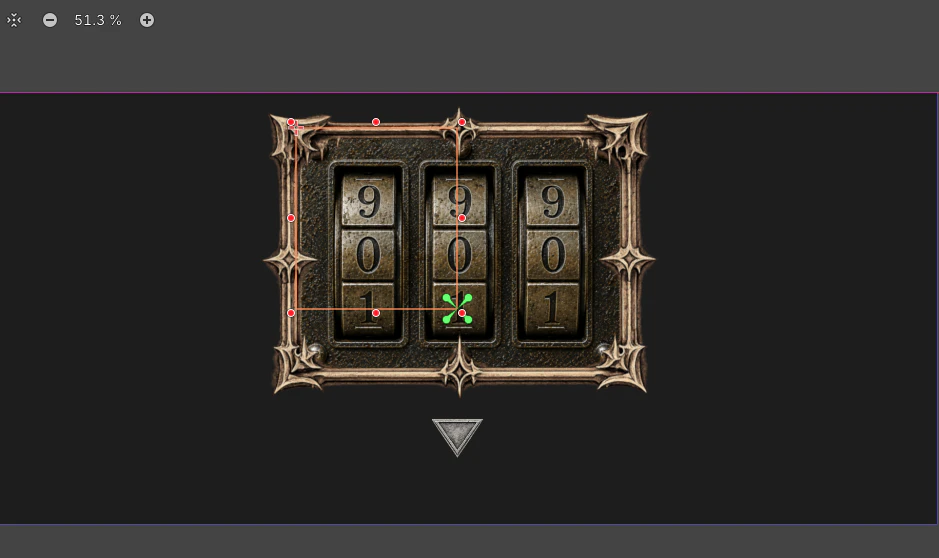
まだダイヤルボタンがずれています。
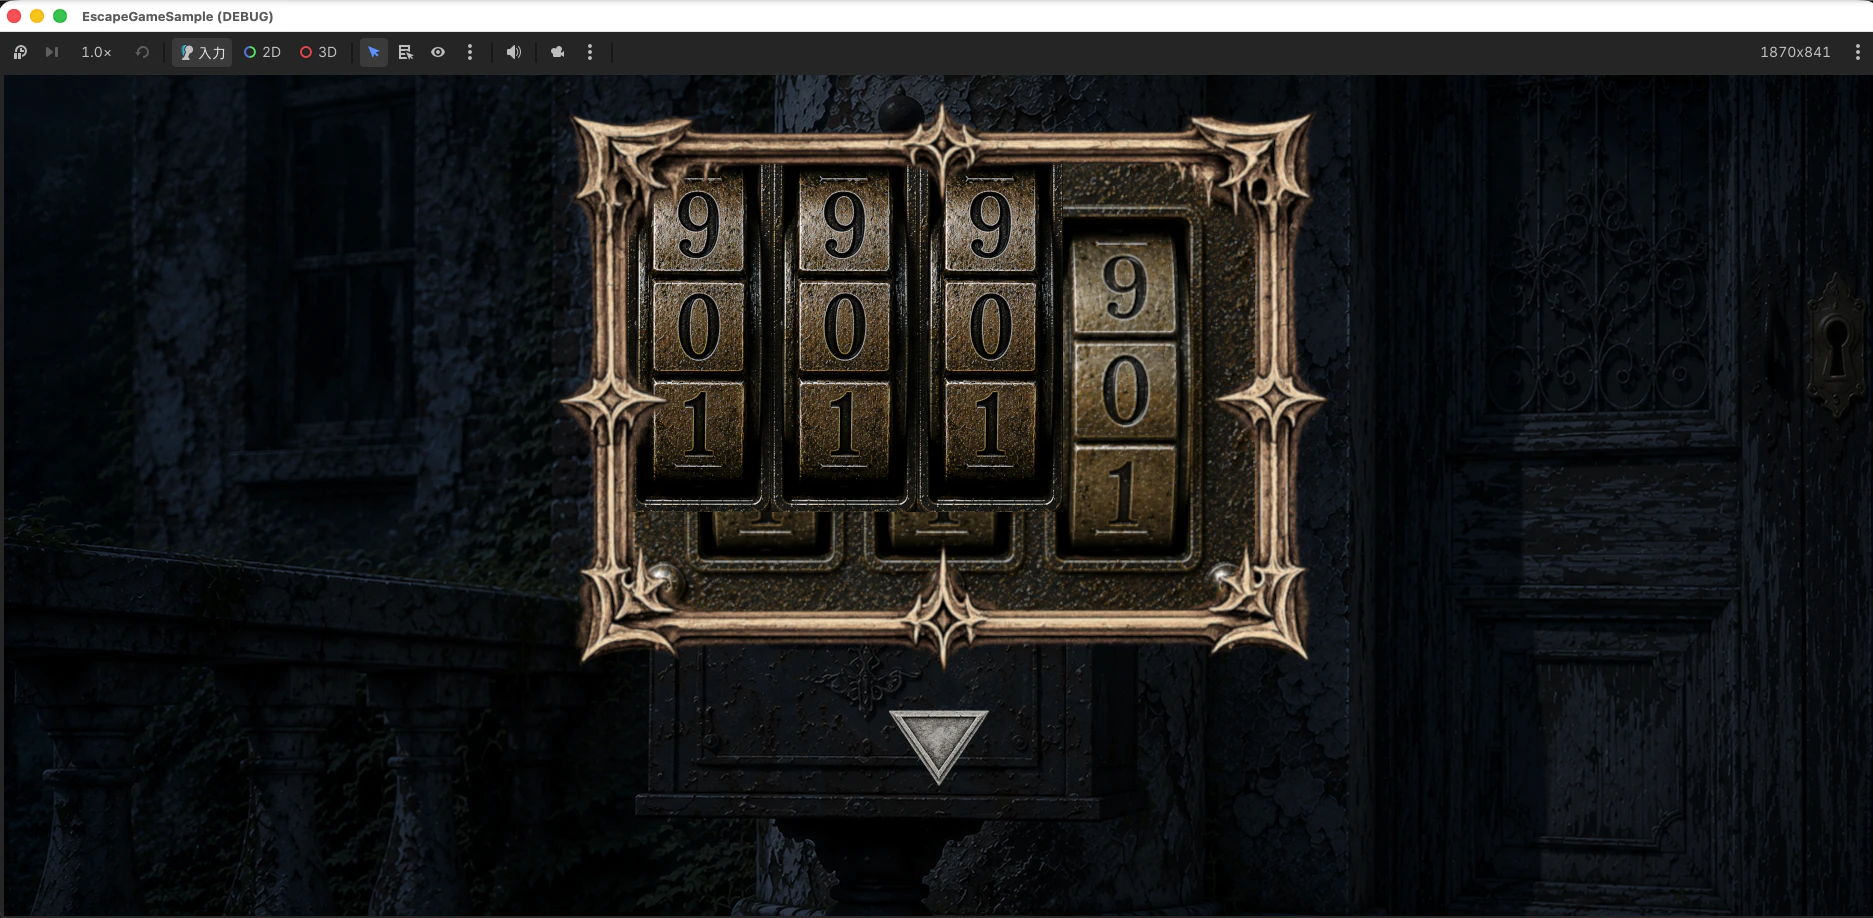
一旦位置調整の方法をClaude Codeに尋ねてみるとある程度は直りましたが、まだずれていたので細かく指示していきます。
Dial1 を x:92, y:64へ
Dial1 は HBoxContainer の子なので直接位置を変更できません。HBoxContainer(Dials)自体の offset を変更することで、ダイヤル全体の表示位置が決まります。
Dial2, 3 は 182pxづつ右へ
ダイヤル間の間隔を182pxにするため、separation を調整します。
- theme_override_constants/separation = 0
+ theme_override_constants/separation = 36
separation = 182 - 146(ダイヤル幅)= 36px という計算です。各ダイヤルの左端x座標は、Dials の offset_left = 61 を基準にDial1が61、Dial2が61+182=243、Dial3が61+364=425になります。
HBoxContainer の子ノードは親がレイアウトを管理するため、子ノード側の offset を直接変更しても反映されません。位置の調整はコンテナ(Dials)の offset を変更することで行います。
6. 動作確認
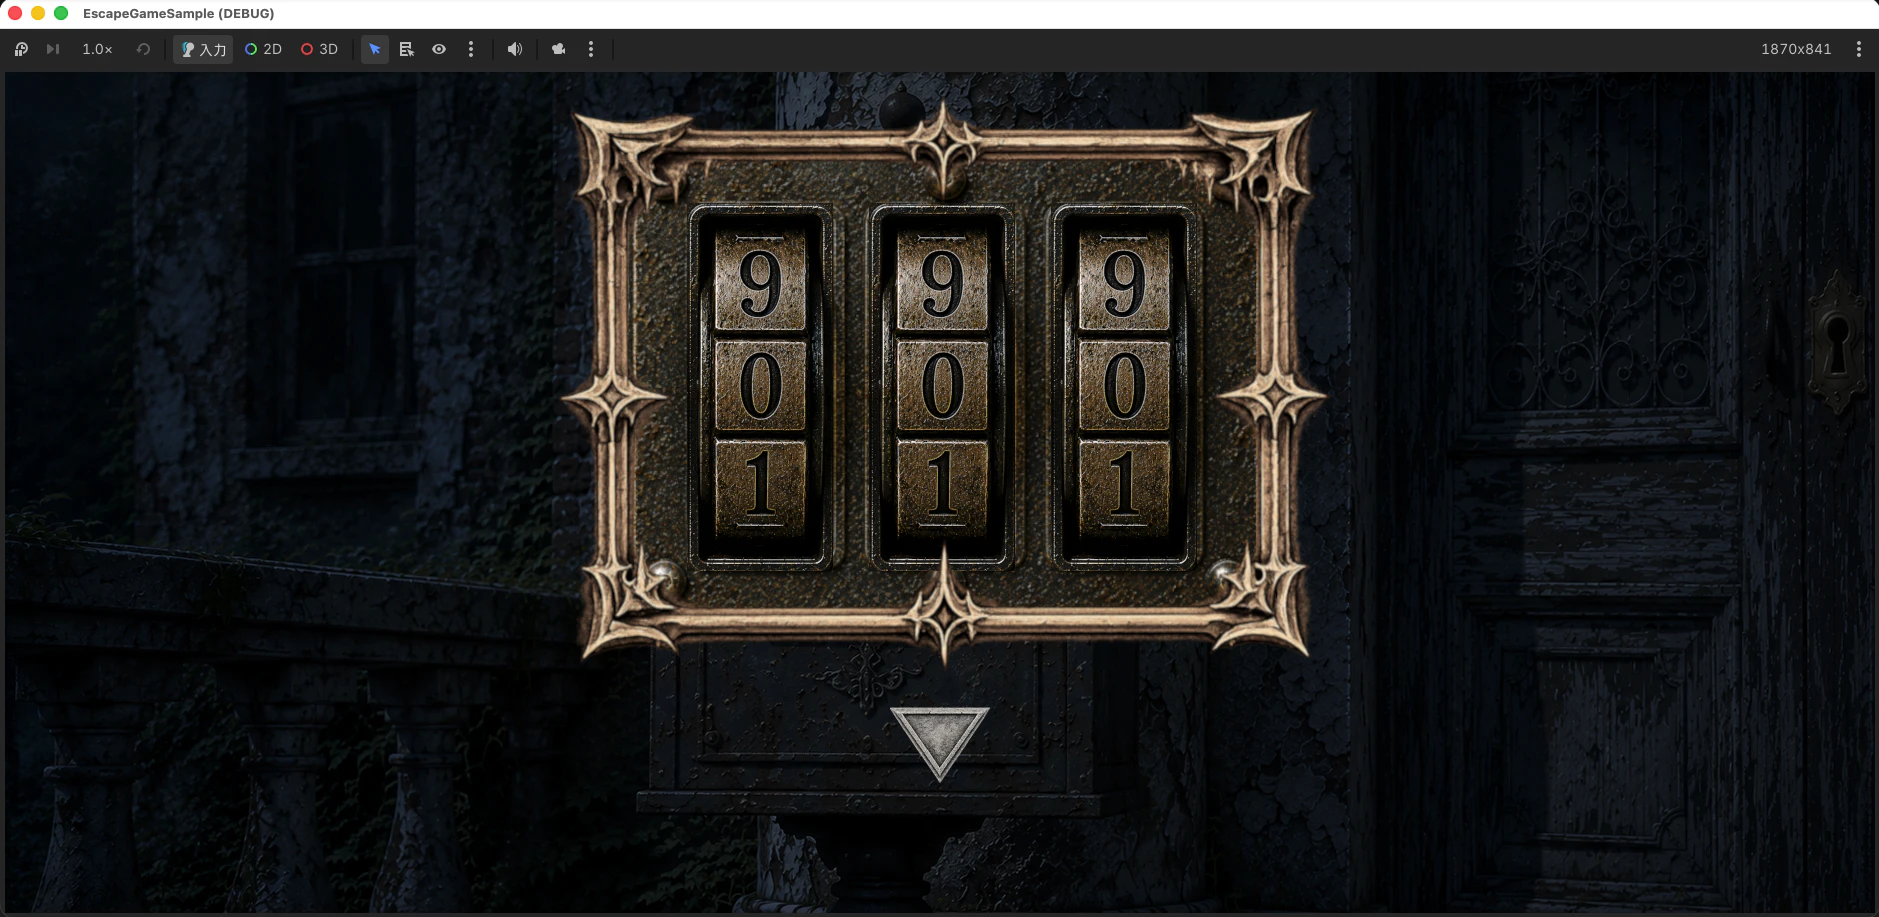
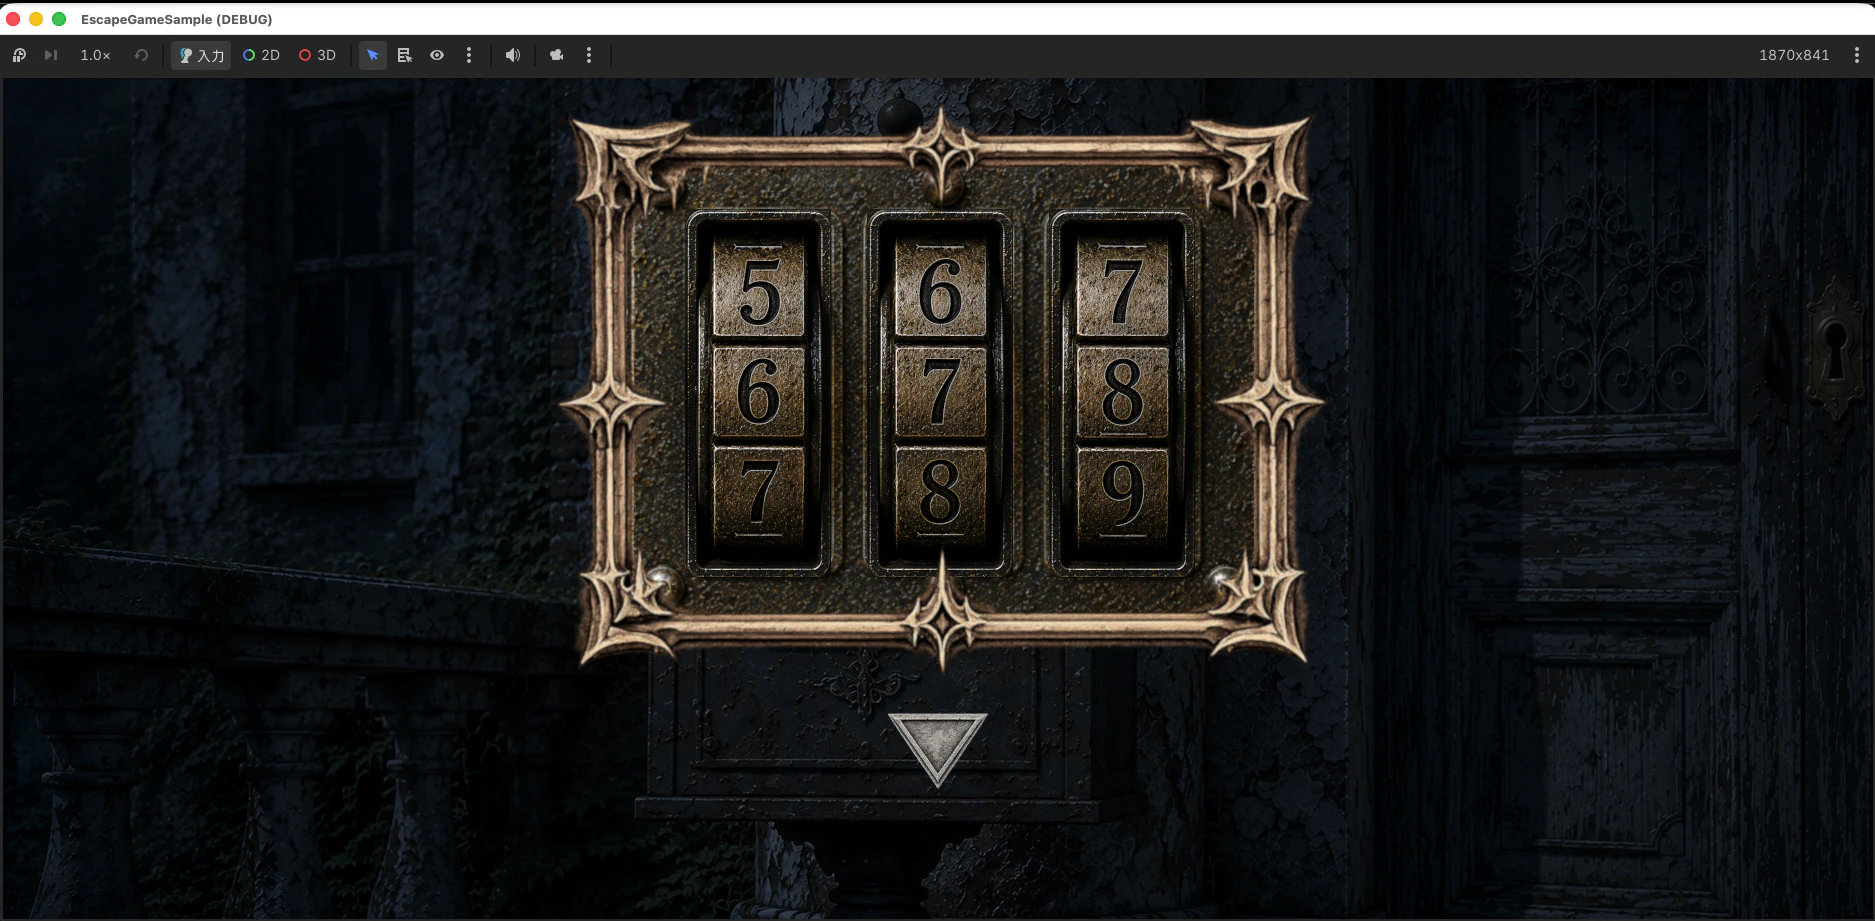
F5 でゲームを実行し、以下の流れで動作すれば成功です。郵便受けをタップしてポップアップを開くと、frame_popup.png の枠の奥にダイヤル錠が表示されています。各ダイヤルをタップするたびに数字が0→1→…→9→0とループし、「戻る」ボタン(btn_back.png)でポップアップを閉じられます。
Claude Codeと一緒に、Godotのエディタとプロンプト指示で位置調整を行い、ポップアップにダイヤルギミックを表示できました。
タップでダイヤルを回すこともできました。
ダイヤルが表示されない場合は DialLock が popup.tscn の Content より前に配置されているか、数字がループしない場合は dial.gd の pressed.connect(_on_pressed) が _ready() で呼ばれているかを確認してください。ダイヤルがフレームの手前に出てしまう場合はノードツリーで DialLock が Content より前(上)にあるか、ダイヤルの間隔がおかしい場合は HBoxContainer の separation が正しく設定されているかを見直すとよいです。
7. 呼び出し側での使い方
combination_changed シグナルを購読することで、ダイヤルの現在値を取得して正解判定ができます。
# 正解の組み合わせを判定する例
$Popup/DialLock.combination_changed.connect(func(digits: Array[int]):
    if digits == [1, 2, 3]:
        print("正解!ロック解除")
)
今回はスプライトシートの切り出し(AtlasTexture.region にフレーム座標を指定)、フレームの効率的な切り替え(_ready() でまとめて生成してキャッシュし、タップ時は参照を差し替えるだけにする)、タップでの数字ループ((_digit + 1) % 10)、HBoxContainer の separation によるダイヤル間隔の管理、ノードツリーの並び順によるz軸の制御、combination_changed シグナルによる3桁まとめての通知、と一通り実装しました。
Axmolからの移植にあたっては、Claude CodeにAxmol実装の参考記事URLを渡すだけで、フレームキャッシュのロジックや数字ループの考え方をそのままGodotに適用してもらえました。