
アドカレ
KENTOのひとりアドカレ10日目の記事です。
https://qiita.com/advent-calendar/2025/kento
環境情報
| ツール/SDK | バージョン |
|---|---|
| Unity | 6000.0.62f1 |
| Meta XR Core SDK | 81.0.0 |
| Open XR Plugin | 1.16.0 |
| XR Interaction Toolkit | 3.0.9 |
| XR Hands | 1.7.1 |
事前準備は以下の通りです。
シミュレーター利用時のハンドトラッキングのつかむ動作
GIFのようにピンチしても反応しません。

問題はNear-Far InteractorのSelect Inputにあります。

対象のInputActionが割り当てられているコードはSelect InputというGameObjectにアタッチされています。
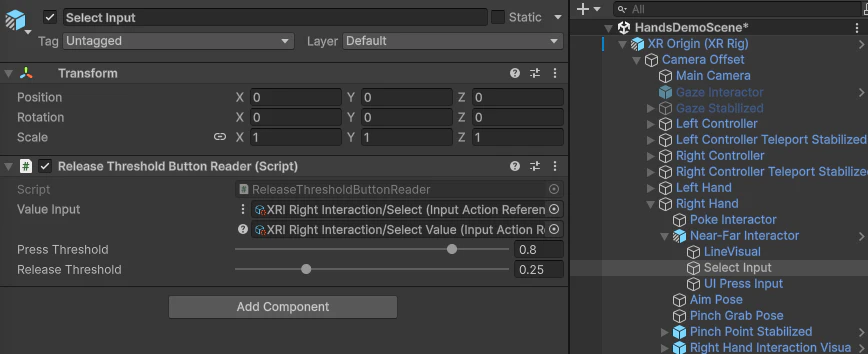
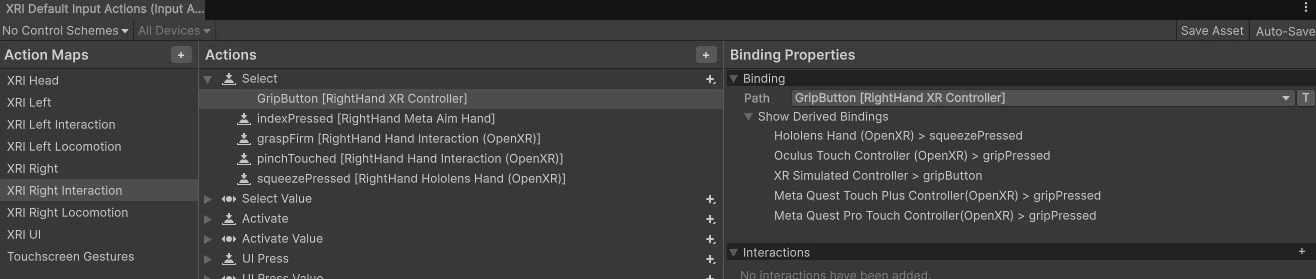
InputActionにはちゃんとOpenXRのHand Interactionが割り当たっているように見えますが、これらのActionはシミュレーター利用時には呼び出されません。

シミュレーター利用時は登録済みの手の形となるようにBoneを動かしているだけで、XRIのHand Interactionをとのつながりを持たないようです。
コントローラーのアクションにはシミュレーターのGripがBindされているので、シミュレーター上でも正常に動きます。
解決策
簡単な解決策として、SelectのInputActionにシミュレーター実行時の対象となるキー入力を割り当てることです。pinchはMのキーボードに割り当たっているので、そのままMのキー入力のActionを追加します。

ただ、このやり方だと以下GIFのように無関係のジェスチャー中や別の操作時にもつかむ機能が反応してしまいます。

そこで別の方法として、Near-Far InteractorのSelect Inputを拡張する方法があります。
サンプルのSelect InputにはReleaseThresholdButtonReaderが登録してあります。以下がそのコード全文です。IXRInputButtonReaderで抽象化されていてややこしいですが、InputAcionから渡ってきた値をNear-Far Interactorへ渡すだけのシンプルなコードです。
using UnityEngine.XR.Interaction.Toolkit.Inputs.Readers;

namespace UnityEngine.XR.Interaction.Toolkit.Samples.Hands
{
    /// <summary>
    /// An input button reader based on another <see cref="XRInputButtonReader"/> and holds it true until falling below a lower release threshold.
    /// Useful with hand interaction because the bool select value can bounce when the hand is near the tight internal threshold,
    /// so using this will keep the pinch true until moving the fingers much further away than the pinch activation threshold.
    /// </summary>
    [DefaultExecutionOrder(XRInteractionUpdateOrder.k_XRInputDeviceButtonReader)]
    public class ReleaseThresholdButtonReader : MonoBehaviour, IXRInputButtonReader
    {
        [SerializeField]
        [Tooltip("The source input that this component reads to create a processed button value.")]
        XRInputButtonReader m_ValueInput = new XRInputButtonReader("Value");

        /// <summary>
        /// The source input that this component reads to create a processed button value.
        /// </summary>
        public XRInputButtonReader valueInput
        {
            get => m_ValueInput;
            set => XRInputReaderUtility.SetInputProperty(ref m_ValueInput, value, this);
        }

        [SerializeField]
        [Tooltip("The threshold value to use to determine when the button is pressed. Considered pressed equal to or greater than this value.")]
        [Range(0f, 1f)]
        float m_PressThreshold = 0.8f;

        /// <summary>
        /// The threshold value to use to determine when the button is pressed. Considered pressed equal to or greater than this value.
        /// </summary>
        /// <remarks>
        /// This reader will also be considered performed if the source input is performed.
        /// </remarks>
        public float pressThreshold
        {
            get => m_PressThreshold;
            set => m_PressThreshold = value;
        }

        [SerializeField]
        [Tooltip("The threshold value to use to determine when the button is released when it was previously pressed. Keeps being pressed until falls back to a value of or below this value.")]
        [Range(0f, 1f)]
        float m_ReleaseThreshold = 0.25f;

        /// <summary>
        /// The threshold value to use to determine when the button is released when it was previously pressed.
        /// Keeps being pressed until falls back to a value of or below this value.
        /// </summary>
        /// <remarks>
        /// This reader will still be considered performed if the source input is still performed
        /// when this threshold is reached.
        /// </remarks>
        public float releaseThreshold
        {
            get => m_ReleaseThreshold;
            set => m_ReleaseThreshold = value;
        }

        bool m_IsPerformed;
        bool m_WasPerformedThisFrame;
        bool m_WasCompletedThisFrame;

        /// <summary>
        /// See <see cref="MonoBehaviour"/>.
        /// </summary>
        void OnEnable()
        {
            m_ValueInput?.EnableDirectActionIfModeUsed();
        }

        /// <summary>
        /// See <see cref="MonoBehaviour"/>.
        /// </summary>
        void OnDisable()
        {
            m_ValueInput?.DisableDirectActionIfModeUsed();
        }

        /// <summary>
        /// See <see cref="MonoBehaviour"/>.
        /// </summary>
        void Update()
        {
            // Go true when either the press threshold is reached or the bool is already performed.
            // Only drop back to false when the release threshold is reached and the bool is no longer performed.
            var prevPerformed = m_IsPerformed;
            var pressAmount = m_ValueInput.ReadValue();

            bool newValue;
            if (prevPerformed)
                newValue = pressAmount > m_ReleaseThreshold || m_ValueInput.ReadIsPerformed();
            else
                newValue = pressAmount >= m_PressThreshold || m_ValueInput.ReadIsPerformed();

            m_IsPerformed = newValue;
            m_WasPerformedThisFrame = !prevPerformed && m_IsPerformed;
            m_WasCompletedThisFrame = prevPerformed && !m_IsPerformed;
        }

        /// <inheritdoc />
        public bool ReadIsPerformed()
        {
            return m_IsPerformed;
        }

        /// <inheritdoc />
        public bool ReadWasPerformedThisFrame()
        {
            return m_WasPerformedThisFrame;
        }

        /// <inheritdoc />
        public bool ReadWasCompletedThisFrame()
        {
            return m_WasCompletedThisFrame;
        }

        /// <inheritdoc />
        public float ReadValue()
        {
            return m_ValueInput.ReadValue();
        }

        /// <inheritdoc />
        public bool TryReadValue(out float value)
        {
            return m_ValueInput.TryReadValue(out value);
        }
    }
}
上記をベースに独自処理を用いて拡張していきます。まずは以前書いた、XR Handsを使ったピンチ処理を利用するのでおさらいです。
Todo ここに記事リンク
using System.Collections.Generic;
using System.Linq;
using UnityEngine;
using UnityEngine.XR.Hands;

/// <summary>
/// XRHandSubsystemを扱いやすくするためのユーティリティクラス。
/// </summary>
public class XRHandSubsystemUtility : MonoBehaviour
{
    [SerializeField] private Transform _cameraOffset;

    public static XRHandSubsystemUtility Instance { get; private set; }
    public XRHandSubsystem Subsystem => GetOrUpdateSubsystem();

    public bool IsLeftHandTracked => Subsystem?.leftHand.isTracked ?? false;
    public bool IsRightHandTracked => Subsystem?.rightHand.isTracked ?? false;
    public bool IsSubsystemRunning => Subsystem?.running ?? false;
    public Transform UserLocalSpace => _cameraOffset;

    private XRHandSubsystem _subsystem;
    private readonly List<XRHandSubsystem> _subsystemsReuse = new();

    private void Awake()
    {
        Instance = this;
    }

    private XRHandSubsystem GetOrUpdateSubsystem()
    {
        if (_subsystem is { running: true }) return _subsystem;

        SubsystemManager.GetSubsystems(_subsystemsReuse);
        foreach (var handSubsystem in _subsystemsReuse.Where(handSubsystem => handSubsystem.running))
        {
            _subsystem = handSubsystem;
            return _subsystem;
        }

        _subsystem = null;
        return null;
    }

    private XRHandJoint GetJoint(Handedness handedness, XRHandJointID jointId)
    {
        var hand = handedness == Handedness.Left ? Subsystem.leftHand : Subsystem.rightHand;
        return hand.GetJoint(jointId);
    }

    /// <summary>
    /// ジョイントの姿勢をCameraOffset基準で取得する。
    /// </summary>
    public bool TryGetJointPose(Handedness handedness, XRHandJointID jointId, out Pose pose)
    {
        pose = Pose.identity;
        var joint = GetJoint(handedness, jointId);
        if (!joint.TryGetPose(out var localPose)) return false;

        pose = localPose.GetTransformedBy(_cameraOffset.transform);
        return true;
    }
}
CustomPinchは両手対応版に修正しています。
using UnityEngine;
using UnityEngine.XR.Hands;

/// <summary>
/// ピンチの状態。
/// </summary>
public enum PinchState
{
    None,
    Started,
    Holding,
    Ended
}

/// <summary>
/// 独自のピンチ認識を行うクラス。
/// </summary>
public static class CustomPinch
{
    private const float PinchThreshold = 0.02f;
    private static bool _wasPinchingLeft;
    private static bool _wasPinchingRight;

    /// <summary>
    /// ピンチの状態を取得。
    /// </summary>
    public static PinchState CheckPinch(Handedness handedness)
    {
        var wasPinching = handedness == Handedness.Left ? _wasPinchingLeft : _wasPinchingRight;
        var isPinching = IsPinchDetected(handedness);

        if (!wasPinching && isPinching)
        {
            SetWasPinching(handedness, true);
            return PinchState.Started;
        }

        if (wasPinching && isPinching)
        {
            return PinchState.Holding;
        }

        if (wasPinching && !isPinching)
        {
            SetWasPinching(handedness, false);
            return PinchState.Ended;
        }

        return PinchState.None;
    }

    private static void SetWasPinching(Handedness handedness, bool value)
    {
        if (handedness == Handedness.Left)
        {
            _wasPinchingLeft = value;
        }
        else
        {
            _wasPinchingRight = value;
        }
    }

    private static bool IsPinchDetected(Handedness handedness)
    {
        var xrHandSubsystemUtility = XRHandSubsystemUtility.Instance;
        var isHandTracked = handedness == Handedness.Left
            ? xrHandSubsystemUtility.IsLeftHandTracked
            : xrHandSubsystemUtility.IsRightHandTracked;

        if (!isHandTracked) return false;

        var isAbleToGetThumbTip = xrHandSubsystemUtility.TryGetJointPose(
            handedness,
            XRHandJointID.ThumbTip,
            out Pose thumbTipPose);

        var isAbleToGetIndexTip = xrHandSubsystemUtility.TryGetJointPose(
            handedness,
            XRHandJointID.IndexTip,
            out Pose indexTipPose);

        if (isAbleToGetThumbTip && isAbleToGetIndexTip)
        {
            var dist = Vector3.Distance(thumbTipPose.position, indexTipPose.position);
            return dist < PinchThreshold;
        }

        return false;
    }
}
上記ピンチのコードを利用したReaderクラスを作成します。
using UnityEngine;
using UnityEngine.XR.Hands;
using UnityEngine.XR.Interaction.Toolkit;
using UnityEngine.XR.Interaction.Toolkit.Inputs.Readers;

[DefaultExecutionOrder(XRInteractionUpdateOrder.k_XRInputDeviceButtonReader)]
public class PinchGestureReader : MonoBehaviour, IXRInputButtonReader
{
    [SerializeField] private Handedness _hand = Handedness.Right;

    private bool _isPerformed;
    private bool _wasPerformedThisFrame;
    private bool _wasCompletedThisFrame;

    private void Update()
    {
        var pinchState = CustomPinch.CheckPinch(_hand);

        _wasPerformedThisFrame = pinchState == PinchState.Started;
        _isPerformed = pinchState == PinchState.Holding || pinchState == PinchState.Started;
        _wasCompletedThisFrame = pinchState == PinchState.Ended;
    }

    public bool ReadIsPerformed()
    {
        return _isPerformed;
    }

    public bool ReadWasPerformedThisFrame()
    {
        return _wasPerformedThisFrame;
    }

    public bool ReadWasCompletedThisFrame()
    {
        return _wasCompletedThisFrame;
    }

    public float ReadValue()
    {
        return _isPerformed ? 1f : 0f;
    }

    public bool TryReadValue(out float value)
    {
        value = _isPerformed ? 1f : 0f;
        return _isPerformed;
    }
}
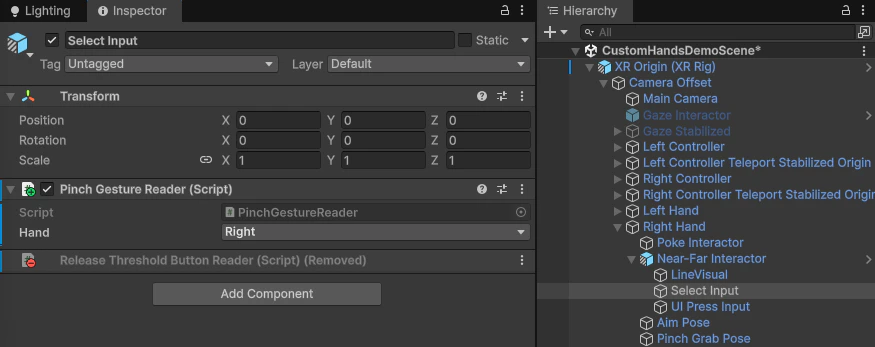
このReaderを登録すれば、シミュレーター上でもピンチが動作します。

Editor上でのみ動作させたい
ここまでの処理により、シミュレーター上でピンチを動かすことができました。しかし、実機ではHand Interaction Profileに依存した処理を扱いたい場合にこのままでは困ります。
その対策として、動作環境に応じて処理を使い分けるReaderを作成していきます。IXRInputButtonReaderで抽象化されていることを活かします。
using UnityEngine;
using UnityEngine.XR.Interaction.Toolkit.Inputs.Readers;
using UnityEngine.XR.Interaction.Toolkit.Samples.Hands;
using UnityEngine.XR.Interaction.Toolkit;

[DefaultExecutionOrder(XRInteractionUpdateOrder.k_XRInputDeviceButtonReader)]
public class GrabReader : MonoBehaviour, IXRInputButtonReader
{
    [SerializeField] private PinchGestureReader _pinchReader;
    [SerializeField] private ReleaseThresholdButtonReader _thresholdReader;

    private IXRInputButtonReader _activeReader;

    private void Awake()
    {
        ConfigureInputReader();
    }

    private void ConfigureInputReader()
    {
        if (Application.isEditor)
        {
            _pinchReader.enabled = true;
            _thresholdReader.enabled = false;
            _activeReader = _pinchReader;
        }
        else
        {
            _pinchReader.enabled = false;
            _thresholdReader.enabled = true;
            _activeReader = _thresholdReader;
        }
    }

    public bool ReadIsPerformed()
    {
        return _activeReader?.ReadIsPerformed() ?? false;
    }

    public bool ReadWasPerformedThisFrame()
    {
        return _activeReader?.ReadWasPerformedThisFrame() ?? false;
    }

    public bool ReadWasCompletedThisFrame()
    {
        return _activeReader?.ReadWasCompletedThisFrame() ?? false;
    }

    public float ReadValue()
    {
        return _activeReader?.ReadValue() ?? 0f;
    }

    public bool TryReadValue(out float value)
    {
        if (_activeReader != null)
        {
            return _activeReader.TryReadValue(out value);
        }

        value = 0f;
        return false;
    }
}
使い方ですが、まず、Select InputにGrabReaderをアタッチし、PinchGestureReaderと既存のThresholdReaderを用意して登録します。
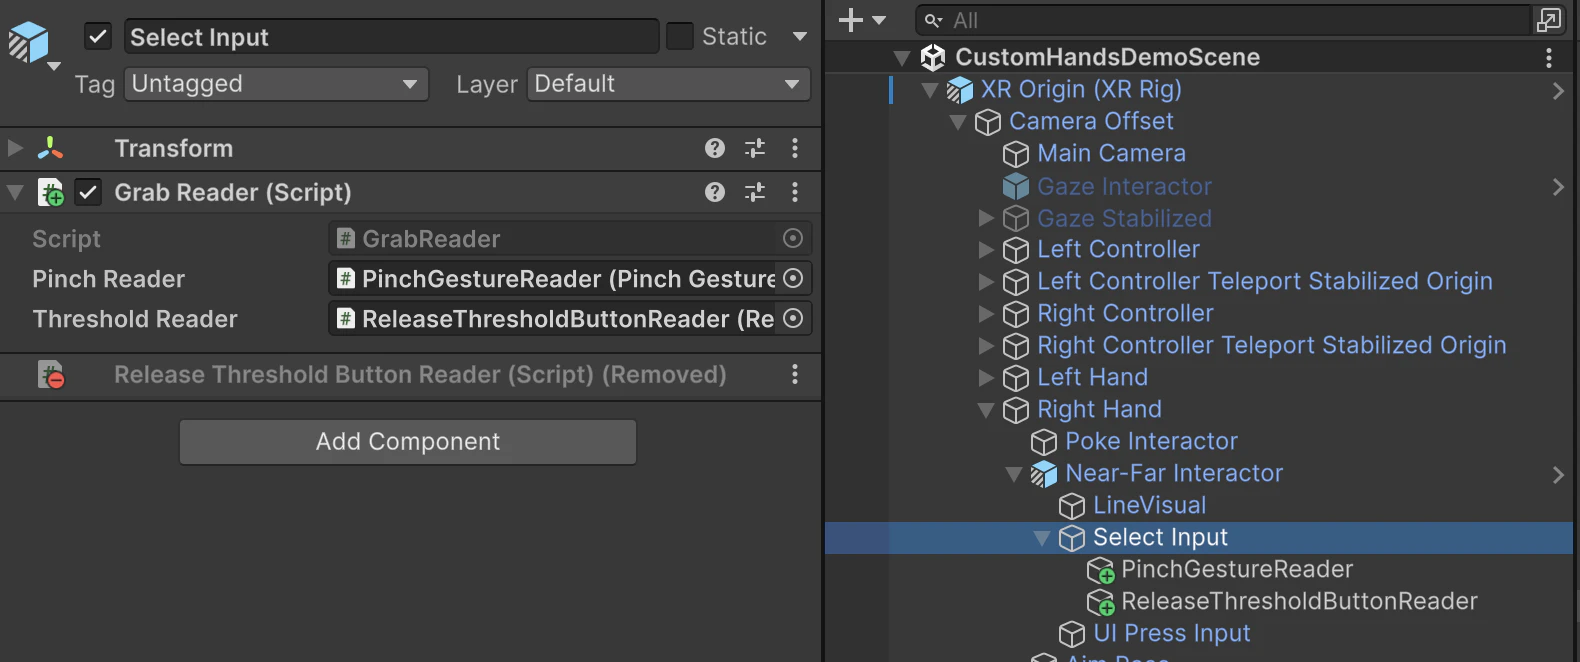

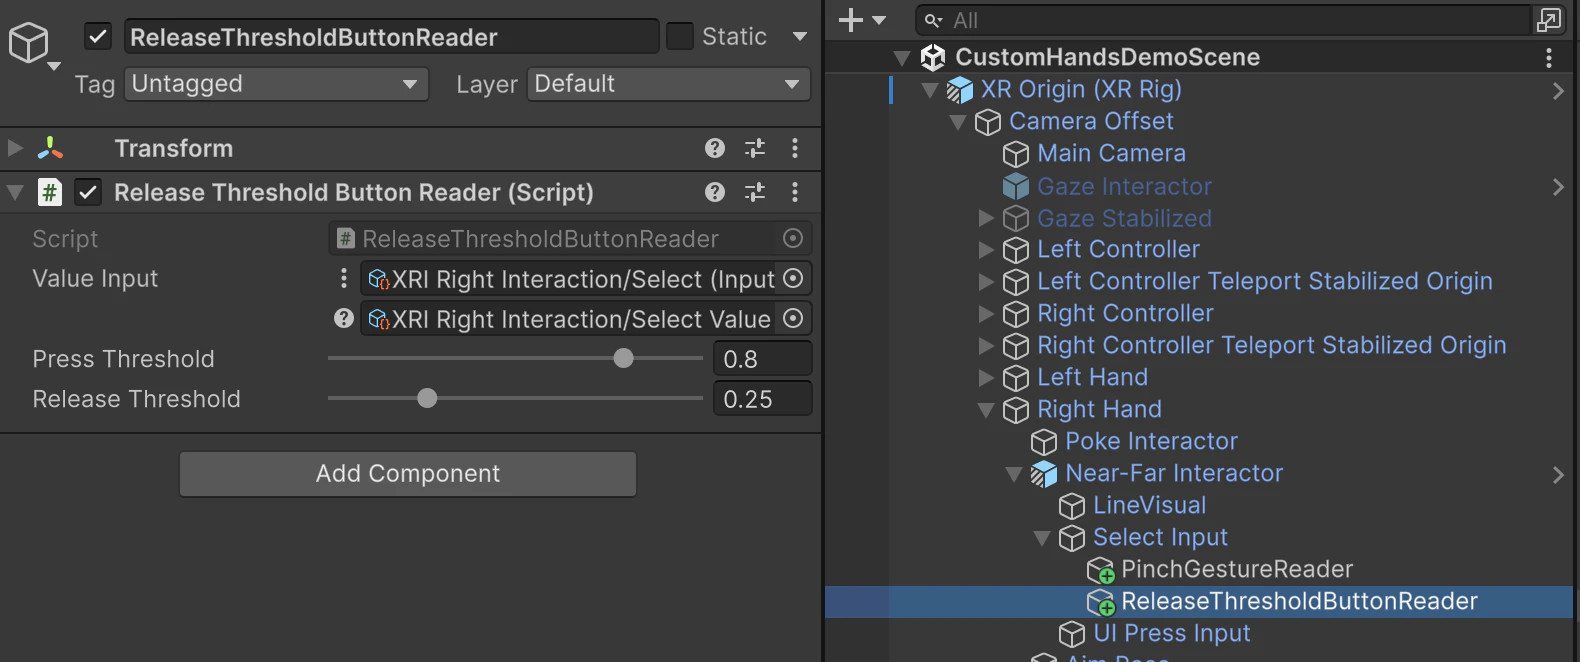
最後に、Select Inputに新しいReader(GrabReader)を登録して完了です。

Editor上ではPinchGestureReader、実機ではThresholdReaderを利用する仕組みができました。
おわりに
「お前のそのシミュレーターへの情熱はなんなんだよ」みたいなツッコミがきそうな内容ですが、出先にMacBookで"簡単な内容なのにシミュレートできない影響で進められないことがかなりストレスになった"という背景があります。
あとは、仕組みを知っておきたいという単純な知的好奇心です。深くまで仕組みが理解できてよかったです。
遠距離編に続きます。