この記事はなに?
この記事は連載している**ルービックキューブを解くロボットを作ろう!**という記事集の一部です。全貌はこちら
GitHubはこちら。
プロモーションビデオはこちらです。
この記事集に関する動画集はこちらです。
今回の記事の内容
今回の記事では、私が作った2x2x2ルービックキューブを解くロボットSoltvvoのソフトウェアの解説をします。
構成
ソフトウェアの解説の前に、どのような構成でロボットを動かすのかを書いておく必要がありますね。図のような感じです。

ここで、Raspberry PiはRaspberry Pi 4(2GBRAM)というシングルボードコンピュータ(つまり普通の(?)コンピュータ)、ATMEGA328Pは有名なマイコン(マイクロコントローラ)で、Arduinoというマイコンボードに使われているものです。今回はArduino Unoとして使います。ATMEGA328Pからはそれぞれ2つずつ、ステッピングモーターとサーボモーターが生えています。これは実際にキューブを回すアームを動かすアクチュエータ(動力)です。
また、Webカメラを使ってキューブの状態を入力します。
全貌
プログラムの全体像をお見せします。
Raspberry Pi側のプログラム 概略
- キューブの状態を表すクラス
- CPとCOの状態を簡単に管理できる
- キューブを動作させる記述が簡単
- アクチュエータを動かす関数
- アームを動かすコマンドを送る
- GUI
- 画面表示
- カメラを使ってパズルの状態を取得
- 画像認識
- 解を探索する
- IDA*探索
- 前計算は事前に計算してcsvファイルにしてある
- 回転記号の羅列からロボットが動くための手順を作る
- 最適な解になるようにする
- 実際にロボットを動かす
ATMEGA328P側のプログラム 概略
- コマンドを受け取る
- モーターを動かす関数
- アームでキューブを掴む関数
- アームでキューブを離す関数
Raspberry Pi側のプログラム - Python
ここではPC側のプログラムの解説をします。
プログラムは580行程度あって長いので、いくつかの部位に分割して解説します。
ライブラリのインポート
使うライブラリをインポートします。
from copy import deepcopy
from collections import deque
from time import time, sleep
import tkinter
import cv2
import numpy as np
import serial
Cubeクラス
キューブをプログラム上で一つの「モノ」として捉えると良い、ということで、Cubeのクラスを作りました。恥ずかしながら人生初のクラス作成です。
class Cube:
    def __init__(self):
        self.Co = [0, 0, 0, 0, 0, 0, 0]
        self.Cp = [0, 1, 2, 3, 4, 5, 6]

    # 回転処理 CP
    def move_cp(self, num):
        surface = [[0, 1, 2, 3], [2, 3, 4, 5], [3, 1, 5, 6]]
        replace = [[2, 0, 3, 1], [3, 2, 1, 0], [1, 3, 0, 2]]
        idx = num // 3
        res = [i for i in self.Cp]
        for i, j in zip(surface[idx], replace[num % 3]):
            res[i] = self.Cp[surface[idx][j]]
        return res

    # 回転処理 CO
    def move_co(self, num):
        surface = [[0, 1, 2, 3], [2, 3, 4, 5], [3, 1, 5, 6]]
        replace = [[2, 0, 3, 1], [3, 2, 1, 0], [1, 3, 0, 2]]
        pls = [2, 1, 1, 2]
        idx = num // 3
        res = [i for i in self.Co]
        for i, j in zip(surface[idx], replace[num % 3]):
            res[i] = self.Co[surface[idx][j]]
        if num // 3 != 0 and num % 3 != 1:
            for i in range(4):
                res[surface[idx][i]] += pls[i]
                res[surface[idx][i]] %= 3
        return res

    # 回転番号に則って実際にパズルの状態配列を変化させる
    def move(self, num):
        res = Cube()
        res.Co = self.move_co(num)
        res.Cp = self.move_cp(num)
        return res

    # cp配列から固有の番号を作成
    def cp2i(self):
        res = 0
        marked = set([])
        for i in range(7):
            res += fac[6 - i] * len(set(range(self.Cp[i])) - marked)
            marked.add(self.Cp[i])
        return res

    # co配列から固有の番号を作成
    def co2i(self):
        res = 0
        for i in self.Co:
            res *= 3
            res += i
        return res
一つずつ関数の説明をします。
__init__(self)
    def __init__(self):
        self.Co = [0, 0, 0, 0, 0, 0, 0]
        self.Cp = [0, 1, 2, 3, 4, 5, 6]
Cubeクラスを呼んだ時に最初に実行される関数です。ここではCubeクラスにCo、Cpという2つの配列を紐付けます。これらは順に、CO(Corner Orientationの略。コーナーパーツの向きを表す)、CP(Corner Permutationの略。コーナーパーツの位置を表す)です。
なお、キューブの状態の保持にCO配列とCP配列を独自に持っておくととても効率が良いです。また、回す面はRとUとFしかないので、DLB(左下奥)のパーツは動きません。このパーツの情報を保持する必要はなく、データ数はCOとCPそれぞれにつき7つずつで済みます。
CPは図のようにパーツに番号をつけ、CP配列の要素のインデックスの場所にあるパーツがCP配列の要素となるように値を保持します。
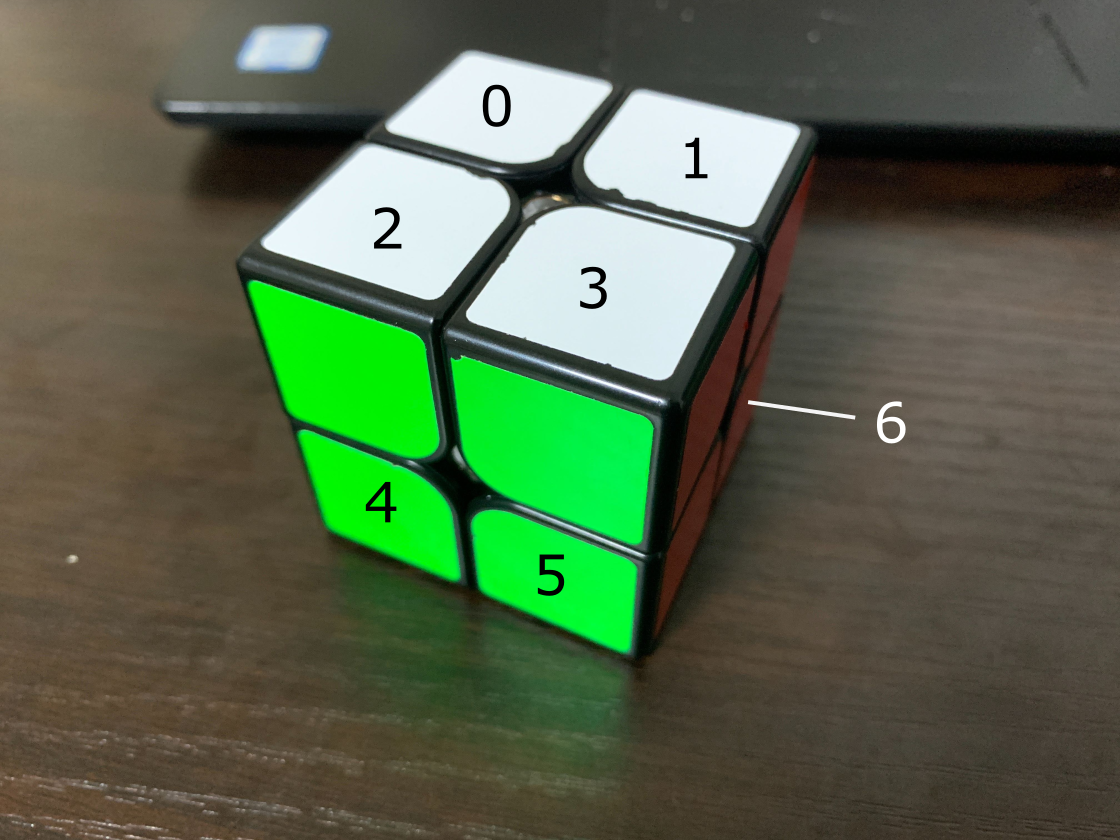
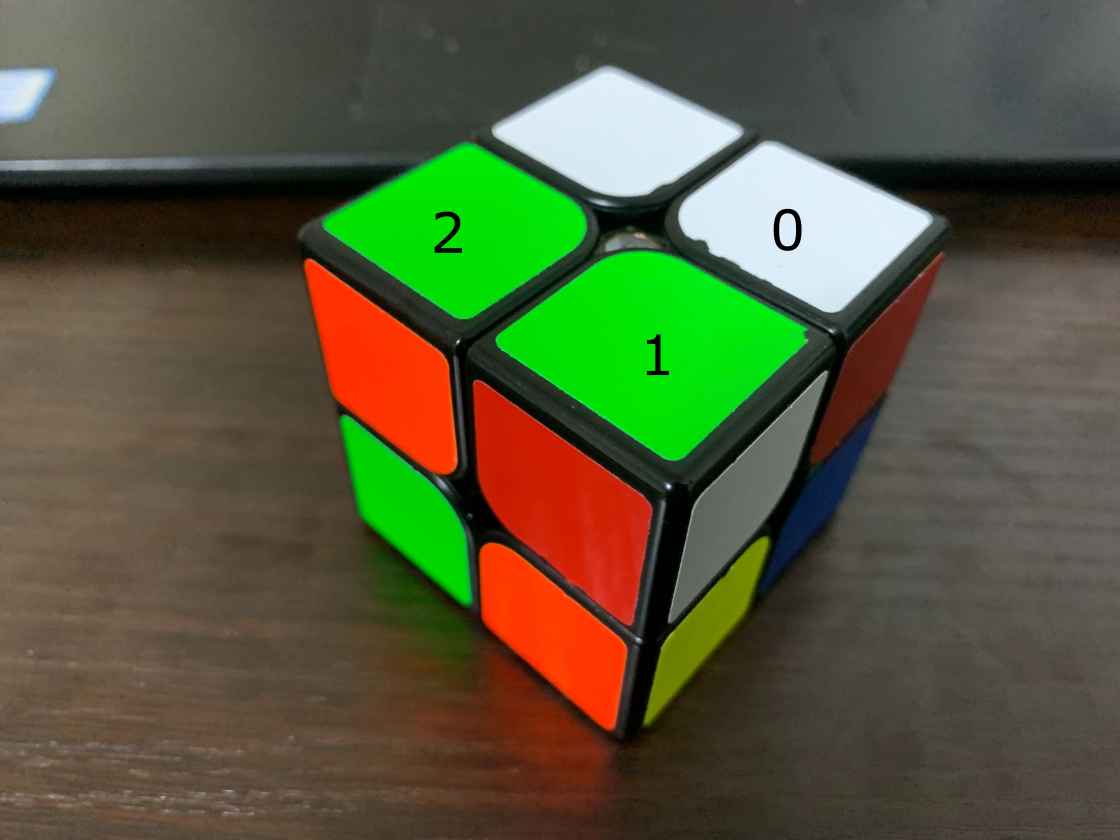
COは白色または黄色のステッカーがU面、またはD面にあらわれているときに0、そこから時計回りに120度ずつ回転するたびに1、2となっていくようにしました。例として写真にCO番号を振っておきます。
move_cp(self, num)
    # 回転処理 CP
    def move_cp(self, num):
        surface = [[0, 1, 2, 3], [2, 3, 4, 5], [3, 1, 5, 6]]
        replace = [[2, 0, 3, 1], [3, 2, 1, 0], [1, 3, 0, 2]]
        idx = num // 3
        res = [i for i in self.Cp]
        for i, j in zip(surface[idx], replace[num % 3]):
            res[i] = self.Cp[surface[idx][j]]
        return res
この関数は実際にキューブを回転させる関数(の一部)です。配列のCPのみを回転させます。COについてはいじりません。
なお、numというのは回転記号の番号(回転番号)を表し、グローバルに置いた以下の配列のインデックスに対応します。
move_candidate = ["U", "U2", "U'", "F", "F2", "F'", "R", "R2", "R'"] #回転の候補
surface配列はそれぞれU面、F面、R面を動かしたときに動くパーツを示し、replace配列はそれぞれX、X2、X'を動かしたときのパーツの動き方を示します。これらの配列を使ってうまく置換してやることで、回転処理を可能にしています。
move_co(self, num)
    # 回転処理 CO
    def move_co(self, num):
        surface = [[0, 1, 2, 3], [2, 3, 4, 5], [3, 1, 5, 6]]
        replace = [[2, 0, 3, 1], [3, 2, 1, 0], [1, 3, 0, 2]]
        pls = [2, 1, 1, 2]
        idx = num // 3
        res = [i for i in self.Co]
        for i, j in zip(surface[idx], replace[num % 3]):
            res[i] = self.Co[surface[idx][j]]
        if num // 3 != 0 and num % 3 != 1:
            for i in range(4):
                res[surface[idx][i]] += pls[i]
                res[surface[idx][i]] %= 3
        return res
この関数も先程のmove_cp関数と同様に、パーツを実際に動かす関数です。この関数はCOを動かします。内容はmove_cp関数と酷似していますが、U面を回す場合でなく(num % 3 != 0)、180度回転でない(num % 3 != 1)場合はCOが変わるので、適宜処理する必要があります。
move(self, num)
    # 回転番号に則って実際にパズルの状態配列を変化させる
    def move(self, num):
        res = Cube()
        res.Co = self.move_co(num)
        res.Cp = self.move_cp(num)
        return res
この関数も実際にパーツを動かす関数です。この関数ではCOとCP両方を動かします。先程の2つの関数をただただ動かしているだけです。
cp2i(self)
    # cp配列から固有の番号を作成
    def cp2i(self):
        res = 0
        marked = set([])
        for i in range(7):
            res += fac[6 - i] * len(set(range(self.Cp[i])) - marked)
            marked.add(self.Cp[i])
        return res
この関数はCP配列からCP配列固有の番号を生成し、返します。内容としてはCP配列の順列の番号を返しているだけです。順列の番号とは、
0: 0, 1, 2, 3, 4, 5, 6
1: 0, 1, 2, 3, 4, 6, 5
2: 0, 1, 2, 3, 5, 4, 6
3: 0, 1, 2, 3, 5, 6, 4
4: 0, 1, 2, 3, 6, 5, 4
のような順番で並べたときの番号です。
この番号の計算の仕方はこちらのサイトがわかりやすいと思います。
co2i(self)
    # co配列から固有の番号を作成
    def co2i(self):
        res = 0
        for i in self.Co:
            res *= 3
            res += i
        return res
この関数はCO配列からCO配列固有の番号を生成し、返します。このときCO配列を3進数7桁の数とみなして計算することで固有の番号を作っています。
その他のパズルに関する関数
num2movesという、回転番号を回転記号に翻訳する関数があります。
# 回転番号を回転記号に変換
def num2moves(arr):
    res = ''
    for i in arr:
        res += move_candidate[i] + ' '
    return res
move_candidateは
move_candidate = ["U", "U2", "U'", "F", "F2", "F'", "R", "R2", "R'"] #回転の候補
です。
アクチュエータを動かす関数
全容はこちらです。
def move_actuator(num, arg1, arg2, arg3=None):
    if arg3 == None:
        com = str(arg1) + ' ' + str(arg2)
    else:
        com = str(arg1) + ' ' + str(arg2) + ' ' + str(arg3)
    ser_motor[num].write((com + '\n').encode())
    ser_motor[num].flush()
    print('num:', num, 'command:', com)

def grab_p():
    for i in range(2):
        for j in range(2):
            move_actuator(i, j, 5)

def release_p():
    for i in range(2):
        for j in range(2):
            move_actuator(i, j, 6)
move_actuator(num, arg1, arg2, arg3=None)
# アクチュエータを動かすコマンドを送る
def move_actuator(num, arg1, arg2, arg3=None):
    if arg3 == None:
        com = str(arg1) + ' ' + str(arg2)
    else:
        com = str(arg1) + ' ' + str(arg2) + ' ' + str(arg3)
    ser_motor[num].write((com + '\n').encode())
    ser_motor[num].flush()
    print('num:', num, 'command:', com)
この関数はATMEGA328Pにシリアル通信でコマンドを送り、モーターを動かす関数です。ここで、numはATMEGA328Pの番号(0か1)で、arg1にはアクチュエータの番号、arg2にはアクチュエータの動作させる量、arg3にはステッピングモーターを動かす場合、モーターのスピード(rpm)を入力します。
なお、シリアル通信関係については
ser_motor[0] = serial.Serial('/dev/ttyUSB0', 9600, write_timeout=0)
ser_motor[1] = serial.Serial('/dev/ttyUSB1', 9600, write_timeout=0)
という定義があります。それぞれのATMEGA328Pにステッピングモーターが2つ、サーボモーターが2つずつついています。
grab_p()
# キューブを掴む
def grab_p():
    for i in range(2):
        for j in range(2):
            move_actuator(i, j, 1000)
この関数は先程のmove_actuator関数を使って全部のアームを一気に動かし、キューブを掴む関数です。
release_p()
# キューブを離す
def release_p():
    for i in range(2):
        for j in range(2):
            move_actuator(i, j, 2000)
この関数は全部のアームを一気に動かし、キューブを離す関数です。
GUI
GUIに関する部分はこちらです。
root = tkinter.Tk()
root.title("2x2x2solver")
root.geometry("300x150")

grid = 20
offset = 30

entry = [[None for _ in range(8)] for _ in range(6)]

for i in range(6):
    for j in range(8):
        if 1 < i < 4 or 1 < j < 4:
            entry[i][j] = tkinter.Entry(master=root, width=2, bg='gray')
            entry[i][j].place(x = j * grid + offset, y = i * grid + offset)

inspection = tkinter.Button(root, text="inspection", command=inspection_p)
inspection.place(x=0, y=0)

start = tkinter.Button(root, text="start", command=start_p)
start.place(x=0, y=40)


solutionvar = tkinter.StringVar(master=root, value='')
solution = tkinter.Label(textvariable=solutionvar)
solution.place(x=70, y=0)

solvingtimevar = tkinter.StringVar(master=root, value='')
solvingtime = tkinter.Label(textvariable=solvingtimevar)
solvingtime.place(x=120, y=20)

grab = tkinter.Button(root, text="grab", command=grab_p)
grab.place(x=0, y=120)

release = tkinter.Button(root, text="release", command=release_p)
release.place(x=120, y=120)

root.mainloop()
GUIライブラリにはtkinterを使っています。それぞれの変数が何に当たるのかを図でご説明します。
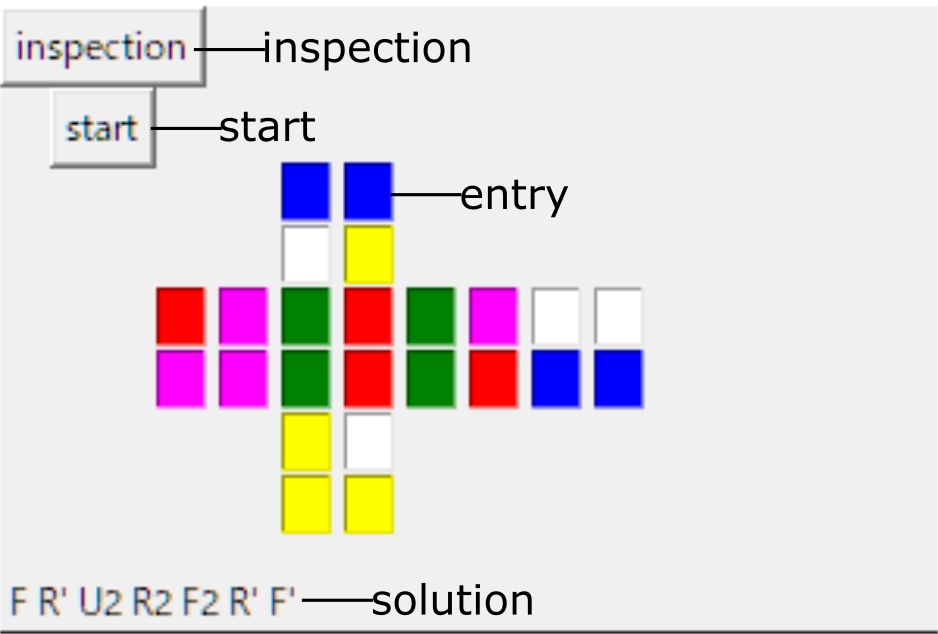
ここには出ていませんが、キューブを解くのにかかった時間を画面上に表示するsolvingtimeというラベルがあります。
なぜ色を表示するのがエントリーボックスなのかといいますと、もともとこのプログラムはエントリーボックスに色を打ち込むことでキューブの状態を入力していたからです。そんな時代は終わって今ではカメラで認識しています。
パズルの色を配列に格納
全容はこちらです。
dic = {'w':'white', 'g':'green', 'r':'red', 'b':'blue', 'o':'magenta', 'y':'yellow'}
parts_place = [[[0, 2], [2, 0], [2, 7]], [[0, 3], [2, 6], [2, 5]], [[1, 2], [2, 2], [2, 1]], [[1, 3], [2, 4], [2, 3]], [[4, 2], [3, 1], [3, 2]], [[4, 3], [3, 3], [3, 4]], [[5, 3], [3, 5], [3, 6]], [[5, 2], [3, 7], [3, 0]]]
parts_color = [['w', 'o', 'b'], ['w', 'b', 'r'], ['w', 'g', 'o'], ['w', 'r', 'g'], ['y', 'o', 'g'], ['y', 'g', 'r'], ['y', 'r', 'b'], ['y', 'b', 'o']]

# ボックスに色を反映させる
def confirm_p():
    global colors
    for i in range(6):
        for j in range(8):
            if (1 < i < 4 or 1 < j < 4) and colors[i][j] in j2color:
                entry[i][j]['bg'] = dic[colors[i][j]]
    # 埋まっていないところで色が確定するところを埋める
    for i in range(6):
        for j in range(8):
            if (1 < i < 4 or 1 < j < 4) and colors[i][j] == '':
                done = False
                for k in range(8):
                    if [i, j] in parts_place[k]:
                        for strt in range(3):
                            if parts_place[k][strt] == [i, j]:
                                idx = [colors[parts_place[k][l % 3][0]][parts_place[k][l % 3][1]] for l in range(strt + 1, strt + 3)]
                                for strt2 in range(3):
                                    idx1 = strt2
                                    idx2 = (strt2 + 1) % 3
                                    idx3 = (strt2 + 2) % 3
                                    for l in range(8):
                                        if parts_color[l][idx1] == idx[0] and parts_color[l][idx2] == idx[1]:
                                            colors[i][j] = parts_color[l][idx3]
                                            entry[i][j]['bg'] = dic[colors[i][j]]
                                            done = True
                                            break
                                    if done:
                                        break
                                break
                    if done:
                        break

    # 埋まっていないところの背景色をgrayに
    for i in range(6):
        for j in range(8):
            if (1 < i < 4 or 1 < j < 4) and colors[i][j] == '':
                entry[i][j]['bg'] = 'gray'
この関数は少し複雑です。パズルの状態を一意に決定するためには、2x2x2の場合、パズルの(うまく選んだ)4面(例えばこのプログラムではD、F、U、B面)だけを見ることで事足ります。そこで、見ていない面の色を推測し決定するのがこの関数です。決定した色はさきほどのエントリーボックスの背景色として反映させます。
この関数では単に、埋まっていないところの色が何になるかを全探索で求めています。ですが実装が少し重くなってしまっています。これが最善の書き方だという自信はありません。
カメラからパズルの状態を取得
全容はこちらです。
j2color = ['g', 'b', 'r', 'o', 'y', 'w']
idx = 0
colors = [['' for _ in range(8)] for _ in range(6)]
# パズルの状態の取得
def detect():
global idx, colors
idx = 0
while idx < 4:
#color: g, b, r, o, y, w
color_low = [[50, 50, 50], [90, 150, 50], [160, 150, 50], [170, 50, 50], [20, 50, 50], [0, 0, 50]] #for PC
color_hgh = [[90, 255, 255], [140, 255, 255], [10, 255, 200], [20, 255, 255], [50, 255, 255], [179, 50, 255]]
circlecolor = [(0, 255, 0), (255, 0, 0), (0, 0, 255), (0, 170, 255), (0, 255, 255), (255, 255, 255)]
surfacenum = [[[4, 2], [4, 3], [5, 2], [5, 3]], [[2, 2], [2, 3], [3, 2], [3, 3]], [[0, 2], [0, 3], [1, 2], [1, 3]], [[3, 7], [3, 6], [2, 7], [2, 6]]]
capture = cv2.VideoCapture(0)
ret, frame = capture.read()
capture.release()
size_x = 200
size_y = 150
frame = cv2.resize(frame, (size_x, size_y))
show_frame = deepcopy(frame)
d = 50
center = [size_x // 2, size_y // 2]
tmp_colors = [['' for _ in range(8)] for _ in range(6)]
hsv = cv2.cvtColor(frame,cv2.COLOR_BGR2HSV)
dx = [-1, 1, -1, 1]
dy = [1, 1, -1, -1]
for i in range(4):
y = center[0] + dy[i] * d
x = center[1] + dx[i] * d
cv2.circle(show_frame, (y, x), 5, (0, 0, 0), thickness=3, lineType=cv2.LINE_8, shift=0)
val = hsv[x, y]
for j in range(6):
flag = True
for k in range(3):
if not ((color_low[j][k] < color_hgh[j][k] and color_low[j][k] <= val[k] <= color_hgh[j][k]) or (color_low[j][k] > color_hgh[j][k] and (color_low[j][k] <= val[k] or val[k] <= color_hgh[j][k]))):
flag = False
if flag:
tmp_colors[surfacenum[idx][i][0]][surfacenum[idx][i][1]] = j2color[j]
cv2.circle(show_frame, (y, x), 15, circlecolor[j], thickness=3, lineType=cv2.LINE_8, shift=0)
break
cv2.imshow('title',show_frame)
key = cv2.waitKey(0)
if key == 32: #スペースキーが押されたとき
for i in range(4):
colors[surfacenum[idx][i][0]][surfacenum[idx][i][1]] = tmp_colors[surfacenum[idx][i][0]][surfacenum[idx][i][1]]
print(idx)
idx += 1
confirm_p()
if idx < 4:
for i in range(2):
move_actuator(i, 0, 5)
move_actuator(i, 0, (-1) ** i, 50)
move_actuator(i, 1, 5)
move_actuator((i + 1) % 2, 1, 5)
move_actuator(i, 0, 6)
move_actuator(i, 0, -(-1) ** i, 50)
move_actuator(i, 0, 5)
move_actuator(i, 1, 6)
move_actuator((i + 1) % 2, 1, 6)
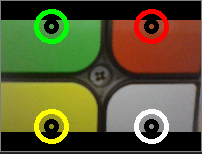
cv2.destroyAllWindows()
この関数ではカメラで撮影した画像の中のある4つのピクセルの色がそれぞれ何であるかによってパズルの色を取得します。画面はこんな感じです。
ロボット専用手順を作る
後述するinspection関数内でIDA*を使って出力されるのは人間が読むための回転記号(回転番号)の羅列です。これを、どのモーターを、いつ、何度動かすのか、という情報を持った配列に変換します。全容はこちらです。
# 回転記号番号の配列から回すモーターを決定する
def proc_motor(rot, num, direction):
    if num == len(ans):
        return rot, num, direction
    turn_arr = [-3, -2, -1]
    r_arr = [[-1, 2, 4, -1, 5, 1], [5, -1, 0, 2, -1, 3], [1, 3, -1, 4, 0, -1], [-1, 5, 1, -1, 2, 4], [2, -1, 3, 5, -1, 0], [4, 0, -1, 1, 3, -1]]
    f_arr = [[1, 2, 4, 5], [3, 2, 0, 5], [3, 4, 0, 1], [4, 2, 1, 5], [3, 5, 0, 2], [3, 1, 0, 4]]
    regrip_arr = [[21, 5, 9, 17, 20, 13, 10, 3, 4, 12, 18, 0, 23, 19, 11, 7, 8, 15, 22, 1, 16, 14, 6, 2], [4, 8, 16, 20, 12, 9, 2, 23, 15, 17, 3, 7, 18, 10, 6, 22, 14, 21, 0, 11, 13, 5, 1, 19]]
    regrip_rot = [[[1, -3], [3, -1]], [[0, -3], [2, -1]]]
    u_face = direction // 4
    f_face = f_arr[u_face][direction % 4]
    r_face = r_arr[u_face][f_face]
    d_face = (u_face + 3) % 6
    b_face = (f_face + 3) % 6
    l_face = (r_face + 3) % 6
    move_able = [r_face, b_face, l_face, f_face]
    move_face = ans[num] // 3
    move_amount = turn_arr[ans[num] % 3]
    if move_face == u_face or move_face == d_face:
        rot_tmp = [[i for i in rot] for _ in range(2)]
        direction_tmp = [-1, -1]
        num_tmp = [num, num]
        for j in range(2):
            rot_tmp[j].extend(regrip_rot[j])
            direction_tmp[j] = regrip_arr[j][direction]
            rot_tmp[j], num_tmp[j], direction_tmp[j] = proc_motor(rot_tmp[j], num_tmp[j], direction_tmp[j])
        idx = 0 if len(rot_tmp[0]) < len(rot_tmp[1]) else 1
        rot_res = rot_tmp[idx]
        num_res = num_tmp[idx]
        direction_res = direction_tmp[idx]
    else:
        tmp = move_able.index(move_face)
        rot_res = [i for i in rot]
        rot_res.append([tmp, move_amount])
        rot_res, num_res, direction_res = proc_motor(rot_res, num + 1, direction)
    return rot_res, num_res, direction_res

# ロボットの手順の最適化
def rot_optimise():
    global rot
    i = 0
    tmp_arr = [0, -3, -2, -1]
    while i < len(rot):
        if i < len(rot) - 1 and rot[i][0] == rot[i + 1][0]:
            tmp = tmp_arr[(rot[i][1] + rot[i + 1][1]) % 4]
            del rot[i + 1]
            if not tmp:
                del rot[i]
                i -= 1
            else:
                rot[i][1] = tmp
        elif i < len(rot) - 2 and rot[i][0] == rot[i + 2][0] and rot[i][0] % 2 == rot[i + 1][0] % 2:
            tmp = tmp_arr[rot[i][1] + rot[i + 2][1] + 2]
            del rot[i + 2]
            if tmp == 0:
                del rot[i]
                i -= 1
            else:
                rot[i][1] = tmp
        i += 1
なにかとても愚直なことをしているようですね。とんでもなく長い手打ちの配列がいくつもあります。では一つずつ関数を説明しましょう。
proc_motor(rot, num, direction)
# 回転記号番号の配列から回すモーターを決定する
def proc_motor(rot, num, direction):
    if num == len(ans):
        return rot, num, direction
    turn_arr = [-3, -2, -1]
    r_arr = [[-1, 2, 4, -1, 5, 1], [5, -1, 0, 2, -1, 3], [1, 3, -1, 4, 0, -1], [-1, 5, 1, -1, 2, 4], [2, -1, 3, 5, -1, 0], [4, 0, -1, 1, 3, -1]]
    f_arr = [[1, 2, 4, 5], [3, 2, 0, 5], [3, 4, 0, 1], [4, 2, 1, 5], [3, 5, 0, 2], [3, 1, 0, 4]]
    regrip_arr = [[21, 5, 9, 17, 20, 13, 10, 3, 4, 12, 18, 0, 23, 19, 11, 7, 8, 15, 22, 1, 16, 14, 6, 2], [4, 8, 16, 20, 12, 9, 2, 23, 15, 17, 3, 7, 18, 10, 6, 22, 14, 21, 0, 11, 13, 5, 1, 19]]
    regrip_rot = [[[1, -3], [3, -1]], [[0, -3], [2, -1]]]
    u_face = direction // 4
    f_face = f_arr[u_face][direction % 4]
    r_face = r_arr[u_face][f_face]
    d_face = (u_face + 3) % 6
    b_face = (f_face + 3) % 6
    l_face = (r_face + 3) % 6
    move_able = [r_face, b_face, l_face, f_face]
    move_face = ans[num] // 3
    move_amount = turn_arr[ans[num] % 3]
    if move_face == u_face or move_face == d_face:
        rot_tmp = [[i for i in rot] for _ in range(2)]
        direction_tmp = [-1, -1]
        num_tmp = [num, num]
        for j in range(2):
            rot_tmp[j].extend(regrip_rot[j])
            direction_tmp[j] = regrip_arr[j][direction]
            rot_tmp[j], num_tmp[j], direction_tmp[j] = proc_motor(rot_tmp[j], num_tmp[j], direction_tmp[j])
        idx = 0 if len(rot_tmp[0]) < len(rot_tmp[1]) else 1
        rot_res = rot_tmp[idx]
        num_res = num_tmp[idx]
        direction_res = direction_tmp[idx]
    else:
        tmp = move_able.index(move_face)
        rot_res = [i for i in rot]
        rot_res.append([tmp, move_amount])
        rot_res, num_res, direction_res = proc_motor(rot_res, num + 1, direction)
    return rot_res, num_res, direction_res
詳しくはハードウェア編でお話ししますが、ロボットにはアームが4つついており、それぞれF、R、B、L面についています。つまり、持ち替えないとU面は回せません。ここで、持ち替えるとは例えばR面とL面を同時に回すようなことです。キューブを持つ向きは$4(通り/面)\times6(面)=24通り$ありますから、それぞれの向きに番号を振っておいて、それぞれの向きからどのように持ち替えたらどのような向きになるのかを配列regrip_arrに打ち込んでおきます(この作業が大変)。なお、持ち替えの方法はRLの同時回しまたはFBの同時回しで2通りあります(時計回り、反時計回りに関してはどちらに回しても結局同値です)。
現在のキューブの向きから、次に回す手順が持ち替えなしで回せるか否か、持ち替えが必要であれば、2通りの持ち替えのどちらがより効率的かを再帰を使った全探索で探ります。
rot配列には、以下のような感じで値が格納されます。
rot = [[回すモーターの番号, 回す向きと量], [0, -90], [1, -180], [2, -270]] #モーター0を90度反時計回りに回し、モーター2を180度回し、モーター2を270度反時計回り(=90度時計回り)に回す
ここで反時計回りしか使わないのにはハードウェアに依存する理由があります。詳しくはハードウェア編で。
rot_optimise()
# ロボットの手順の最適化
def rot_optimise():
    global rot
    i = 0
    tmp_arr = [0, -3, -2, -1]
    while i < len(rot):
        if i < len(rot) - 1 and rot[i][0] == rot[i + 1][0]:
            tmp = tmp_arr[(rot[i][1] + rot[i + 1][1]) % 4]
            del rot[i + 1]
            if not tmp:
                del rot[i]
                i -= 1
            else:
                rot[i][1] = tmp
        elif i < len(rot) - 2 and rot[i][0] == rot[i + 2][0] and rot[i][0] % 2 == rot[i + 1][0] % 2:
            tmp = tmp_arr[rot[i][1] + rot[i + 2][1] + 2]
            del rot[i + 2]
            if tmp == 0:
                del rot[i]
                i -= 1
            else:
                rot[i][1] = tmp
        i += 1
生成されたロボット専用手順には、例えばrot配列が
rot = [[0, -90], [0, -90], [2, -90]]
のようになっていて、以下のように簡略化できる場合があります。この場合の回転記号はF' F' R'です。これはF2 R'に簡略化できますね。
rot = [[0, -180], [2, -90]]
この簡略化をこの関数内で行います。
インスペクション処理
さあ、いよいよメインの処理(パズルの解法を探索する処理)です。
# インスペクション処理
def inspection_p():
    global ans, rot, colors

    ans = []
    rot = []
    colors = [['' for _ in range(8)] for _ in range(6)]

    grab_p()
    for i in range(2):
        move_actuator(i, 1, 2000)
    detect()

    strt = time()

    # 色の情報からパズルの状態配列を作る
    confirm_p()
    puzzle = Cube()
    set_parts_color = [set(i) for i in parts_color]
    for i in range(7):
        tmp = []
        for j in range(3):
            tmp.append(colors[parts_place[i][j][0]][parts_place[i][j][1]])
        tmp1 = 'w' if 'w' in tmp else 'y'
        puzzle.Co[i] = tmp.index(tmp1)
        if not set(tmp) in set_parts_color:
            solutionvar.set('cannot solve!')
            print('cannot solve!')
            return
        puzzle.Cp[i] = set_parts_color.index(set(tmp))
    tmp2 = list(set(range(7)) - set(puzzle.Cp))
    if len(tmp2):
        tmp2 = tmp2[0]
        for i in range(7):
            if puzzle.Cp[i] > tmp2:
                puzzle.Cp[i] -= 1
    print('scramble:')
    for i in range(6):
        print(colors[i])
    print(puzzle.Cp)
    print(puzzle.Co)

    # パズルの向きから、solved状態の配列を作る
    solved_color = [['' for _ in range(8)] for _ in range(6)]
    solved_color[5][2] = colors[5][2]
    solved_color[3][7] = colors[3][7]
    solved_color[3][0] = colors[3][0]
    solved_color[2][2] = j2color[(j2color.index(solved_color[3][7]) // 2) * 2 - j2color.index(solved_color[3][7]) % 2 + 1]
    solved_color[3][4] = j2color[(j2color.index(solved_color[3][0]) // 2) * 2 - j2color.index(solved_color[3][0]) % 2 + 1]
    solved_color[0][2] = j2color[(j2color.index(solved_color[5][2]) // 2) * 2 - j2color.index(solved_color[5][2]) % 2 + 1]
    for i in range(6):
        for j in range(8):
            if (1 < i < 4 or 1 < j < 4) and solved_color[i][j] == '':
                if i % 2 and j % 2:
                    dx = [0, -1, -1]
                    dy = [-1, -1, 0]
                elif i % 2 and (not j % 2):
                    dx = [0, 1, 1]
                    dy = [-1, -1, 0]
                elif (not i % 2) and j % 2:
                    dx = [-1, -1, 0]
                    dy = [0, 1, 1]
                elif (not i % 2) and (not j % 2):
                    dx = [1, 1, 0]
                    dy = [0, 1, 1]
                #print(i, j, dx, dy)
                for k in range(3):
                    if solved_color[i + dy[k]][j + dx[k]] != '':
                        solved_color[i][j] = solved_color[i + dy[k]][j + dx[k]]
    solved = Cube()
    for i in range(7):
        tmp = []
        for j in range(3):
            tmp.append(solved_color[parts_place[i][j][0]][parts_place[i][j][1]])
        tmp1 = 'w' if 'w' in tmp else 'y'
        solved.Co[i] = tmp.index(tmp1)
        solved.Cp[i] = set_parts_color.index(set(tmp))
    tmp2 = list(set(range(7)) - set(solved.Cp))
    if len(tmp2):
        tmp2 = tmp2[0]
        for i in range(7):
            if solved.Cp[i] > tmp2:
                solved.Cp[i] -= 1
    print('solved:')
    for i in range(6):
        print(solved_color[i])
    print(solved.Cp)
    print(solved.Co)

    # 枝刈り用のco配列とcp配列
    direction = -1
    direction_arr = [21, 12, 15, 18, 2, 22, 20, 4, 8, 13, 23, 1, 6, 0, 3, 9, 11, 16, 14, 7, 5, 19, 17, 10]
    for idx, d in enumerate(direction_arr):
        if solved_color[5][2] == parts_color[d // 3][d % 3] and solved_color[3][7] == parts_color[d // 3][(d % 3 + 1) % 3]:
            direction = idx
    if direction == -1:
        solutionvar.set('cannot solve!')
        print('cannot solve!')
        return
    with open('cp'+ str(direction) + '.csv', mode='r') as f:
        cp = [int(i) for i in f.readline().replace('\n', '').split(',')]
    with open('co'+ str(direction) + '.csv', mode='r') as f:
        co = [int(i) for i in f.readline().replace('\n', '').split(',')]
    print('pre', time() - strt, 's')

    # 深さ優先探索with枝刈り
    def dfs(status, depth, num):
        global ans
        if num + max(cp[status.cp2i()], co[status.co2i()]) <= depth:
            l_mov = ans[-1] if num else -1
            t = (l_mov // 3) * 3
            lst = set(range(9)) - set([t, t + 1, t + 2])
            for mov in lst:
                n_status = status.move(mov)
                ans.append(mov)
                if num + 1 == depth and n_status.Cp == solved.Cp and n_status.Co == solved.Co:
                    return True
                if dfs(n_status, depth, num + 1):
                    return True
                ans.pop()
        return False

    # IDA*
    for depth in range(1, 12):
        ans = []
        if dfs(puzzle, depth, 0):
            break

    if ans:
        print('answer:', num2moves(ans))
        solutionvar.set(num2moves(ans))
        rot, _, _ = proc_motor(rot, 0, 4)
        print('before:', len(rot))
        print(rot)
        rot_optimise()
        print('after:', len(rot))
        print(rot)
        print('all', time() - strt, 's')
    else:
        solutionvar.set('cannot solve!')
        print('cannot solve!')
長いですね。なんで関数化しなかったんでしょう。塊ごとに解説します。
色の情報からパズルの状態配列を作る
    # 色の情報からパズルの状態配列を作る
    confirm_p()
    puzzle = Cube()
    set_parts_color = [set(i) for i in parts_color]
    for i in range(7):
        tmp = []
        for j in range(3):
            tmp.append(colors[parts_place[i][j][0]][parts_place[i][j][1]])
        tmp1 = 'w' if 'w' in tmp else 'y'
        puzzle.Co[i] = tmp.index(tmp1)
        if not set(tmp) in set_parts_color:
            solutionvar.set('cannot solve!')
            print('cannot solve!')
            return
        puzzle.Cp[i] = set_parts_color.index(set(tmp))
    tmp2 = list(set(range(7)) - set(puzzle.Cp))
    if len(tmp2):
        tmp2 = tmp2[0]
        for i in range(7):
            if puzzle.Cp[i] > tmp2:
                puzzle.Cp[i] -= 1
    print('scramble:')
    for i in range(6):
        print(colors[i])
    print(puzzle.Cp)
    print(puzzle.Co)
この部分では色の配列colorsから、CO配列(puzzle.Co)とCP配列(puzzle.Cp)を生成します。ただただ愚直に探索していますが実装が少し重めです。
parts_colorとparts_placeは以下の配列です。
parts_place = [[[0, 2], [2, 0], [2, 7]], [[0, 3], [2, 6], [2, 5]], [[1, 2], [2, 2], [2, 1]], [[1, 3], [2, 4], [2, 3]], [[4, 2], [3, 1], [3, 2]], [[4, 3], [3, 3], [3, 4]], [[5, 3], [3, 5], [3, 6]], [[5, 2], [3, 7], [3, 0]]]
parts_color = [['w', 'o', 'b'], ['w', 'b', 'r'], ['w', 'g', 'o'], ['w', 'r', 'g'], ['y', 'o', 'g'], ['y', 'g', 'r'], ['y', 'r', 'b'], ['y', 'b', 'o']]
パズルの向きから、solved状態の配列を作る
    # パズルの向きから、solved状態の配列を作る
    solved_color = [['' for _ in range(8)] for _ in range(6)]
    solved_color[5][2] = colors[5][2]
    solved_color[3][7] = colors[3][7]
    solved_color[3][0] = colors[3][0]
    solved_color[2][2] = j2color[(j2color.index(solved_color[3][7]) // 2) * 2 - j2color.index(solved_color[3][7]) % 2 + 1]
    solved_color[3][4] = j2color[(j2color.index(solved_color[3][0]) // 2) * 2 - j2color.index(solved_color[3][0]) % 2 + 1]
    solved_color[0][2] = j2color[(j2color.index(solved_color[5][2]) // 2) * 2 - j2color.index(solved_color[5][2]) % 2 + 1]
    for i in range(6):
        for j in range(8):
            if (1 < i < 4 or 1 < j < 4) and solved_color[i][j] == '':
                if i % 2 and j % 2:
                    dx = [0, -1, -1]
                    dy = [-1, -1, 0]
                elif i % 2 and (not j % 2):
                    dx = [0, 1, 1]
                    dy = [-1, -1, 0]
                elif (not i % 2) and j % 2:
                    dx = [-1, -1, 0]
                    dy = [0, 1, 1]
                elif (not i % 2) and (not j % 2):
                    dx = [1, 1, 0]
                    dy = [0, 1, 1]
                #print(i, j, dx, dy)
                for k in range(3):
                    if solved_color[i + dy[k]][j + dx[k]] != '':
                        solved_color[i][j] = solved_color[i + dy[k]][j + dx[k]]
    solved = Cube()
    for i in range(7):
        tmp = []
        for j in range(3):
            tmp.append(solved_color[parts_place[i][j][0]][parts_place[i][j][1]])
        tmp1 = 'w' if 'w' in tmp else 'y'
        solved.Co[i] = tmp.index(tmp1)
        solved.Cp[i] = set_parts_color.index(set(tmp))
    tmp2 = list(set(range(7)) - set(solved.Cp))
    if len(tmp2):
        tmp2 = tmp2[0]
        for i in range(7):
            if solved.Cp[i] > tmp2:
                solved.Cp[i] -= 1
    print('solved:')
    for i in range(6):
        print(solved_color[i])
    print(solved.Cp)
    print(solved.Co)
パズルの向きは決まった向きではなくランダムで色が入力されるとします。その場合にもうまく対応できるよう、まず解けた状態でのパズルの色の状態が入るsolved_color配列を作ります。ここで、j2colorはこれです。
j2color = ['g', 'b', 'r', 'o', 'y', 'w']
そして、実際にsolved(Cubeクラス)を作っていきます。パズルの向きがランダムなので、solved配列が一意に決定できないのです。
IDA*で探索する
# 枝刈り用のco配列とcp配列
    direction = -1
    direction_arr = [21, 12, 15, 18, 2, 22, 20, 4, 8, 13, 23, 1, 6, 0, 3, 9, 11, 16, 14, 7, 5, 19, 17, 10]
    for idx, d in enumerate(direction_arr):
        if solved_color[5][2] == parts_color[d // 3][d % 3] and solved_color[3][7] == parts_color[d // 3][(d % 3 + 1) % 3]:
            direction = idx
    if direction == -1:
        solutionvar.set('cannot solve!')
        print('cannot solve!')
        return
    with open('cp'+ str(direction) + '.csv', mode='r') as f:
        cp = [int(i) for i in f.readline().replace('\n', '').split(',')]
    with open('co'+ str(direction) + '.csv', mode='r') as f:
        co = [int(i) for i in f.readline().replace('\n', '').split(',')]
    print('pre', time() - strt, 's')

    # 深さ優先探索with枝刈り
    def dfs(status, depth, num):
        global ans
        if num + max(cp[status.cp2i()], co[status.co2i()]) <= depth:
            l_mov = ans[-1] if num else -1
            t = (l_mov // 3) * 3
            lst = set(range(9)) - set([t, t + 1, t + 2])
            for mov in lst:
                n_status = status.move(mov)
                ans.append(mov)
                if num + 1 == depth and n_status.Cp == solved.Cp and n_status.Co == solved.Co:
                    return True
                if dfs(n_status, depth, num + 1):
                    return True
                ans.pop()
        return False

    # IDA*
    for depth in range(1, 12):
        ans = []
        if dfs(puzzle, depth, 0):
            break
ここでやっとアルゴリズム編で出てきた探索です。ですがアルゴリズム編のプログラムと大きく違います。アルゴリズム編ではみやすさ重視のため深さ優先探索を再帰を使わずstackを使って書いていましたが、ここでは再帰を使ってうまくメモリ使用量を極限まで減らしています。また、枝刈り用の配列はたったの24個ずつ(CPとCOで2セット)のバリエーションしかないので、以下のプログラムで前計算してcsvファイルにしてあります。
import csv
from collections import deque

class Cube:
    def __init__(self):
        self.Co = [0, 0, 0, 0, 0, 0, 0]
        self.Cp = [0, 1, 2, 3, 4, 5, 6]
        self.Moves = []
        #self.Movnum = 0

    # 回転処理 CP
    def move_cp(self, num):
        surface = [[0, 1, 2, 3], [2, 3, 4, 5], [3, 1, 5, 6]]
        replace = [[2, 0, 3, 1], [3, 2, 1, 0], [1, 3, 0, 2]]
        idx = num // 3
        res = Cube()
        res.Cp = [i for i in self.Cp]
        for i, j in zip(surface[idx], replace[num % 3]):
            res.Cp[i] = self.Cp[surface[idx][j]]
        res.Moves = [i for i in self.Moves]
        res.Moves.append(num)
        return res

    # 回転処理 CO
    def move_co(self, num):
        surface = [[0, 1, 2, 3], [2, 3, 4, 5], [3, 1, 5, 6]]
        replace = [[2, 0, 3, 1], [3, 2, 1, 0], [1, 3, 0, 2]]
        pls = [2, 1, 1, 2]
        idx = num // 3
        res = Cube()
        res.Co = [i for i in self.Co]
        for i, j in zip(surface[idx], replace[num % 3]):
            res.Co[i] = self.Co[surface[idx][j]]
        if num // 3 != 0 and num % 3 != 1:
            for i in range(4):
                res.Co[surface[idx][i]] += pls[i]
                res.Co[surface[idx][i]] %= 3
        res.Moves = [i for i in self.Moves]
        res.Moves.append(num)
        return res

    # 回転番号に則って実際にパズルの状態配列を変化させる
    def move(self, num):
        res = Cube()
        res = self.move_co(num)
        res.Cp = self.move_cp(num).Cp
        return res

    # cp配列から固有の番号を作成
    def cp2i(self):
        res = 0
        marked = set([])
        for i in range(7):
            res += fac[6 - i] * len(set(range(self.Cp[i])) - marked)
            marked.add(self.Cp[i])
        return res

    # co配列から固有の番号を作成
    def co2i(self):
        res = 0
        for i in self.Co:
            res *= 3
            res += i
        return res

parts_place = [[[0, 2], [2, 0], [2, 7]], [[0, 3], [2, 6], [2, 5]], [[1, 2], [2, 2], [2, 1]], [[1, 3], [2, 4], [2, 3]], [[4, 2], [3, 1], [3, 2]], [[4, 3], [3, 3], [3, 4]], [[5, 3], [3, 5], [3, 6]], [[5, 2], [3, 7], [3, 0]]]
parts_color = [['w', 'o', 'b'], ['w', 'b', 'r'], ['w', 'g', 'o'], ['w', 'r', 'g'], ['y', 'o', 'g'], ['y', 'g', 'r'], ['y', 'r', 'b'], ['y', 'b', 'o']]
j2color = ['g', 'b', 'r', 'o', 'y', 'w']
direction_arr = [21, 12, 15, 18, 2, 22, 20, 4, 8, 13, 23, 1, 6, 0, 3, 9, 11, 16, 14, 7, 5, 19, 17, 10]

fac = [1]
for i in range(1, 8):
    fac.append(fac[-1] * i)

for idx, d in enumerate(direction_arr):
    set_parts_color = [set(i) for i in parts_color]
    solved_color = [['' for _ in range(8)] for _ in range(6)]
    solved_color[5][2] = parts_color[d // 3][d % 3]
    solved_color[3][7] = parts_color[d // 3][(d % 3 + 1) % 3]
    solved_color[3][0] = parts_color[d // 3][(d % 3 + 2) % 3]
    solved_color[2][2] = j2color[(j2color.index(solved_color[3][7]) // 2) * 2 - j2color.index(solved_color[3][7]) % 2 + 1]
    solved_color[3][4] = j2color[(j2color.index(solved_color[3][0]) // 2) * 2 - j2color.index(solved_color[3][0]) % 2 + 1]
    solved_color[0][2] = j2color[(j2color.index(solved_color[5][2]) // 2) * 2 - j2color.index(solved_color[5][2]) % 2 + 1]
    for i in range(6):
        for j in range(8):
            if (1 < i < 4 or 1 < j < 4) and solved_color[i][j] == '':
                if i % 2 and j % 2:
                    dx = [0, -1, -1]
                    dy = [-1, -1, 0]
                elif i % 2 and (not j % 2):
                    dx = [0, 1, 1]
                    dy = [-1, -1, 0]
                elif (not i % 2) and j % 2:
                    dx = [-1, -1, 0]
                    dy = [0, 1, 1]
                elif (not i % 2) and (not j % 2):
                    dx = [1, 1, 0]
                    dy = [0, 1, 1]
                #print(i, j, dx, dy)
                for k in range(3):
                    if solved_color[i + dy[k]][j + dx[k]] != '':
                        solved_color[i][j] = solved_color[i + dy[k]][j + dx[k]]
    solved = Cube()
    for i in range(7):
        tmp = []
        for j in range(3):
            tmp.append(solved_color[parts_place[i][j][0]][parts_place[i][j][1]])
        tmp1 = 'w' if 'w' in tmp else 'y'
        solved.Co[i] = tmp.index(tmp1)
        solved.Cp[i] = set_parts_color.index(set(tmp))
    tmp2 = list(set(range(7)) - set(solved.Cp))
    if len(tmp2):
        tmp2 = tmp2[0]
        for i in range(7):
            if solved.Cp[i] > tmp2:
                solved.Cp[i] -= 1
    print('solved:')
    for i in range(6):
        print(solved_color[i])
    print(solved.Cp)
    print(solved.Co)
    print(idx)

    # 枝刈り用のco配列とcp配列
    inf = 100
    cp = [inf for _ in range(fac[7])]
    cp_solved = Cube()
    cp_solved.Cp = solved.Cp
    cp[cp_solved.cp2i()] = 0
    que = deque([cp_solved])
    while len(que):
        status = que.popleft()
        num = len(status.Moves)
        l_mov = status.Moves[-1] if num else -1
        t = (l_mov // 3) * 3
        lst = set(range(9)) - set([t, t + 1, t + 2])
        for mov in lst:
            n_status = status.move_cp(mov)
            n_idx = n_status.cp2i()
            if cp[n_idx] == inf:
                cp[n_idx] = len(n_status.Moves) #n_status.Movnum
                que.append(n_status)
    co = [inf for _ in range(3 ** 7)]
    co_solved = Cube()
    co_solved.Co = solved.Co
    co[co_solved.co2i()] = 0
    que = deque([co_solved])
    while len(que):
        status = que.popleft()
        num = len(status.Moves)
        l_mov = status.Moves[-1] if num else -1
        t = (l_mov // 3) * 3
        lst = set(range(9)) - set([t, t + 1, t + 2])
        for mov in lst:
            n_status = status.move_co(mov)
            n_idx = n_status.co2i()
            if co[n_idx] == inf:
                co[n_idx] = len(n_status.Moves) #n_status.Movnum
                que.append(n_status)

    with open('cp' + str(idx) + '.csv', mode='x') as f:
            writer = csv.writer(f, lineterminator='\n')
            writer.writerow(cp)
    with open('co' + str(idx) + '.csv', mode='x') as f:
            writer = csv.writer(f, lineterminator='\n')
            writer.writerow(co)
ちょっとクラスが前に説明したものと違うため、載せるプログラムが長くなってしまいましたが大したことはしていません。愚直に24通りの持ち方についてCOとCPのどちらかを揃えるのに必要な最短手数をまとめてcsvにしています。
ロボットを動かすための配列を生成する
    if ans:
        print('answer:', num2moves(ans))
        solutionvar.set(num2moves(ans))
        rot, _, _ = proc_motor(rot, 0, 4)
        print('before:', len(rot))
        print(rot)
        rot_optimise()
        print('after:', len(rot))
        print(rot)
        print('all', time() - strt, 's')
    else:
        solutionvar.set('cannot solve!')
        print('cannot solve!')
ここでは、人間が読む回転記号としての答えをロボットを動かすための配列に変換します。また、回転記号を画面に表示します。キューブが揃えられない状態のときはcannot colve!と表示します。
実際にロボットを動かす
ここでは実際にATMEGA328Pと通信してロボットを動かします。
# 実際にロボットを動かす
def start_p():
    print('start!')
    strt_solv = time()
    i = 0
    while i < len(rot):
        if GPIO.input(4) == GPIO.LOW:
            solvingtimevar.set('emergency stop')
            print('emergency stop')
            return
        grab = rot[i][0] % 2
        for j in range(2):
            move_actuator(j, grab, 1000)
        sleep(0.4)
        for j in range(2):
            move_actuator(j, (grab + 1) % 2, 2000)
        sleep(0.1)
        ser_num = rot[i][0] // 2
        rpm = 100
        offset = -5
        move_actuator(ser_num, rot[i][0] % 2, rot[i][1] * 90 + offset, rpm)
        max_turn = abs(rot[i][1])
        flag = i < len(rot) - 1 and rot[i + 1][0] % 2 == rot[i][0] % 2
        if flag:
            move_actuator(rot[i + 1][0] // 2, rot[i + 1][0] % 2, rot[i + 1][1] * 90 + offset, rpm)
            max_turn = max(max_turn, abs(rot[i + 1][1]))
        slptim = 60 / rpm * (max_turn * 90 + offset) / 360 * 1.1
        sleep(slptim)
        move_actuator(ser_num, rot[i][0] % 2, -offset, rpm)
        if flag:
            move_actuator(rot[i + 1][0] // 2, rot[i + 1][0] % 2, -offset, rpm)
            i += 1
        i += 1
        slptim2 = abs(60 / rpm * offset / 360) * 1.1
        sleep(slptim2)
        print('done', i, 'sleep:', slptim, slptim2)
    solv_time = time() - strt_solv
    solvingtimevar.set(str(round(solv_time, 3)) + 's')
    print('solving time:', solv_time, 's')
モーター0と2、または1と3はそれぞれU・B、R・Lのモーターに当たるので、同時に回すことができます。そのような場合は同時回しをすることで高速化を図っています。
また、モーターを回したら回している時間(の1.1倍)だけ待機するようにしています。
ATMEGA328P - C++
Pythonの内容はかなり重かったですね。その分ATMEGA328Pのプログラムは簡素なので、分割せずいっぺんにお見せします。
# include <Servo.h>

const long turn_steps = 400;
const int step_dir[2] = {3, 7};
const int step_pul[2] = {4, 8};

char buf[30];
int idx = 0;
long data[3];

Servo servo0;
Servo servo1;

void move_motor(long num, long deg, long spd) {
  bool hl = true;
  if (deg < 0) hl = false;
  digitalWrite(step_dir[num], hl);
  long wait_time = 1000000 * 60 / turn_steps / spd;
  long steps = abs(deg) * turn_steps / 360;
  bool motor_hl = false;
  for (int i = 0; i < steps; i++) {
    motor_hl = !motor_hl;
    digitalWrite(step_pul[num], motor_hl);
    delayMicroseconds(wait_time);
  }
}

void release_arm(int num) {
  if (num == 0)servo0.write(120);
  else servo1.write(120);
}

void grab_arm(int num) {
  if (num == 0)servo0.write(60);
  else servo1.write(60);
}

void setup() {
  Serial.begin(9600);
  for (int i = 0; i < 2; i++) {
    pinMode(step_dir[i], OUTPUT);
    pinMode(step_pul[i], OUTPUT);
  }
  servo0.attach(5);
  servo1.attach(6);
}

void loop() {
  if (Serial.available()) {
    buf[idx] = Serial.read();
    if (buf[idx] == '\n') {
      buf[idx] = '\0';
      data[0] = atoi(strtok(buf, " "));
      data[1] = atoi(strtok(NULL, " "));
      data[2] = atoi(strtok(NULL, " "));
      if (data[1] == 1000) grab_arm(data[0]);
      else if (data[1] == 2000) release_arm(data[0]);
      else move_motor(data[0], data[1], data[2]);
      idx = 0;
    }
    else {
      idx++;
    }
  }
}
各関数を紹介します。
turning_time(int deg, int speed_motor)
float turning_time(int deg, int speed_motor) {
  return abs(1000 * quarter * deg / turn_steps * 60 / speed_motor);
}
この関数はモーターの動く角度とスピードを入力することで、モーターを動かすのにかかる時間(ミリ秒)を返します。
move_motor(int num, int deg, int spd)
void move_motor(long num, long deg, long spd) {
  bool hl = true;
  if (deg < 0) hl = false;
  digitalWrite(step_dir[num], hl);
  long wait_time = 1000000 * 60 / turn_steps / spd;
  long steps = abs(deg) * turn_steps / 360;
  bool motor_hl = false;
  for (int i = 0; i < steps; i++) {
    motor_hl = !motor_hl;
    digitalWrite(step_pul[num], motor_hl);
    delayMicroseconds(wait_time);
  }
}
ステッピングモーターを動かす関数です。モータードライバにはA4988という(amazonで5つ1000円くらいの)ものを使いましたので、それに合わせた書き方になっています。
step_dir[num]をHIGHにすると正転、LOWで逆転です。そしてstep_pul[num]にパルスを送るたびに1ステップずつ動きます。詳しいA4988の使い方はこちらなどをご覧ください。
release_arm(int num)
void release_arm(int num) {
  if (num == 0)servo0.write(120);
  else servo1.write(120);
}
アームでキューブを離す関数です。サーボの角度を120度にします。
grab_arm(int num)
void grab_arm(int num) {
  if (num == 0)servo0.write(60);
  else servo1.write(60);
}
アームでキューブを掴む関数です。サーボの角度を60度にします。
loop()
void loop() {
  if (Serial.available()) {
    buf[idx] = Serial.read();
    if (buf[idx] == '\n') {
      buf[idx] = '\0';
      data[0] = atoi(strtok(buf, " "));
      data[1] = atoi(strtok(NULL, " "));
      data[2] = atoi(strtok(NULL, " "));
      if (data[1] == 1000) grab_arm(data[0]);
      else if (data[1] == 2000) release_arm(data[0]);
      else move_motor(data[0], data[1], data[2]);
      idx = 0;
    }
    else {
      idx++;
    }
  }
}
送られてきたスペース区切りのコマンドを分割し、それをクエリとしてmove_motorまたはgrab_arm、release_armを実行します。
まとめ
ここまで読んでくださり本当にありがとうございます!全部で800行程度のそれなりの規模のプログラムで、紹介するのにも、そして読むのにも一苦労でしょう…今回は関数の機能の紹介に留め、細かい内容には触れませんでした。また、ハードウェア編をまだお読みになっていなければアーム周りの仕組みがいまいちわからないかもしれません。なにかわからないことがありましたらコメントをください。