Index
1.VueCLIでHelloWorld
2.Vue.jsでフォームを使おう
3.Vue.jsで単一ファイルコンポーネント
4.Vue.jsでAPI通信
5.Vue.jsで猫検索アプリ作成
6.おまけ
1. 前提条件
2.axiosとmockeyをインストール
VueでAjaxするには何を使えばいいの?っていう話が調べていくときな臭い感じ・・・・・
https://jp.vuejs.org/2016/11/03/retiring-vue-resource/
とりあえず、上記の公式コミュニティでおすすめされてる、axiosを使ってみたいと思います。
npm install axios --save
npm install -D mocky --save
3. mockeyのインストールとAPIスタブ作成
3.1 スタブAPI作成
mock.js
var mocky = require('mocky');

mocky.createServer([{
// simple GET route without request body to match
  url: '/profile',
  method: 'get',
  headers: {'Content-type': 'text/json'},
  res: {
    status: 200,
    headers: {'Content-type': 'text/html', 'Access-Control-Allow-Origin': 'http://localhost:8080'},
    body: JSON.stringify({'nickname': ''})
  }
},
{
// simple GET route without request body to match
  url: '/profile_wait',
  method: 'get',
  headers: {'Content-type': 'text/json'},
  res: function(req, res, callback) {
    setTimeout(function() {
      callback(null, {
        status: 200,
        headers: {'Content-type': 'text/html', 'Access-Control-Allow-Origin': 'http://localhost:8080'},
        body: JSON.stringify({'nickname': ''})
      });
    }, 1000);
  }
},
{
// POST route with request body to match and respose with status, headers and body
  url: '/profile',
  method: 'post',
  req: '',
  headers: {'Content-type': 'text/json'},
  res: {
    status: 200,
    headers: {'Content-type': 'text/html', 'Access-Control-Allow-Origin': 'http://localhost:8080'},
    body: JSON.stringify({'status': 'ok'})
  }
},
{
// PUT route with dynamic response body
  url: '/profile',
  method: 'put',
  req: '',
  headers: {'Content-type': 'text/json'},
  res: {
    status: 200,
    headers: {'Content-type': 'text/html', 'Access-Control-Allow-Origin': 'http://localhost:8080'},
    body: JSON.stringify({'status': 'ok'})
  }
},
{
// DELETE route with dynamic response body
  url: '/profile',
  method: 'delete',
  req: '',
  headers: {'Content-type': 'text/json'},
  res: {
    status: 200,
    headers: {'Content-type': 'text/html', 'Access-Control-Allow-Origin': 'http://localhost:8080'},
    body: JSON.stringify({'status': 'ok'})
  }
}]).listen(4321);
3.2 起動
node mock.js
3.3 動作確認
# GET
curl "http://127.0.0.1:4321/profile"
# POST
curl -d "{'nickname': 'test'}" http://127.0.0.1:4321/profile
# PUT
curl -v -X PUT -d "{'nickname': 'test'}" http://127.0.0.1:4321/profile
# DELETE
curl -v -X DELETE -d "{'nickname': 'test'}" http://127.0.0.1:4321/profile
4. axiosを使ってAPI通信
下記の記述をScene1.vueに追加してAPIデータ取得が非同期である事を確認してみましょう。profile_waitを読んでいるので少し遅れてコンソールにレスポンスが出力されます。
components/Scene1.vue
.......
import axios from 'axios'

export default {
  created: function () {
    axios.get('http://127.0.0.1:4321/profile_wait')
      .then(response => {
        console.log(response.data) // mockData
        console.log(response.status) // 200
      })
  }
}
.......
5. VuexのインストールとStoreの書き換え
npm install vuex install --save
5.1 非同期通信の実践
まず、PropertyStore.jsをVuexに合わせて書き換えていきます
PropertyStore.js
import Vue from 'vue'
import Vuex from 'vuex'
import axios from 'axios'
Vue.use(Vuex)

//  データストア
var PropertyStore = new Vuex.Store({
  state: {
    property: {
      nickname: 'Loading.....'
    }
  },
  mutations: {
    increment (state, n) {
      state.count += n
    },
    getUser (state, response) {
      state.property.nickname = response.data.nickname
    },
    setUser (state, nickname) {
      state.property.nickname = nickname
    }
  },
  actions: {
    getUser ({ commit }) {
      axios.get('http://127.0.0.1:4321/profile_wait')
        .then(response => {
          if (response.status === 200) {
            commit('getUser', response)
          }
        })
    },
    setUser ({ state, commit, rootState }) {
      if (state.property.nickname.length <= 3) {
        throw new Error('3文字以上入力してください')
      }
      axios.post('http://127.0.0.1:4321/profile')
        .then(response => {
          if (response.status === 200 && response.data.status === 'ok') {
            commit('setUser', state.property.nickname)
          } else {
            throw new Error('レスポンスエラー')
          }
        })
    }
  }
})
export default PropertyStore
次に、Scene1に処理を追加します。
component/Scene1.vue
.....
import InputText from './forms/InputText'
import PropertyStore from '../models/PropertyStore.js'

export default {
  created: function () {

  }
}
//  ユーザー情報取得
PropertyStore.dispatch('getUser')
//  コンポーネントを登録
Vue.component('nickname-header', NickNameHeader)
.....
最後に、ボタンアクションでバリデーションしていた部分を書き換えます。
component/forms/Scene1.vue
.....
  methods: {
    validate: function (event) {
      try {
        this.$data.sharedState.dispatch('setUser')
        this.$router.push('/scene2')
      } catch (e) {
        alert(e.message)
      }
    }
  }
.....
スタブでレスポンスの返却を1秒まってから行っているので、初期値としてnicknameに入れているloadingという文字が1秒後に書き換えられる事が確認できました。
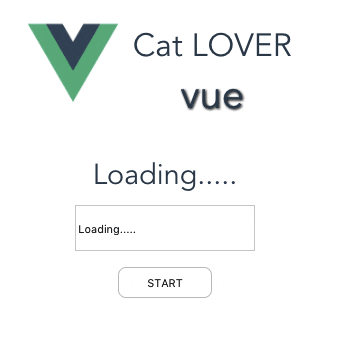
6. Loading画面からのフォーム表示
上記 5.の実習では、フォームを表示した後にデータ入力が可能な状態になるので、ユーザービリティがよくありませんでした。
ここで、再度リファクタリングをしてStoreのステータス管理とUIを結びつけて行きます。
ここでは、v-show というsyntaxを利用します。
まずは、ステータス管理用のconfigを作成します。
config/Status.js
export const StatusConfig = {
  INITIALIZE: 0,
  DATA_LOADED: 1
}
PropertyStoreでステータス管理ができるようにコードを書き換えます。
- 先程作成した、StatusConfigをインポートします。
- stateの中にstatus=StatusConfig.INITIALIZEを追加、代入しましょう。
- mutations内のgetUserの中でstatusをStatusConfig.DATA_LOADEDに書き換えます。
models/PropertyStore.js
import {StatusConfig} from '../config/Status.js'

.....
  state: {
    status: StatusConfig.INITIALIZE,
    property: {
      nickname: 'Loading.....'
    }
  },
.....
  mutations: {
.....
    getUser (state, response) {
      state.property.nickname = response.data.nickname
      state.status = StatusConfig.DATA_LOADED
    },
最後にScene1.vueを書き換えます。
- StatusConfigのインポート
- computedの中にis_loading関数を追加
- <template></template>内でLoading中に表示するものとLoading後に表示するものを書き分けます。
components/Scene1.vue
<template>
  <div class="scene1">
    <div v-show="is_loading">
      Loading......
  </div>
  <div v-show="!is_loading">
      <nickname-header></nickname-header>
      <input-text></input-text>
      <input-button></input-button>
    </div>
  </div>
</template>
........
import PropertyStore from '../models/PropertyStore.js'
import {StatusConfig} from '../config/Status.js'
........
export default {
  computed: {
    is_loading: function () {
      return PropertyStore.state.status === StatusConfig.INITIALIZE
    }
  }
}
........