※一般公開されているWWDC Keynoteの動画と公開Session/Documentation/Sample Codeページだけを使ってこの記事を執筆しました。
新しくリリースされたWeatherKitフレームワークでは、現在の天気、10日間の1時間ごとの気温予測、予想降水量、風の報告、UVインデックスなどを取得することができます。
iOS 16で新たにリリースされたフレームワークです。このアプリを実行するには、Xcode 14.0 betaとiOS 16が動作するデバイスを使用する必要があります。
利用料金
Appleの開発者アカウントには、天気予報APIを呼び出すための無料枠がいくつか含まれています。
制限を超えたリクエストに対しては、料金が発生する場合があります。
2022/06/08のAppleウェブページに:
WeatherKit のベータ版では、Apple Developer Program のメンバーシップごとに、月に最大 50 万回の API 呼び出しが可能です。WeatherKit がベータを終了した後も、メンバーシップには月間 50 万件の API コールが含まれます。追加のAPIコールが必要な場合は、月単位のサブスクリプションプランを購入することができるようになります。
Apple Weather著作権attributionの要件については、この記事の最後もお読みください。
エンタイトルメントを追加する
まず、Appleデベロッパーアカウント・ページに行き、Certificates, Identifiers & Profiles タブを開き、WeatherKitを使いたいアプリを選択します。次に、App Services タブを選択し、WeatherKit オプションをトグルします。最後に、保存ボタンをクリックします。
サービスがあなたのアプリを登録するために少なくとも30分待ちます(Appleのドキュメントによると)。
Xcodeのプロジェクトビューで、Signing & Capabilities タブを選択し、追加のプラスアイコンをクリックし、WeatherKit を追加します。
アラートが表示される場合は、developer.apple.com/account にアクセスして、最新のデベロッパーアカウント契約に同意しないと続行できない場合があります。
ヘルパーを作成する
プロジェクトをよりよくまとめるために、天気データの取得を支援するヘルパーを作成します。
import WeatherKit

@MainActor
class WeatherDataHelper: ObservableObject {
    static let shared = WeatherDataHelper()
    private let service = WeatherService.shared

    @Published var currentWeather: CurrentWeather?
   // TODO
}
WeatherDataHelperを ObservableObjectに適合させ、SwiftUIのビューがビューを再読み込みするためにヘルパーからの値を使用できるようにしています。
sharedオブジェクトを追加しています。これにより、すべてのアプリ内から天気データにアクセスできるようになります。
また、@Publishedという変数も使っています。SwiftUI のビューで @Published 変数から値を読み取ると、これらの変数の値が変更されたときにビューが更新されます。
ここでは、@Published変数の初期値をnilに設定しています。天気データの取得に成功すると、値が更新されます。
現在の天気を取得する
作成した service 変数は、weather API からデータを取得するために使用されます。
場所 for: userLocation を指定します。また、 including: .currentを使用して、現在の天気情報を取得することにします。
func updateCurrentWeather(userLocation: CLLocation) {
    Task.detached(priority: .userInitiated) {
        do {
            let forcast = try await self.service.weather(
                for: userLocation,
                including: .current)
            DispatchQueue.main.async {
                self.currentWeather = forcast
            }
        } catch {
            print(error.localizedDescription)
        }
    }
}
さて、上記の関数と変数で、ヘルパーのコードは以下のようになります。
@MainActor
class WeatherData: ObservableObject {

    static let shared = WeatherData()

    let service = WeatherService.shared

    @Published var currentWeather: CurrentWeather?

    func updateCurrentWeather(userLocation: CLLocation) {
        Task.detached(priority: .userInitiated) {
            do {
                let forecast = try await self.service.weather(
                    for: userLocation,
                    including: .current)
                DispatchQueue.main.async {
                    // 1
            print(forecast)
                    self.currentWeather = forecast
                }
            } catch {
                print(error.localizedDescription)
            }
        }
    }

}
// 1の位置にブレークポイントを設定することができます。
ご覧のように、現在の天気の情報を格納した CurrentWeather オブジェクトが得られます。
cloudCover: Double これは 0 から 1 までの値で、雲で覆われている空の割合を表します。
condition: WeatherCondition は、現在の天候を表す。これは列挙型である。
symbolName: String は、現在の天候を表す SF Symbol の名前を表す。
humidity: Double は湿度を表す。
pressure: Measurement<UnitPressure> 空気中の気圧を表す。
isDaylight: Bool は現在が昼間か夜間かを返す。
temperature: Measurement<UnitTemperature> は気温を表す。
apparentTemperature: Measurement<UnitTemperature> は体感温度を表す。
uvIndex: UVIndex は現在の紫外線インデックスを表す。
visibility: Measurement<UnitLength> は現在の視認性の状態を表す。
wind: Wind は風速、風向、突風を格納する。
フォーマットされた天気データを取得する
iOSは、現在の地域の天気に合わせて、自動的にフォーマットすることができます。
currentWeather.temperature.formatted()
// または
// currentWeather.temperature.formatted(.measurement(width: .abbreviated, usage: .weather))
また、風速をフォーマットで取得することも可能です。
speed.formatted(.measurement(width: .abbreviated, usage: .general))
ビューで現在の天気を表示する
さて、SwiftUIビュー内で変数の変化を観察し、現在の天気を要求することができます。
現在のユーザーの位置を取得するために、LocationManagerを使用しています。
struct ContentView: View {

    @ObservedObject var weatherDataHelper = WeatherData.shared
    @ObservedObject var userLocationHelper = LocationManager.shared

    var body: some View {

        Form {

            if let currentWeather = weatherDataHelper.currentWeather {
                Section {
                    Label(currentWeather.temperature.formatted(), systemImage: "thermometer")
                    Label("\(Int(currentWeather.humidity * 100))%", systemImage: "humidity.fill")
                    Label(currentWeather.isDaylight ? "日中" : "夜間", systemImage: currentWeather.isDaylight ? "sun.max.fill" : "moon.stars.fill")
                } header: {
                    HStack {
                        Spacer()
                        Image(systemName: currentWeather.symbolName)
                            .font(.system(size: 60))
                        Spacer()
                    }
                }
            }

            Section {
                if userLocationHelper.userLocation == nil {
                    Button("Load user current location") {
                        loadUserCurrentLocation()
                    }
                }
                Button("Fetch current weather") {
                    loadCurrentWeatherData()
                }
            }

        }

    }

    func loadUserCurrentLocation() {
        userLocationHelper.requestPermission()
        userLocationHelper.locationManager.requestLocation()
    }

    func loadCurrentWeatherData() {
        guard let userLocation = LocationManager.shared.userLocation else {
            return
        }
        Task.detached { @MainActor in
            weatherDataHelper.updateCurrentWeather(userLocation: userLocation)
        }
    }

}
上記のコードでは、まず @ObservedObject を使って WeatherData クラス内の公開変数の変化を観察しています。
現在の天気変数がnilでないかどうかをif条件を使ってチェックします。
もし値があれば、天気予報のSF Symbol画像、気温、日照表示用のアイコンを表示します。
ビューには2つのボタンがあります。ユーザは最初のボタンをクリックして現在地を読み込み、2番目のボタンをクリックして現在の天気を要求する。
時間予報の取得
時間ごとの天気を取得するには、現在の天気を取得するのと同様の関数を使用します。
ただし、現在の天気を含むように結果を求めるのではなく、毎時の天気を含む including: .hourly ように結果を求めます。
func updateHourlyWeather(userLocation: CLLocation) {
    Task.detached(priority: .userInitiated) {
        do {
            let forcast = try await self.service.weather(
                for: userLocation,
                including: .hourly)
            DispatchQueue.main.async {
                self.hourlyForecast = forcast
            }
        } catch {
            print(error.localizedDescription)
        }
    }
}
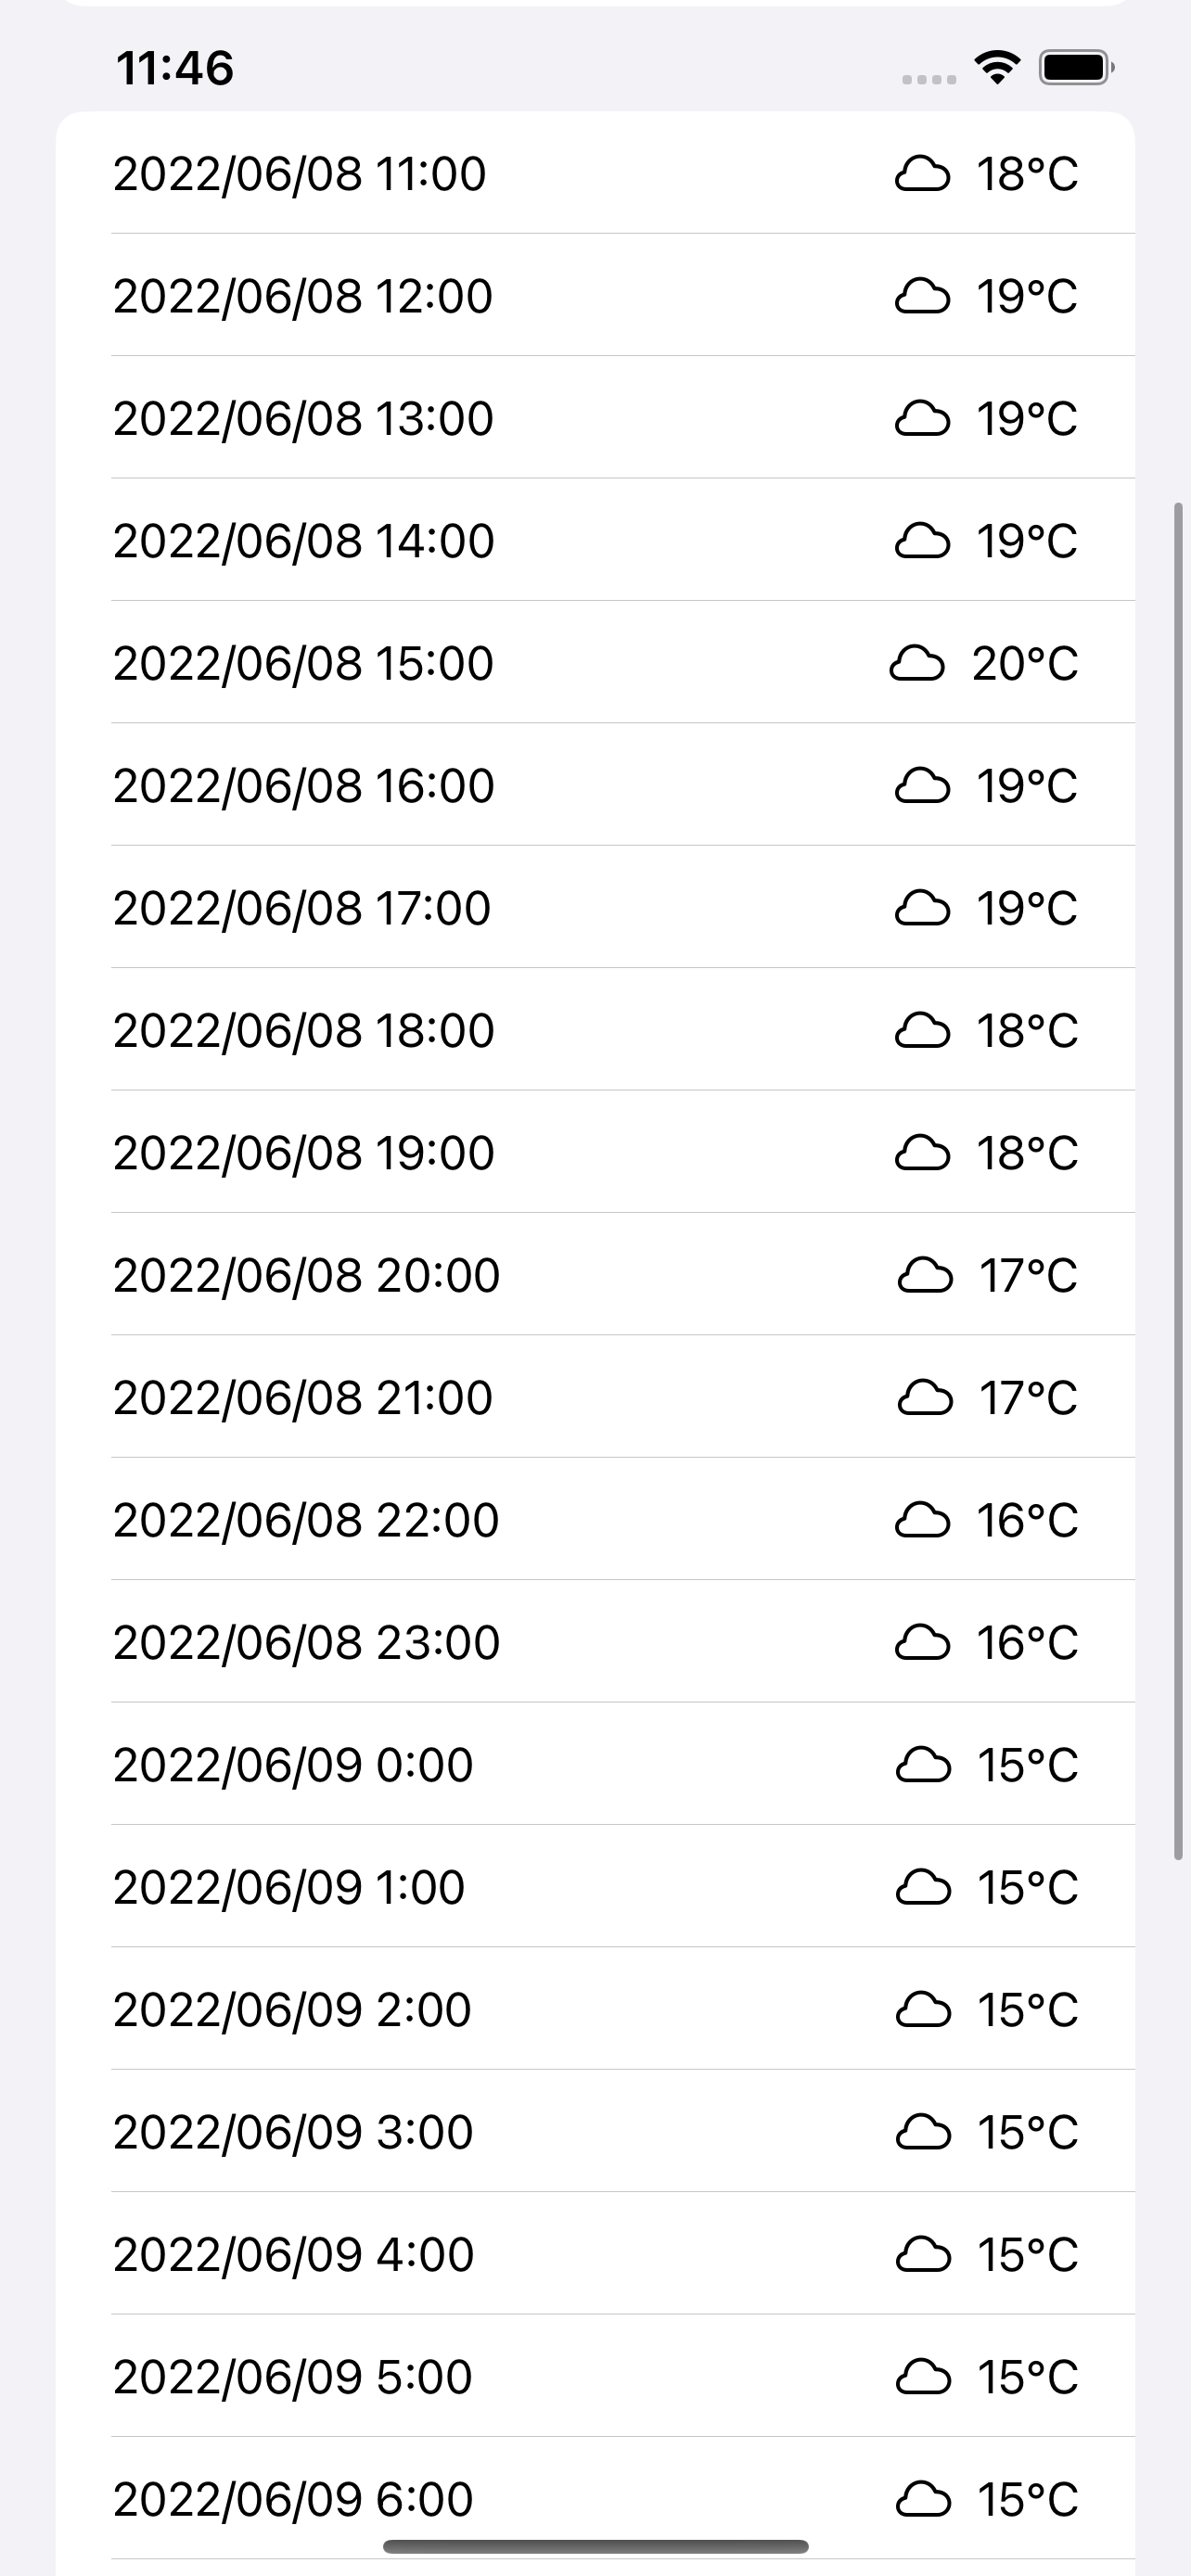
結果は配列になります。これを表示するには、SwiftUIで ForEach ループを使用します。
if let hourlyWeather = weatherDataHelper.hourlyForecast {
    ForEach(hourlyWeather, id: \.self.date) { weatherEntry in
        HStack {
            Text(DateFormatter.localizedString(from: weatherEntry.date, dateStyle: .short, timeStyle: .short))
            Spacer()
            Image(systemName: weatherEntry.symbolName)
            Text(weatherEntry.temperature.formatted(.measurement(width: .abbreviated, usage: .weather)))
        }
    }
}
毎日の天気予報の取得
1時間ごとの天気予報の取得と同様です。ただし、日の出や日の入りの時間など、より多くの情報が含まれています。
また、毎日の天気予報では、最高気温と最低気温が表示されます。
highTemperature: その日の最高気温
lowTemperature: その日の最低気温
precipitationChance: 雨が降るかどうかの変化
sun: 太陽に関連する情報、例えば日の出や日の入りの時間など。
moon: 月に関連する情報
uvIndex: 紫外線インデックス UV インデックス
ForEach(dailyWeather, id: \.self.date) { weatherEntry in
    HStack {
        Text(DateFormatter.localizedString(from: weatherEntry.date, dateStyle: .short, timeStyle: .none))
        Spacer()
        Image(systemName: weatherEntry.symbolName)
        Text("\(weatherEntry.lowTemperature.formatted()) ~ \(weatherEntry.highTemperature.formatted())")
    }
}
他のタイプのデータを取得する
include パラメータを変更することで、他のタイプのデータを要求することができます。
.current: 現在の天気
.minute: 1 分ごとの天気 (最も詳細)
.hourly: 1 時間ごとの天気
.daily: 毎日の天気
.alerts: 天気予報のアラート
.availability: 天気予報が利用可能かどうかを確認する
また、複数のデータを一度にリクエストすることもできる。
let forcast = try await self.service.weather(
                    for: userLocation,
                    including: .hourly, .daily, .current)
上記の場合、結果には要求された気象データセットが順番に含まれる。例えば、時間ごとの天気、日ごとの天気、現在の天気を要求します。すると、resultの最初の要素(forecast.0)は時間ごとの天気、2番目は日ごとの天気、3番目は現在の天気になります。
func updateHourlyWeather(userLocation: CLLocation) {
    Task.detached(priority: .userInitiated) {
        do {
            let forcast = try await self.service.weather(
                for: userLocation,
                including: .hourly, .daily, .current)
            DispatchQueue.main.async {
                self.hourlyForecast = forcast.0
                self.dailyForecast = forcast.1
                self.currentWeather = forcast.2
            }
        } catch {
            print(error.localizedDescription)
        }
    }
}
アトリビューション
アプリで気象データを利用する場合、アトリビューションを表示する必要があります。
アトリビューションデータは、serviceオブジェクトから取得することができます。
func updateAttributionInfo() {
    Task.detached(priority: .background) {
        let attribution = try await self.service.attribution
        DispatchQueue.main.async {
            self.attributionInfo = attribution
        }
    }
}
画像とリンクを表示する必要があります。画像はattributionオブジェクト内のURLから利用できます。ダークビューで表示される画像は attribution.combinedMarkLightURL 、ライトビューで表示される画像は attribution.combinedMarkDarkURL となります。attribution.legalPageURL は、法的なページへのリンクです。
SwiftUIでは、リモートURLの画像を読み込むためにAsyncImageを使用し、リンクを表示するために(私の他の記事で説明したように)マークダウンテキストを使用することができます。
Section {

} footer: {
    HStack {
        Spacer()
        VStack {
            if let attribution = weatherDataHelper.attributionInfo {
                AsyncImage(url: colorScheme == .dark ? attribution.combinedMarkLightURL : attribution.combinedMarkDarkURL) { image in
                    image
                        .resizable()
                        .scaledToFit()
                        .frame(height: 20)
                } placeholder: {
                    ProgressView()
                }
                Text("[Other data sources](\(attribution.legalPageURL))".getAttributedString())
            }
        }
        Spacer()
    }
}
Web API
Web APIはSwiftフレームワークが行うすべての機能を提供します。そしてまた、より多くのエンドポイントを含みます。
たとえば、天気予報のリクエストに開始日と終了日を指定できます (過去の天気予報データを取得するようなものです)。
Web APIを使用するには、最初にアクセストークンを作成する必要があります: https://developer.apple.com/account/resources/authkeys/list
なお、これらのAPIをiOSアプリ内で使用する場合は、Swiftフレームワークを使用するのがベストです。
![]() 個人ウェブサイト https://MszPro.com
個人ウェブサイト https://MszPro.com
![]() 私の公開されているQiita記事のリストをカテゴリー別にご覧いただけます:
私の公開されているQiita記事のリストをカテゴリー別にご覧いただけます:


Written by MszPro~
関連記事
・UICollectionViewの行セル、ヘッダー、フッター、またはUITableView内でSwiftUIビューを使用(iOS 16, UIHostingConfiguration)
・iPhone 14 ProのDynamic Islandにウィジェットを追加し、Live Activitiesを開始する(iOS16.1以降)
・iOS 16:秘密値の保存、FaceID認証に基づく個人情報の表示/非表示(LARight)
・iOS16 MapKitの新機能 : 地図から場所を選ぶ、通りを見回す、検索補完
・SwiftUIアプリでバックグラウンドタスクの実行(ネットワーク、プッシュ通知) (BackgroundTasks, URLSession)
・WWDC22、iOS16:iOSアプリに画像からテキストを選択する機能を追加(VisionKit)
・WWDC22、iOS16:数行のコードで作成できるSwiftUIの新機能(26本)
・WWDC22、iOS 16:SwiftUIでChartsフレームワークを使ってチャートを作成する


