MapKitは、iOSアプリケーションが利用できる無料のサービスで、
地図の表示、場所の検索、見回し画像の提供などを行うことができます。
iOS 16 の MapKit では、ユーザーが地図から場所をクリックして選択することができ、
また、通りを見回す (Look Around) を提供することができます。
地図から場所を選ぶ

アプリに通りを見回すビューを表示します。

通りを見回す画像のスナップショット

テストにはXcode betaとiOS 16のシミュレータ/デバイスが必要です。
この記事には、古いiOSシステムで利用可能なMapKitに関するヒントも含まれています。
検索補完 (旧バージョンのiOSでも利用可能です)

- 地図の表示領域を限定する
- 地図上に表示される場所の種類を制限する
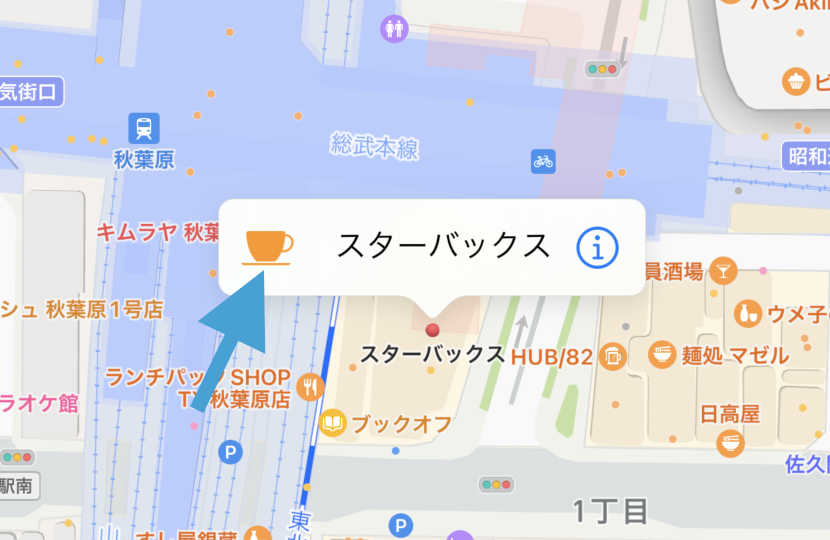
クリックして地図から場所を選択
MapViewのセットアップ
ここでは、変数 mapView に MKMapView オブジェクトが格納されています。
これはプログラムで作成するか、
@IBOutletを使用するか、
SwiftUIビュー互換のビュー内の変数を使用することができます。
private var mapView: MKMapView = .init(frame: .zero)
// @IBOutlet weak var mapView: MKMapView!
カスタムアノテーションビュー(ユーザーが地図上の場所をタップしたときに表示されるビュー)を登録します。
ここでは、このカスタムビューの識別子を featureAnnotation とし、後で使用することにします。
mapView.register(MKMarkerAnnotationView.self, forAnnotationViewWithReuseIdentifier: "featureAnnotation")
マップの選択可能な要素を設定します。
mapView.selectableMapFeatures = [.pointsOfInterest]
以下、Appleデベロッパーサイトからの情報です。
| オプション | 説明 |
|---|---|
| .pointOfInterest | 美術館、カフェ、公園、学校などの施設を表すオプションです。 |
| .physicalFeatures | 山脈、河川、海洋盆地などの物理的な地図上の特徴を表すオプションです。 |
| .territories | 国境、州境、近隣など、領土の境界を表すオプションです。 |
デリゲートを設定します。
アノテーションビューを提供し、ユーザーがアノテーションをタップしたときのアクションを処理します。
mapView.delegate = context.coordinator
ユーザーの現在地を表示する
オプションで地図の領域をユーザーの現在地とすることができます。
mapView.showsUserLocation = true
if let userLocation = locationManager.userLocation {
    let mapRegion = MKCoordinateRegion(center: userLocation.coordinate,
                                       latitudinalMeters: 200,
                                       longitudinalMeters: 200)
    mapView.setRegion(mapRegion, animated: true)
}
私が書いたヘルパークラスのいずれかを使って、ユーザーの位置情報を取得することができます。
カスタムアノテーションビューの提供
まず、ビューを MKMapViewDelegate に適合させます。
そして、デリゲート関数 func mapView(_ mapView: MKMapView, viewFor annotation: MKAnnotation) -> MKAnnotationView? を実装します。
public func mapView(_ mapView: MKMapView, viewFor annotation: MKAnnotation) -> MKAnnotationView? {
    if let annotation = annotation as? MKMapFeatureAnnotation {
        let markerAnnotationView = mapView.dequeueReusableAnnotationView(withIdentifier: "featureAnnotation",
                                                                         for: annotation)
        if let markerAnnotationView = markerAnnotationView as? MKMarkerAnnotationView {
            markerAnnotationView.animatesWhenAdded = true
            markerAnnotationView.canShowCallout = true

            let infoButton = UIButton(type: .detailDisclosure)
            markerAnnotationView.rightCalloutAccessoryView = infoButton

            if let tappedFeatureColor = annotation.iconStyle?.backgroundColor,
                let image = annotation.iconStyle?.image {
                let imageView = UIImageView(image: image.withTintColor(tappedFeatureColor, renderingMode: .alwaysOriginal))
                imageView.bounds = CGRect(origin: .zero, size: CGSize(width: 50, height: 50))
                markerAnnotationView.leftCalloutAccessoryView = imageView
            }
        }

        return markerAnnotationView
    } else {
        return nil
    }
}
まずマップビューからアノテーションビューオブジェクトを取得します。
public func mapView(_ mapView: MKMapView, viewFor annotation: MKAnnotation) -> MKAnnotationView? {
    if let annotation = annotation as? MKMapFeatureAnnotation {
+        let markerAnnotationView = mapView.dequeueReusableAnnotationView(withIdentifier: "featureAnnotation",
+                                                                         for: annotation)
+        if let markerAnnotationView = markerAnnotationView as? MKMarkerAnnotationView {
            // ...
        }
        return markerAnnotationView
    } else {
        return nil
    }
}
次に、ユーザーが選択した場所を確認するためのコールアウトボタンを設定します。
これは、ユーザーが場所をタップした後、アノテーションに表示されるボタンになります。

public func mapView(_ mapView: MKMapView, viewFor annotation: MKAnnotation) -> MKAnnotationView? {
    if let annotation = annotation as? MKMapFeatureAnnotation {
        let markerAnnotationView = mapView.dequeueReusableAnnotationView(withIdentifier: "featureAnnotation",
                                                                         for: annotation)
        if let markerAnnotationView = markerAnnotationView as? MKMarkerAnnotationView {
+            markerAnnotationView.animatesWhenAdded = true
+            markerAnnotationView.canShowCallout = true

+            let infoButton = UIButton(type: .detailDisclosure)
+            markerAnnotationView.rightCalloutAccessoryView = infoButton

            // ...
        }

        return markerAnnotationView
    } else {
        return nil
    }
}
最後に、このタップされた場所のシステムシンボル (annotation.iconStyle?.image) と推奨色 (annotation.iconStyle?.backgroundColor) を取得し、
それに基づいてアノテーションポップアップのUIを設定することができます。
public func mapView(_ mapView: MKMapView, viewFor annotation: MKAnnotation) -> MKAnnotationView? {
    if let annotation = annotation as? MKMapFeatureAnnotation {
        let markerAnnotationView = mapView.dequeueReusableAnnotationView(withIdentifier: "featureAnnotation",
                                                                         for: annotation)
        if let markerAnnotationView = markerAnnotationView as? MKMarkerAnnotationView {
            markerAnnotationView.animatesWhenAdded = true
            markerAnnotationView.canShowCallout = true

            let infoButton = UIButton(type: .detailDisclosure)
            markerAnnotationView.rightCalloutAccessoryView = infoButton

+            if let tappedFeatureColor = annotation.iconStyle?.backgroundColor,
+                let image = annotation.iconStyle?.image {
+                let imageView = UIImageView(image: image.withTintColor(tappedFeatureColor, renderingMode: .alwaysOriginal))
+                imageView.bounds = CGRect(origin: .zero, size: CGSize(width: 50, height: 50))
+                markerAnnotationView.leftCalloutAccessoryView = imageView
+            }
        }

        return markerAnnotationView
    } else {
        return nil
    }
}
コールアウトボタンをタップしたときの処理
ユーザーがコールアウトボタンをタップした場合、
コードはアノテーションオブジェクトを取得することができます。
通常、これはユーザがこの場所を選択したいことを意味します。
public func mapView(_ mapView: MKMapView, annotationView view: MKAnnotationView, calloutAccessoryControlTapped control: UIControl)をデリゲートに追加します。
public func mapView(_ mapView: MKMapView, annotationView view: MKAnnotationView, calloutAccessoryControlTapped control: UIControl) {
    if let annotation = view.annotation, annotation.isKind(of: MKMapFeatureAnnotation.self) {
        print(annotation.title)
    }
}
位置情報を選択できるようにする
マップビューで、ユーザーは場所をタップすることができます。その後、ユーザーはカスタムアノテーションのポップアップ(右側にボタンがある)を見ることができます。ユーザーがそのボタンをタップすると、あなたのコードは calloutAccessoryControlTapped 関数でユーザーがその選択を行ったことを知ります。
SwiftUIと互換性のあるビュー
互換性のあるビューを使用することで、SwiftUIで直接この機能を使うことができます。
//
//  Created by MszPro.
//

import SwiftUI
import MapKit
import UIKit

@available(iOS 16, *)
public struct PickFromMap_ViewAdaptor: UIViewRepresentable {

    public typealias UIViewType = MKMapView

    private var mapView: MKMapView = .init(frame: .zero)

    // Center the map to user current location
    private var userLocationCoordinate: CLLocationCoordinate2D?

    public init(userLocationCoordinate: CLLocationCoordinate2D?) {
        self.userLocationCoordinate = userLocationCoordinate
    }

    public func makeUIView(context: UIViewRepresentableContext<PickFromMap_ViewAdaptor>) -> MKMapView {
        mapView.register(MKMarkerAnnotationView.self, forAnnotationViewWithReuseIdentifier: "featureAnnotation")
        mapView.selectableMapFeatures = [.pointsOfInterest]
        mapView.showsUserLocation = true
        mapView.delegate = context.coordinator
        if let userLocation = self.userLocationCoordinate {
            let mapRegion = MKCoordinateRegion(center: userLocation,
                                               latitudinalMeters: displayedRegionDistance,
                                               longitudinalMeters: displayedRegionDistance)
            mapView.setRegion(mapRegion, animated: true)
        }
        return mapView
    }

    public func updateUIView(_ uiView: MKMapView, context: UIViewRepresentableContext<PickFromMap_ViewAdaptor>) {

    }

    public func makeCoordinator() -> Coordinator {
        Coordinator()
    }

    public class Coordinator: NSObject, MKMapViewDelegate {

        public func mapView(_ mapView: MKMapView, viewFor annotation: MKAnnotation) -> MKAnnotationView? {
            if let annotation = annotation as? MKMapFeatureAnnotation {
                let markerAnnotationView = mapView.dequeueReusableAnnotationView(withIdentifier: "featureAnnotation",
                                                                                 for: annotation)
                if let markerAnnotationView = markerAnnotationView as? MKMarkerAnnotationView {
                    markerAnnotationView.animatesWhenAdded = true
                    markerAnnotationView.canShowCallout = true

                    let infoButton = UIButton(type: .detailDisclosure)
                    markerAnnotationView.rightCalloutAccessoryView = infoButton

                    if let tappedFeatureColor = annotation.iconStyle?.backgroundColor,
                        let image = annotation.iconStyle?.image {
                        let imageView = UIImageView(image: image.withTintColor(tappedFeatureColor, renderingMode: .alwaysOriginal))
                        imageView.bounds = CGRect(origin: .zero, size: CGSize(width: 50, height: 50))
                        markerAnnotationView.leftCalloutAccessoryView = imageView
                    }
                }

                return markerAnnotationView
            } else {
                return nil
            }
        }

        public func mapView(_ mapView: MKMapView, annotationView view: MKAnnotationView, calloutAccessoryControlTapped control: UIControl) {
            if let annotation = view.annotation as? MKMapFeatureAnnotation {
                print(annotation)
            }
        }

    }

}
calloutAccessoryControlTapped 関数内に、
ユーザーが選択した場所を処理するコードを追加できます。
ユーザが選択した位置の詳細情報を取得する
ユーザーがコールアウトボタンをタップすると、
MKMapFeatureAnnotationオブジェクトを取得します。
しかし、これには場所の名前、住所、タイプしか含まれていません。
MKMapItemRequest 関数を使用すると、その場所の詳細な情報を取得することができます。
public func mapView(_ mapView: MKMapView, annotationView view: MKAnnotationView, calloutAccessoryControlTapped control: UIControl) {
-    if let annotation = view.annotation, annotation.isKind(of: MKMapFeatureAnnotation.self) {
+    if let annotation = view.annotation as? MKMapFeatureAnnotation {
+        let detailRequest = MKMapItemRequest(mapFeatureAnnotation: annotation)
+        detailRequest.getMapItem { mapItem, error in
+            print(mapItem)
+        }
        self.selectedAnnotation = annotation
    }
}
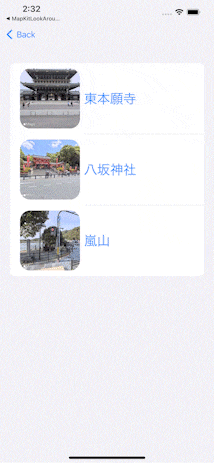
通りを見回す(Look Around 画像)
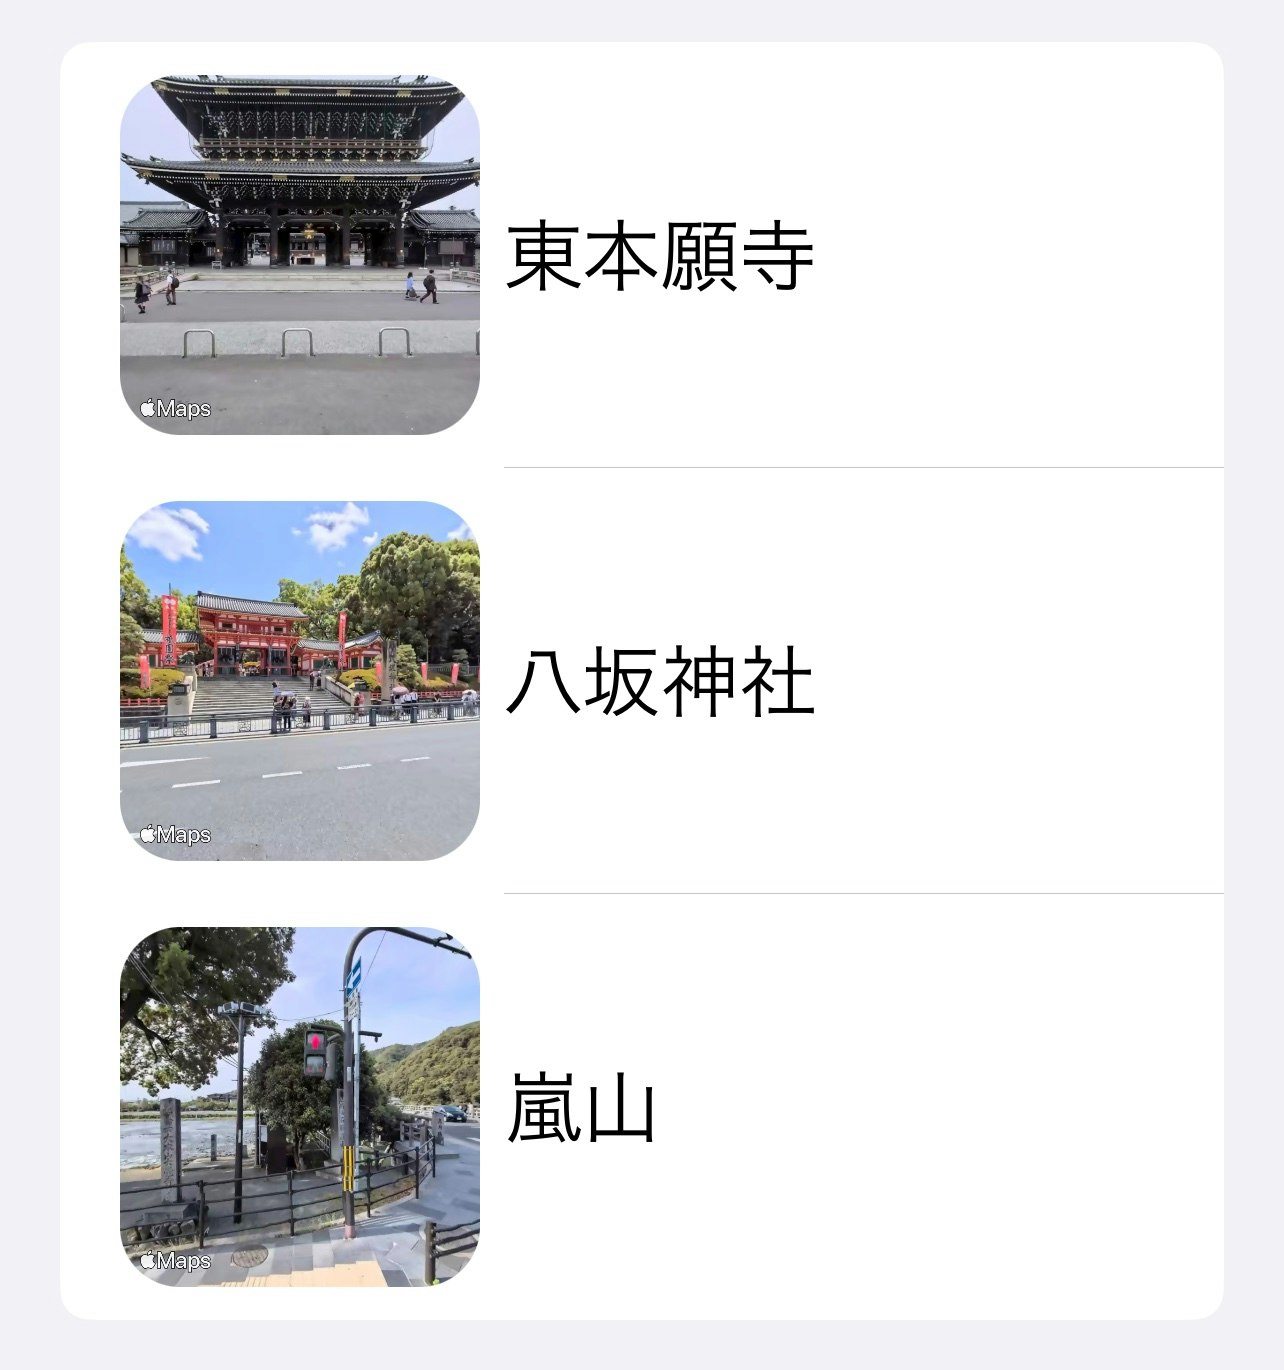
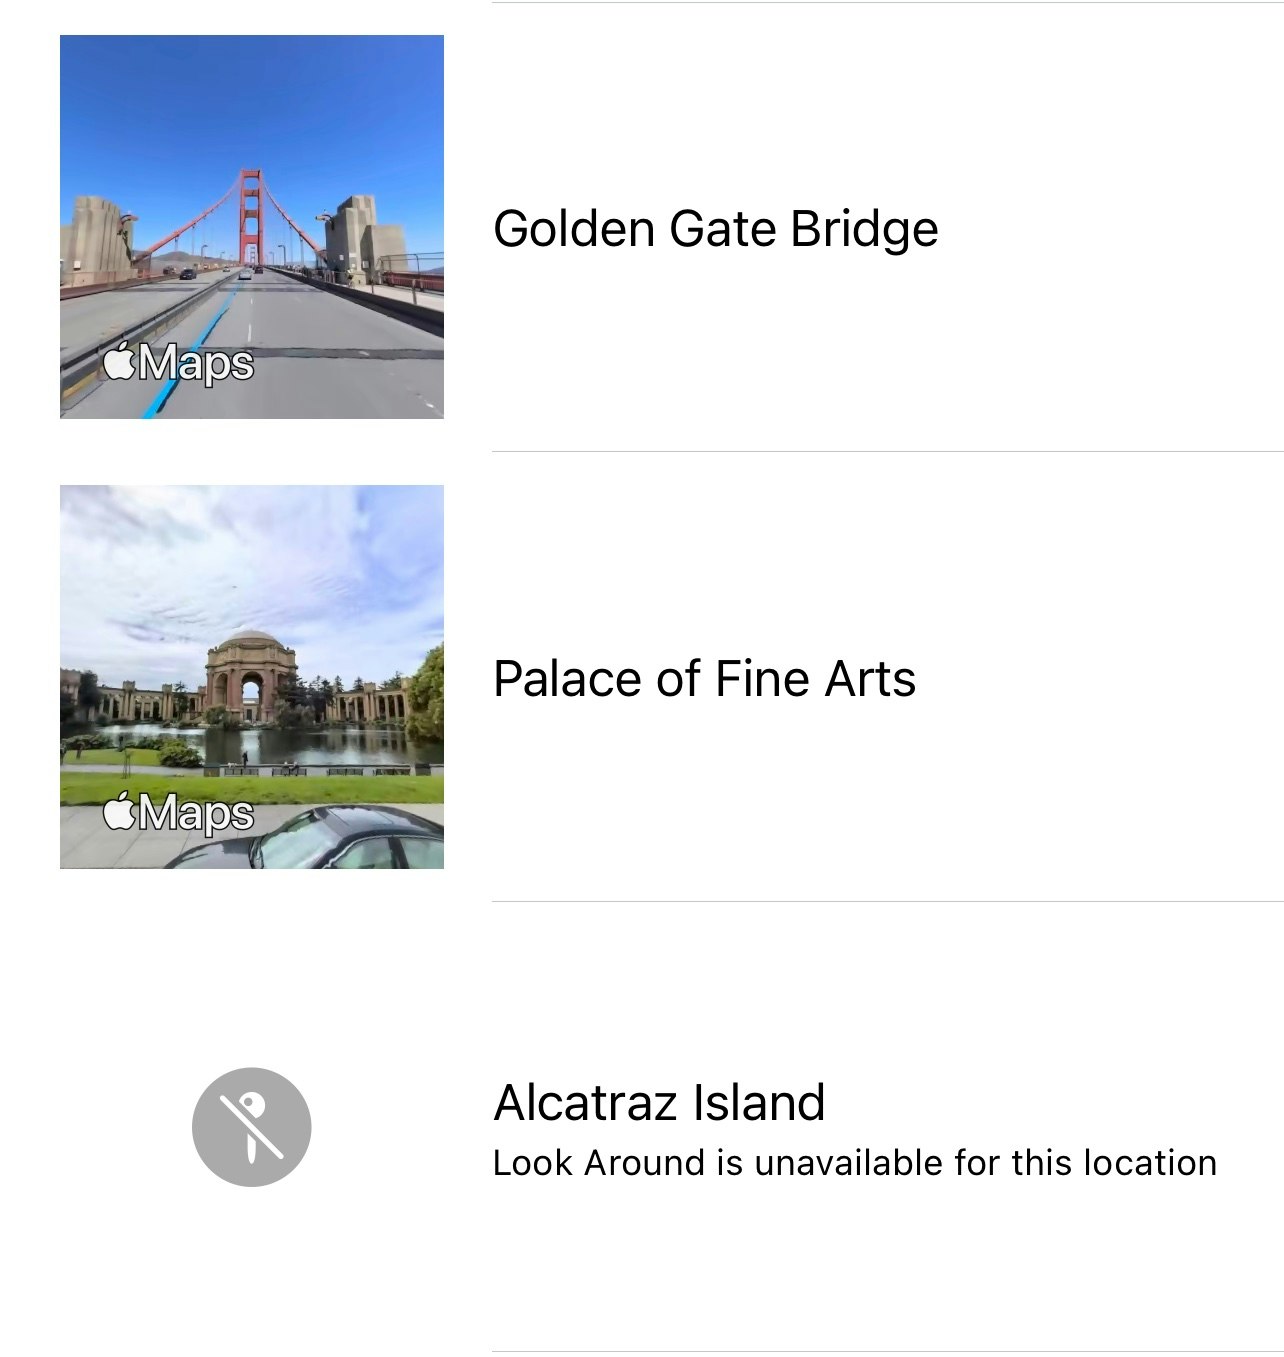
通りを見回すは、Appleマップ車が撮影したその場所の画像が含まれています。
ここでは、場所の座標を指定して、見回し画像を取得することができます。
まず、座標や地図の項目を指定して、シーンオブジェクトを取得します。
let sceneRequest = MKLookAroundSceneRequest(coordinate: snapshotLocationCoordinate)
sceneRequest.getSceneWithCompletionHandler { scene, error in
    guard error == nil, let scene = scene else {
        return
    }
    // ...
}
また、Swiftの新機能である await を使えば、補完ハンドラを使う代わりに結果を待つことができます。
.task {
    let sceneRequest = MKLookAroundSceneRequest(coordinate: snapshotLocationCoordinate)
    if let scene = try? await sceneRequest.scene {
        // ...
    }
}
Look Aroundのシーンができたら、
スナップショッターを使ってそのシーンから写真を取得します。
.task {
    let sceneRequest = MKLookAroundSceneRequest(coordinate: snapshotLocationCoordinate)
    if let scene = try? await sceneRequest.scene {
+        let snapshotter = MKLookAroundSnapshotter(scene: scene, options: .init())
+        if let snapshotImage = try? await snapshotter.snapshot.image {
+            DispatchQueue.main.async {
+                self.generatedSnapshotImage = snapshotImage
+            }
+        }
    }
}
スナップショット画像を取得したら、それをUIに表示することができます。
以下は、Look Aroundのスナップショットを表示するためのSwiftUIのコードです。
//
//  Created by MszPro.
//

import SwiftUI
import MapKit

struct SnapshotRowView: View {

    var snapshotLocationCoordinate: CLLocationCoordinate2D
    var locationName: String
    @State private var generatedSnapshotImage: UIImage?

    var body: some View {
        HStack {
            if let generatedSnapshotImage {
                Image(uiImage: generatedSnapshotImage)
                    .resizable()
                    .scaledToFit()
                    .frame(width: 120)
                    .cornerRadius(20)
            } else {
                ProgressView()
            }
            Text(locationName)
                .font(.title)
        }
        .task {
            let sceneRequest = MKLookAroundSceneRequest(coordinate: snapshotLocationCoordinate)
            if let scene = try? await sceneRequest.scene {
                let snapshotter = MKLookAroundSnapshotter(scene: scene, options: .init())
                if let snapshotImage = try? await snapshotter.snapshot.image {
                    DispatchQueue.main.async {
                        self.lookaroundScene = scene
                        self.generatedSnapshotImage = snapshotImage
                    }
                }
            }
        }
    }

}
上記のコードでは、見回りのシーンを保存し、スナップショット画像を保存しています。
このシーン (lookaroundScene) オブジェクトは、後でその場所のApple Mapの見回しビューを開くために使用できます。
ルックアラウンドビューを開く
また、アプリ内で見回し表示を行うことも可能です。
let lookaroundVC = MKLookAroundViewController(scene: lookaroundScene)
デフォルトでは、ユーザーはタップして別のエリアに移動することができます、
isNavigationEnabledをfalseに設定すると、見回しビューでの移動を禁止することができます。
検索補完
ユーザーが入力した内容を検索完了オブジェクトに提供することになります。
そして、デリゲートを通して結果を受け取ることができます。
また、検索を行うための領域 (searchCompleter.region) を定義しておく必要があります。
まず、検索補完オブジェクトを作成します。
private var searchCompleter: MKLocalSearchCompleter = .init()
検索対象の地域を設定します。
通常、これはユーザーの現在地です(近くのマーチャントを検索する場合)。
public func updateSearchRegion(center: CLLocationCoordinate2D,
                        radius: CLLocationDistance) {
    let newRegion: MKCoordinateRegion = .init(center: center,
                                              latitudinalMeters: radius,
                                              longitudinalMeters: radius)
    searchCompleter.region = newRegion
    self.autoCompleteRegion = newRegion
}
デリゲートとパラメータを設定します。
また、欲しい結果の種類 MKLocalSearchCompleter.ResultType (住所または場所)、
興味のあるポイント MKPointOfInterestFilter (レストラント、カフェなど)を定義することができます。
public func startProvidingSuggestions() {
    searchCompleter.delegate = self
    searchCompleter.resultTypes = resultTypes
    searchCompleter.pointOfInterestFilter = pointOfInterestFilter
}
ユーザーが検索ボックスに入力すると、ユーザーの検索文字列を検索コンプリーションに更新します。
public func updateUserSearchString(_ text: String) {
    searchCompleter.queryFragment = text
}
デリゲート関数を実装する。
ViewController などのクラスを MKLocalSearchCompleterDelegate 型に適合させます。
そして、以下の2つの関数を追加します。
public func completerDidUpdateResults(_ completer: MKLocalSearchCompleter) {
    DispatchQueue.main.async {
        self.completionResults = completer.results
    }
}

public func completer(_ completer: MKLocalSearchCompleter, didFailWithError error: Error) {
    DispatchQueue.main.async {
        self.completionResults = []
    }
}
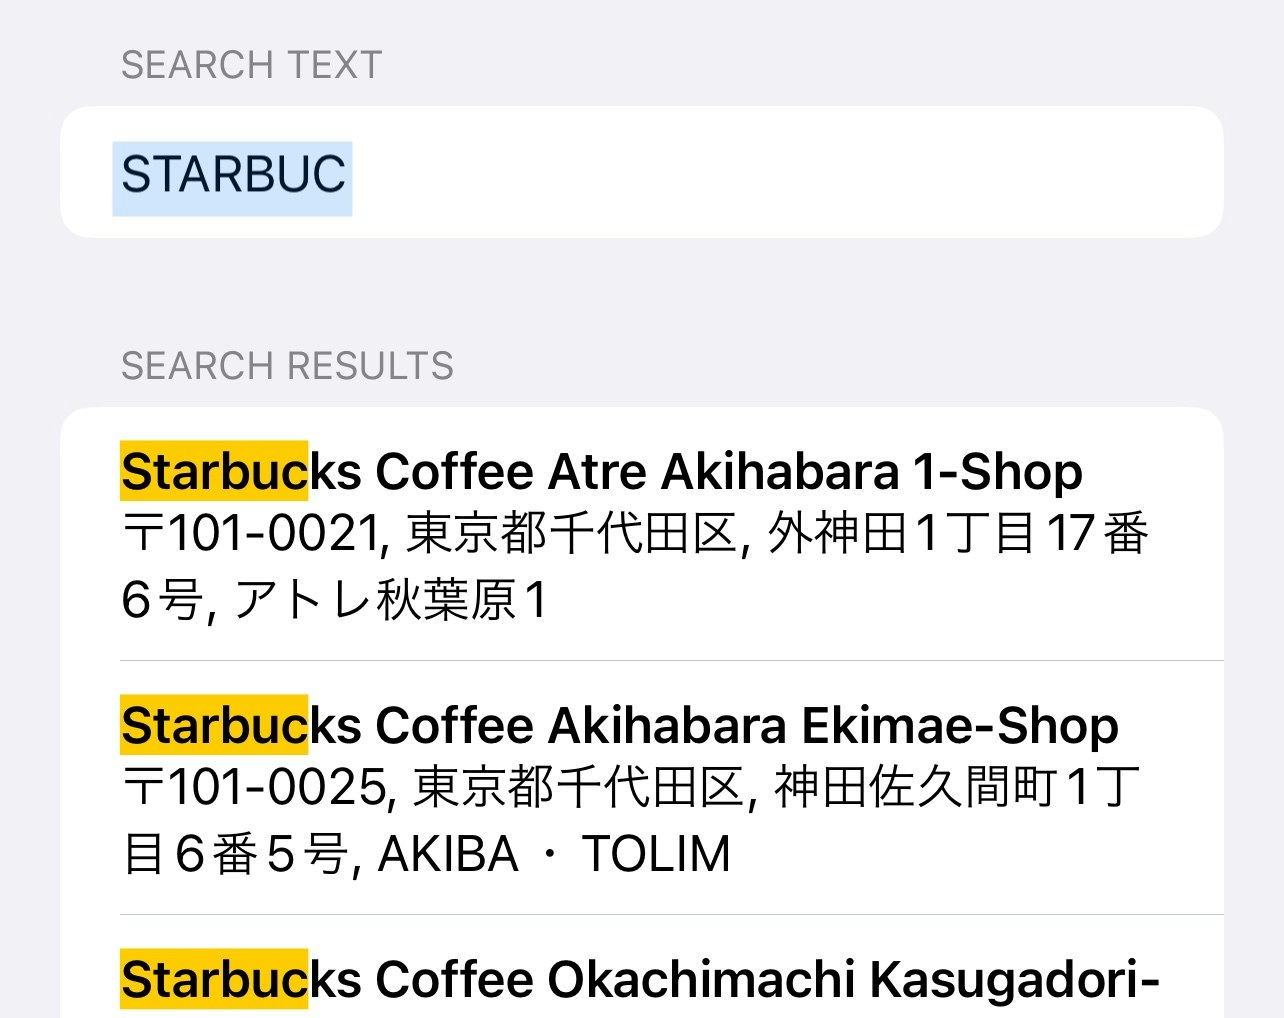
最初の関数は、検索結果(MKLocalSearchCompletion)を知らせるもので、タイトル、一致したキーワードの範囲(強調する属性文字列を作ることができます)、サブタイトルが含まれています。
2番目の関数は、エラーを報告します。
また、関連するキーワードを強調した属性付き文字列を作成することも可能です。
この機能はApple Developerサイトのサンプルコードより引用しています
private func createHighlightedString(text: String, rangeValues: [NSValue]) -> NSAttributedString {
    let attributes = [NSAttributedString.Key.backgroundColor: UIColor.yellow]
    let highlightedString = NSMutableAttributedString(string: text)
    let ranges = rangeValues.map { $0.rangeValue }
    ranges.forEach { (range) in
        highlightedString.addAttributes(attributes, range: range)
    }
    return highlightedString
}
MapKit に関するその他のヒント
(以下のTipsは、古いiOSシステムでも利用可能です)
マップを特定の地域に限定する
イベントアプリなどを開発する場合、地図の表示範囲を限定して、特定の地域しか表示できないようにすることができます。
static let event = MKCoordinateRegion(center: CLLocationCoordinate2D.eventCenter, latitudinalMeters: 200, longitudinalMeters: 200)
static let cameraBoundary = MKCoordinateRegion(center: CLLocationCoordinate2D.eventCenter, latitudinalMeters: 100, longitudinalMeters: 80)
mapView.region = .event
mapView.cameraBoundary = MKMapView.CameraBoundary(coordinateRegion: .cameraBoundary)
mapView.cameraZoomRange = MKMapView.CameraZoomRange(minCenterCoordinateDistance: 250,                                               maxCenterCoordinateDistance: 800)
地図上に表示される場所の種類を制限する
特定のカテゴリーの場所のみを表示することもできます(例:飲食店のみ)。
mapView.pointOfInterestFilter = MKPointOfInterestFilter(including: [.restaurant, .cafe])
![]() お読みいただきありがとうございました。
お読みいただきありがとうございました。
☺️ Twitter @MszPro
🐘 Mastodon @me@mszpro.com
![]()


Written by MszPro~
関連記事
・UICollectionViewの行セル、ヘッダー、フッター、またはUITableView内でSwiftUIビューを使用(iOS 16, UIHostingConfiguration)
・iPhone 14 ProのDynamic Islandにウィジェットを追加し、Live Activitiesを開始する(iOS16.1以降)
・iOS 16:秘密値の保存、FaceID認証に基づく個人情報の表示/非表示(LARight)
・iOS16 MapKitの新機能 : 地図から場所を選ぶ、通りを見回す、検索補完
・SwiftUIアプリでバックグラウンドタスクの実行(ネットワーク、プッシュ通知) (BackgroundTasks, URLSession)
・WWDC22、iOS16:iOSアプリに画像からテキストを選択する機能を追加(VisionKit)
・WWDC22、iOS16:数行のコードで作成できるSwiftUIの新機能(26本)
・WWDC22、iOS 16:SwiftUIでChartsフレームワークを使ってチャートを作成する