iOS 16では、UIKitのコレクションビュー(UICollectionView)やテーブルビュー(UITableView)の中で、行セル(cell)、ヘッダー、フッターにSwiftUIビューを使用することができます。
これは新しい UIHostingConfiguration を使用することで実現できます。
この記事では、UICollectionViewの行コンテンツ、ヘッダービュー、フッタービューとして、
またUITableViewの行コンテンツとしてSwiftUIビューを使うことについて説明します。
UICollectionView と UITableView の違い
UITableView が簡単にテーブルを表示できるのに対し、 UICollectionView はカスタマイズのための機能が充実しています。また、UICollectionViewのインターフェースは UITableView に比べてより現代的です (角丸やパディングが自動で行われます)。
UICollectionView はリスト配置を使用すると、アイテムを縦に並べて表示するテーブルビューとして使用することができます。
| UICollectionView + SwiftUI | UITableView + SwiftUI |
|---|---|
|
 |
サンプル使用
この記事では、クラウドサーバーの設定を表示するテーブルを構築する例を使用します。各セルには基本的な情報が含まれ、UIには星印ボタンが表示されます(ユーザーはクリックすることで項目のスターを追加または削除できます)。
struct ServerConfiguration {
    var serverNickname: String
    var serverRegion: String
    var serverHardwareType: String
    var numberOfCPUCores: Int
    var gbOfMemory: Int
    var networkMaxSpeedGB: Int?
    var isServerStarred: Bool // <-- この変数は、テーブルビューの行UIから直接変更することができます。
}
以下はテスト用のデータです。
enum DemoData {
    static let demoServers: [ServerConfiguration] = [
        .init(serverNickname: "Kitsu",
              serverRegion: "ap-northeast-1",
              serverHardwareType: "m6g.medium",
              numberOfCPUCores: 1,
              gbOfMemory: 4,
              networkMaxSpeedGB: 10,
              isServerStarred: true
             ),
        .init(serverNickname: "Neko",
              serverRegion: "ap-northeast-3",
              serverHardwareType: "t2.micro",
              numberOfCPUCores: 1,
              gbOfMemory: 1,
              isServerStarred: false
             )
    ]
}
UICollectionView の場合
スタート点
UICollectionViewController を使用して作成した新しいビューコントローラーからスタートします
viewDidLoad 関数の中で、 UICollectionViewCompositionalLayout.list を使用して、リスト(またはテーブル)のような要素を表示するコレクションビューを設定します。
class ViewController: UICollectionViewController {

    let servers = DemoData.demoServers

    override func viewDidLoad() {
        super.viewDidLoad()
        // Set the collection view to list layout
+        var listLayoutConfig = UICollectionLayoutListConfiguration(appearance: .insetGrouped)
+        let listLayout = UICollectionViewCompositionalLayout.list(using: listLayoutConfig)
+        self.collectionView.collectionViewLayout = listLayout
    }

    override func numberOfSections(in collectionView: UICollectionView) -> Int {
        return 1
    }

    override func collectionView(_ collectionView: UICollectionView, numberOfItemsInSection section: Int) -> Int {
        return servers.count
    }

    override func collectionView(_ collectionView: UICollectionView, cellForItemAt indexPath: IndexPath) -> UICollectionViewCell {
        // ...
    }

}
データ項目を ObservableObject としてマークする
アイテム(テーブルに表示されるデータを含むオブジェクト)を ObservableObject プロトコルに適合させる必要があります。
そして、変更可能な変数に @Published 修飾子を追加する必要があります。
そうすることで、SwiftUIのビューはアイテムに保存されたデータを変更できるようになります。
たとえば、ユーザーがサーバーにスターをつけることができる場合、スイッチをSwiftUIビュー内に設置することができます。
変数を @Published としてマークすることで、SwiftUI ビューは変数の値を更新できます;
また、変数が他の場所で変更されたとき (たとえば UICollectionView のボタンによって)、SwiftUI ビューは自動的に更新します (テーブル全体もしくは行を手動で再ロードする必要はありません)。
- struct ServerConfiguration {
+ class ServerConfiguration: ObservableObject {
    var serverNickname: String
    var serverRegion: String
    var serverHardwareType: String
    var numberOfCPUCores: Int
    var gbOfMemory: Int
    var networkMaxSpeedGB: Int?
-   var isServerStarred: Bool
+   @Published var isServerStarred: Bool

+    init(serverNickname: String, serverRegion: String, serverHardwareType: String, numberOfCPUCores: Int, gbOfMemory: Int, networkMaxSpeedGB: Int? = nil, isServerStarred: Bool) {
+        self.serverNickname = serverNickname
+        self.serverRegion = serverRegion
+        self.serverHardwareType = serverHardwareType
+        self.numberOfCPUCores = numberOfCPUCores
+        self.gbOfMemory = gbOfMemory
+        self.networkMaxSpeedGB = networkMaxSpeedGB
+        self.isServerStarred = isServerStarred
+    }
}
SwiftUIビューをデザインする
行セルcellとして使用されるSwiftUIビューを設計する必要があります。
そのSwiftUIビューはデータアイテム(この場合、ServerConfigurationオブジェクト)を入力として受け取る必要があります。
struct ServerCollectionViewCell: View {
    @ObservedObject var item: ServerConfiguration
    var body: some View {
        HStack {
            // 星マークボタン
            Button {
                item.isServerStarred.toggle()
            } label: {
                Image(systemName: item.isServerStarred ? "star.fill" : "star")
            }
            // サーバーのニックネーム
            Text(item.serverNickname)
        }
    }
}
ObservedObjectを使用しているため、SwiftUI のビューが @Published` でマークされた変数からの変更を受信し、ビューをリロードできます。
@Published でマークされた変数については、$ シンボル ($isServerStarred など) を使用して、変数のバインディング(@Binding) を取得することもできます。
行の表示のためのレジスタを準備する (CellRegistration)
行の表示にSwiftUIビューを使いたいことをテーブルビューに知らせるために、レジスタを設定する必要があります。
まず、コレクションビューまたはテーブルビューファイルで import SwiftUI します。
次に、提供されたアイテムに基づいたSwiftUIビューを返すレジスタを追加します。
レジスタは、呼び出されたときに値を計算する変数として追加されます。
class ViewController: UICollectionViewController {

    let servers = DemoData.demoServers

+    // Configuration for using SwiftUI for cell
+    private var swiftUICellViewRegister: UICollectionView.CellRegistration<UICollectionViewListCell, ServerConfiguration> = {
+        .init { cell, indexPath, item in
+            let hostingConfiguration = UIHostingConfiguration {
+                // Provide the SwiftUI view components here
+                ServerCollectionViewCell(item: item)
+            }
+            // 上記のビューを行セルに設定する
+            cell.contentConfiguration = hostingConfiguration
+        }
+    }()

    // ...

}
このレジスタの中で、行のcellを新しく設計された SwiftUI のビュー ServerCollectionViewCell に設定します。
コレクションビューの行cell表示のためにレジスタを適用する
cellForItemAt デリゲート関数の中で、コレクションビューの行cellを生成するために上記のレジスタを使用します。
override func collectionView(_ collectionView: UICollectionView, cellForItemAt indexPath: IndexPath) -> UICollectionViewCell {
    let serverInfo = servers[indexPath.row]
+    let cell = collectionView.dequeueConfiguredReusableCell(using: swiftUICellViewRegister, for: indexPath, item: serverInfo)
    return cell
}
コレクションビューのコード
以下は、SwiftUIビューを行cellにしたコレクションビューのコードです。
class ViewController: UICollectionViewController {

    let servers = DemoData.demoServers

    // Configuration for using SwiftUI for cell
    private var swiftUICellViewRegister: UICollectionView.CellRegistration<UICollectionViewListCell, ServerConfiguration> = {
        .init { cell, indexPath, item in
            let hostingConfiguration = UIHostingConfiguration {
                // Provide the SwiftUI view components here
                ServerCollectionViewCell(item: item)
            }
            // Set the above view to the cell
            cell.contentConfiguration = hostingConfiguration
        }
    }()

    override func viewDidLoad() {
        super.viewDidLoad()
        // Set the collection view to list layout
        var listLayoutConfig = UICollectionLayoutListConfiguration(appearance: .insetGrouped)
        let listLayout = UICollectionViewCompositionalLayout.list(using: listLayoutConfig)
        self.collectionView.collectionViewLayout = listLayout
    }

    override func numberOfSections(in collectionView: UICollectionView) -> Int {
        return 1
    }

    override func collectionView(_ collectionView: UICollectionView, numberOfItemsInSection section: Int) -> Int {
        return servers.count
    }

    override func collectionView(_ collectionView: UICollectionView, cellForItemAt indexPath: IndexPath) -> UICollectionViewCell {
        let serverInfo = servers[indexPath.row]
        let cell = collectionView.dequeueConfiguredReusableCell(using: swiftUICellViewRegister, for: indexPath, item: serverInfo)
        return cell
    }

}
シミュレータでコードを実行し、
SwiftUIビューが行cellの表示として使われているのがわかるはずです。
また、各セルの星印のアイコンをクリックすると、星印としてマークすることができます。
ObservableObject と @Published 修飾子を使用しているので、
SwiftUI から行われた変更は変数(UIKitコード内の servers 配列)に行われることになります。
ヘッダーとフッターの表示を追加する
ヘッダーとフッターの有効化
まず、ヘッダーとフッターのモードを .supplementary に設定します。
これは、リスト形式の表示を設定するときに、viewDidLoad 関数内で行うことができます。
class ViewController: UICollectionViewController {

    // ...

    override func viewDidLoad() {
        super.viewDidLoad()
        // Set the collection view to list layout
        var listLayoutConfig = UICollectionLayoutListConfiguration(appearance: .insetGrouped)
+        listLayoutConfig.headerMode = .supplementary
+        listLayoutConfig.footerMode = .supplementary
        let listLayout = UICollectionViewCompositionalLayout.list(using: listLayoutConfig)
        self.collectionView.collectionViewLayout = listLayout
        // ...
    }

    // ...

}
レジスタを用意する(SupplementaryRegistration)。
上記で各行cellにレジスタを用意したのと同様です。
ヘッダーまたはフッターのレジスタを変数として提供します。
例えば、ここではSwiftUIのテキストを含むフッターを追加しています。
class ViewController: UICollectionViewController {

    let servers = DemoData.demoServers //...

    private var swiftUICellViewRegister //...

+    // フッタービューにSwiftUIを使用するための設定
+    private var swiftUIFooterViewRegister: UICollectionView.SupplementaryRegistration<UICollectionViewCell> = .init(elementKind: UICollectionView.elementKindSectionFooter) {
+        (footer, elementKind, indexPath) in
+        // `UIHostingConfiguration` を使用してフッターの内容を定義する。
+        footer.contentConfiguration = UIHostingConfiguration {
+            Text("Thanks for reading this article!")
+        }
+    }

    // ...

}
注意: このコードは計算された変数の中にあるからですから、ここでは self を使うことはできません。
self の使用については後で説明します。
フッターの適用
ビューにフッターを適用するには、viewForSupplementaryElementOfKind デリゲート関数を使用します。
class ViewController: UICollectionViewController {

    // ...

    override func collectionView(_ collectionView: UICollectionView, viewForSupplementaryElementOfKind kind: String, at indexPath: IndexPath) -> UICollectionReusableView {
        guard let swiftUIHeaderViewRegister else {
            return .init()
        }
        switch kind {
+        case UICollectionView.elementKindSectionFooter:
+            let footer = collectionView.dequeueConfiguredReusableSupplementary(
+                using: swiftUIFooterViewRegister,
+                for: indexPath
+            )
+            return footer
        default:
            return .init()
        }
    }

    // ...

}
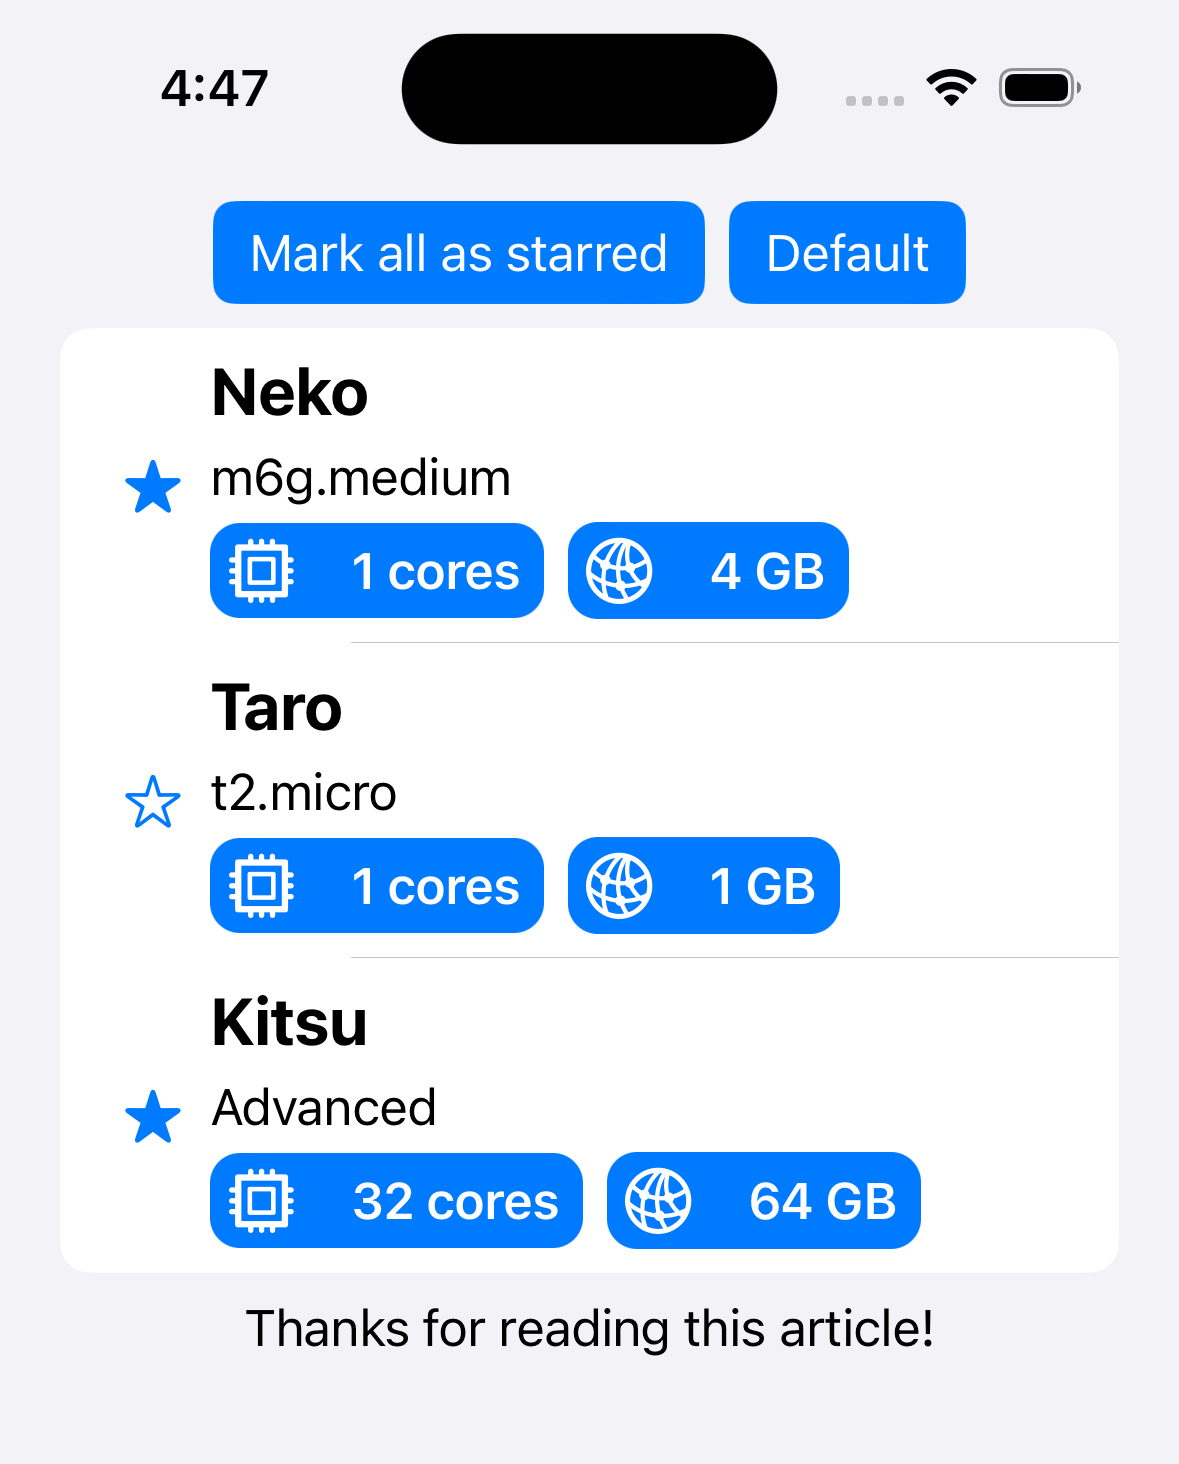
self にアクセスできるヘッダを追加する
例えば、ユーザーが全てのアイテムにスターを付けるためのボタンを用意したいとします。
まず、以下の変数を追加します。
class ViewController: UICollectionViewController {

    let servers = DemoData.demoServers

 +   private var swiftUIHeaderViewRegister: UICollectionView.SupplementaryRegistration<UICollectionViewCell>?

    // ...

}
そして、viewDidLoad 関数内で、このレジスタを初期化することができます。
override func viewDidLoad() {
    // ...

+    // ヘッダーコンフィギュレーションを設定する
+    // ここでは、`self` を使用できるように設定しています
+    self.swiftUIHeaderViewRegister = .init(elementKind: UICollectionView.elementKindSectionHeader) { [unowned self]
+       (header, elementKind, indexPath) in
+       // Define header content using `UIHostingConfiguration`
+       header.contentConfiguration = UIHostingConfiguration {
+           HStack {
+               Button("Mark all as starred") {
+                   self.markAllAsStarred()
+               }
+               .buttonStyle(.borderedProminent)
+               Button("Default") {
+                   self.markAllAsNotStarred()
+               }
+               .buttonStyle(.borderedProminent)
+           }
+       }
+   }
}
上記のコードでは、コードが呼び出されたときにコレクションビューコントローラが既に初期化されているので、 [unowned self] を使用してこのコントローラ内のデータや関数にアクセスすることができます。
さて、ヘッダを適用するために viewForSupplementaryElementOfKind 関数を変更します。
override func collectionView(_ collectionView: UICollectionView, viewForSupplementaryElementOfKind kind: String, at indexPath: IndexPath) -> UICollectionReusableView {
    guard let swiftUIHeaderViewRegister else {
        return .init()
    }
    switch kind {
+    case UICollectionView.elementKindSectionHeader:
+        let header = collectionView.dequeueConfiguredReusableSupplementary(
+            using: swiftUIHeaderViewRegister,
+            for: indexPath
+        )
+        return header
    case UICollectionView.elementKindSectionFooter:
        let footer = collectionView.dequeueConfiguredReusableSupplementary(
            using: swiftUIFooterViewRegister,
            for: indexPath
        )
        return footer
    default:
        return .init()
    }
}
ObservableObject と @Published 修飾子を使ったので、UIKitからの変更はデータ配列(サーバー)に適用され、SwiftUIビューは自動的に再読み込みされます。
UITableViewの場合
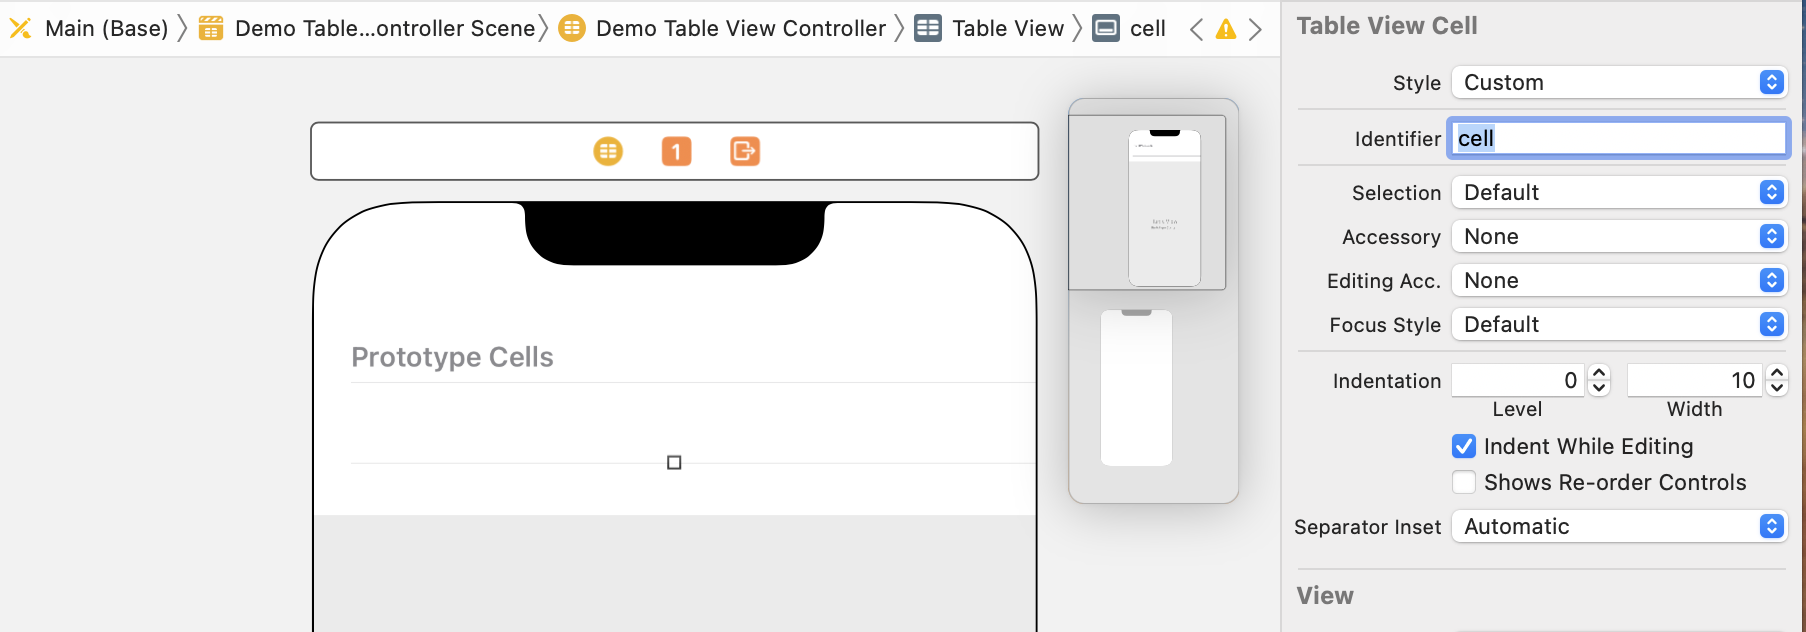
デフォルトのセル識別子をマークする
最初に、UITableView のために UIStoryBoard または xib ファイルに空のセルテンプレートを作成します。
ストーリーボードまたはXIBの空のセルの識別子を cell に変更する。
次に、cellForRowAt デリゲート関数の中で、まず、セルオブジェクトを取得します。
override func tableView(_ tableView: UITableView, cellForRowAt indexPath: IndexPath) -> UITableViewCell {
    let cell = tableView.dequeueReusableCell(withIdentifier: "cell", for: indexPath)
    let item = servers[indexPath.row]
}
それから、 contentConfiguration を使って、SwiftUIビューを表示するセルを設定します。
override func tableView(_ tableView: UITableView, cellForRowAt indexPath: IndexPath) -> UITableViewCell {
    let cell = tableView.dequeueReusableCell(withIdentifier: "cell", for: indexPath)
    let item = servers[indexPath.row]
+    // Apply SwiftUI view as the content of the cell
+    cell.contentConfiguration = UIHostingConfiguration {
+        ServerCollectionViewCell(item: item)
+    }
    return cell
}
UITableViewでSwiftUIのセルを使うための完成したコードは次のとおりです。
class DemoTableViewController: UITableViewController {

    let servers = DemoData.demoServers

    override func viewDidLoad() {
        super.viewDidLoad()
    }

    override func numberOfSections(in tableView: UITableView) -> Int {
        return 1
    }

    override func tableView(_ tableView: UITableView, numberOfRowsInSection section: Int) -> Int {
        return servers.count
    }

    override func tableView(_ tableView: UITableView, cellForRowAt indexPath: IndexPath) -> UITableViewCell {
        let cell = tableView.dequeueReusableCell(withIdentifier: "cell", for: indexPath)
        let item = servers[indexPath.row]
        // Apply SwiftUI view as the content of the cell
        cell.contentConfiguration = UIHostingConfiguration {
            ServerCollectionViewCell(item: item)
        }
        return cell
    }

}
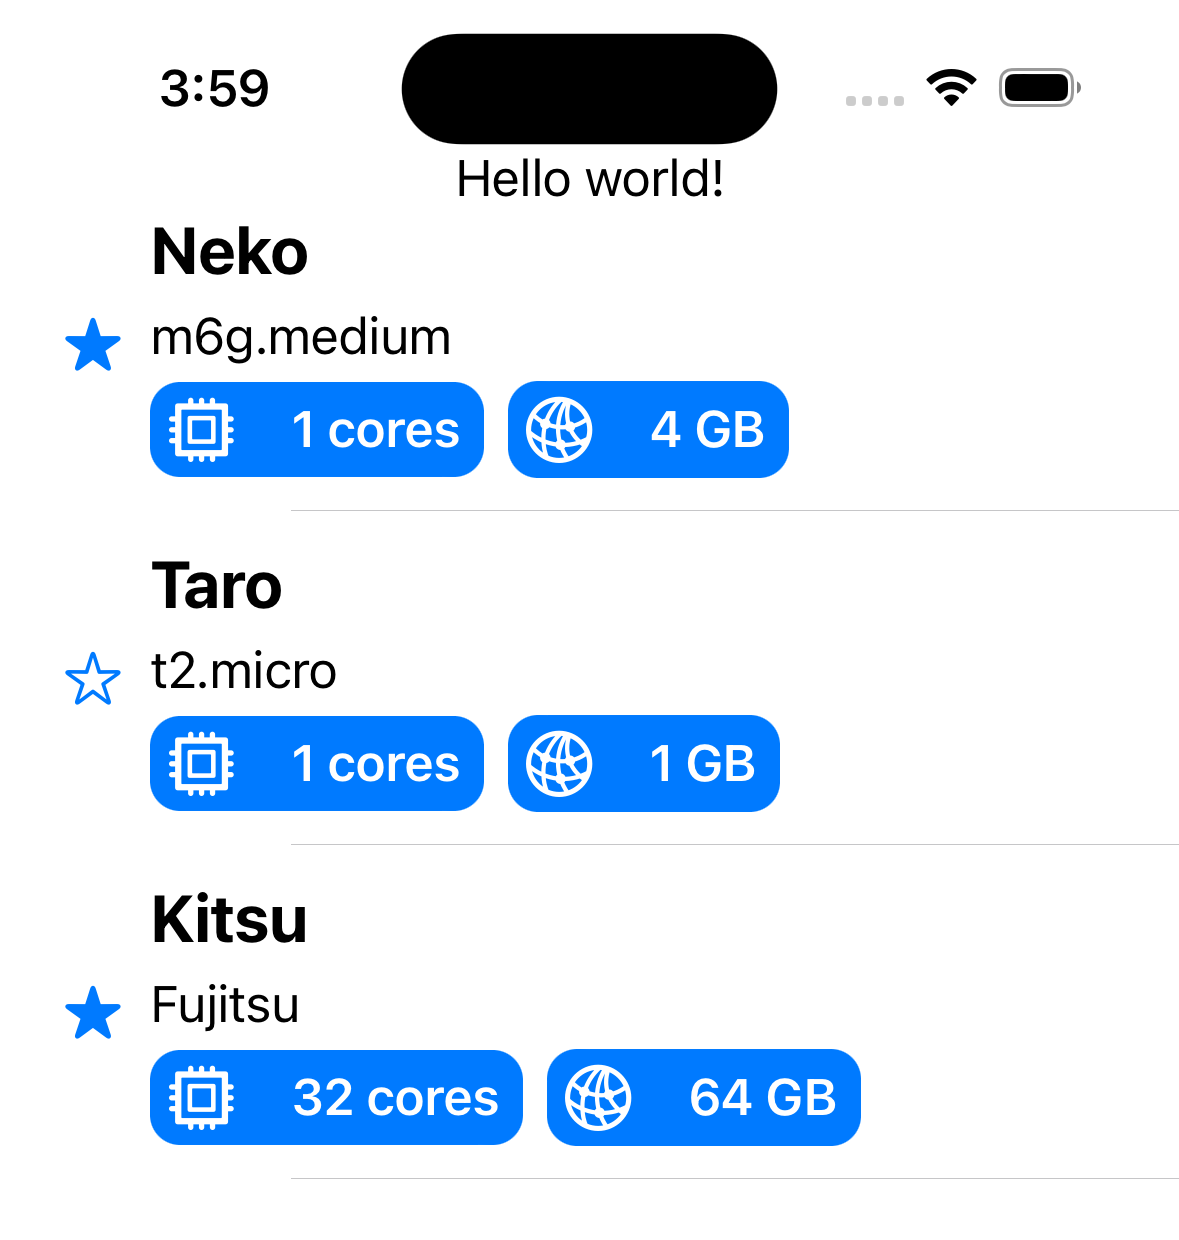
テーブルビューのヘッダーとフッターをSwiftUIビューに設定するには、UIHostingControllerを使用することができます。
+struct HelloWorldHeaderView: View {
+    var body: some View {
+        Text("Hello world!")
+    }
+}

class DemoTableViewController: UITableViewController {
    // ...

    override func viewDidLoad() {
        super.viewDidLoad()
+        tableView.tableHeaderView = UIHostingController(rootView: HelloWorldHeaderView()).view
    }

   // ...
}
お読みいただきありがとうございました。
☺️ Twitter @MszPro
🐘 Mastodon @me@mszpro.com

![]() 私の公開されているQiita記事のリストをカテゴリー別にご覧いただけます:
私の公開されているQiita記事のリストをカテゴリー別にご覧いただけます:

Written by MszPro~
関連記事
・UICollectionViewの行セル、ヘッダー、フッター、またはUITableView内でSwiftUIビューを使用
・iPhone 14 ProのDynamic Islandにウィジェットを追加し、Live Activitiesを開始する
・iOS 16:秘密値の保存、FaceID認証に基づく個人情報の表示/非表示(LARight)
・iOS16 MapKitの新機能 : 地図から場所を選ぶ、通りを見回す、検索補完
・SwiftUIアプリでバックグラウンドタスクの実行(ネットワーク、プッシュ通知) (BackgroundTasks, URLSession)
・WWDC22、iOS16:iOSアプリに画像からテキストを選択する機能を追加(VisionKit)
・WWDC22、iOS16:数行のコードで作成できるSwiftUIの新機能(26本)
・WWDC22、iOS 16:SwiftUIでChartsフレームワークを使ってチャートを作成する
・WWDC22, iOS 16: WeatherKitで気象データを取得
Github Repository