目次
1. BlenderでVroidのモデルを編集しよう
2. Oculus Quest 2の準備をしよう
3. UnityにVRMモデルを入れてみよう
4. VeryAnimationで遊んでみよう
5. DynamicBoneでいろいろ遊んでみよう
6. UnityのAnimationでいちゃいちゃしよう
デモとパッケージ
4.VeryAnimationで遊んでみよう
AnimationContollerを用意しよう!
Projectから右クリックして、Create > AnimationControllerを用意してください。
もしくは、3. UnityにVRMモデルを入れてみようで用意したAnimation Controllerを使用してもらっても大丈夫です。
AnimatorタブのところのParamatersの **+**をクリックしてもらって、Intをクリックしてパラメータを用意してください。
今回の場合は名前を lineとしています。
AnimationClipを用意しよう!
Projectのところで右クリックをして、Create > Animation からAnimation Clipを作成してください。
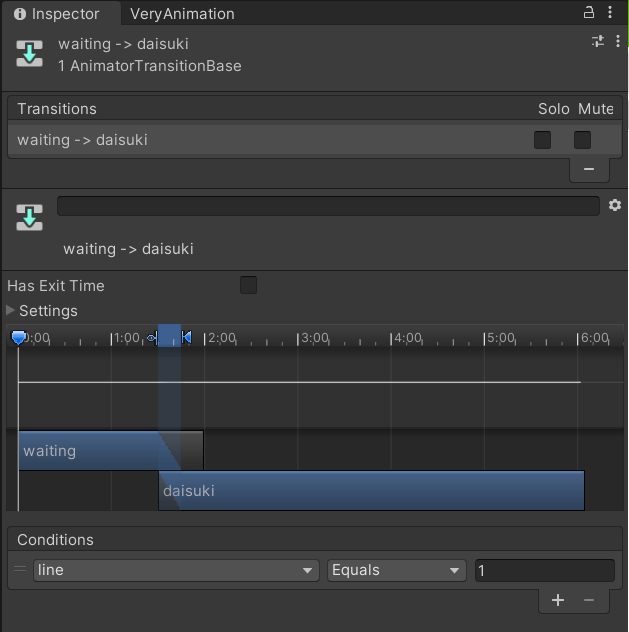
次に写真のようにノードからMake Transitionを使って矢印を貼ってください。

ここではWaitingが待機モーションで、そのほかのノードがユーザーのアクションにより、遷移するモーションとなります。
次にWaitingから各モーションへの遷移に対してのConditionsを設定していきます。
Inspectorから、Waitingから各モーションへの遷移のConditions に以下の写真のように line Equals 1~3までの数字をそれぞれの矢印に設定してください。
次に各ノードをクリックして、InspectorのAdd BefaviourからNew Scriptを選択し、以下のExitAnimationを設定します。
using System.Collections;
using System.Collections.Generic;
using UnityEngine;

public class ExitAnimation : StateMachineBehaviour
{
    // OnStateEnter is called when a transition starts and the state machine starts to evaluate this state
    //override public void OnStateEnter(Animator animator, AnimatorStateInfo stateInfo, int layerIndex)
    //{
    //
    //}

    // OnStateUpdate is called on each Update frame between OnStateEnter and OnStateExit callbacks
    //override public void OnStateUpdate(Animator animator, AnimatorStateInfo stateInfo, int layerIndex)
    //{
    //
    //}

    // OnStateExit is called when a transition ends and the state machine finishes evaluating this state
    override public void OnStateExit(Animator animator, AnimatorStateInfo stateInfo, int layerIndex)
    {
        animator.SetInteger("line", 0);
        animator.SetInteger("action", 0);
    }

    // OnStateMove is called right after Animator.OnAnimatorMove()
    //override public void OnStateMove(Animator animator, AnimatorStateInfo stateInfo, int layerIndex)
    //{
    //    // Implement code that processes and affects root motion
    //}

    // OnStateIK is called right after Animator.OnAnimatorIK()
    //override public void OnStateIK(Animator animator, AnimatorStateInfo stateInfo, int layerIndex)
    //{
    //    // Implement code that sets up animation IK (inverse kinematics)
    //}
}
同様にして、waiting以外のすべてのノードにExitAnimationを設定します。
Animationの音声と遷移の条件設定
つぎにSpace Keyを押したときやOculus ControllerのIndex Triggerを引いたときにアニメーション遷移を取らせるために、以下のLine_Controllerを作成しモデルにアタッチします。
using System.Collections;
using System.Collections.Generic;
using UnityEngine;

public class Line_Contoller : MonoBehaviour
{
    private Animator animator;
    // Start is called before the first frame update
    void Start()
    {
        animator = GetComponent<Animator>();
    }

    // Update is called once per frame
    void Update()
    {

        if (Input.GetKey(KeyCode.Space) || OVRInput.Get(OVRInput.RawButton.LIndexTrigger) ||
            OVRInput.Get(OVRInput.RawButton.RIndexTrigger))
        {
            if (animator.GetInteger("line") == 0 && animator.GetInteger("action") == 0)
            {
                int num = Random.Range(1, 4);
                animator.SetInteger("line", num);
            }
        }
    }
}
Animationを作ってみよう。
次にVeryAnimationをつかって、AnimationClipを編集していきたいと思います。
VeryAnimationの詳細な操作手順とかは公式に譲り、ここでは音声付きのAnimationClip編集するコツを紹介します。
もっといい方法があれば教えていただけると助かります(^_-)-☆
まず、Projectで右クリックから、Create > TimelineでTimelineを作成し、モデルのところにDrag&Dropします。
次に写真のようにTimelineにAudioTrackとAnimationTrackを貼り付けます。
初めは、AudioTrackよりもAnimationTrackが短いのでVeryAnimationでAnimationTrackをAudioTrackよりも長くしてください。
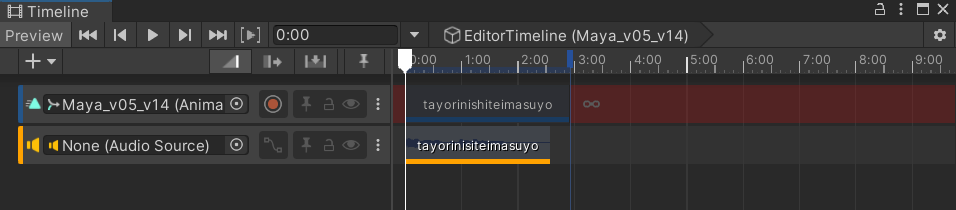
この状態でAnimationTrackをダブルクリックするとAnimation Windowが出てきて、Inspectorの右隣のVeryAnimationのタブから、Edit Animationができるようになります。
AnimationTrackを右クリックするとEdit in Animation Windowという項目が出てきますが、こちらでやるとうまくいかないことがあるので気をつけてください。
アニメーション作成時のコツとしては大きな動作から、だんだんと小さな動作を付け足していって、最後にBlend Shapeで口パクをつけるといいと思います。
Very AnimationでTimelineを使わずにアニメーションを編集しようとすると、音声のタイミングがわからず、大変なのでぜひTimelineを活用してみてください。
###AnimationClipに音声をつけてみよう!
実際に動作させるときには、Timelineは無効化して動作させるので音声が付きません。
なので、AnimationClipに音声を再生させる機能を追加します。
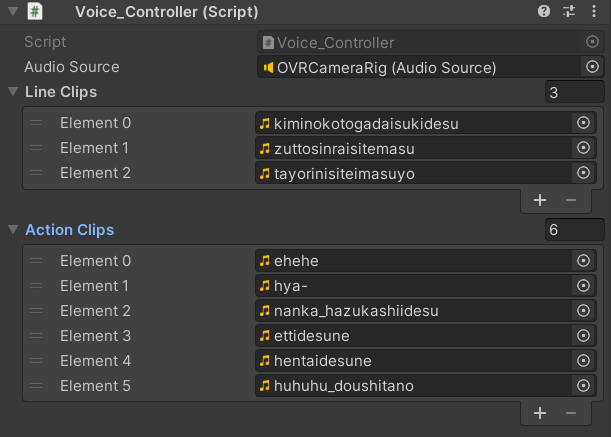
まず、以下のVoice_Controllerを作成します。
using System.Collections;
using System.Collections.Generic;
using UnityEngine;

public class Voice_Controller : MonoBehaviour
{
    [SerializeField]
    public AudioSource audioSource;

    [SerializeField]
    public AudioClip[] lineClips;

    [SerializeField]
    public AudioClip[] actionClips;

    // Update is called once per frame
    void LinePlayback(int animIndex)
    {
        audioSource.PlayOneShot(lineClips[animIndex-1], 1.0f);
    }

    void ActionPlayBack(int actionIndex)
    {
        audioSource.PlayOneShot(actionClips[actionIndex-1], 1.0f);
    }
}
ここで、actionClipsとActionPlayBackは6.UnityのAnimationでいちゃいちゃしようで使用するので、必要ない方は削除してください。
まず、このスクリプトをモデルのところにアタッチします。
次にOVRCameraRigにAdd ComponentからAudio Sourceを追加します。
そして、以下の写真のように音声を設定します。
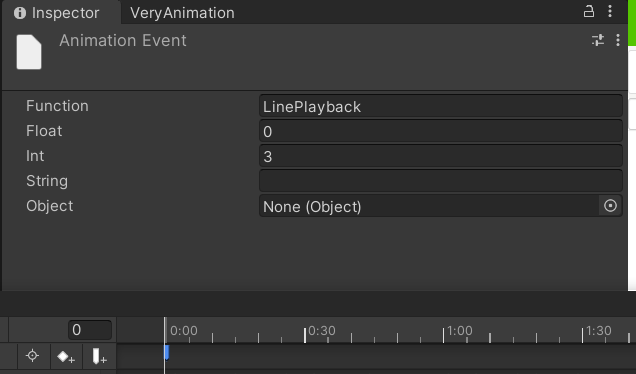
次に、AnimationWindowを開き、左上の3つ並んだアイコンの最も右のアイコンであるAdd Eventから音声の開始時刻にイベントを追加します。
Inspectorから写真のようにFunctionとIntを設定します。
Intのところは各再生したい音声のIndex + 1 を指定してください。
以下に今回のセリフを載せておきます。
| セリフ |
|---|
| 君のことが大好きです |
| 頼りにしていますよ |
| ずっと、信頼しています |
セリフは「男 言われて嬉しいセリフ」をググった結果をいじって作りました(笑)。
これで必要な設定がすべて完了したので、Play modeに入りSpace Keyを押して、遊んでみてください。