目次
1. BlenderでVroidのモデルを編集しよう
2. Oculus Quest 2の準備をしよう
3. UnityにVRMモデルを入れてみよう
4. VeryAnimationで遊んでみよう
5. DynamicBoneでいろいろ遊んでみよう
6. UnityのAnimationでいちゃいちゃしよう
デモとパッケージ
##2. Oculus Quest 2の準備をしよう
###Oculus Quest 2をセットアップしてみよう!
セットアップの詳細についてはOculus Quest 2 の公式Documentに譲ります。
今回のはまりポイントである、VRM Importerによるエラーについてだけセットアップについては述べたいと思います。
VRM Importerではproject Settings > Player > Other Settings > Rendering > Color Space のパラメータ値がLinearに設定されています。
しかし、実際にOculus Quest 2 でBuildしようとすると、Color Spaceがおかしいというエラーが生じ、Buildができません。
In order to build a player go to 'Player Settings...' to
resolve the incompatibility between the Color Space and
the current settings.
ググるとこれの対処はColorSpaceをLinearから、Gammaに変えると大丈夫とありますが、これをするとVRMのほうでエラーが生じ、にっちもさっちもいかなくなります。
対処法としては先ほどのColor Spaceの下にある、Graphics APIs の中にOpenGLES2が入っていることが問題なので、ColorSpaceはLinearのまま、Graphic APIsのOpenGLES2を削除します。
これでアプリがBuildできるようになります。
###OVRCameraを設定してみよう!
Projectから、OVRCameraRigを検索して、HierachyのところにDrag&Dropします。
まず、OVRCameraRigのTransformを設定します。
PositionをX = 0, Y = 1.4, Z = 1.5にして、RotaionをX = 0, Y = 180, Z = 0にしてもらえれば大丈夫です。
あとの3. UnityにVRMモデルを入れてみようでVRMモデルをImportしたときに位置を調節してください。
つぎに、OVR ManagerのTracking Origin TypeをEye Levelにして、Hand Tracking Support を Controllers And Hands に設定してください。
次に、OVRCameraRigの孫である、CenterEyeAnchorの設定をします。
Physical Cameraを有効にして、Focal Length を 150 にし、Clipping Planes の Near を 0.04、Farを 1000にしてください。
###OVRHandを用意しよう!
Project からOVRCustomHandPrefabを検索し、OVRCustomHandPrefab_RとOVRCustomHandPrefab_LをRightHandAnchorとLeftHandAnchorの下にDrag&Dropします。
そのあとでInspectorから、OVR Custom SkeletonのAuto Map Bones をクリックしてもらえれば、自動的にBoneが設定されます。
いったんアプリをBuildしてもらって、Oculus Quest 2 を装着後に、Controllderを別のところに置き、目の前に手をかざすと、Oculus Handが出てきて、Hand Trackingが正常に動いているかを確かめてみてください。
###OVRCameraを動かしてみよう!
つぎにOVRCameraを動かしたいと思います。
まず、Hierachyのシーンを選択し、右クリックして、 Game Object > Cubeで中央にCubeを設置します。
つぎに、Projectのところで右クリックして、Create > C# Scriptから、以下のようにCameraPosition.csを作ります。
using System.Collections;
using System.Collections.Generic;
using UnityEngine;

public class CameraPosition : MonoBehaviour
{
    [SerializeField]
    public Transform Head = null;

    private float rotateSpeed = 1.0f;

    [SerializeField]
    public GameObject targetObject;

    [SerializeField] public OVRHand leftHand;
    [SerializeField] public OVRHand rightHand;

    //MonoBehavor Reset() 関数はコンポーネントの初期化で呼ばれる
    void Reset()
    {
        Head = GetComponent<OVRCameraRig>().transform.Find("TrackingSpace/CenterEyeAnchor");

    }


    void Update()
    {
        // Forward move
        if (Input.GetKey(KeyCode.W) || OVRInput.Get(OVRInput.RawButton.LThumbstickUp) || OVRInput.Get(OVRInput.RawButton.RThumbstickUp))
        {
            var forward = Head.forward;
            forward.y = 0;
            transform.position += forward.normalized * Time.deltaTime;
        }
        // Back move
        if (Input.GetKey(KeyCode.S) || OVRInput.Get(OVRInput.RawButton.LThumbstickDown) || OVRInput.Get(OVRInput.RawButton.RThumbstickDown))
        {
            var forward = Head.forward;
            forward.y = 0;
            transform.position -= forward.normalized * Time.deltaTime;
        }
        // Left rotate
        if (Input.GetKey(KeyCode.A) || OVRInput.Get(OVRInput.RawButton.LThumbstickLeft) || OVRInput.Get(OVRInput.RawButton.RThumbstickLeft))
        {
            transform.RotateAround(targetObject.transform.position, Vector3.up, rotateSpeed);
        }
        // Right rotate
        if (Input.GetKey(KeyCode.D) || OVRInput.Get(OVRInput.RawButton.LThumbstickRight) || OVRInput.Get(OVRInput.RawButton.RThumbstickRight))
        {
            transform.RotateAround(targetObject.transform.position, Vector3.up, -rotateSpeed);
        }
        // Up move
        if (Input.GetKey(KeyCode.Q) || OVRInput.Get(OVRInput.RawButton.Y) || OVRInput.Get(OVRInput.RawButton.B))
        {
            transform.position += Vector3.up / 1000.0f;
        }
        // Down move
        if (Input.GetKey(KeyCode.E) || OVRInput.Get(OVRInput.RawButton.X) || OVRInput.Get(OVRInput.RawButton.A))
        {
            transform.position -= Vector3.up / 1000.0f;
        }

        if (leftHand.GetFingerIsPinching(OVRHand.HandFinger.Index) ||
            rightHand.GetFingerIsPinching(OVRHand.HandFinger.Index))
        {
            ;
        }
    }
}
これをOVR Camera RigにAddComponentしてもらって、以下の写真のように設定してもらえれば大丈夫です。
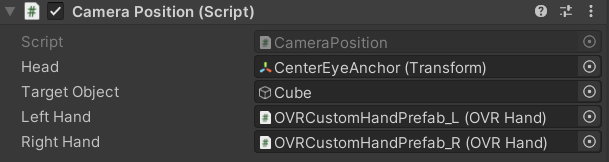
実際にBuildしてもらうと、ジョイスティックの上下でCubeに近づき、左右でCubeを中心としてまわります。また、A ボタンと X ボタンで視点が下がり、 B ボタンと Y ボタンで視点が上がるようになっています。
今回使用したCubeはもう使わないので削除してください。
ただ、ピンチ動作をすると何故か勝手に視点が下がります。対処法は今のところ不明です。一応、
        if (leftHand.GetFingerIsPinching(OVRHand.HandFinger.Index) ||
            rightHand.GetFingerIsPinching(OVRHand.HandFinger.Index))
        {
            ;
        }
として、対処してますがあまり効果はないです。
これでOculus Quest 2側の準備は終わりです。