この記事について
2022.09.29現在、かなり簡単にFirebaseAuthの認証を行えるようになっているのでここにメモ書きとして残しておきます!
FirebaseそのものをFlutterに導入する手順については別途こちらで解説しているのでそちらをご覧ください!
コピペでも動くようにしておきますので、試しに使ってみてください。
では始めます!
※この記事内のコードではProviderを利用しています。Providerについての簡単な記事はこちら
ログインさせてみよう
ログインの時に仕様するメソッドはsignInWithEmailAndPassword
これを用いてやっていきます。
まずは簡単なViewを作成しましょう。login_page.dart.でいきます。
こちらではUIだけを作成していきます。
login_page.dart
class LoginPage extends StatelessWidget {
  const LoginPage({super.key});

  @override
  Widget build(BuildContext context) {
    return ChangeNotifierProvider<LoginModel>(
        create: (_) => LoginModel(),
        child: Scaffold(
          appBar: AppBar(
            title: const Text("ログイン"),
          ),
          body: SingleChildScrollView(
            child: Center(
             child: Consumer<LoginModel>(builder: (context, model, child) {
              return SizedBox(
                width: MediaQuery.of(context).size.width*0.8,
                child: Column(
                  children: [
                    const SizedBox( height: 100 ),

                    // メールアドレスの入力欄
                    TextField(
                      controller: model.loginEmailController,
                      decoration: const InputDecoration(
                          labelText: 'メールアドレス'
                      ),
                      onChanged: (text) {
                        model.setEmail(text);
                      },
                    ),
                    const SizedBox( height: 30 ),

                    // パスワード入力欄
                    TextField(
                      controller: model.loginPasswordController,
                      obscureText: model.passObscure,
                      decoration: InputDecoration(
                          labelText: 'パスワード',
                          suffixIcon: IconButton(
                            icon: Icon((model.passObscure) ? Icons.visibility_off : Icons.visibility ),
                            onPressed: (){
                              model.changeObscure();
                            },
                          )
                      ),
                      onChanged: (text) {
                        model.setPassword(text);
                      },
                    ),
                    const SizedBox( height: 200 ),

                    // ログインボタン
                    SizedBox(
                      width: 200,
                      height: 50,
                      child: ElevatedButton(
                          onPressed: () async{
                            model.startLoading();

                            try {
                              await model.login();
                              await Navigator.push(context, MaterialPageRoute(builder: (context) => HomePage()));
                            } catch(e) {
                              final snackBar = SnackBar(
                                backgroundColor: Colors.red,
                                content: Text(e.toString()),
                              );
                              ScaffoldMessenger.of(context)
                                  .showSnackBar(snackBar);
                            } finally {
                              model.endLoading();
                            }
                          },
                          child: const Text("ログイン")
                      ),
                    ),
                    const SizedBox( height: 30 ),

                    // 新規登録に遷移
                    TextButton(
                        onPressed: (){
                          Navigator.pushNamed(context, "/register");
                        },
                        child: const Text("または新規登録")
                    )
                  ],
                ),
              );
            }),
        ),
          ),
      ),
    );
  }
}
続いてlogin_model.dartの作成です。
こちらでは状態管理及び処理の記述を行います。
login_model.dart
class LoginModel extends ChangeNotifier {
  final loginEmailController = TextEditingController();
  final loginPasswordController = TextEditingController();

  String? email;
  String? password;

  bool isLoading = false;
  bool passObscure = true; // パスワードの可視・不可視の切り替え

  // ローディング開始
  void startLoading() {
    isLoading = true;
    notifyListeners();
  }

  // ローデイング終了
  void endLoading() {
    isLoading = false;
    notifyListeners();
  }

  // メールアドレスのセット
  void setEmail(String email) {
    this.email = email;
    notifyListeners();
  }

  // パスワードのセット
  void setPassword(String password) {
    this.password = password;
    notifyListeners();
  }

  // パスワードの可視・不可視の切り替え
  void changeObscure() {
    passObscure = !passObscure;
    notifyListeners();
  }

  // ログインに関する関数
  Future login() async{
    email = loginEmailController.text;
    password = loginPasswordController.text;

    if(email != null && password != null) {
      await FirebaseAuth.instance
          .signInWithEmailAndPassword(email: email!, password: password!);
      final currentUser = FirebaseAuth.instance.currentUser;
      final uid = currentUser!.uid;
    } else {
      // パスワードまたはメールアドレスがブランクだった場合の処理
    }
  }
}
これで完成です!
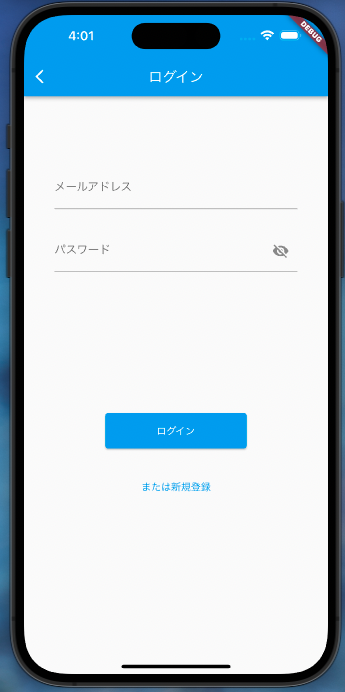
完成した画面はこちら
とても雑な内容にはなってしまいましたが、コピペして色々いじってみると段々とわかってくると思います!
今回は以上です!