記事一覧
Swift MkMapViewで地図アプリ作成してみた(記事一覧)
スケールバーを表示する
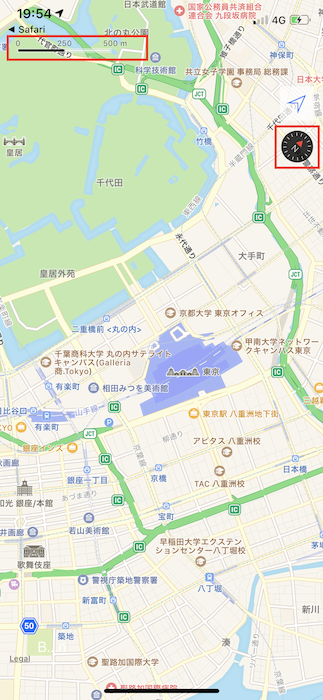
スケールを変更すると自動でスケールバーを表示する。
ViewController.swift:スケールバーを表示する
// スケールバーの表示
let scale = MKScaleView(mapView: mapView)
scale.frame.origin.x = 15
scale.frame.origin.y = 45
scale.legendAlignment = .leading
self.view.addSubview(scale)
legendAlignmentに設定できる値は以下の通り。
| 1 | 2 |
|---|---|
| .leading | 0を左起点にする |
| .trailing | 0を右起点にする |

コンパスを表示する
ViewController.swift:コンパスを表示する
// コンパスの表示
let compass = MKCompassButton(mapView: mapView)
compass.compassVisibility = .adaptive
compass.frame = CGRect(x: width - 50, y: 150, width: 40, height: 40)
self.view.addSubview(compass)
// デフォルトのコンパスを非表示にする
mapView.showsCompass = false
compassVisibilityに設定できる値は以下の通り。
| 1 | 2 |
|---|---|
| .hidden | 常に非表示 |
| .visible | 常に表示 |
| .adaptive | 地図の方位を動かしたとき(ノースアップでない時)だけ表示。 |
デバイスで実行した結果
補足
前回の記事で設定したトラッキングモードを変更するボタンの位置を変えている。
Swift MkMapViewで地図アプリ作成してみた(04)- トラッキングモードを切り替える(自作ボタン)
Swift MkMapViewで地図アプリ作成してみた(05)- トラッキングモードを切り替える(MKUserTrackingButton)
ViewController.swift:トラッキングボタンの位置を変更
trakingBtn.frame = CGRect(x:width - 50, y:100, width:40, height:40)
