Wandboxとは
オンラインコード実行環境です。同種の他サービスと比べ、圧倒的な対応言語とコンパイラバージョン数を誇ることで、特にコンパイラのバージョンが命取りになるC++界隈では重宝されています[要出典]。また、ideone.comやpaiza.ioと違い、コードを書いている最中にタブを閉じてしまってもキャッシュが生きている限り作業データを取り戻せるというため、ああああああとならずにすむという、細やかな気配りが見られます(意図した挙動なのかな?)。
@melpon 氏、@kikairoya 氏はじめ、数人が開発に携わっています。
最新のGCCやClangが使えるため、煩雑極まりないコンパイラのHEAD(開発中の最新版)のビルドを自分でやらずに利用できるという喜びの声もあります。
あくまで個人でやっているサービスのため、先日資金難に陥ったためのスポンサー募集をかけていました。
TwitterのTLを追っていなかった人には突如としてWandboxの左側にCorporate Sponsors:とPersonal Sponsors:が現れて驚いたのではないでしょうか。
当座十分な資金が集まったらしく、サービスは継続するらしいです。ついでにSSL接続になりました。継続するのだからどんどんどん活用するべきでしょう(typoにあらず)。
注意
以降スクリーンショットは2017/4/15現在のUIです。UIは変更になる可能性は・・・きっとあるんじゃないかなぁ、しらないけど。
まずはどんなサーバーなのか見てみよう
せっかくbash scriptを動かせるのですからまずやることは
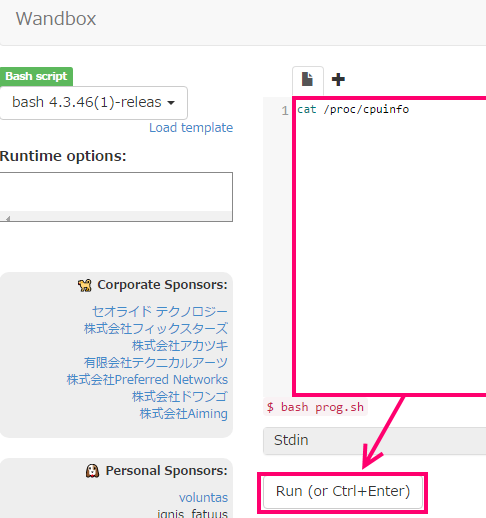
cat /proc/cpuinfo
でしょう。
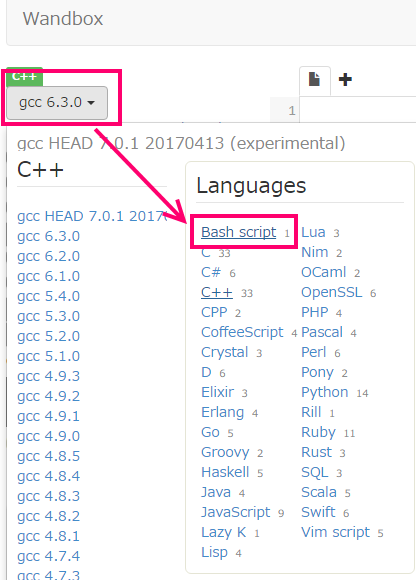
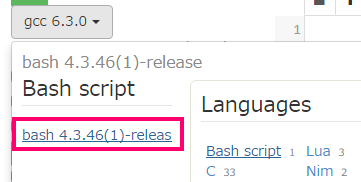
Languagesは Bash script、バージョンは一つしかないのでbash 4.3.46(1)-releas を選びました。
コードを書いて、「Run」をクリックするかCtrl+Enterで実行されます。
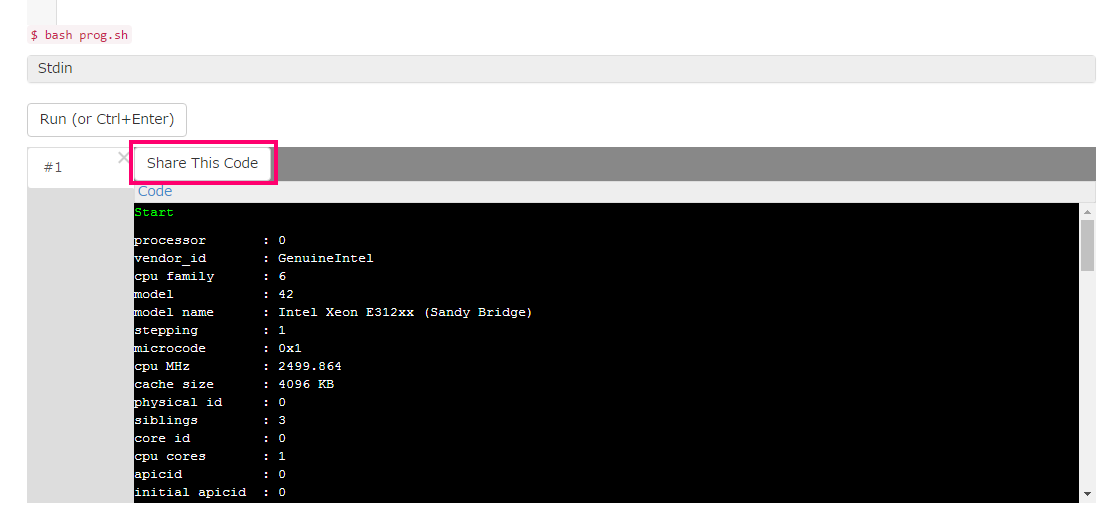
Shere This Codeを押すとURLが割り振られて、公開されます。公開する気もないのに押すのはいいことではない気がします。
結果: https://wandbox.org/permlink/2WNGw7YDL28xnt56
この記事でyumetodoさんが「SIMDが使えるオンライン環境としては」云々とありましたので、
— YSR@冴えカノ2期視聴勢 (@YSRKEN) 2017年4月8日
てっきりwandboxではSIMDできないのかと思ってテストコードを投げたら普通に使えました……whttps://t.co/WwrfuhIlmL
で、wandbox相手に「cat /proc/cpuinfo」してみたところ、
— YSR@冴えカノ2期視聴勢 (@YSRKEN) 2017年4月8日
「Intel Xeon E312xx (Sandy Bridge)を1コア×3ソケット分提供するゾ」と返されたのでびっくり。
AVX2は使えないもののAVXは使用可能だと分かりました
これは @melponn 氏に焼肉をみんながおごったからか?(前からAVX使えてたならごめんなさい、知りませんでした) https://t.co/B93j499T7K
— yumetodo-C++erだけど化学科 (@yumetodo) 2017年4月8日
@YSRKEN @yumetodo コードを実行してるさくらVPSのサーバは結構最近借りたものなので、それのおかげの可能性はあるかも
— めるぽん(Wandboxの中の人) (@melponn) 2017年4月8日
はい、どうやらIntelのCPUで、SIMDもAVXまで使えるようです。強い。
普通にC++のコードをコンパイルしよう
さっきも見たように膨大な数のLanguagesとVersionが選べますが、そろそろタイトル詐欺にならないようにC++のコードをコンパイルしていきましょう。
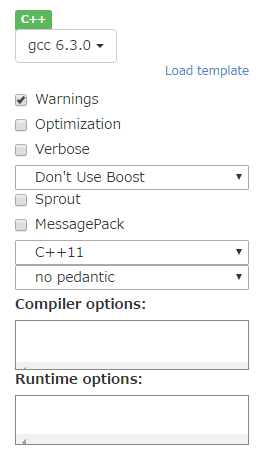
C++の場合の設定項目はこんな感じです。詳細は後述します。
# include <iostream>
int main()
{
    std::cout << "arikitari_na_world!" << std::endl;
}
File I/Oもやってみよう
arikitari
na
world!
のようなファイルが有ったとしてそれを全部読み出して標準出力に書き出すコードは
# include <fstream>
# include <iostream>
int main()
{
    std::ifstream in("a.txt");
    std::cout << in.rdbuf();
}
のように書けます。ちゃんとファイルを開けるので結果はもちろん
arikitari
na
world!
になります。
Boostを使ってみよう
Boostでまあもっとも手軽なのといえばboost::optinalだと思うので、使ってみましょう。
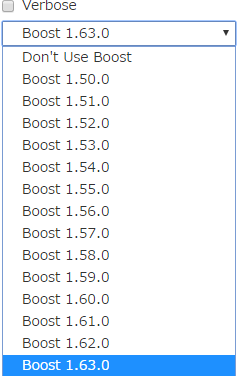
図のようにBoostのバージョンが選べます。基本的には一番新しいのを使っとけばいいでしょう。
# include <iostream>
# include <boost/optional.hpp>
boost::optional<int> f(int n)
{
    return { n };
}

int main()
{
    const auto n = f(23);
    if(n) std::cout << *n << std::endl;
}
無事にコンパイルして実行できました。
Sproutを使ってみみよう
SproutとはC++11で追加されC++14で強化されたconstexprを始めとする機能を使ってコンパイル時に様々な処理を行えるようにすることを目的としたライブラリです。
https://github.com/bolero-MURAKAMI/Sprout
@bolero_MURAKAMI氏が開発しています。
使うためには
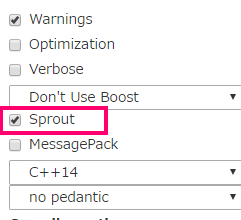
Sproutにチェックを入れるだけで良いです、ほぼ最新のSproutが常に使えます。
さて、Sproutにもoptionalがあります。このoptionalはboostのとは違って、範囲を持っているのでRange-based forでつかえる便利なやつなので使ってみましょう。
# include <iostream>
# include <sprout/optional.hpp>
sprout::optional<int> f(int n)
{
    return { n };
}

int main()
{
    const auto n = f(23);
    for(int i : n) std::cout << i << std::endl;
}
SIMDなコードも書いてみよう
白状しよう。私はまともに高速なSIMDを使ったコードもかけない情弱だと。
ところが適当な題材がつい先日出てきました。
SIMD intrinsicでチェックディジットを計算してみる その2
これだ。マイナンバーの最後の桁はチェックデジットなのですが、これを高速に導出するコードをサンプルに使います。
@MaverickTse, @mtfmk, @YSRKEN 氏の格闘の結果生まれたコードです。
ベンチマーク部分のコードもあるからちと長い。
# include <iostream>
# include <sstream>
# include <algorithm>
# include <numeric>
# include <array>
# include <random>
# include <chrono>
# include <random>
# include <vector>
# include <string>
# include <cstdint>
# include <algorithm>
# include <stdexcept>
# include <unordered_set>
# include <functional>
# include <limits>
# include <cstring>
# include <cctype>
# include <emmintrin.h>
# include <immintrin.h>
# define SPROUT_CONFIG_DISABLE_VARIABLE_TEMPLATES 1
# if defined(_MSC_VER) && !defined(__c2__)
#	pragma warning(disable: 5030)//警告	C5030	属性 'gnu::unused' は認識されません
#	if 191025017 <= _MSC_FULL_VER
#		define SPROUT_CONFIG_FORCE_CXX14_CONSTEXPR 1
#	endif
# endif
# include <sprout/array.hpp>
std::mt19937 create_rand_engine() {
	std::random_device rnd;
	std::vector<std::uint_least32_t> v(10);// 初期化用ベクタ
	std::generate(v.begin(), v.end(), std::ref(rnd));// ベクタの初期化
	std::seed_seq seed(v.begin(), v.end());
	return std::mt19937(seed);// 乱数エンジン
}
std::string generate_input() {
	static auto mt = create_rand_engine();
	static std::uniform_int_distribution<std::uint16_t> dist(0u, 9u);
	std::string re;
	re.resize(11);
	std::generate(re.begin(), re.end(), []() -> char {
		return char('0' + dist(mt));
	});
	return re;
}
using calc_check_digit_f = std::uint8_t(*)(const std::string&);
struct test_result {
	std::string test_case;
	std::uint8_t expected;
	std::uint8_t actual;
};
std::ostream& operator<<(std::ostream& os, const test_result& t) {
	os << "testcase:" << t.test_case << ": expected(" << std::uint16_t(t.expected) << ") actual(" << std::uint16_t(t.actual) << ')';
	return os;
}
auto test(calc_check_digit_f f) {
	static const std::pair<std::string, std::uint8_t> testcase[] = {
		{ "12345678901", 8 },
		{ "56661137362", 0 },
		{ "61671451309", 6 },
		{ "66383747390", 9 },
		{ "08065140466", 9 },
		{ "15473503678", 2 },
		{ "40113376378", 8 },
		{ "12226480680", 0 },
		{ "82046894873", 4 },
		{ "48880517043", 6 },
		{ "97816786786", 3 }
	};
	std::vector<test_result> fail;
	fail.reserve(sizeof(testcase) / sizeof(*testcase));
	for (auto&& t : testcase) {
		try {
			const auto re = f(t.first);
			if (re != t.second) fail.push_back({ t.first, t.second, re });
		}
		catch (...) {
			fail.push_back({ t.first, t.second, std::uint8_t(0xff) });
		}
	}
	return fail;
}
std::chrono::nanoseconds bench(const char* func_name, calc_check_digit_f f, const std::vector<std::string>& inputs) {
	namespace ch = std::chrono;
	using hc = ch::high_resolution_clock;
	const auto test_re = test(f);
	auto v2s = [](const std::vector<test_result>& a) {
		std::stringstream ss;
		for (auto&& t : a) ss << t << std::endl;
		return ss.str();
	};
	const auto t0 = hc::now();
	[[gnu::unused]] std::uint8_t dst;
	for (auto&& i : inputs) dst = f(i);
	const auto t1 = hc::now();
	const auto t = t1 - t0;
	std::cout
		<< func_name << " : test::" << (test_re.empty() ? "pass:" : "fail:")
		<< ch::duration_cast<ch::milliseconds>(t).count() << "[ms] ("
		<< ch::duration_cast<ch::nanoseconds>(t).count() << "[ns])" << std::endl;
	if(!test_re.empty()) std::cout << v2s(test_re) << std::endl;
	return ch::duration_cast<ch::nanoseconds>(t);
}
SPROUT_CXX14_CONSTEXPR sprout::array<std::uint8_t, 1000> make_mod_table_ysr() {
	sprout::array<std::uint8_t, 1000> re{};
	for (size_t i = 0; i < 1000; ++i) {
		size_t mod = i % 11;
		re[i] = static_cast<std::uint8_t>(mod <= 1 ? 0 : 11 - mod);
	}
	return re;
}

static inline bool validate(const __m128i& x)
{
	__m128i t = _mm_sub_epi8(x, _mm_min_epu8(x, _mm_set1_epi8(9)));
	return _mm_test_all_zeros(t, _mm_setr_epi32(-1, -1, 0x00FFFFFF, 0)) == 1;
}
uint8_t calc_check_digit_mtfmk_ysrken(const std::string& str) noexcept
{
	static SPROUT_CXX14_CONSTEXPR auto mod_table = make_mod_table_ysr();
	if (str.size() != 11) {
		return 0xFE;
	}

	__m128i p_n = _mm_loadu_si128(reinterpret_cast<const __m128i*>(str.c_str()));
	p_n = _mm_sub_epi8(p_n, _mm_set1_epi8('0'));
	if (!validate(p_n)) {
		return 0xFF;
	}

	__m128i sum = _mm_maddubs_epi16(p_n, _mm_setr_epi8(6, 5, 4, 3, 2, 7, 6, 5, 4, 3, 2, 0, 0, 0, 0, 0));
	sum = _mm_sad_epu8(sum, _mm_setzero_si128());
	sum = _mm_add_epi32(sum, _mm_srli_si128(sum, 8));
	return mod_table[_mm_cvtsi128_si32(sum)];
}

int main() {
	SPROUT_CONSTEXPR int test_times = 10000000;
	try {
		std::cout << "generating inputs..." << std::flush;
		std::vector<std::string> inputs(test_times);
		std::generate(inputs.begin(), inputs.end(), []() { return generate_input(); });
		std::cout
			<< "done." << std::endl
			<< "start benchmark mark:" << std::endl;

		bench("calc_check_digit_mtfmk_ysrken", calc_check_digit_mtfmk_ysrken, inputs);
		std::cout << std::endl << "benchmark finish!" << std::endl;
	}
	catch (const std::exception& er) {
		std::cerr << er.what() << std::endl;
	}
}
冒頭も書いたように、SIMDなコードがWandboxで使えるようになったのは割と最近なので感慨深いですね。当たり前ですがAVX2なコードを書こうとするとヘッダーファイルがなくて詰みますん。
コンパイル時に剰余計算とかをやってしまって配列に保存しておく処理がありますが(make_mod_table_ysr)、これはstd::arrayだとoperator[]がconstexprではないのでやむなくsproutを使っています。
ヘッダーファイルを追加してみよう
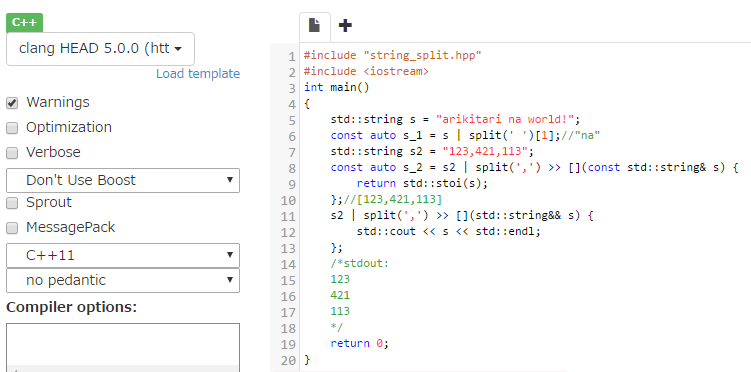
その昔Wandboxは一つのファイルしか扱えなかったですが、だいぶ前から複数のファイルを扱うことができるようになっています。
何に役立つかというと、ヘッダーオンリーライブラリを利用できるようになります。
ここでは
C++でPStade.Oven(pipeline)風味なstringのsplitを作ってみた
で紹介した文字列分割ライブラリを使ってみましょう(ステマ)
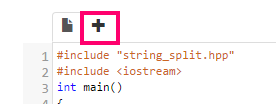
そうしたらヘッダーファイルを追加したいので、この+ボタンを押します。

タブをダブルクリックするとファイル名を編集できるので、書き換えましょう。
あとは普通にオプションいじって実行するだけです。
ファイル名編集部分でディレクトリも作れる
@yumetodo @kariya_mitsuru @srz_zumix あれ、一応タブのファイル名は a/b/c.hpp とかできるようにしてますけどそういうのではなく?
— めるぽん(Wandboxの中の人) (@melponn) 2017年4月10日
@yumetodo @melponn @kariya_mitsuru @srz_zumix ディレクトリ作れるのではhttps://t.co/qwHsrlLsfj
— 白山風露 (@kazatsuyu) 2017年4月10日
@yumetodo @melponn @kariya_mitsuru @srz_zumix URL間違えた https://t.co/fLbXxCCfft
— 白山風露 (@kazatsuyu) 2017年4月10日
のように、ファイル名編集のところで/を書くとディレクトリが作れるようです。ただし../a.txtとかはかけないです。
複数の翻訳単位をコンパイルしてみよう
C/C++では普通ヘッダーファイルとソースファイルがあり、ソースファイルをそれぞれコンパイルしてリンクし、実行ファイルを作ります。つまりソースファイルごとに翻訳が行われるのでそれぞれを翻訳単位と言います(常識)。
ここまですべてソースファイルが一つ、つまり翻訳単位が一つのプログラムばかり取り上げてきました。
ではどうすれば複数の翻訳単位をコンパイルすればいいのでしょうか?
@yumetodo 多分、匿名名前空間の方が、staticでは対応しきれないパターンのために用意された感じではないでしょうか。
— 白山風露 (@kazatsuyu) 2016年10月16日
名前空間内のstatic関数は、匿名名前空間で定義した場合とほぼ同じ動作をします。https://t.co/KV035mCVne
@kazatsuyu ほう、ますますstatic/extern/inlineまわりわかんねぇ・・・。
— yumetodo-C++erだけど化学科 (@yumetodo) 2016年10月16日
ところでwandboxで複数の翻訳単位作る方法あったのか・・・@srz_zumix 氏のiuwandboxつかっててヘッダーオンリーなものしか使えないイメージだった
@kazatsuyu 氏の情報提供によりその方法が明らかになりました。
ここで出番になるのがCompiler options:です。
- main関数があるソースファイルを一番最初のタブに貼り付ける(一番最初(prog.cc)にないとリンカエラーになります)
- それ以外のヘッダーファイル、ソースファイルを他のタブに貼り付ける(ファイル名をつけるのをお忘れなく)
- ソースファイルを
Compiler options:にすべて改行区切りで指定する
例えば
# include <iostream>
# include "a.hpp"

int main() {
    std::cout << (f == g);
}
static inline void f(){}

extern void(*g)();
# include "a.hpp"

void (*g)() =f;
のようにあったときは
a.cpp
のように指定すると
のように実行できます。
注意点としては
-
Compiler options:に複数のことを書くときは常に改行区切り - クオートされて渡されるので余計なスペースは入れない
でしょうか。
なお、中の人こと @melpon 氏の反応がこちら。
@yumetodo @kariya_mitsuru というかコンパイルオプションにファイル名入れたら使えるの盲点でした。確かにこれでいける…
— めるぽん(Wandboxの中の人) (@melponn) 2017年4月10日
OpenSSLを使ってみよう
WandboxにはOpenSSLもあるので使ってみましょう。と言ってもネットワーク通信は死んでいるようなので実行はできませんが、コンパイルはできます。
使えるバージョンは
ls /opt/wandbox/ | grep openssl
すればわかりますが、1.1.0eはどうもヘッダーがぶっ壊れているので(Wandboxのせいではなく)1.0.2kを今回は使います。
https://wandbox.org/permlink/aZi1sLFmojdd0vbX
で、OpenSSLを直叩きとかできる気がしないので、Boost.asio.sslを使うコードをコンパイルしてみましょう。
https://github.com/yumetodo/boost_asio_ssl_file_dl_test
Compiler options:に大量にいろいろ指定することになります。pkgconf?今回の場合あってもさして簡単にならないよ(使えるのか知らない)
まず、OpenSSLがある場所をコンパイラに伝えるために
-I/opt/wandbox/openssl-1.0.2k/include
-L/opt/wandbox/openssl-1.0.2k/lib
が必要です。それから先に複数の翻訳単位をコンパイルする方法で述べたように、今回も複数の翻訳単位があるので
downloader.cpp
downloader_impl.cpp
を指定します。あとはリンクするものですね。
-lssl
-lcrypto
-ldl
-lsslと-lcryptoは順番を間違えるとリンクエラーになりますね
すべて合わせると
-I/opt/wandbox/openssl-1.0.2k/include
-L/opt/wandbox/openssl-1.0.2k/lib
downloader.cpp
downloader_impl.cpp
-lssl
-lcrypto
-ldl
こうなりますね。実行結果は
https://wandbox.org/permlink/uK0Z9eWfFlX3WGUN
です。予想通り実行時に例外はいて死にます。
なんでかというと、セキュリティのために、そもそもソケットが作れないからです。
試しにsocktでpingを作っている適当なプログラムを走らせてみると
http://www.geekpage.jp/programming/linux-network/simple-ping.php
socket: Operation not permitted
と言われます。ソケットすら開けねぇから何もできんですね。
sqlite3を使ってみよう
sqliteも使えるみたいですね。公式サンプルのCreate a Tableの項を動かしてみましょう。
-I/opt/wandbox/sqlite-3.17.0/include
-L/opt/wandbox/sqlite-3.17.0/lib
-lsqlite3
まあCompiler optionsに書くことはさっきとそう変わらないですね。
無事実行できました。
Range-v3を使ってみよう
Range-v3が何かについては
[c++,boost] Eric Niebler's range 3.0の基本設計思想
に丸投げして、公式サンプルを動かしてみましょう。カレンダーのやつはコンパイル中にメモリーが足りなくなったのでフィボナッチ数列で。
https://github.com/ericniebler/range-v3/blob/963ac2617d7593b120df34e38d1916b31a878757/example/fibonacci.cpp
Bash scriptから任意バージョンのコンパイラでC++のコードをコンパイルしよう
Wandbox、複数の翻訳単位っていうかbash動くから色々やれる https://t.co/mKwxmBLe7m
— いぐにすさん (@ignis_fatuus) 2017年4月11日
@ignis_fatuus なおGCCのバージョン
— yumetodo-C++erだけど化学科 (@yumetodo) 2017年4月11日
@yumetodo 色々やれるといったはずだ https://t.co/yYMannoRE9
— いぐにすさん (@ignis_fatuus) 2017年4月11日
@ignis_fatuus /opt/wandbox/
— yumetodo-C++erだけど化学科 (@yumetodo) 2017年4月11日
そこにあるのか、ずっとどこかわからず探し回ってた
@ignis_fatuus 氏から情報提供頂いたので検証してきましょう。
まず
ls /opt/wandbox | grep gcc
の結果を見てみると
gcc-4.4.7
gcc-4.5.4
gcc-4.6.4
gcc-4.7.3
gcc-4.7.4
gcc-4.8.1
gcc-4.8.2
gcc-4.8.3
gcc-4.8.4
gcc-4.8.5
gcc-4.9.0
gcc-4.9.1
gcc-4.9.2
gcc-4.9.3
gcc-5.1.0
gcc-5.2.0
gcc-5.3.0
gcc-5.4.0
gcc-6.1.0
gcc-6.2.0
gcc-6.3.0
gcc-head
のようになります。
次に
ls -l /opt/wandbox/gcc-6.3.0/bin
してみると
total 42416
-rwxr-xr-x 1 root root 4544016 Jan 27 23:26 c++
-rwxr-xr-x 1 root root 4537480 Jan 27 23:26 cpp
-rwxr-xr-x 1 root root 4544016 Jan 27 23:26 g++
-rwxr-xr-x 1 root root 4533168 Jan 27 23:26 gcc
-rwxr-xr-x 1 root root  146248 Jan 27 23:26 gcc-ar
-rwxr-xr-x 1 root root  146168 Jan 27 23:26 gcc-nm
-rwxr-xr-x 1 root root  146184 Jan 27 23:26 gcc-ranlib
-rwxr-xr-x 1 root root 3133744 Jan 27 23:26 gcov
-rwxr-xr-x 1 root root 3080944 Jan 27 23:26 gcov-tool
-rwxr-xr-x 1 root root 4544016 Jan 27 23:26 x86_64-pc-linux-gnu-c++
-rwxr-xr-x 1 root root 4544016 Jan 27 23:26 x86_64-pc-linux-gnu-g++
-rwxr-xr-x 1 root root 4533168 Jan 27 23:26 x86_64-pc-linux-gnu-gcc
-rwxr-xr-x 1 root root 4533168 Jan 27 23:26 x86_64-pc-linux-gnu-gcc-6.3.0
-rwxr-xr-x 1 root root  146248 Jan 27 23:26 x86_64-pc-linux-gnu-gcc-ar
-rwxr-xr-x 1 root root  146168 Jan 27 23:26 x86_64-pc-linux-gnu-gcc-nm
-rwxr-xr-x 1 root root  146184 Jan 27 23:26 x86_64-pc-linux-gnu-gcc-ranlib
おお?
ならば、
/opt/wandbox/gcc-6.3.0/bin/gcc --version
の結果は・・・?
gcc (GCC) 6.3.0
Copyright (C) 2016 Free Software Foundation, Inc.
This is free software; see the source for copying conditions.  There is NO
warranty; not even for MERCHANTABILITY or FITNESS FOR A PARTICULAR PURPOSE.
おお!!
つまり
/opt/wandbox/gcc-6.3.0/bin/g++ --version
/opt/wandbox/gcc-6.3.0/bin/g++ a.cpp b.cpp
./a.out
# include<iostream>
# include"b.h"
int main() {
    std::cout << "Hello" << std::endl;
    b();
}
void b(void);
# include<iostream>
void b(void) {
    std::cout << __FILE__ << std::endl;
}
とかするとコンパイルして実行できてしまう!
GNUmakeとかninjaとかCMakeとかはないですが、bash scriptはあるので文字通りなんでもできちゃいますね!
唯一の難点はSyntax highlightが仕事しないことでしょうか。
Wandbox APIを利用する
Wandbox APIに特定フォーマットJSONを投げつけることでビルドして実行結果を返してくれます。
各種エディタからWandboxを使う
vim
https://github.com/rhysd/wandbox-vim
emacs
https://github.com/kosh04/emacs-wandbox
Visual Studio Code
https://github.com/wraith13/wandbox-vscode
なんかいろいろあります。詳細は割愛
iuwandbox.py
まあまずiutestという @srz-zumix氏が開発しているC++のテストフレームワークがあるわけですが、
https://github.com/srz-zumix/iutest
そのツールとして、iuwandbox.pyがあります。
導入はかんたんです
- python3かpython2とGNUMakeが動く環境を用意します。Windowsだったらmsys2とか?
- gitとかでiutestを落としてくる
cd <iutestのあるパス>make -C tools/fused
使ってみましょう。使い方は
http://srz-zumix.github.io/iutest/
に記述があります。
- 複数ヘッダーファイル対応(相対パス自動解決)
- 複数翻訳単位対応(暫定)
- boost, sprout対応
となかなかポテンシャル高いです。
Cranberries Build Tool
C, C++, Go、Rubyのみ対応したWandboxをコマンドラインから叩くツール。こっちはgolangで作られている。
GoでWandboxにコードを送って実行結果を見る - Qiita
導入は難しくない。
マニュアルインストール
リリースページからダウンロードして自分でインストールする。
go getを使って導入
-
Chocolateyなどでgolangを導入する(go-1.9以上が必要)
-
go get github.com/LoliGothick/cbt -
dep ensure(推奨) -
go install github.com/LoliGothick/cbt -
$GOPATH/binにパスを通す。Windowsだとデフォルトなら$env:HOME/go/bin
使い方は例えば
cbt wandbox cpp --std c++14 -w .\vector_growth_test.cpp
とかする。
余談:Share This Codeを取り消せるか
取り消せません
サーバーのDBにどんどんゴミが溜まっていくんじゃないかという気がしますが
@yumetodo @TheorideTech データは残りますが、こっちとしては大したサイズでも無いので全く気にならないですね。ユーザ認証は、そんなに便利でも無いよなーとか思ったりして手を出しにくかったり
— めるぽん(Wandboxの中の人) (@melponn) 2017年4月15日
とのことなので常識的な範疇で使っていれば問題はないんでしょう。
感想
- Wandboxのポテンシャル高い
-
/opt/wandboxにだいたいなんでもあるのでBash Scriptでゴリ押せる - iuwandboxのポテンシャルも高い
追記
ユーザー認証機能が追加された。
WandboxにGithubを利用したユーザー認証が来た
