はじめに
こんにちは、XR系Unityエンジニアのやうです。Twitterはこちら
随分前に、Twitterで以下のデモを見てから、「俺もiPhone11買ったら実装するで!」と思っていて、
最近やっと買えたので、色々作り方を検索したものの、以外にも見つけられなかったので、自分で書くことにしました。
Some ARKit 3 body segmentation experiments pic.twitter.com/BgltTbglKu
— Laan Labs (@laanlabs) June 13, 2019
今回作るもの
今回は、動きに残像が追従してくるパターンと、その場に残存するパターンの2つを作ります。
本記事では、追従編の解説をするので、残存編の解説を見たい場合は、こちらのリンクからお願いします。
追従編

残存編

今回のサンプルのリポジトリはこちらです。
https://github.com/YoHana19/HumanAfterImageEffect
環境
- Unity2019.2.18f1
- ForwardRendering (SRPではない)
- AR Foundation preview.3 - 3.1.0
- ARKit XR Plugin preview.2 - 3.1.0
- Xcode 11.3.1
- iPhone 11 pro (iOS 13.3.1)
UnityでARKit3のHumanSegmentationを利用する
Unity-Technologies社がARFoundationのサンプルを公開しているので、その中のHumanSegmentationImagesというサンプルシーンを改変していきます。
サンプルシーンの細い説明は他の記事にお任せして、今回の実装の概要を説明します。
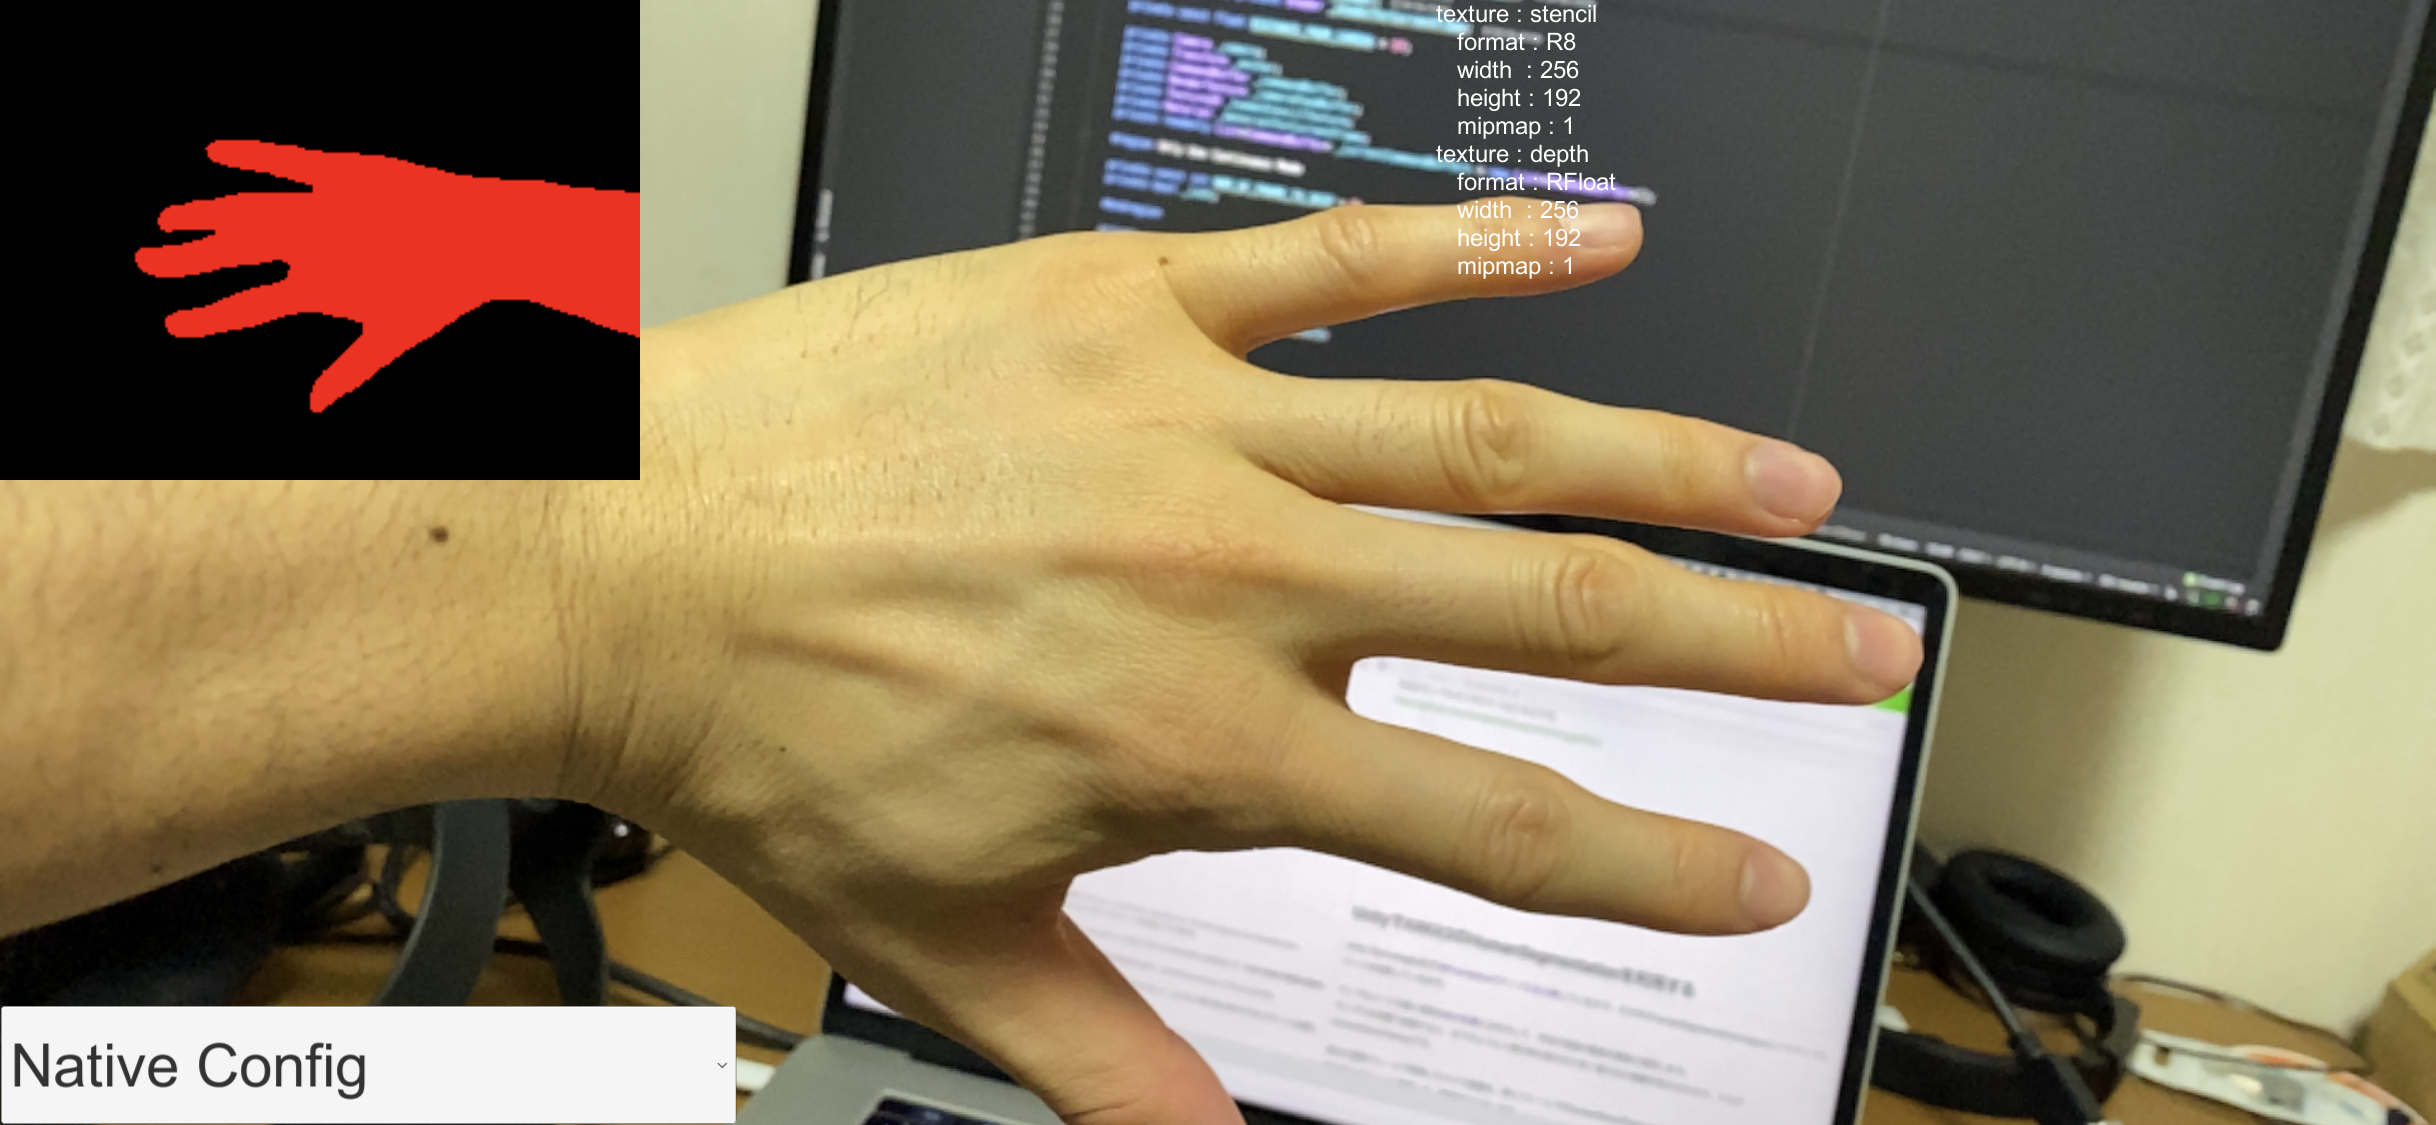
サンプルを実機で起動すると、以下のように人間の体の部分だけ赤く塗られた画像が表示されます。これがhumanStencilTextureとして取得できます。
過去の複数フレームで取得したカメラ画像を、各フレームのhumanStencilTextureでマスクして、ちょうど人間の体の部分だけをスクリーンに描画していくことで、残像を生み出します。
カメラ画像とhumanStencilTextureのバッファをとる
今回残像を作るにあたって、過去数フレームのカメラ画像とhumanStencilTextureを保持しておく必要があります。
まずコード全文を載せます。
using System.Collections.Generic;
using System.Linq;
using UnityEngine;
using UnityEngine.Rendering;
using UnityEngine.XR.ARFoundation;
using UnityEngine.XR.ARSubsystems;

[RequireComponent(typeof(Camera))]
public class AfterImagePostEffect : MonoBehaviour
{
    [SerializeField] private AROcclusionManager _occlusionManager;
    [SerializeField] private Shader _shader;

    private const int NUM_OF_IMAGES = 10;
    private const int FRAME_OF_INTERVAL = 4;

    private readonly (int, int)[] _humanStencilTextureResolution =
    {
        (256, 192), // Fastest
        (960, 720), // Medium
        (1920, 1440) // Best
    };

    private readonly List<AfterImage> _afterImages = new List<AfterImage>();
    private readonly List<RenderTexture> _cameraFeedBuffers = new List<RenderTexture>();
    private readonly List<RenderTexture> _stencilBuffers = new List<RenderTexture>();

    private Camera _camera;
    private CommandBuffer _commandBuffer;

    private void Awake()
    {
        _camera = GetComponent<Camera>();

        for (int i = 0; i < NUM_OF_IMAGES; i++)
        {
            _afterImages.Add(new AfterImage(_camera, new Material(_shader)));
        }

        var resolution = (0, 0);
        switch (_occlusionManager.humanSegmentationStencilMode)
        {
            case SegmentationStencilMode.Fastest:
                resolution = _humanStencilTextureResolution[0];
                break;
            case SegmentationStencilMode.Medium:
                resolution = _humanStencilTextureResolution[1];
                break;
            case SegmentationStencilMode.Best:
                resolution = _humanStencilTextureResolution[2];
                break;
        }

        for (int i = 0; i < (NUM_OF_IMAGES - 1) * FRAME_OF_INTERVAL + 1; i++)
        {
            _cameraFeedBuffers.Add(new RenderTexture(_camera.pixelWidth, _camera.pixelHeight, 0));
            _stencilBuffers.Add(new RenderTexture(resolution.Item1, resolution.Item2, 0));
        }

        _commandBuffer = new CommandBuffer();
        _commandBuffer.Blit(null, _cameraFeedBuffers.Last());
        _camera.AddCommandBuffer(CameraEvent.AfterForwardOpaque, _commandBuffer);
    }

    private void Update()
    {
        for (int i = 0; i < _cameraFeedBuffers.Count - 1; i++)
        {
            Graphics.Blit(_cameraFeedBuffers[i + 1], _cameraFeedBuffers[i]);
        }
    }

    private void OnRenderImage(RenderTexture src, RenderTexture dest)
    {
        var humanStencil = _occlusionManager.humanStencilTexture;
        if (humanStencil)
        {
            // デバイスの向きが変更された時用
            if (_cameraFeedBuffers.Last().width != _camera.pixelWidth)
            {
                ReInitCameraFeedBuffers();
            }

            for (int i = 0; i < _stencilBuffers.Count - 1; i++)
            {
                Graphics.Blit(_stencilBuffers[i + 1], _stencilBuffers[i]);
            }

            Graphics.Blit(humanStencil, _stencilBuffers.Last());

            for (int i = 0; i < _afterImages.Count; i++)
            {
                _afterImages[i].SetMaterialProperty(_stencilBuffers[i * FRAME_OF_INTERVAL]);
            }
        }

        Graphics.Blit(src, dest);
    }

    private void OnGUI()
    {
        if (Event.current.type.Equals(EventType.Repaint))
        {
            for (int i = 0; i < _afterImages.Count; i++)
            {
                _afterImages[i].Draw(_cameraFeedBuffers[i * FRAME_OF_INTERVAL]);
            }
        }
    }

    private void ReInitCameraFeedBuffers()
    {
        _commandBuffer.Clear();
        _camera.RemoveCommandBuffer(CameraEvent.AfterForwardOpaque, _commandBuffer);
        var total = _cameraFeedBuffers.Count;
        foreach (var cameraFeed in _cameraFeedBuffers)
        {
            cameraFeed.Release();
        }

        _cameraFeedBuffers.Clear();

        for (int i = 0; i < total; i++)
        {
            _cameraFeedBuffers.Add(new RenderTexture(_camera.pixelWidth, _camera.pixelHeight, 0));
        }

        _camera.AddCommandBuffer(CameraEvent.AfterForwardOpaque, _commandBuffer);
    }
}
using UnityEngine;

public class AfterImage
{
    private readonly Camera _camera;
    private readonly Material _material;

    private readonly int PropertyID_UVMultiplierLandScape;
    private readonly int PropertyID_UVMultiplierPortrait;
    private readonly int PropertyID_UVFlip;
    private readonly int PropertyID_OnWide;
    private readonly int PropertyID_StencilTex;

    public AfterImage(Camera camera, Material material)
    {
        _camera = camera;
        _material = material;

        PropertyID_UVMultiplierLandScape = Shader.PropertyToID("_UVMultiplierLandScape");
        PropertyID_UVMultiplierPortrait = Shader.PropertyToID("_UVMultiplierPortrait");
        PropertyID_UVFlip = Shader.PropertyToID("_UVFlip");
        PropertyID_OnWide = Shader.PropertyToID("_OnWide");
        PropertyID_StencilTex = Shader.PropertyToID("_StencilTex");
    }

    public void Draw(Texture cameraFeed)
    {
        _material.mainTexture = cameraFeed;
        Graphics.DrawTexture(new Rect(0, 0, _camera.pixelWidth, _camera.pixelHeight), cameraFeed, _material);
    }

    public void SetMaterialProperty(Texture humanStencilTexture)
    {
        if (Input.deviceOrientation == DeviceOrientation.LandscapeRight)
        {
            _material.SetFloat(PropertyID_UVMultiplierLandScape, CalculateUVMultiplierLandScape(humanStencilTexture));
            _material.SetFloat(PropertyID_UVFlip, 0);
            _material.SetInt(PropertyID_OnWide, 1);
        }
        else if (Input.deviceOrientation == DeviceOrientation.LandscapeLeft)
        {
            _material.SetFloat(PropertyID_UVMultiplierLandScape, CalculateUVMultiplierLandScape(humanStencilTexture));
            _material.SetFloat(PropertyID_UVFlip, 1);
            _material.SetInt(PropertyID_OnWide, 1);
        }
        else
        {
            _material.SetFloat(PropertyID_UVMultiplierPortrait, CalculateUVMultiplierPortrait(humanStencilTexture));
            _material.SetInt(PropertyID_OnWide, 0);
        }

        _material.SetTexture(PropertyID_StencilTex, humanStencilTexture);
    }

    private float CalculateUVMultiplierLandScape(Texture textureFromAROcclusionManager)
    {
        float screenAspect = (float) Screen.width / Screen.height;
        float cameraTextureAspect = (float) textureFromAROcclusionManager.width / textureFromAROcclusionManager.height;
        return screenAspect / cameraTextureAspect;
    }

    private float CalculateUVMultiplierPortrait(Texture textureFromAROcclusionManager)
    {
        float screenAspect = (float) Screen.height / Screen.width;
        float cameraTextureAspect = (float) textureFromAROcclusionManager.width / textureFromAROcclusionManager.height;
        return screenAspect / cameraTextureAspect;
    }
}
今回は、残像を4フレーム間隔にし、10個の残像を作っています。
なので、全部で37個分のカメラ画像及びhumanStencilTextureのバッファを用意します。
private const int NUM_OF_IMAGES = 10;
private const int FRAME_OF_INTERVAL = 4;

for (int i = 0; i < (NUM_OF_IMAGES - 1) * FRAME_OF_INTERVAL + 1; i++)
{
    _cameraFeedBuffers.Add(new RenderTexture(_camera.pixelWidth, _camera.pixelHeight, 0));
    _stencilBuffers.Add(new RenderTexture(resolution.Item1, resolution.Item2, 0));
}
カメラ画像バッファの更新
カメラ画像のバッファは、同じ大きさのRenderTextureを作成し、それに各フレームのカメラ画像をコピーしていきます。
Graphics.Blit(Texture source, RenderTexture dest)でコピーし、バッファ内でスライドさせていく形で、毎フレームバッファを更新します。
for (int i = 0; i < _cameraFeedBuffers.Count - 1; i++)
{
    Graphics.Blit(_cameraFeedBuffers[i + 1], _cameraFeedBuffers[i]);
}
ただし、最新のバッファは現在のフレームのカメラ画像をコピーするためにCommandBufferを使います。
_commandBuffer = new CommandBuffer();
_commandBuffer.Blit(null, _cameraFeedBuffers.Last());
_camera.AddCommandBuffer(CameraEvent.AfterForwardOpaque, _commandBuffer);
CommandBufferは、レンダリングパイプラインの任意のタイミングに命令を積んでおけるもので、今回はCameraEvent.AfterForwardOpaque(不透明オブジェクトの描画後)のタイミングで、Blitを実行するようにしています。
Blitの第一引数のsourceにnullを入れると、現在スクリーンに描画されているものがsourceとなって、第二引数のdestにコピーされます。
ここで、CameraEvent.AfterForwardOpaqueにしているのがミソで、ARFoundationのARCameraBackgroundというクラスのソースコードを読むと、カメラ画像をスクリーンに描画する処理をCameraEvent.BeforeForwardOpaqueで行なっている(ForwardRenderingの場合)ことがわかったので、それより後のタイミングでスクリーンをBlitすれば、最新のカメラ画像がコピーできるということになります(描画するオブジェクトを何もシーンに置いていない場合)。
humanStencilTextureバッファの更新
まず、humanStencilTextureの解像度は、以下の3つがあり、AROcclusionManagerのhumanSegmentationStencilModeを選択することで、変更することができます(インスペクター上で変更できます)。解像度が高い=綺麗に表示されますが、当然メモリ等の負荷が上がります。今回はMediumの設定にしています。
private readonly (int, int)[] _humanStencilTextureResolution =
{
    (256, 192),  // Fastest
    (960, 720),  // Medium
    (1920, 1440) // Best
};

var resolution = (0, 0);
switch (_occlusionManager.humanSegmentationStencilMode)
{
    case SegmentationStencilMode.Fastest:
        resolution = _humanStencilTextureResolution[0];
        break;
    case SegmentationStencilMode.Medium:
        resolution = _humanStencilTextureResolution[1];
        break;
    case SegmentationStencilMode.Best:
        resolution = _humanStencilTextureResolution[2];
        break;
}
各解像度に合わせた適切な大きさのRenderTextureをバッファとして作成し、カメラ画像と同様にGraphics.Blitで毎フレーム更新します。
また、AROcclusionManagerから最新のhumanStencilTextureを取得できるので、最新のバッファには、それをコピーします。
var humanStencil = _occlusionManager.humanStencilTexture;
if (humanStencil)
{
    for (int i = 0; i < _stencilBuffers.Count - 1; i++)
    {
        Graphics.Blit(_stencilBuffers[i + 1], _stencilBuffers[i]);
    }
    Graphics.Blit(humanStencil, _stencilBuffers.Last());
}
カメラ画像とhumanStencilTextureで残像を描画する
さて、ついに残像の描画ですが、コード的には以下の部分になります。
private void OnGUI()
{
    if (Event.current.type.Equals(EventType.Repaint))
    {
        for (int i = 0; i < _afterImages.Count; i++)
        {
            _afterImages[i].Draw(_cameraFeedBuffers[i * FRAME_OF_INTERVAL]);
        }
    }
}
public void Draw(Texture cameraFeed)
{
    _material.mainTexture = cameraFeed;
    Graphics.DrawTexture(new Rect(0, 0, _camera.pixelWidth, _camera.pixelHeight), cameraFeed, _material);
}
Graphics.DrawTexture(Rect screenRect, Texture texture, Material mat = null)は、描画する位置とサイズ、Texture、使用するMaterialを指定して、直接スクリーンに描画することができます。
今回は、スクリーン全面に、カメラ画像を、特別なshader(後述)のMaterialで描画して一個一個の残像を作ります。
ちなみに、Graphics.DrawTextureは、OnGUI()の中のEvent.current.type.Equals(EventType.Repaint)の中で呼び出す必要があるそうです。
では、shaderの説明に入りましょう。まずコード全文を載せます。
Shader "HumanSegmentation/AfterImage"
{
    SubShader
    {
        Cull Off ZWrite Off ZTest Always

        Pass
        {
            CGPROGRAM
            #pragma vertex vert
            #pragma fragment frag
            #include "UnityCG.cginc"

            struct appdata
            {
                float4 vertex : POSITION;
                float2 uv : TEXCOORD0;
            };

            struct v2f
            {
                float2 uv : TEXCOORD0;
                float2 uv1 : TEXCOORD1;
                float2 uv2 : TEXCOORD2;
                float4 vertex : SV_POSITION;
            };

            sampler2D _MainTex;
            sampler2D _StencilTex;
            float _UVMultiplierLandScape;
            float _UVMultiplierPortrait;
            float _UVFlip;
            int _OnWide;

            v2f vert (appdata v)
            {
                v2f o;
                o.vertex = UnityObjectToClipPos(v.vertex);
                o.uv = v.uv;
                if(_OnWide == 1)
                {
                    o.uv1 = float2(v.uv.x, (1.0 - (_UVMultiplierLandScape * 0.5f)) + (v.uv.y / _UVMultiplierLandScape));
                    o.uv2 = float2(lerp(1.0 - o.uv1.x, o.uv1.x, _UVFlip), lerp(o.uv1.y, 1.0 - o.uv1.y, _UVFlip));
                }
                else
                {
                    o.uv1 = float2(1.0 - v.uv.y, 1.0 - _UVMultiplierPortrait * 0.5f + v.uv.x / _UVMultiplierPortrait);
                    float2 forMask = float2((1.0 - (_UVMultiplierPortrait * 0.5f)) + (v.uv.x / _UVMultiplierPortrait), v.uv.y);
                    o.uv2 = float2(lerp(1.0 - forMask.y, forMask.y, 0), lerp(forMask.x, 1.0 - forMask.x, 1));
                }
                return o;
            }

            fixed4 frag (v2f i) : SV_Target
            {
                fixed4 col = tex2D(_MainTex, i.uv);
                float stencilCol = tex2D(_StencilTex, i.uv2);
                if (stencilCol < 1) {
                    discard;
                }
                return col;
            }
            ENDCG
        }
    }
}
複雑に見えるのは、_StencilTexのUV調整をしている部分だけで、あとは至ってシンプルです。一つ一つ説明していきましょう。
まず、プロパティは以下の通りで、_MainTexにはカメラ画像、_StencilTexにはhumanStencilTextureが入ります。残りはUV調整のためのパラメータです。
sampler2D _MainTex;
sampler2D _StencilTex;
float _UVMultiplierLandScape;
float _UVMultiplierPortrait;
float _UVFlip;
int _OnWide;
UV調整については後述するとして、人間の体だけを描画する実装は以下の部分です。
stencilColには、人間の体があるピクセルには1、ないピクセルには0が入ります。(floatを指定すると前詰め、つまりrgbaのrの値のみが入る)
よって、stencilCol < 1であればdiscard=描画しないようにすれば、カメラ画像のうち人間の体に値する部分だけ描画されることになります。
これで、過去のあるフレームのカメラ画像とhumanStencilTextureをこのshaderに渡せば、残像を描画することができます。
fixed4 frag (v2f i) : SV_Target
{
    fixed4 col = tex2D(_MainTex, i.uv);
    float stencilCol = tex2D(_StencilTex, i.uv2);
    if (stencilCol < 1) {
        discard;
    }
    return col;
}
では、UV調整の説明をしましょう。
UV調整が必要な理由は、冒頭にあげたサンプルシーンの画像のように、humanStencilTextureのアスペクト比及び向きがスクリーンと異なるので、それを合わせてあげる必要があるからです。
以下のUV調整コードは、このフォーラムであげられていたコードをそのまま持ってきたものです。
if(_OnWide == 1)
{
    o.uv1 = float2(v.uv.x, (1.0 - (_UVMultiplierLandScape * 0.5f)) + (v.uv.y / _UVMultiplierLandScape));
    o.uv2 = float2(lerp(1.0 - o.uv1.x, o.uv1.x, _UVFlip), lerp(o.uv1.y, 1.0 - o.uv1.y, _UVFlip));
}
else
{
    o.uv1 = float2(1.0 - v.uv.y, 1.0 - _UVMultiplierPortrait * 0.5f + v.uv.x / _UVMultiplierPortrait);
    float2 forMask = float2((1.0 - (_UVMultiplierPortrait * 0.5f)) + (v.uv.x / _UVMultiplierPortrait), v.uv.y);
    o.uv2 = float2(lerp(1.0 - forMask.y, forMask.y, 0), lerp(forMask.x, 1.0 - forMask.x, 1));
}
各プロパティへの値の代入は、以下で行なっています(こちらも同様にフォーラムから持ってきたコードを改変)。
public void SetMaterialProperty(Texture humanStencilTexture)
{
    if (Input.deviceOrientation == DeviceOrientation.LandscapeRight)
    {
        _material.SetFloat(PropertyID_UVMultiplierLandScape, CalculateUVMultiplierLandScape(humanStencilTexture));
        _material.SetFloat(PropertyID_UVFlip, 0);
        _material.SetInt(PropertyID_OnWide, 1);
    }
    else if (Input.deviceOrientation == DeviceOrientation.LandscapeLeft)
    {
        _material.SetFloat(PropertyID_UVMultiplierLandScape, CalculateUVMultiplierLandScape(humanStencilTexture));
        _material.SetFloat(PropertyID_UVFlip, 1);
        _material.SetInt(PropertyID_OnWide, 1);
    }
    else
    {
        _material.SetFloat(PropertyID_UVMultiplierPortrait, CalculateUVMultiplierPortrait(humanStencilTexture));
        _material.SetInt(PropertyID_OnWide, 0);
    }

    _material.SetTexture(PropertyID_StencilTex, humanStencilTexture);
}

private float CalculateUVMultiplierLandScape(Texture textureFromAROcclusionManager)
{
    float screenAspect = (float) Screen.width / Screen.height;
    float cameraTextureAspect = (float) textureFromAROcclusionManager.width / textureFromAROcclusionManager.height;
    return screenAspect / cameraTextureAspect;
}

private float CalculateUVMultiplierPortrait(Texture textureFromAROcclusionManager)
{
    float screenAspect = (float) Screen.height / Screen.width;
    float cameraTextureAspect = (float) textureFromAROcclusionManager.width / textureFromAROcclusionManager.height;
    return screenAspect / cameraTextureAspect;
}
UV調整のコードの仕組みは聞かないでください(笑)
横向きにも縦向きにも対応しています(先人さまさまです)。
また、今回は使用していないですが、uv1はARFoundationから直接取得するカメラ画像のUVをスクリーンと合わせる時に使用します。
では最後に、残像のマテリアルを設定しているコードを示して説明を終わります。
毎フレーム、残像を描画するクラスAfterImageにhumanStencilTextureとカメラ画像を渡して、マテリアルの設定とTextureの描画を行なっています。
private void Awake()
{
    _camera = GetComponent<Camera>();
    for (int i = 0; i < NUM_OF_IMAGES; i++)
    {
        _afterImages.Add(new AfterImage(_camera, new Material(_shader)));
    }
}

private void OnRenderImage(RenderTexture src, RenderTexture dest)
{
    var humanStencil = _occlusionManager.humanStencilTexture;
    if (humanStencil)
    {
        for (int i = 0; i < _afterImages.Count; i++)
        {
            _afterImages[i].SetMaterialProperty(_stencilBuffers[i * FRAME_OF_INTERVAL]);
        }
    }
}

private void OnGUI()
{
    if (Event.current.type.Equals(EventType.Repaint))
    {
        for (int i = 0; i < _afterImages.Count; i++)
        {
            _afterImages[i].Draw(_cameraFeedBuffers[i * FRAME_OF_INTERVAL]);
        }
    }
}
おわりに
今回は、ARFoundationで残像ARエフェクトを作りましたが、とりあえず作ってみたという段階で、もっと最適化の余地はあるかと思います。
例えばメモリに関して、今回残像を作るにあたって大量のTextureを保持していますが、調子乗って増やしすぎると1.5GB超えたぐらいで落ちます。
一応調べてみると、
| Texture | 解像度 | メモリ(MB) |
|---|---|---|
| カメラ画像 | 1125×2436 | 10.45 |
| humanStencilTexture | 256×192 | 0.19 |
| humanStencilTexture | 960×720 | 2.64 |
| humanStencilTexture | 1920×1440 | 10.55 |
ほどあり、加えてBufferなし状態で300MBぐらい使っていました。
また、残像の綺麗さに関しても、同じエフェクトを実装してあるMEISAIと比べると、汚い部分が目立つので、もっと良い実装方法があるのかもしれません。
ぜひ、改善点などに気がついたら、コメントで教えていただけると幸いです!
以上!