はじめに
こんにちは、XR系Unityエンジニアのやうです。Twitterはこちら
随分前に、Twitterで以下のデモを見てから、「俺もiPhone11買ったら実装するで!」と思っていて、
最近やっと買えたので、色々作り方を検索したものの、以外にも見つけられなかったので、自分で書くことにしました。
Some ARKit 3 body segmentation experiments pic.twitter.com/BgltTbglKu
— Laan Labs (@laanlabs) June 13, 2019
今回作るもの
今回は、動きに残像が追従してくるパターンと、その場に残存するパターンの2つを作ります。
本記事では、残存編の解説をするので、追従編の解説を見たい場合は、こちらのリンクからお願いします。
追従編

残存編
今回のサンプルのリポジトリはこちらです。
https://github.com/YoHana19/HumanAfterImageEffect
環境
- Unity2019.2.18f1
- ForwardRendering (SRPではない)
- AR Foundation preview.3 - 3.1.0
- ARKit XR Plugin preview.2 - 3.1.0
- Xcode 11.3.1
- iPhone 11 pro (iOS 13.3.1)
UnityでARKit3のHumanSegmentationを利用する
Unity-Technologies社がARFoundationのサンプルを公開しているので、その中のHumanSegmentationImagesというサンプルシーンを改変していきます。
サンプルシーンの細い説明は他の記事にお任せして、今回の実装の概要を説明します。
サンプルを実機で起動すると、以下のように人間の体の部分だけ赤く塗られた画像が表示されます。これがhumanStencilTextureとして取得できます。
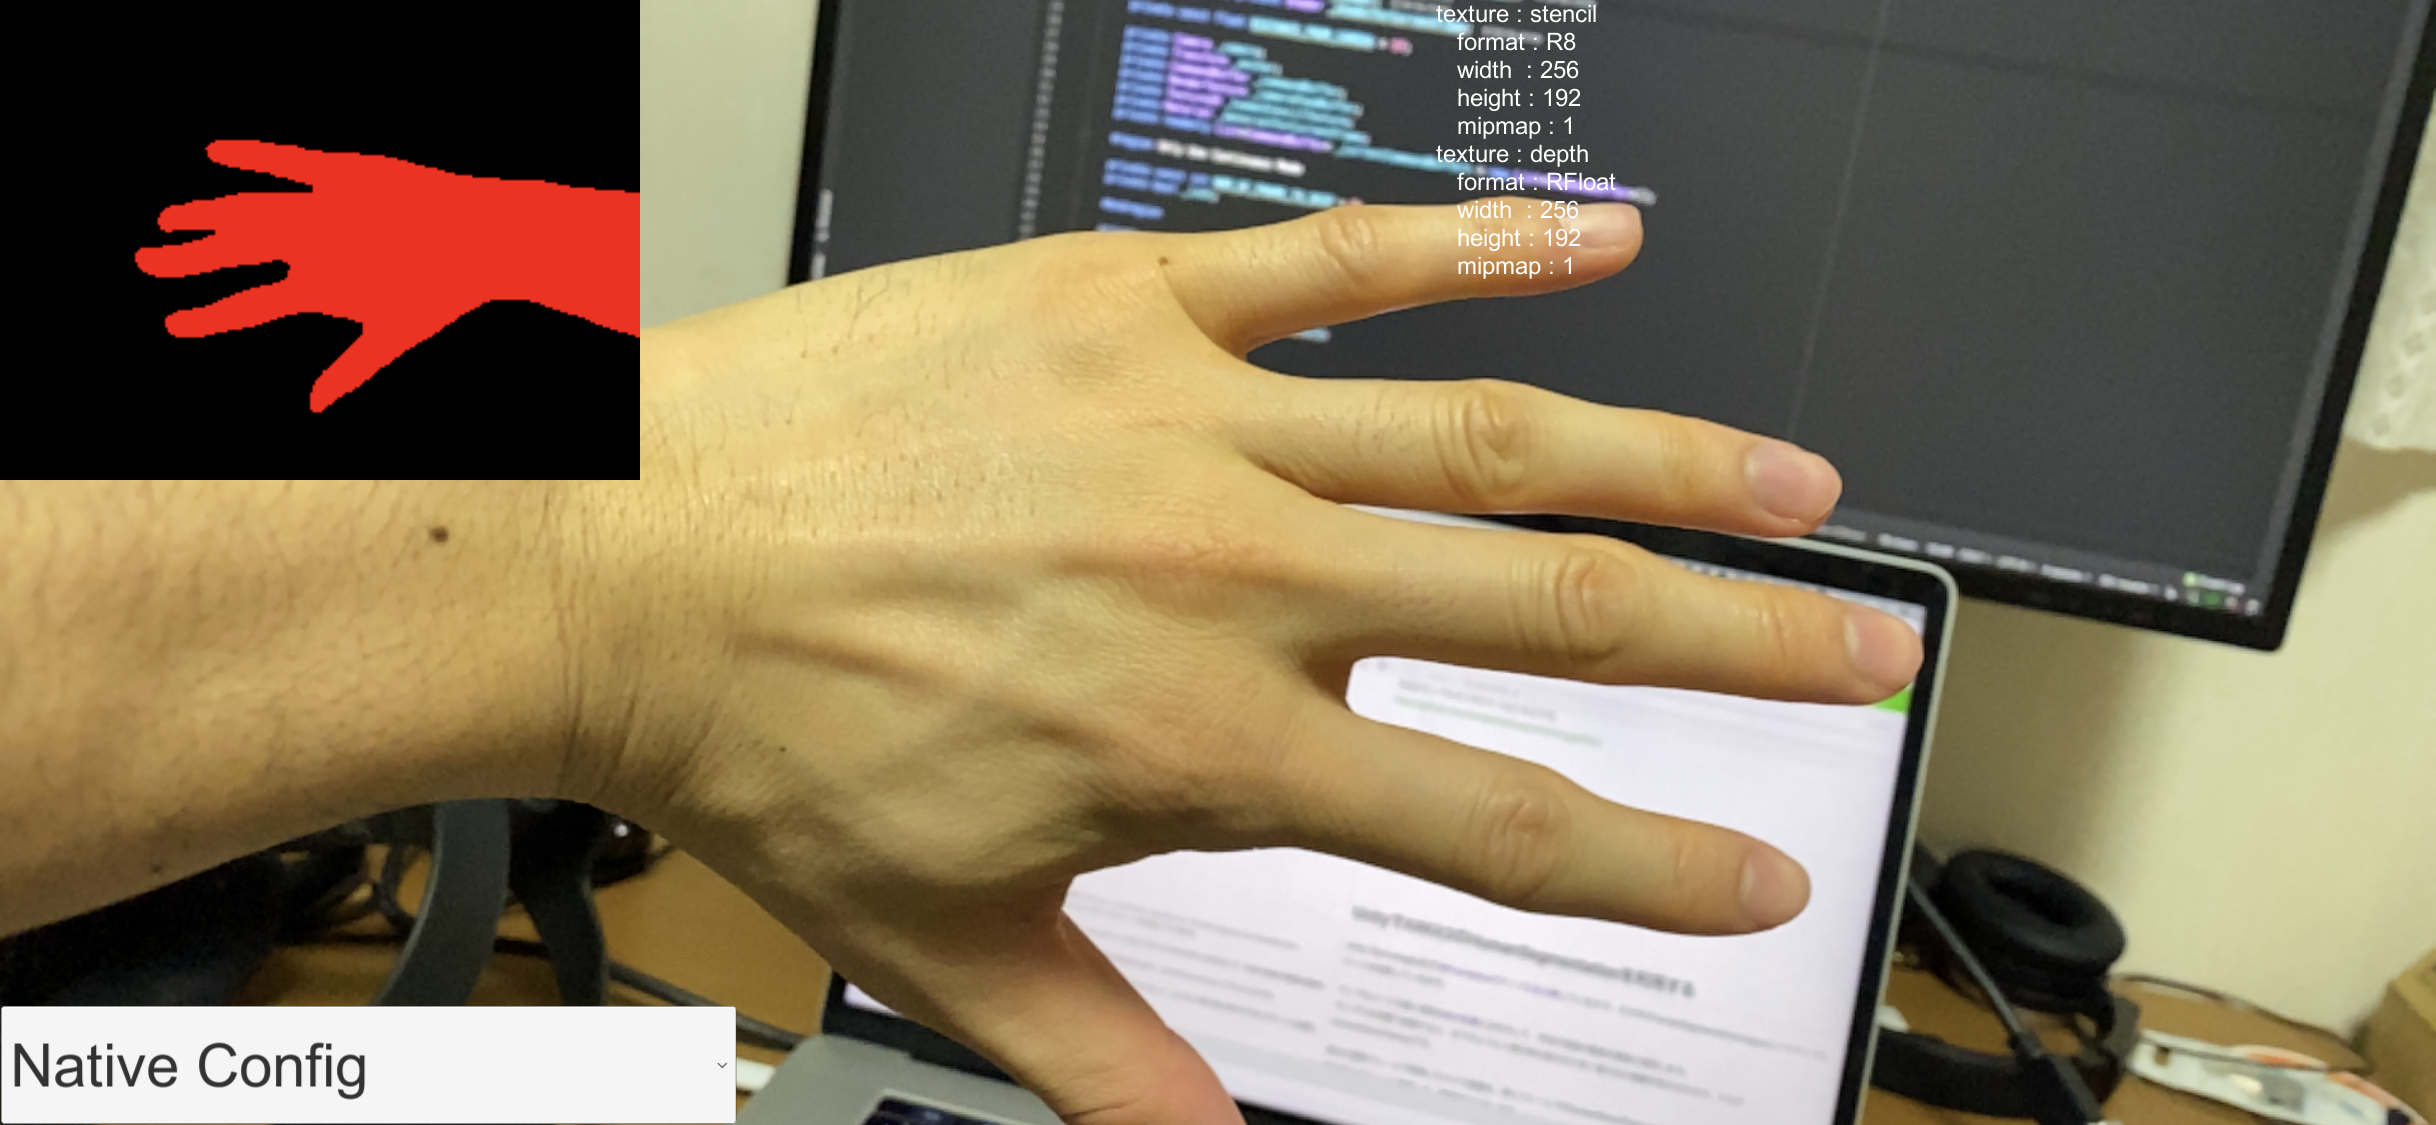
任意のフレームで取得したカメラ画像を、同フレームのhumanStencilTextureでマスクして、ちょうど人間の体の部分だけをスクリーンに描画することで、残像を生み出します。
CommandBufferを使って板ポリに残像を描画する
今回の実装では、残像の生成の流れは以下のようになります。
- 画面タップ
- その瞬間のカメラ画像と
humanStencilTextureをコピーして、特別なshader(後述)のMaterialに渡す -
CommandBufferを使って、QuadのMeshを2で生成したMaterialで一定の位置に描画することで、shaderによって人間の体の部分だけが描画され、残像ができる。
まずは、コード全文を載せます。
using System;
using System.Collections;
using System.Collections.Generic;
using UnityEngine;
using UnityEngine.Rendering;
using UnityEngine.UI;
using UnityEngine.XR.ARFoundation;

[RequireComponent(typeof(Camera))]
public class RemainableAfterImagePostEffect : MonoBehaviour
{
    private enum RemainableAfterImageEffectMode
    {
        Intermittent = 0,
        Continuous
    }

    [SerializeField] private RemainableAfterImageEffectMode _mode;
    [SerializeField] private AROcclusionManager _occlusionManager;
    [SerializeField] private Mesh _quadMesh;
    [SerializeField] private Shader _shader;
    [SerializeField] private Shader _shaderForCurrentFrame;

    private const float DISTANCE_FROM_CAMERA = 1f;

    private Camera _camera;
    private Transform _anchor;
    private CommandBuffer _commandBuffer;
    private RenderTexture _cameraFeedBuffer;
    private Texture2D _humanStencilTexture;
    private Material _materialForCurrentFrame;
    private readonly List<CommandBuffer> _currentCommandBuffers = new List<CommandBuffer>();

    #region Only Use Continuous Mode
    private const int NUM_OF_FRAME_TO_SKIP = 8;
    private bool _isOn;
    #endregion

    private int PropertyID_UVMultiplierLandScape;
    private int PropertyID_UVMultiplierPortrait;
    private int PropertyID_UVFlip;
    private int PropertyID_OnWide;
    private int PropertyID_StencilTex;
    private int PropertyID_CameraFeedTexture;

    private void Awake()
    {
        _camera = GetComponent<Camera>();

        _anchor = new GameObject("Draw Mesh Anchor").transform;
        _anchor.SetParent(_camera.transform);
        _anchor.localPosition = new Vector3(0, 0, DISTANCE_FROM_CAMERA);

        PropertyID_UVMultiplierLandScape = Shader.PropertyToID("_UVMultiplierLandScape");
        PropertyID_UVMultiplierPortrait = Shader.PropertyToID("_UVMultiplierPortrait");
        PropertyID_UVFlip = Shader.PropertyToID("_UVFlip");
        PropertyID_OnWide = Shader.PropertyToID("_OnWide");
        PropertyID_StencilTex = Shader.PropertyToID("_StencilTex");
        PropertyID_CameraFeedTexture = Shader.PropertyToID("_CameraFeedTexture");

        _cameraFeedBuffer = new RenderTexture(_camera.pixelWidth, _camera.pixelHeight, 0);
        _commandBuffer = new CommandBuffer();
        _commandBuffer.Blit(null, _cameraFeedBuffer);
        _camera.AddCommandBuffer(CameraEvent.AfterForwardOpaque, _commandBuffer);

        _materialForCurrentFrame = new Material(_shaderForCurrentFrame);
        _materialForCurrentFrame.SetTexture(PropertyID_CameraFeedTexture, _cameraFeedBuffer);
    }

    private void Update()
    {
        if (Input.touchCount > 0)
        {
            Touch touch = Input.GetTouch(0);

            if (touch.phase == TouchPhase.Began)
            {
                switch (_mode)
                {
                    case RemainableAfterImageEffectMode.Intermittent:
                        SetCommandToDraw();
                        break;
                    case RemainableAfterImageEffectMode.Continuous:
                        _isOn = true;
                        StartCoroutine(CreateAfterImageContinuously());
                        break;
                }
            }

            if (touch.phase == TouchPhase.Ended)
            {
                switch (_mode)
                {
                    case RemainableAfterImageEffectMode.Continuous:
                        _isOn = false;
                        break;
                }
            }
        }
    }

    private void OnRenderImage(RenderTexture src, RenderTexture dest)
    {
        _humanStencilTexture = _occlusionManager.humanStencilTexture;
        if (_humanStencilTexture)
        {
            // デバイスの向きが変わった時用
            if (_cameraFeedBuffer.width != _camera.pixelWidth)
            {
                ReInitCameraFeedBuffer();
            }

            SetMaterialProperty(_materialForCurrentFrame, false);
            Graphics.Blit(src, dest, _materialForCurrentFrame);
        }
        else
        {
            Graphics.Blit(src, dest);
        }
    }

    private void SetCommandToDraw()
    {
        var command = new CommandBuffer();
        var material = new Material(_shader);
        var cameraFeed = new RenderTexture(_camera.pixelWidth, _camera.pixelHeight, 0);

        Graphics.Blit(_cameraFeedBuffer, cameraFeed);
        material.mainTexture = cameraFeed;
        SetMaterialProperty(material);

        command.DrawMesh(
            _quadMesh,
            Matrix4x4.TRS(_anchor.position, _anchor.rotation, GetMeshScale()),
            material, 0, 0);

        _camera.AddCommandBuffer(CameraEvent.AfterForwardAlpha, command);
        _currentCommandBuffers.Add(command);
    }

    private IEnumerator CreateAfterImageContinuously()
    {
        while (_isOn)
        {
            SetCommandToDraw();
            for (int i = 0; i < NUM_OF_FRAME_TO_SKIP; i++)
            {
                yield return null;
            }
        }
    }

    private Vector3 GetMeshScale()
    {
        var pointTop = _camera.ScreenToWorldPoint(new Vector3(0, 0, DISTANCE_FROM_CAMERA));
        var pointBottom = _camera.ScreenToWorldPoint(new Vector3(0, _camera.pixelHeight, DISTANCE_FROM_CAMERA));
        var frustumHeight = Vector3.Distance(pointTop, pointBottom);
        return new Vector3(frustumHeight * _camera.aspect, frustumHeight, 1);
    }

    private void SetMaterialProperty(Material mat, bool shouldCopy = true)
    {
        if (_humanStencilTexture)
        {
            if (Input.deviceOrientation == DeviceOrientation.LandscapeRight)
            {
                mat.SetFloat(PropertyID_UVMultiplierLandScape, CalculateUVMultiplierLandScape(_humanStencilTexture));
                mat.SetFloat(PropertyID_UVFlip, 0);
                mat.SetInt(PropertyID_OnWide, 1);
            }
            else if (Input.deviceOrientation == DeviceOrientation.LandscapeLeft)
            {
                mat.SetFloat(PropertyID_UVMultiplierLandScape, CalculateUVMultiplierLandScape(_humanStencilTexture));
                mat.SetFloat(PropertyID_UVFlip, 1);
                mat.SetInt(PropertyID_OnWide, 1);
            }
            else
            {
                mat.SetFloat(PropertyID_UVMultiplierPortrait, CalculateUVMultiplierPortrait(_humanStencilTexture));
                mat.SetInt(PropertyID_OnWide, 0);
            }

            if (shouldCopy)
            {
                var humanStencil = new RenderTexture(_humanStencilTexture.width, _humanStencilTexture.height, 0);
                Graphics.Blit(_humanStencilTexture, humanStencil);
                mat.SetTexture(PropertyID_StencilTex, humanStencil);
            }
            else
            {
                mat.SetTexture(PropertyID_StencilTex, _humanStencilTexture);
            }
        }
    }

    private float CalculateUVMultiplierLandScape(Texture2D cameraTexture)
    {
        float screenAspect = (float) Screen.width / Screen.height;
        float cameraTextureAspect = (float) cameraTexture.width / cameraTexture.height;
        return screenAspect / cameraTextureAspect;
    }

    private float CalculateUVMultiplierPortrait(Texture2D cameraTexture)
    {
        float screenAspect = (float) Screen.height / Screen.width;
        float cameraTextureAspect = (float) cameraTexture.width / cameraTexture.height;
        return screenAspect / cameraTextureAspect;
    }

    public void Clear()
    {
        _isOn = false;
        StopCoroutine(CreateAfterImageContinuously());
        foreach (var command in _currentCommandBuffers)
        {
            _camera.RemoveCommandBuffer(CameraEvent.AfterForwardAlpha, command);
        }

        _currentCommandBuffers.Clear();
        Resources.UnloadUnusedAssets();
    }

    public void ChangeMode(Dropdown dropdown)
    {
        Clear();
        _mode = (RemainableAfterImageEffectMode) Enum.ToObject(typeof(RemainableAfterImageEffectMode), dropdown.value);
    }

    private void ReInitCameraFeedBuffer()
    {
        _commandBuffer.Clear();
        _camera.RemoveCommandBuffer(CameraEvent.AfterForwardOpaque, _commandBuffer);
        _cameraFeedBuffer.Release();

        _cameraFeedBuffer = new RenderTexture(_camera.pixelWidth, _camera.pixelHeight, 0);
        _commandBuffer.Blit(null, _cameraFeedBuffer);
        _camera.AddCommandBuffer(CameraEvent.AfterForwardOpaque, _commandBuffer);

        _materialForCurrentFrame.SetTexture(PropertyID_CameraFeedTexture, _cameraFeedBuffer);
    }
}
板ポリの描画
順番は前後しますが、まずはCommandBufferを使って、板ポリを描画する所の説明をします。
CommandBufferは、レンダリングパイプラインの任意のタイミングに命令を積んでおけるもので、今回はCameraEvent.AfterForwardAlpha(透明オブジェクトの描画後)のタイミングで、板ポリを描画する処理を実行します。
CommandBuffer.DrawMesh (Mesh mesh, Matrix4x4 matrix, Material material, int submeshIndex, int shaderPass, MaterialPropertyBlock properties = null)を使うと、任意のMeshを任意の位置・回転・スケール(Matrix4x4で指定)、任意のMaterialでスクリーンに直接描画することができます。
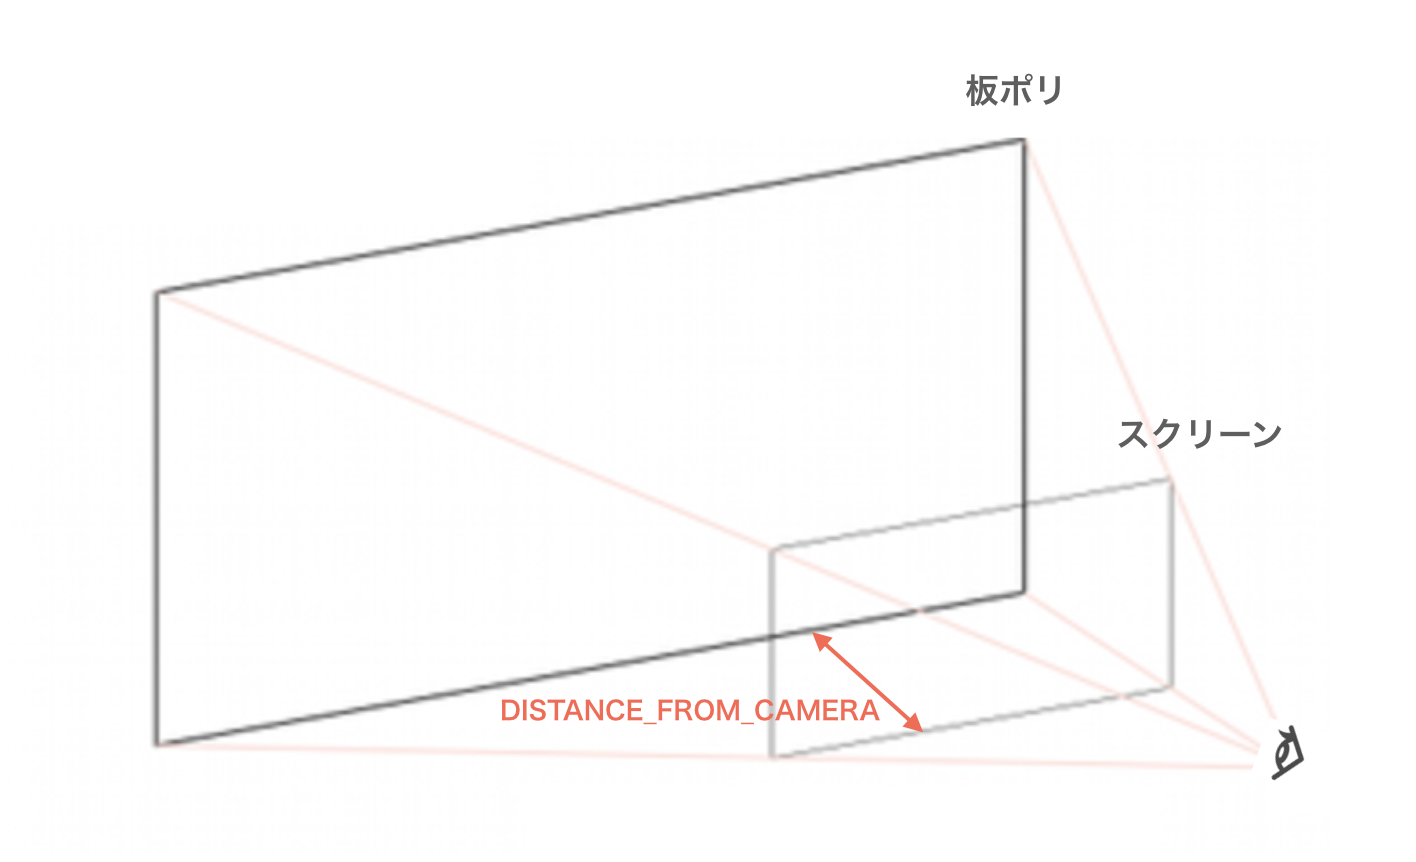
今回は、板ポリ(Quad)をカメラ前方、DISTANCE_FROM_CAMERA分だけ離れた位置に描画します。
以下の実装のように、最初に指定の位置に空オブジェクトをカメラの子として生成しておけば、カメラの位置や回転がランタイムでどう変化しても、そのオブジェクトのWorldPosition, Rotationを参照して、常にカメラから一定距離でこちらに正面を向けた板ポリを描画することができます。
private const float DISTANCE_FROM_CAMERA = 1f;

private void Awake()
{
    _camera = GetComponent<Camera>();

    // Meshの作成位置(カメラの前方、DISTANCE_FROM_CAMERA分だけ離れた位置)
    _anchor = new GameObject("Draw Mesh Anchor").transform;
    _anchor.SetParent(_camera.transform);
    _anchor.localPosition = new Vector3(0, 0, DISTANCE_FROM_CAMERA);
}

private void SetCommandToDraw()
{
    var command = new CommandBuffer();
    var material = new Material(_shader);
    var cameraFeed = new RenderTexture(_camera.pixelWidth, _camera.pixelHeight, 0);

    Graphics.Blit(_cameraFeedBuffer, cameraFeed);
    material.mainTexture = cameraFeed;
    SetMaterialProperty(material);

    command.DrawMesh(
        _quadMesh, // QuadMeshを指定
        Matrix4x4.TRS(_anchor.position, _anchor.rotation, GetMeshScale()), // 位置・回転・スケールを指定
        material, // Materialを指定
        0, 0);

    _camera.AddCommandBuffer(CameraEvent.AfterForwardAlpha, command);
    _currentCommandBuffers.Add(command);
}
そして、今回ミソとなるのが板ポリのスケールです。
板ポリに描画するのは、タップした瞬間のカメラ画像(のうち人間の体の部分)です。なので、スクリーンと全く同じサイズに見えるスケールで板ポリを描画する必要があります。
最初は、カメラの視錐台の高さを求めて、スケールを取っていたのですが、それだとなぜか大きさが合わなかったので、以下のような実装になりました。
private Vector3 GetMeshScale()
{
    var pointTop = _camera.ScreenToWorldPoint(new Vector3(0, 0, DISTANCE_FROM_CAMERA));
    var pointBottom = _camera.ScreenToWorldPoint(new Vector3(0, _camera.pixelHeight, DISTANCE_FROM_CAMERA));
    var frustumHeight = Vector3.Distance(pointTop, pointBottom);
    return new Vector3(frustumHeight * _camera.aspect, frustumHeight, 1);
}
Camera.ScreenToWorldPoint(Vector3 position)は、positionのx, yにスクリーン座標(ピクセル単位)を入れ、zにカメラからの距離を入れると、cameraの視野角をうまいこと考慮して、その点のワールド座標を計算してくれます。
これを使って、カメラからDISTANCE_FROM_CAMERA分の距離のスクリーンの上端と下端のpositionを求め、その距離を出すことで、スケールを計算しています。
板ポリに残像を描画する
あとは、板ポリにカメラ画像とhumanStencilTextureを使って残像を描画するだけです。
まず、カメラ画像の取得方法ですが、これもCommandBufferを使います。
_cameraFeedBuffer = new RenderTexture(_camera.pixelWidth, _camera.pixelHeight, 0);
_commandBuffer = new CommandBuffer();
_commandBuffer.Blit(null, _cameraFeedBuffer);
_camera.AddCommandBuffer(CameraEvent.AfterForwardOpaque, _commandBuffer);
カメラ画像と同じ大きさのRenderTextureをバッファとして用意し、そこに現在のフレームのカメラ画像をCommandBuffer.Blitで毎フレームコピーします。
Blitの第一引数のsourceにnullを入れると、現在スクリーンに描画されているものがsourceとなって、第二引数のdestにコピーされます。
ここで、CommandBufferを積むタイミングをCameraEvent.AfterForwardOpaqueにしている理由は、カメラ画像をスクリーンに描画する処理(ARCameraBackgroundクラス参照のこと)がCameraEvent.BeforeForwardOpaqueで行われている(ForwardRenderingの場合)ので、それより後のタイミングでスクリーンをBlitすれば、最新のカメラ画像がコピーできるためです(描画するオブジェクトを何もシーンに置いていない場合)。
次に、humanStencilTextureの取得ですが、これはAROcclusionManagerから取得できます。
[SerializeField] private AROcclusionManager _occlusionManager;

_humanStencilTexture = _occlusionManager.humanStencilTexture;
あとは、毎フレーム更新されるカメラ画像とhumanStencilTextureを、任意のタイミングにGraphics.Blit(Texture source, RenderTexture dest)でコピーし、特別なshaderのMaterialに渡します。
Graphics.Blit(_cameraFeedBuffer, cameraFeed);
material.mainTexture = cameraFeed;

var humanStencil = new RenderTexture(_humanStencilTexture.width, _humanStencilTexture.height, 0);
Graphics.Blit(_humanStencilTexture, humanStencil);
mat.SetTexture(PropertyID_StencilTex, humanStencil);
それをもらって、shaderが人間の体だけを描画する処理をします。
コード全文をまず載せます。
Shader "HumanSegmentation/AfterImage"
{
    SubShader
    {
        Cull Off ZWrite Off ZTest Always

        Pass
        {
            CGPROGRAM
            #pragma vertex vert
            #pragma fragment frag
            #include "UnityCG.cginc"

            struct appdata
            {
                float4 vertex : POSITION;
                float2 uv : TEXCOORD0;
            };

            struct v2f
            {
                float2 uv : TEXCOORD0;
                float2 uv1 : TEXCOORD1;
                float2 uv2 : TEXCOORD2;
                float4 vertex : SV_POSITION;
            };

            sampler2D _MainTex;
            sampler2D _StencilTex;
            float _UVMultiplierLandScape;
            float _UVMultiplierPortrait;
            float _UVFlip;
            int _OnWide;

            v2f vert (appdata v)
            {
                v2f o;
                o.vertex = UnityObjectToClipPos(v.vertex);
                o.uv = v.uv;
                // UV調整
                if(_OnWide == 1)
                {
                    o.uv1 = float2(v.uv.x, (1.0 - (_UVMultiplierLandScape * 0.5f)) + (v.uv.y / _UVMultiplierLandScape));
                    o.uv2 = float2(lerp(1.0 - o.uv1.x, o.uv1.x, _UVFlip), lerp(o.uv1.y, 1.0 - o.uv1.y, _UVFlip));
                }
                else
                {
                    o.uv1 = float2(1.0 - v.uv.y, 1.0 - _UVMultiplierPortrait * 0.5f + v.uv.x / _UVMultiplierPortrait);
                    float2 forMask = float2((1.0 - (_UVMultiplierPortrait * 0.5f)) + (v.uv.x / _UVMultiplierPortrait), v.uv.y);
                    o.uv2 = float2(lerp(1.0 - forMask.y, forMask.y, 0), lerp(forMask.x, 1.0 - forMask.x, 1));
                }
                return o;
            }

            fixed4 frag (v2f i) : SV_Target
            {
                fixed4 col = tex2D(_MainTex, i.uv);
                float stencilCol = tex2D(_StencilTex, i.uv2);
                if (stencilCol < 1) {
                    discard;
                }
                return col;
            }
            ENDCG
        }
    }
}
複雑に見えるのは、_StencilTexのUV調整をしている部分だけで、あとは至ってシンプルです。一つ一つ説明していきましょう。
まず、プロパティは以下の通りで、_MainTexにはカメラ画像、_StencilTexにはhumanStencilTextureが入ります。残りはUV調整のためのパラメータです。
sampler2D _MainTex;
sampler2D _StencilTex;
float _UVMultiplierLandScape;
float _UVMultiplierPortrait;
float _UVFlip;
int _OnWide;
UV調整については後述するとして、人間の体だけを描画する実装は以下の部分です。
stencilColには、人間の体があるピクセルには1、ないピクセルには0が入ります。(floatを指定すると前詰め、つまりrgbaのrの値のみが入る)
よって、stencilCol < 1であればdiscard=描画しないようにすれば、カメラ画像のうち人間の体に値する部分だけ描画されることになります。
これで、カメラ画像とhumanStencilTextureをこのshaderに渡せば、残像のみを描画することができます。
fixed4 frag (v2f i) : SV_Target
{
    fixed4 col = tex2D(_MainTex, i.uv);
    float stencilCol = tex2D(_StencilTex, i.uv2);
    if (stencilCol < 1) {
        discard;
    }
    return col;
}
では、UV調整の説明をしましょう。
UV調整が必要な理由は、冒頭にあげたサンプルシーンの画像のように、humanStencilTextureのアスペクト比及び向きがスクリーンと異なるので、それを合わせてあげる必要があるからです。
以下のUV調整コードは、このフォーラムであげられていたコードをそのまま持ってきたものです。
if(_OnWide == 1)
{
    o.uv1 = float2(v.uv.x, (1.0 - (_UVMultiplierLandScape * 0.5f)) + (v.uv.y / _UVMultiplierLandScape));
    o.uv2 = float2(lerp(1.0 - o.uv1.x, o.uv1.x, _UVFlip), lerp(o.uv1.y, 1.0 - o.uv1.y, _UVFlip));
}
else
{
    o.uv1 = float2(1.0 - v.uv.y, 1.0 - _UVMultiplierPortrait * 0.5f + v.uv.x / _UVMultiplierPortrait);
    float2 forMask = float2((1.0 - (_UVMultiplierPortrait * 0.5f)) + (v.uv.x / _UVMultiplierPortrait), v.uv.y);
    o.uv2 = float2(lerp(1.0 - forMask.y, forMask.y, 0), lerp(forMask.x, 1.0 - forMask.x, 1));
}
各プロパティへの値の代入は、以下で行なっています(こちらも同様にフォーラムから持ってきたコードを改変)。
private void SetMaterialProperty(Material mat, bool shouldCopy = true)
{
    if (_humanStencilTexture)
    {
        if (Input.deviceOrientation == DeviceOrientation.LandscapeRight)
        {
            mat.SetFloat(PropertyID_UVMultiplierLandScape, CalculateUVMultiplierLandScape(_humanStencilTexture));
            mat.SetFloat(PropertyID_UVFlip, 0);
            mat.SetInt(PropertyID_OnWide, 1);
        }
        else if (Input.deviceOrientation == DeviceOrientation.LandscapeLeft)
        {
            mat.SetFloat(PropertyID_UVMultiplierLandScape, CalculateUVMultiplierLandScape(_humanStencilTexture));
            mat.SetFloat(PropertyID_UVFlip, 1);
            mat.SetInt(PropertyID_OnWide, 1);
        }
        else
        {
            mat.SetFloat(PropertyID_UVMultiplierPortrait, CalculateUVMultiplierPortrait(_humanStencilTexture));
            mat.SetInt(PropertyID_OnWide, 0);
        }

        if (shouldCopy)
        {
            var humanStencil = new RenderTexture(_humanStencilTexture.width, _humanStencilTexture.height, 0);
            Graphics.Blit(_humanStencilTexture, humanStencil);
            mat.SetTexture(PropertyID_StencilTex, humanStencil);
        }
        else
        {
            mat.SetTexture(PropertyID_StencilTex, _humanStencilTexture);
        }
    }
}

private float CalculateUVMultiplierLandScape(Texture textureFromAROcclusionManager)
{
    float screenAspect = (float) Screen.width / Screen.height;
    float cameraTextureAspect = (float) textureFromAROcclusionManager.width / textureFromAROcclusionManager.height;
    return screenAspect / cameraTextureAspect;
}

private float CalculateUVMultiplierPortrait(Texture textureFromAROcclusionManager)
{
    float screenAspect = (float) Screen.height / Screen.width;
    float cameraTextureAspect = (float) textureFromAROcclusionManager.width / textureFromAROcclusionManager.height;
    return screenAspect / cameraTextureAspect;
}
UV調整のコードの仕組みは聞かないでください(笑)
横向きにも縦向きにも対応しています(先人さまさまです)。
また、今回は使用していないですが、uv1はARFoundationから直接取得するカメラ画像のUVをスクリーンと合わせる時に使用します。
さて、これで画面をタップしたら、その瞬間の人間の体を描画して空間に置いておくことができるようになりました。
最後にもう一工夫必要なので、その説明をします。
現在のカメラ映像の人間を最前面に持ってくる
以上までの実装だと、残像がカメラ映像よりも前面に描画されてしまうので、現在のカメラ映像の中の人間が隠されてしまいます。
それだとあまり良くないので、現在のフレームのカメラ画像の中の人間の体だけ最後に再描画するようにします。
private void Awake()
{
    _materialForCurrentFrame = new Material(_shaderForCurrentFrame);
    _materialForCurrentFrame.SetTexture(PropertyID_CameraFeedTexture, _cameraFeedBuffer);
}

private void OnRenderImage(RenderTexture src, RenderTexture dest)
{
    SetMaterialProperty(_materialForCurrentFrame, false);
    Graphics.Blit(src, dest, _materialForCurrentFrame);
}
Graphics.Blit(Texture source, RenderTexture dest, Material mat, int pass= -1)では、Materialを指定すると、sourceがそのMaterialの_MainTexプロパティに入り、Materialが適用されてdestに出力されます。
今回は、OnRenderImage(RenderTexture src, RenderTexture dest)の中で、スクリーンに_materialForCurrentFrameを適用していますが、このMaterialのshaderで、該当の処理をします。
まずコードの全文を載せます。
Shader "HumanSegmentation/AfterImageForCurrentFrame"
{
    Properties
    {
        _MainTex ("_MainTex", 2D) = "white" {}
    }
    SubShader
    {
        Cull Off ZWrite Off ZTest Always

        Pass
        {
            CGPROGRAM
            #pragma vertex vert
            #pragma fragment frag
            #include "UnityCG.cginc"

            struct appdata
            {
                float4 vertex : POSITION;
                float2 uv : TEXCOORD0;
            };

            struct v2f
            {
                float2 uv : TEXCOORD0;
                float2 uv1 : TEXCOORD1;
                float2 uv2 : TEXCOORD2;
                float4 vertex : SV_POSITION;
            };

            sampler2D _MainTex;
            sampler2D _StencilTex;
            sampler2D _CameraFeedTexture;
            float _UVMultiplierLandScape;
            float _UVMultiplierPortrait;
            float _UVFlip;
            int _OnWide;

            v2f vert (appdata v)
            {
                v2f o;
                o.vertex = UnityObjectToClipPos(v.vertex);
                o.uv = v.uv;
                if(_OnWide == 1)
                {
                    o.uv1 = float2(v.uv.x, (1.0 - (_UVMultiplierLandScape * 0.5f)) + (v.uv.y / _UVMultiplierLandScape));
                    o.uv2 = float2(lerp(1.0 - o.uv1.x, o.uv1.x, _UVFlip), lerp(o.uv1.y, 1.0 - o.uv1.y, _UVFlip));
                }
                else
                {
                    o.uv1 = float2(1.0 - v.uv.y, 1.0 - _UVMultiplierPortrait * 0.5f + v.uv.x / _UVMultiplierPortrait);
                    float2 forMask = float2((1.0 - (_UVMultiplierPortrait * 0.5f)) + (v.uv.x / _UVMultiplierPortrait), v.uv.y);
                    o.uv2 = float2(lerp(1.0 - forMask.y, forMask.y, 0), lerp(forMask.x, 1.0 - forMask.x, 1));
                }
                return o;
            }

            fixed4 frag (v2f i) : SV_Target
            {
                fixed4 screen = tex2D(_MainTex, i.uv);
                fixed4 cameraFeed = tex2D(_CameraFeedTexture, i.uv);
                float stencilCol = tex2D(_StencilTex, i.uv2);
                return lerp(screen, cameraFeed, stencilCol);
            }
            ENDCG
        }
    }
}
ほとんどHumanSegmentation_AfterImage.shaderと同じで、主な差分としては、_CameraFeedTextureプロパティが増えたのと、fragment関数の中身が少しだけ変わっていますが、仕組み自体はほとんど同じです。
sampler2D _CameraFeedTexture;

fixed4 frag (v2f i) : SV_Target
{
    fixed4 screen = tex2D(_MainTex, i.uv);
    fixed4 cameraFeed = tex2D(_CameraFeedTexture, i.uv);
    float stencilCol = tex2D(_StencilTex, i.uv2);
    return lerp(screen, cameraFeed, stencilCol);
}
lerp関数は、第三引数の値(0~1)に応じて、0だったら第一引数の値、1だったら第二引数の値、0.5だったらそれぞれ半々という感じに値を返してくれるものです。
今回stencilColは、人間の体があるピクセルに1、ないピクセルに0となるので、人間の体の部分だけカメラ画像を描画し、それ以外の部分はそのままスクリーン映像を描画する事になります。これによって、人間の体だけを最前面に描画することが可能となります。
これで、最後の一工夫は終わりです。
おわりに
コード全文の中には、説明を省いている所がありますが、根幹となる部分については説明できたかと思います。
ちなみに、二つあるモードは、
private enum RemainableAfterImageEffectMode
{
    Intermittent = 0,
    Continuous
}
-
Intermittent:画面タップしたら残像が生成される -
Continuous:画面に触れている間一定間隔で残像が生成され続ける
ようになっています。Continuousモードは結構すぐにメモリ不足でクラッシュするので気をつけて下さい。
また、今回は一応の再現はできていますが、最適化やより性能を高める余地はあるかと思います。
例えばメモリに関して、残像をが増えすぎると1.5GB超えたぐらいで落ちます。
一応調べてみると、
| Texture | 解像度 | メモリ(MB) |
|---|---|---|
| カメラ画像 | 1125×2436 | 10.45 |
| humanStencilTexture | 256×192 | 0.19 |
| humanStencilTexture | 960×720 | 2.64 |
| humanStencilTexture | 1920×1440 | 10.55 |
ほどあり、加えてBufferなし状態で300MBぐらい使っていました。
また、残像の綺麗さに関しても、冒頭にあげたTwitterのデモと比べると、汚い部分が目立つので、もっと良い実装方法がある気がしています。
なのでぜひ、改善点などに気がついたら、コメントで教えていただけると幸いです!
以上!