はじめに
とあるハッカソンに参加した折、使う機会がありましたので、その時したことの備忘録となります。
最後までやると、学習済(?)の検索APIをWebから叩けるようになります。
(私のような)Bluemixも機械学習も触ったことがない、でもなんとなく試してみたい…という方でもなるべく苦しまないように、ファイルやコマンドの情報を色々と補完しました。
間違い・勘違い等ありましたらご指摘頂ければ幸いです。
[追記]
ハッカソンの後に、Retrieve and RankとNatural Language Classifierを用いてレストラン検索アプリを作成しました。
辞書や学習の詳細についても記載しましたので、よろしければご覧ください。
参考資料
本記事は、以下を始めとする各種資料を見ながら作業した結果のまとめになります。
先に記事を書かれていた方々のお陰で、ハッカソン当日はなんとか完成にこぎつけました。
ありがとうございました(感謝)。
-
概要
-
Watson API トレーニング 20160716 rev02
- p54くらいからRetrieve and Rankの話ですが、時間があれば最初から読んだ方がよいと思います
-
Watson API トレーニング 20160716 rev02
-
Retrieve and Rank
-
- 英語ですが、詳細な手順&各種サンプルファイルがあります
-
- まずこちらを読んで、見つからなかったら↓を探すのがよいと思います
-
-
Node-RED
手順
前提
-
筆者はMacbookにて作業を実施
-
Windowsでもcurlコマンドを使えるようにすれば多分OK
アカウント、サービス作成
-
IBM Watson Developer Cloudにて、**無料評価版(30日間)**のアカウントを作成
-
サービスから、サービスの作成 > Retrieve and Rank > 作成
- 料金の話が書いてあってびびるが、30日間は大丈夫(のはず)
-
サービスから、Retrieve and Rank > サービス資格情報 > 資格情報の表示で表示される情報をコピー
- 以降、curlコマンドの-uオプションに、
**username**:**password**の形で設定する
- 以降、curlコマンドの-uオプションに、
{
  "url": "https://gateway.watsonplatform.net/retrieve-and-rank/api",
  "password": "**password**",
  "username": "**username**"
}
クラスタ作成
-
ターミナル(ないしコマンドプロンプト)を起動。curlを実行していく
-
クラスタを作成
-
**cluster_id**をコピー
-
curl -k -X POST -u "**username:**password**" "https://gateway.watsonplatform.net/retrieve-and-rank/api/v1/solr_clusters" -d ""
{
  "solr_cluster_id": "**cluster_id**",
  "cluster_name": "",
  "cluster_size": "",
  "solr_cluster_status": "NOT_AVAILABLE"
}
- 以下でクラスタのステータスが確認できる。ステータスに
READYが返るまで待つ
curl -u "**username**:**password**" "https://gateway.watsonplatform.net/retrieve-and-rank/api/v1/solr_clusters"
{"clusters": [{
  "solr_cluster_id": "**cluster_id**",
  "cluster_name": "",
  "cluster_size": "",
  "solr_cluster_status": "READY"
}]}
設定ファイル用意・インポート
-
クラスタを作っている間に、コレクション用設定ファイルを用意
- こちらの方が日本語用設定ファイルを公開していたので、ありがたくお借りする(Attachment > Solr_Japanese_20160108.zip)
-
設定ファイルを解凍後、schema.xmlファイルを確認
- デフォルトであれば、ドキュメント作成時に
id、title、bodyを定義することになる。ハッカソンでは、フィールドの名前を変えたり、他に保持したい情報があったためフィールドの追加をおこなった - 設定ファイルを変更後、再圧縮する時は、解凍先ディレクトリを圧縮しない(=解凍先ディレクトリ直下の内容を選択して圧縮する)こと。インポート時にエラーとなる
- デフォルトであれば、ドキュメント作成時に
   <field name="id" type="string" indexed="true" stored="true" required="true" multiValued="false" />
   <field name="title" type="watson_text_ja" indexed="true" stored="true" required="false" multiValued="true" />
   <field name="body" type="watson_text_ja" indexed="true" stored="true" required="false" multiValued="true" />

   <!-- make a copy field using normal OOB solr text_en -->
   <field name="text" type="text_ja" indexed="true" stored="false" required="false" multiValued="true" />
   <!-- make a copy field using watson_text_ja -->
   <field name="watson_text" type="watson_text_ja" indexed="true" stored="false" required="false" multiValued="true" />

   <copyField source="title" dest="text"/>
   <copyField source="body" dest="text"/>

   <copyField source="title" dest="watson_text"/>
   <copyField source="body" dest="watson_text"/>
   <!-- Watsonによる解析が不要であれば、以下のように定義すればよい模様 -->
   <field name="custom_field" type="string" indexed="true" stored="true" required="false" multiValued="false" />
- 設定ファイルをインポート
-
**cluster_id**に先ほど取得したクラスタID、**config_name**に任意の名前(英数字)、**config_path**に設定ファイル(zip)へのパスを設定
-
curl -k -X POST -H "Content-Type: application/zip" -u "**username**:**password**" "https://gateway.watsonplatform.net/retrieve-and-rank/api/v1/solr_clusters/**cluster_id**/config/**config_name**" --data-binary @**config_path**
{
  "message": "WRRCSR026: Successfully uploaded named config [**config_name**] for Solr cluster [**cluster_id**].",
  "statusCode": 200
}
コレクション作成
- 以下を実行しコレクションを作成
-
**collection_name**に任意の名前(英数字)、**config_name**に先ほどインポートした設定ファイルの名前を設定 -
successなどと書かれたXMLが返ってくればOK
-
curl -k -X POST -u "**username**:**password**" "https://gateway.watsonplatform.net/retrieve-and-rank/api/v1/solr_clusters/**cluster_id**/solr/admin/collections" -d "action=CREATE&name=**collection_name**&collection.configName=**config_name**"
<?xml version="1.0" encoding="UTF-8"?>
  <response>
    <lst name="responseHeader">
      <int name="status">0</int>
      <int name="QTime">11214</int>
    </lst>
    <lst name="success">
      <lst name="****">
        <lst name="responseHeader">
          <int name="status">0</int>
          <int name="QTime">2468</int>
        </lst>
        <str name="core">****</str>
      </lst>
      <lst name="****">
        <lst name="responseHeader">
          <int name="status">0</int>
          <int name="QTime">2915</int>
        </lst>
      <str name="core">****</str>
    </lst>
  </lst>
</response>
ドキュメント準備
- 投入するドキュメント情報を用意
- ハッカソンでは、チームの方に簡易クローラ(とあるサイトのHTMLから投入データを抽出)を作ってもらい救われた。8000件ほどのレコードを登録した
- 未確認だがDocument Conversionを使ってもよさそう
ドキュメント作成
- 設定ファイルで定義したフィールドに合わせて、以下のようなJSONファイルを作成
- ここを見ると記法は色々あるらしい(これはJSONとして問題ないんでしょうか…?)
- 文字コードはUTF-8、改行はLFのみ
- ハッカソンでは、ここで
commitが必要なことに気づけず数時間をフイにした(反省)
{
  "add": {
    "doc": {
      "id": "1",
      "title": "****",
      "body": "****",
      "custom_field": "****"
    }
  },
  "add": {
    "doc": {
      "id": "2",
      "title": "****",
      "body": "****",
      "custom_field": "****"
    }
  },

・・・中略・・・

  "commit": { }
}
ドキュメント投入
- 以下実行でコレクションにドキュメントを投入
-
**cluster_id**、**config_name**は適宜置換、**document_path**に先ほど作成したjsonファイルへのパスを設定
-
curl -k -X POST -H "Content-Type: application/json" -u "**username**:**password**" "https://gateway.watsonplatform.net/retrieve-and-rank/api/v1/solr_clusters/**cluster_id**/solr/**collection_name**/update" --data-binary @**document_path**
{
  "responseHeader": {
    "status": 0,
    "QTime": 495
  }
}
検索(ランカー無し)
- ブラウザのアドレスバーに以下を入力
-
**xxxx**の箇所は今までに倣って適宜変更。検索文は任意に設定 - 検索文に応じてドキュメントが返ってくればOK
- id検索がしたい場合は、q=id:1などとする
-
https://**username**:**password**@gateway.watsonplatform.net/retrieve-and-rank/api/v1/solr_clusters/**cluster_id**/solr/**collection_name**/select?q=検索文&wt=json&fl=id,title,body,custom_field
{
  "responseHeader": {
    "status": 0,
    "QTime": 1,
    "params":{
      "q": "検索文",
      "fl": "id,title,body,custom_field",
      "wt":"json"
    }
  },
  "response": {
    "numFound": 58,
    "start": 0,
    "docs": [
      {
        "id": "1",
        "title": ["****"],
        "body": ["****"],
        "custom_field": "****"
      },

・・・中略・・・

    ]
  }
}
アプリケーション作成
-
Retrieve and RankをWebから呼び出すには、Node-REDアプリケーションを経由する必要がある
- ハッカソンではこれに気づけず1時間ほどフイにした(反省)
-
アプリからアプリケーションの作成 > Node-RED Starter > 作成
- 入力項目は任意、デフォルトでよいが、ホスト名についてはAPIのURLに用いられる
-
アプリからアプリ名 > ランタイム > 環境変数 > ユーザー定義 > 追加 > 保存でユーザー名、パスワードを設定
- アプリにて再始動(円弧型の矢印のボタン)を押しておく
| 名前 | 値 |
|---|---|
| NODE_RED_USERNAME | 任意 |
| NODE_RED_PASSWORD | 任意 |
アプリケーション編集
-
アプリでアプリ名 > 経路に表示されているURLにアクセスすると、Node-REDのトップ画面が表示される
-
Go to your Node-RED flow editorをクリックすると認証画面が出るので、先ほど設定したユーザー名、パスワードを入力
-
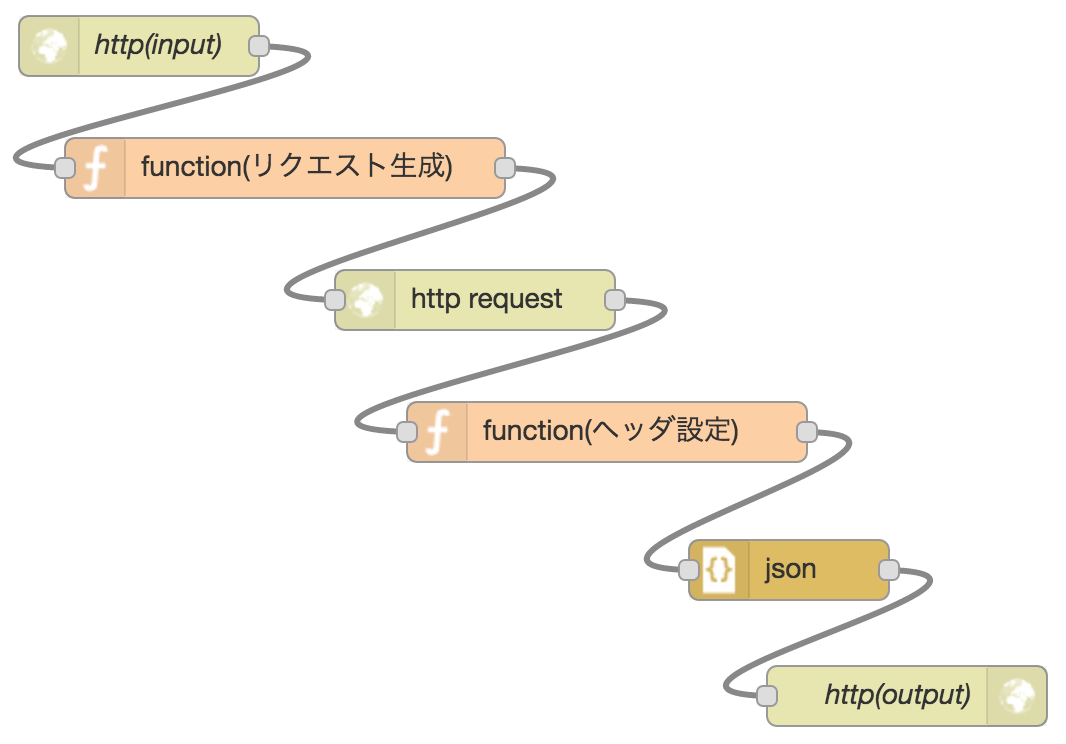
表示されたエディタ画面にて、以下要領でノードを作成、接続

http(input)
-
画面左よりinput > http。エディタ中央にドロップ
-
URLに指定した値が、APIのURLのパスに使用される
| 名前 | 値 |
|---|---|
| Method | POST |
| URL | /**path**
|
| Name | 任意 |
function(リクエスト生成)
-
画面左よりfunction > function
-
Webより呼び出す際に検索文を設定するパラメーターを
msg.payloadのqで指定する -
色々とエスケープしているのはこちらを参考に。substringはなんとなく実施
var query;
try {
    query = msg.payload.q.substring(0, 1000);
} catch(e) {
    query = "";
}
query = query.replace(
    /[\\\+\-\&\|\!\(\)\{\}\[\]\^\"\~\*\?\:\/\r\n\t\u0020\u3000]|AND|OR|NOT/g,
    function(c) { return "\\" + c; });
msg.headers = {
    "content-type": "application/x-www-form-urlencoded"
};
msg.payload = {
    "wt": "json",
    "fl": "id,title,body,custom_field",
    "q": query
};
return msg;
http request
- 画面左よりfunction > http request
| 名前 | 値 |
|---|---|
| Method | POST |
| URL | https://gateway.watsonplatform.net/retrieve-and-rank/api/v1/solr_clusters/**cluster_id**/solr/**collection_name**/select |
| Enable secure (SSL/TLS) connection | チェック無 |
| Use basic authentication | チェック有 |
| Username | **username** |
| Password | **password** |
| Return | a UTF-8 string |
| Name | 任意 |
function(ヘッダ設定)
-
画面左よりfunction > function
-
CORS対応のため
msg.headers = {
  "Access-Control-Allow-Origin": "*"
}
return msg;
json、http(output)
- 画面左よりfunction > json、output > http response
アプリケーション反映
- 画面右上のDeployを押すと反映
- エラーがあると、画面右のdebugタブに表示される
WebからAPI呼び出し
- jQuery等を使ってAPI呼び出し、結果取得
<!DOCTYPE html>
<html>
  <head>
    <meta charset="utf-8">
    <title>Retrieve and Rank</title>
    <script type="text/javascript" src="https://code.jquery.com/jquery-3.1.1.min.js"></script>
  </head>
  <body>
    <input id="query" type="text">
    <input id="test" type="button" value="Test">
    <div id="result"></div>
  </body>
  <script type="text/javascript">
    $("#test").click(function(){
      $("#result").empty();

      $.ajax({
        type: "POST",
        url: "http://**ホスト名**.mybluemix.net/**path**",
        dataType: "json",
        data: {
            q: $("#query").val()
        }
      }).done(function(data){
        var doc = "";
        var docs = data.response.docs;
        if (docs.length > 0) {
            doc = JSON.stringify(docs[0]);
        } else {
            doc = "結果が見つかりませんでした。";
        }
        $("#result").text(doc);
      }).fail(function(error){
          console.log(error);
      });
    });
  </script>
</html>
学習
- ハッカソンでは時間が足らず泣く泣く諦めた、ランカーを用いた検索について挑戦した
Grandtruthの作成
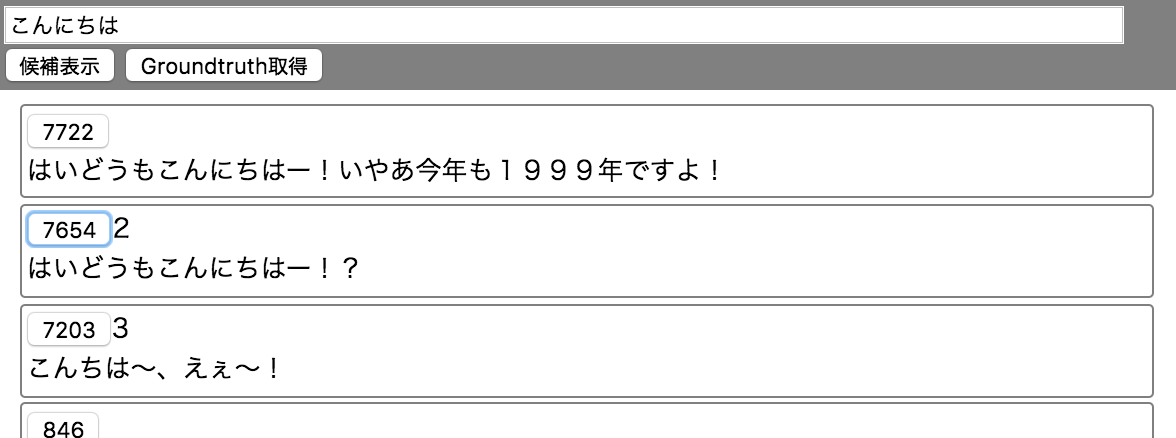
- 質問に対してどの解答が適切であったか解答してGrandtruthを生成するツールを作り、ランカーを作成
- 質問文入力&解答候補表示→適切と思われるドキュメントのボタンを押す→質問文入力…→Groundtruth取得でCSVファイル作成
<!DOCTYPE html>
<html>
  <head>
    <meta charset="utf-8">
    <title>Groundtruth</title>
    <script type="text/javascript" src="https://code.jquery.com/jquery-3.1.1.min.js"></script>
    <style type="text/css">
      body {
        font-size: small;
      }
      #query {
        width: 95%;
      }
      #header {
        position: fixed;
        top: 0;
        left: 0;
        right: 0;
        padding: 0.2em;
        background-color: gray;
      }
      .doc {
        border: 1px solid gray;
        border-radius: 0.2em;
        margin: 0.2em;
        padding: 0.2em;
      }
      #result {
        margin-top: 4em;
      }
    </style>
  </head>
  <body>
    <div id="header">
      <input id="query" type="text" placeholder="質問文"><br>
      <input id="send" type="button" value="候補表示">
      <input id="getgt" type="button" value="Groundtruth取得">
      <a id="downloadlink" target="_blank" href="#"></a>
    </div>
    <div id="result"></div>
  </body>
  <script type="text/javascript">
    var MAX_USEFUL=4;
    var groundtruth={};

    $("#send").click(function(){
      var $result=$("#result");
      $result.empty();

      var $query=$("#query");
      $.ajax({
        type: "POST",
        url: "http://**ホスト名**.mybluemix.net/**path**",
        dataType: "json",
        data: {
          q: $query.val()
        }
      }).done(function(data){
        var docs = data.response.docs;
        if (docs.length > 0) {
          docs.forEach(function(doc){
            var $doc=$("<div>").addClass("doc").data({
              "query": data.responseHeader.params.q,
              "doc": doc
            });

            $doc.append($("<input>").attr({
              "id": "useful",
              "type": "button",
              "value": doc.id,
            }).click(function(){ clickUseful($doc); }));

            $doc.append($("<span>").addClass("counter"));
            $doc.append($("<div>").text(doc.body));

            $result.append($doc);
          });
        } else {
          $result.text("結果が見つかりませんでした。");
        }
      }).fail(function(error){
          console.log(error);
      });
    });

    $("#getgt").click(function(){
      var rows=[];
      $.each(groundtruth,function(query, idList){
        var row=[];
        row.push(query);
        $.each(idList,function(id, count){
          row.push(id);
          row.push(count);
        });
        rows.push(row.map(function(value){ return escapeCSV(String(value)) }).join(","));
      });
      rows.push("");

      var blob = new Blob([rows.join("\n")], { "type": "text/plain" });
      var $downloadlink=$("#downloadlink");
      $downloadlink.attr("href", window.URL.createObjectURL(blob));
      $downloadlink.attr("download", "gt_" + createTimeString() + ".csv");
      $downloadlink[0].click();
    });

    function clickUseful($doc) {
      var query=$doc.data("query");
      var id=$doc.data("doc").id;
      if (groundtruth[query] === undefined) {
        groundtruth[query]={};
      }

      var count=(groundtruth[query][id] === undefined ? 0 : groundtruth[query][id]);
      count=Math.min(count + 1, MAX_USEFUL);
      groundtruth[query][id]=count;

      $doc.find(".counter").text(count);
      if (count >= MAX_USEFUL) {
        $doc.find("#useful").prop("disabled", true);
      }
    }

    function escapeCSV(value) {
      return "\"" + value.replace(/\"/, "\"\"") + "\"";
    }
    function createTimeString() {
      function padZero(num) {
          var result;
          if (num < 10) {
              result = "0" + num;
          } else {
              result = "" + num;
          }
          return result;
      }
      var now = new Date();
      var res = "" + now.getFullYear() + padZero(now.getMonth() + 1) +
          padZero(now.getDate()) + padZero(now.getHours()) +
          padZero(now.getMinutes()) + padZero(now.getSeconds());
      return res;
    }
  </script>
</html>

- 質問文,解答1のID,解答1の役に立った度(1〜4),解答2のID,解答2の役に立った度(1〜4)...
"こんにちは","7203","3","7654","2"
ランカーの作成
- csvファイルを作ったら、こちらからtrain.pyを取得し、以下実行
-
**ranker_name**は任意でよい - Windows環境の人は、Pythonを使えるようにする必要がある
-
python ./train.py -u "**username**:**password**" -i ./gt.csv -c "**cluster_id**" -x "**collection_name**" -n "**ranker_name**"
Input file is ./gt.csv
Solr cluster is **cluster_id**
Solr collection is **collection_name**
Ranker name is **ranker_name**
Rows per query 10
Generating training data...
Generating training data complete.
  % Total    % Received % Xferd  Average Speed   Time    Time     Time  Current
                                 Dload  Upload   Total   Spent    Left  Speed
100  242k    0   316  100  241k    113  88936  0:00:02  0:00:02 --:--:-- 88935
- ステータスが
Trainingの間は使用不可。5分程度かかるので暫し待つ-
**ranker_id**をメモ
-
{
  "ranker_id": "**ranker_id**",
  "name": "**ranker_name**",
  "created": "2016-11-18T19:14:20.146Z",
  "url": "https://gateway.watsonplatform.net/retrieve-and-rank/api/v1/rankers/**ranker_id**",
  "status": "Training",
  "status_description": "The ranker instance is in its training phase, not yet ready to accept rank requests"
}
- ランカーの状態確認は以下。
AvailableとなればOK
curl -u "**username**:**password**" "https://gateway.watsonplatform.net/retrieve-and-rank/api/v1/rankers/**ranker_id**"
{
  "ranker_id": "**ranker_id**",
  "name": "**ranker_name**",
  "created":"2016-11-18T19:14:20.146Z",
  "url": "https://gateway.watsonplatform.net/retrieve-and-rank/api/v1/rankers/**ranker_id**",
  "status": "Available",
  "status_description": "The ranker instance is now available and is ready to take ranker requests."
}
検索(ランカー有り)
- fcselectで実施
- APIリファレンスに記載がないが、flに
ranker.confidenceを追加すると、ランク付けの信頼度が出力される(ここのWorking with ranker confidence scores参照)
- APIリファレンスに記載がないが、flに
https://**username**:**password**@gateway.watsonplatform.net/retrieve-and-rank/api/v1/solr_clusters/**cluster_id**/solr/**collection_name**/fcselect?ranker_id=**ranker_id**&q=検索文&wt=json&fl=id,title,body,custom_field,ranker.confidence
{
  "responseHeader": {
    "status": 0,
    "QTime": 75
  },
  "response": {
    "numFound": 11,
    "start": 0,
    "maxScore": 10.0,
    "docs": [
      {
        "id": "7722",
        "title": ["****"],
        "body": ["****"],
        "custom_field": "****",
        "ranker.confidence": 0.48287850973637736
      },
      {
        "id": "7203",
        "title": ["****"],
        "body": ["****"],
        "custom_field": "****",
        "ranker.confidence": 0.3192066081818791
      },

・・・中略・・・

    ]
  }
}
結果の比較
-
左がselect(=学習無?)、右がfcselect(=学習有?)
-
"7810"はselectでランクの一番下だったが、fcselectでは検索に引っかからなくなった…
-
"1908"など、直接指定していないIDもランクが上昇
- "どうもよろしくお願いします"で"4"を指定しているので、その影響か?
-
"7963"は、Grandtruth全体を通じて一度もボタンを押してないが順位が上昇している
- 周りが下がっている?
- その他色々な質問文にボタンを押しているので、それらの影響もあるのかも
"どうも","1525","2","4669","4","6137","3","7481","3","8252","4"
"どうもー","1908","2","7481","2","7810","2","8252","3"
"どうもありがとうございました","2475","4","5984","4","6220","4","6490","4"
"どうもよろしくお願いします","252","4","1439","4","1750","2","1821","2","1908","4","3731","4"
"どうもこんにちは","3627","3","7203","2","7654","2","7660","4","7722","2"

後片付け
-
こちらを見ると、試用期間終了後に自動で全削除される雰囲気だが、なんとなく手で消しておく
-
ランカー削除
curl -X DELETE -u "**username**:**password**" "https://gateway.watsonplatform.net/retrieve-and-rank/api/v1/rankers/**ranker_id**"
{}
- コレクション削除
curl -X POST -u "**username**:**password**" "https://gateway.watsonplatform.net/retrieve-and-rank/api/v1/solr_clusters/**cluster_id**/solr/admin/collections" -d "action=DELETE&name=**collection_name**"
<?xml version="1.0" encoding="UTF-8"?>
<response>
  <lst name="responseHeader">
    <int name="status">0</int>
    <int name="QTime">907</int>
  </lst>
  <lst name="success">
    <lst name="****">
      <lst name="responseHeader">
        <int name="status">0</int>
        <int name="QTime">95</int>
      </lst>
    </lst>
    <lst name="****">
      <lst name="responseHeader">
        <int name="status">0</int>
        <int name="QTime">119</int>
      </lst>
    </lst>
  </lst>
</response>
- コンフィグ削除
curl -X DELETE -u "**username**:**password**" "https://gateway.watsonplatform.net/retrieve-and-rank/api/v1/solr_clusters/**cluster_id**/config/**config_name**"
{
  "message": "WRRCSR025: Successfully deleted named config [**config_name**] for Solr cluster [**cluster_id**].",
  "statusCode": 200
}
- クラスタ削除
curl -X DELETE -u "**username**:**password**" "https://gateway.watsonplatform.net/retrieve-and-rank/api/v1/solr_clusters/**cluster_id**"
{
  "message": "WRRCSR023: Successfully deleted Solr cluster [**cluster_id**].",
  "statusCode": 200
}