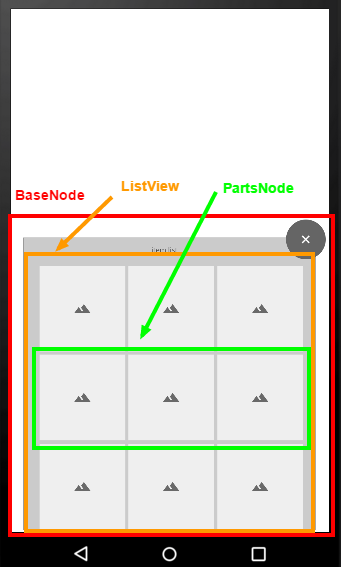
Cococs StudioでListViewを設定したBaseNodeとパーツ部分になるPartsNodeを作成。
ListViewにPartsNodeを追加していって、さくっとGridView的なものを作る備忘録。
Cocos Studio側の作業は割愛。
##作りたいモノ
- 1行にボタン3つ
- スクロールして欲しい
###実装
Main.cpp
//BaseNodeを読み込む
auto baseNode = CSLoader::createNode("BaseNode.csb");
baseNode->setPosition(Vec2(origin.x + visibleSize.width/2, 0));

//ListViewを準備
auto listView = itemNode->getChildByName<ui::ListView*>("ItemList");

//PartsNodeを追加
for (int i = 0; i < 6 ; i++) {
    //Partsの読み込み
    auto listPartsNode = CSLoader::createNode("Parts.csb");

    //スクロールを有効化するためにPartsをLayoutとして取得
    auto panelLayout = listPartsNode->getChildByName<ui::Layout*>("Parts");
    //PartsNodeを一度削除
    listPartsNode->removeChild(panelLayout, true);

    //Parts内の要素を諸々設定
    auto item = utils::findChildren(*panelLayout, "//Button_0");
    auto itemBtn = (Button*)item.front();
    itemBtn->setTag(0);
    itemBtn->setOpacity(255);
    itemBtn->addTouchEventListener(this,toucheventselector(Main::onTouchButton));

    //PartsをListViewに追加
    listView->addChild(panelLayout);
}

addChild(itemNode);
「pushBackCustomItem」での実装だとスクロールが右端の限られた部分でしかできず、
かつ、PartsNode内に設置しているボタンが押せなくて断念。
おそらく、普通のリストであればこれで問題なかったはず。
今回はどうしてもグリッド的に表示したかったので(GridViewの方法が分からず……)、
この様な形で再現。
参考:
CocosStudioのUIEditorで作ったListViewを使う
[Cocos2dx] ui::ListView 備忘録
