背景##
前回はRetinaNetの学習流れを紹介しました
学習する対象は信頼度Classificationと変形Regressionです。
では、すでに学習できたモデルからどうやって、与えられた画像に対して、物体を検出することを紹介したいと思います。
流れ##
モデルに入力####
まずは画像をモデルに投げる前に、Normalizationとリサイズします

ここは2125X1500の画像を例として、リサイズされたら、864X640になります。
詳しくはこちらへみてください。
Resize処理
モデルからの出力####
そして、前処理された画像をモデルに入れて、出力をもらいます。
モデルの詳しい処理はこちらへみてください
モデルの流れ
推論材料###
モデルからの出力####
モデルからの出力はRegressionとClassificationになります。
Regressionは予め定義されたAnchor Boxごとに変形要な情報を用意しています。
Classificationは予め定義されたAnchor Boxごとに、各予測カテゴリーの信頼度情報を用意しています。
要するに、Regression、Classificationの主な次元はAnchor Boxesのメイン次元と同じです。
Regressionは△x,△y,△width,△heightを納めてあるため、最後の次元は4で終わります
Classificationは各予測カテゴリーの情報を納めてあるため、最後の次元はclass_numで終わります。
Regression#####
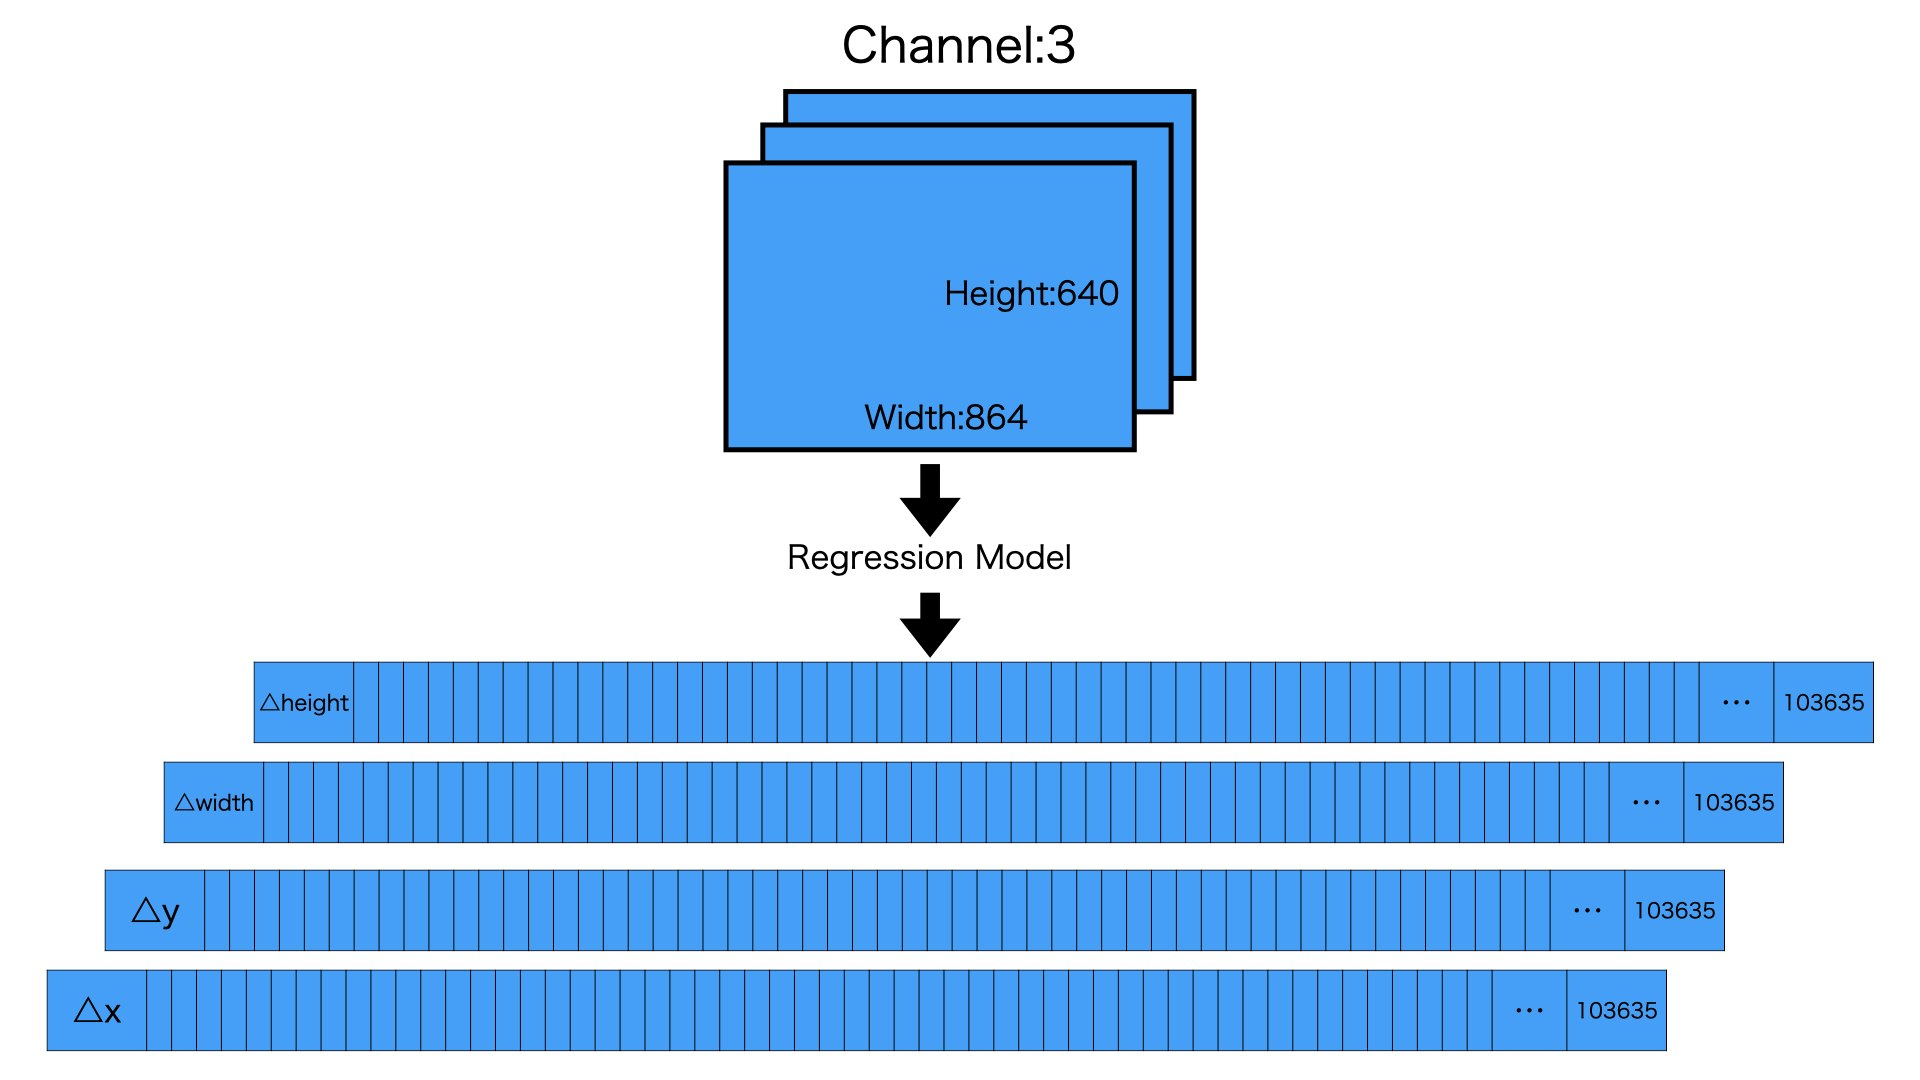
図のように640,864,3の入力画像をRegression Modelを経由させ、103635,4のRegressionを取得します
Classification#####
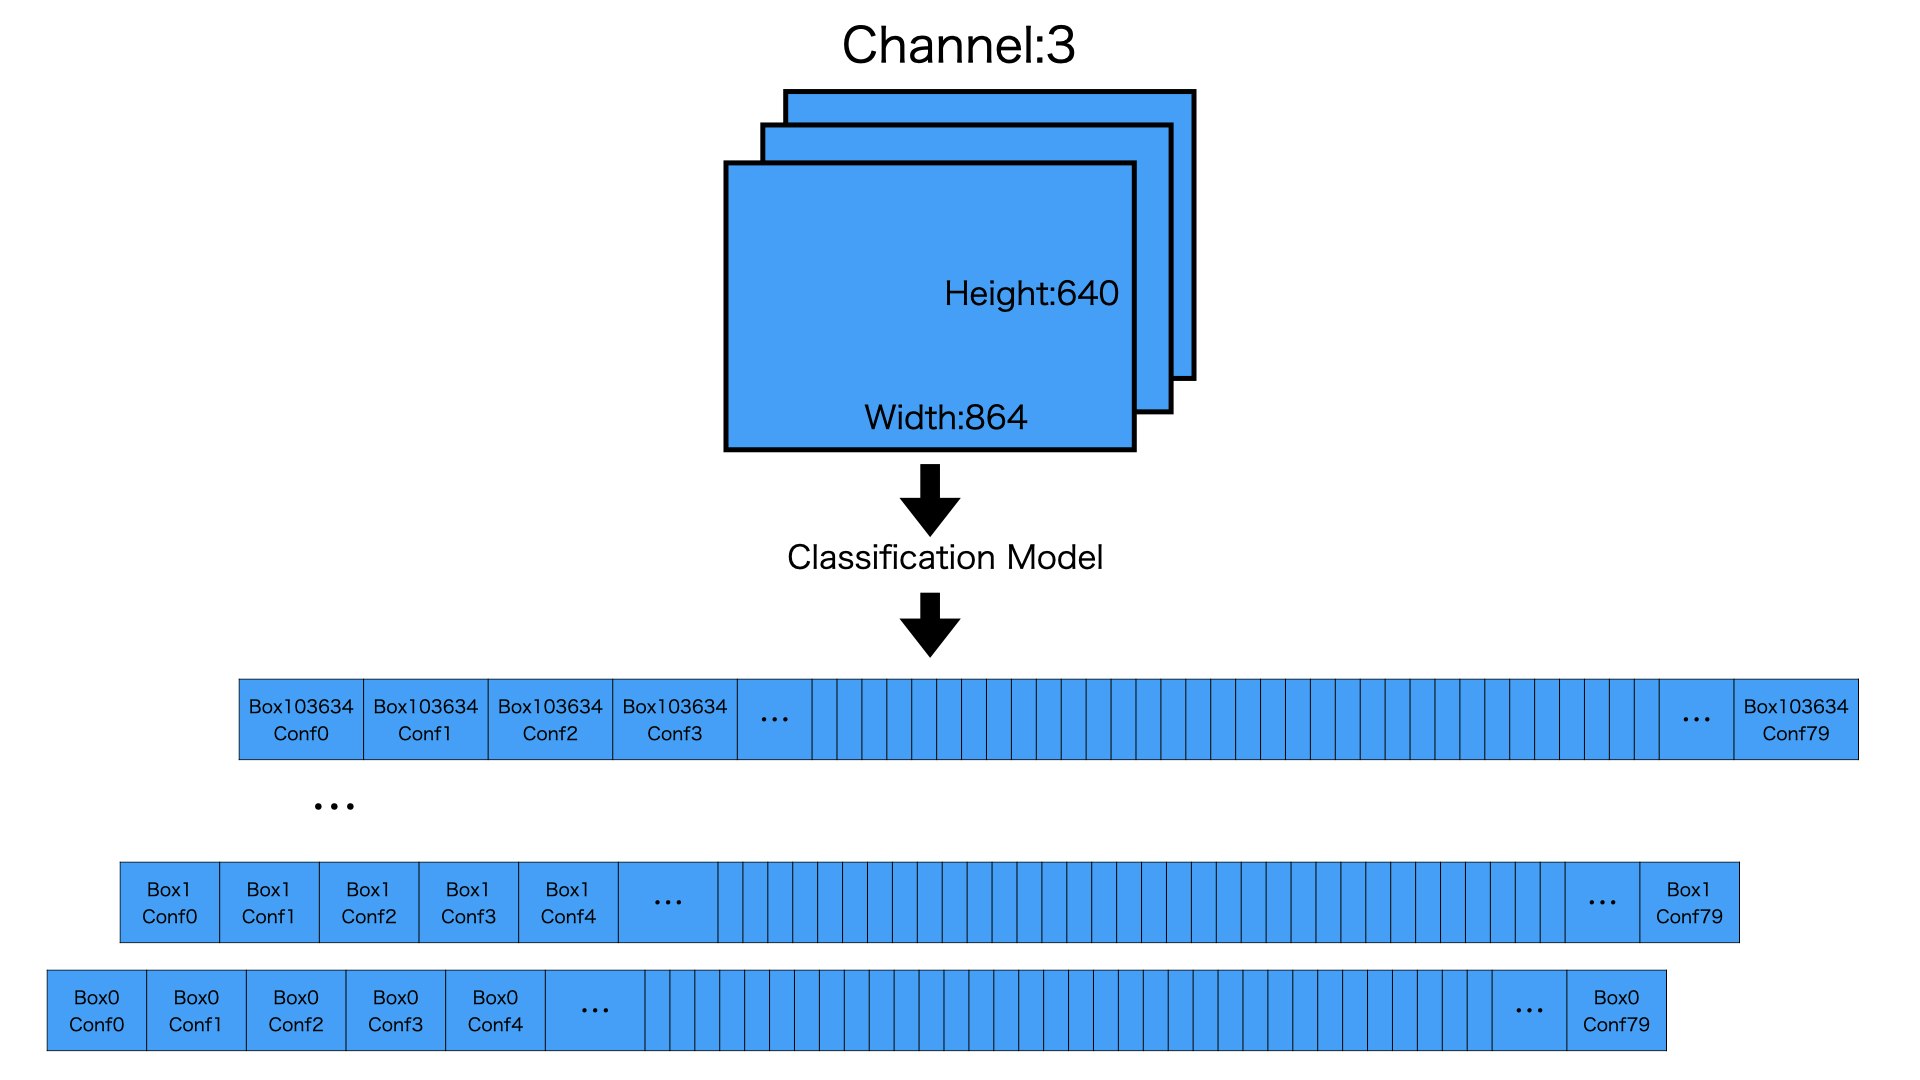
図のように640,864,3の入力画像をClassification Modelを経由させ、103635,80のClassificationを取得します
ここの103635はAnchor Boxesの数です、なぜ103635かというと、それは前処理された画像サイズによってきめられたものです。詳しくはこちらへみてください
囲碁の碁盤を計算
自ら生成したAnchorBoxes####
以下の生成の流れは下の方に詳しく書いてあります。
pyramid level
今回の推論の例の画像サイズが変わりましたので、もう一度簡単に説明させていただきます。
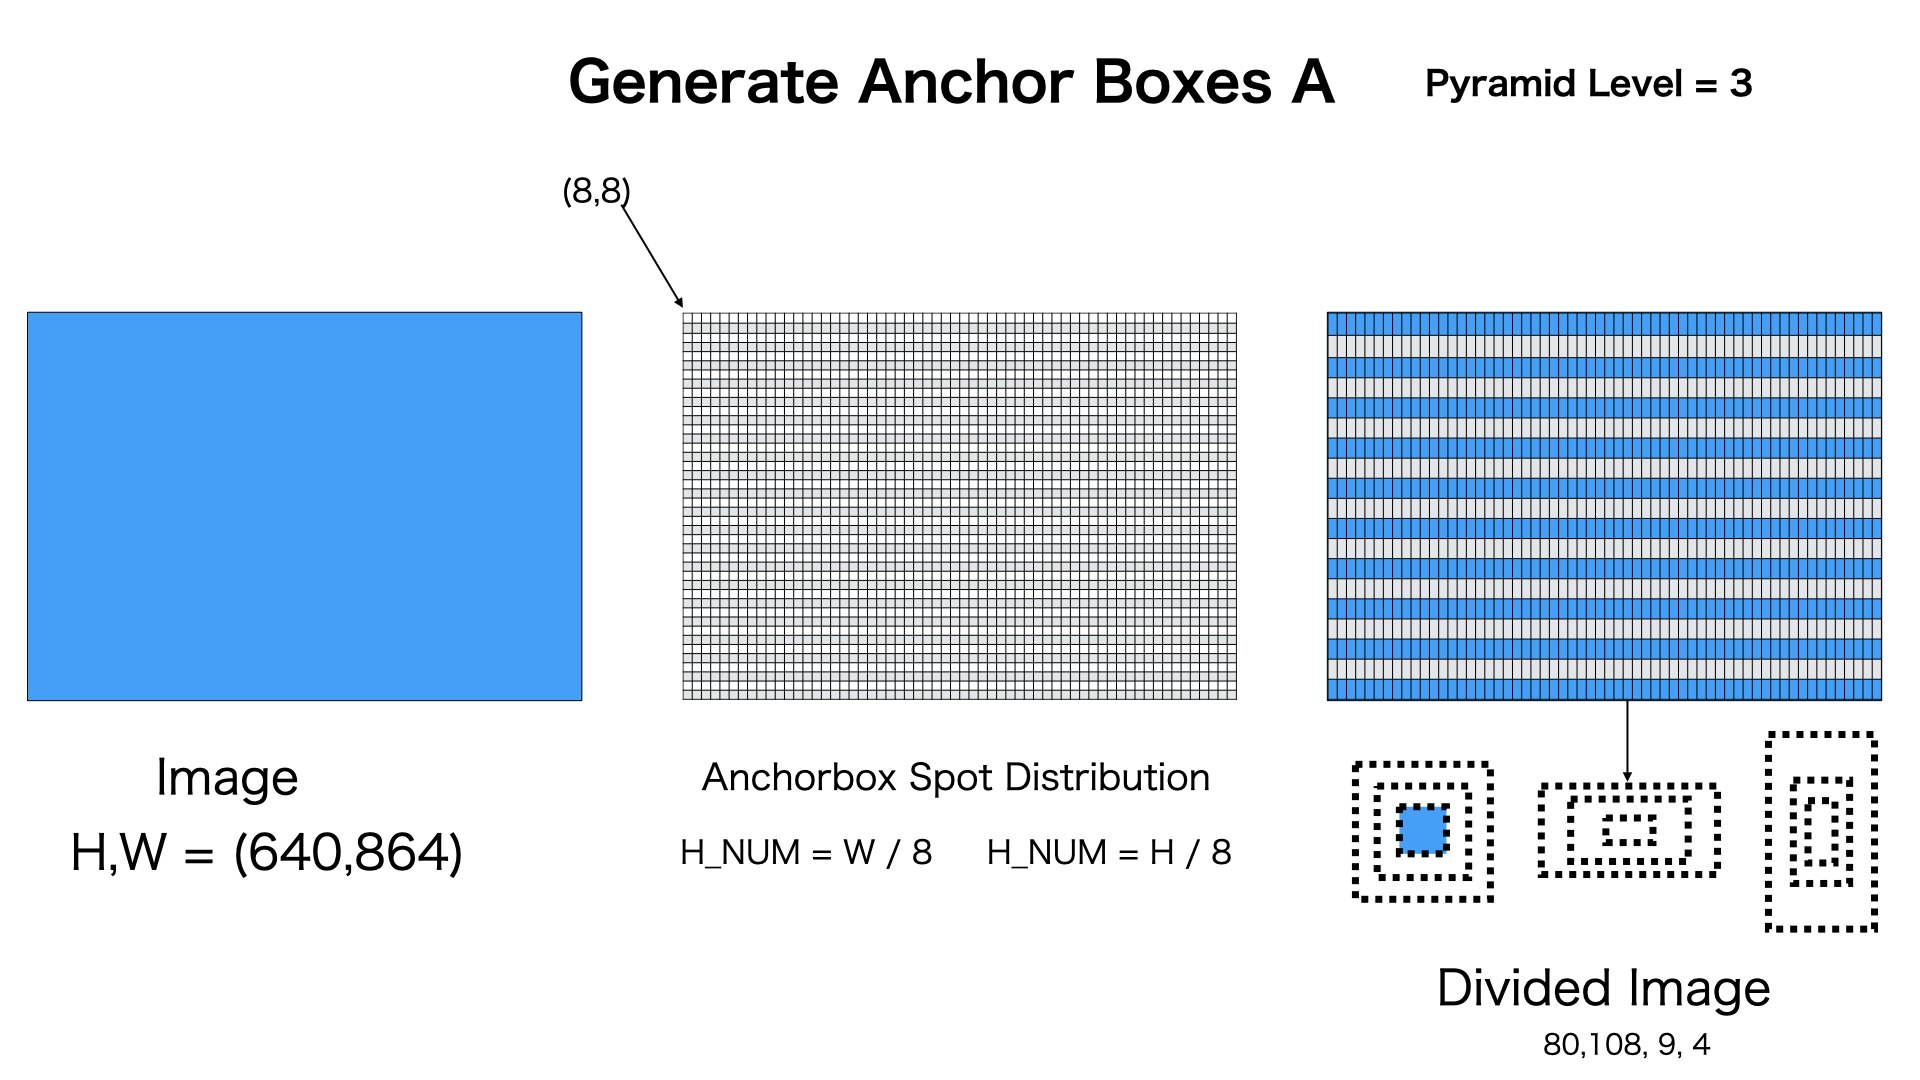
図のようにpyramid level=3の場合、[80,108,9,4]のAnchor Boxesを生成します
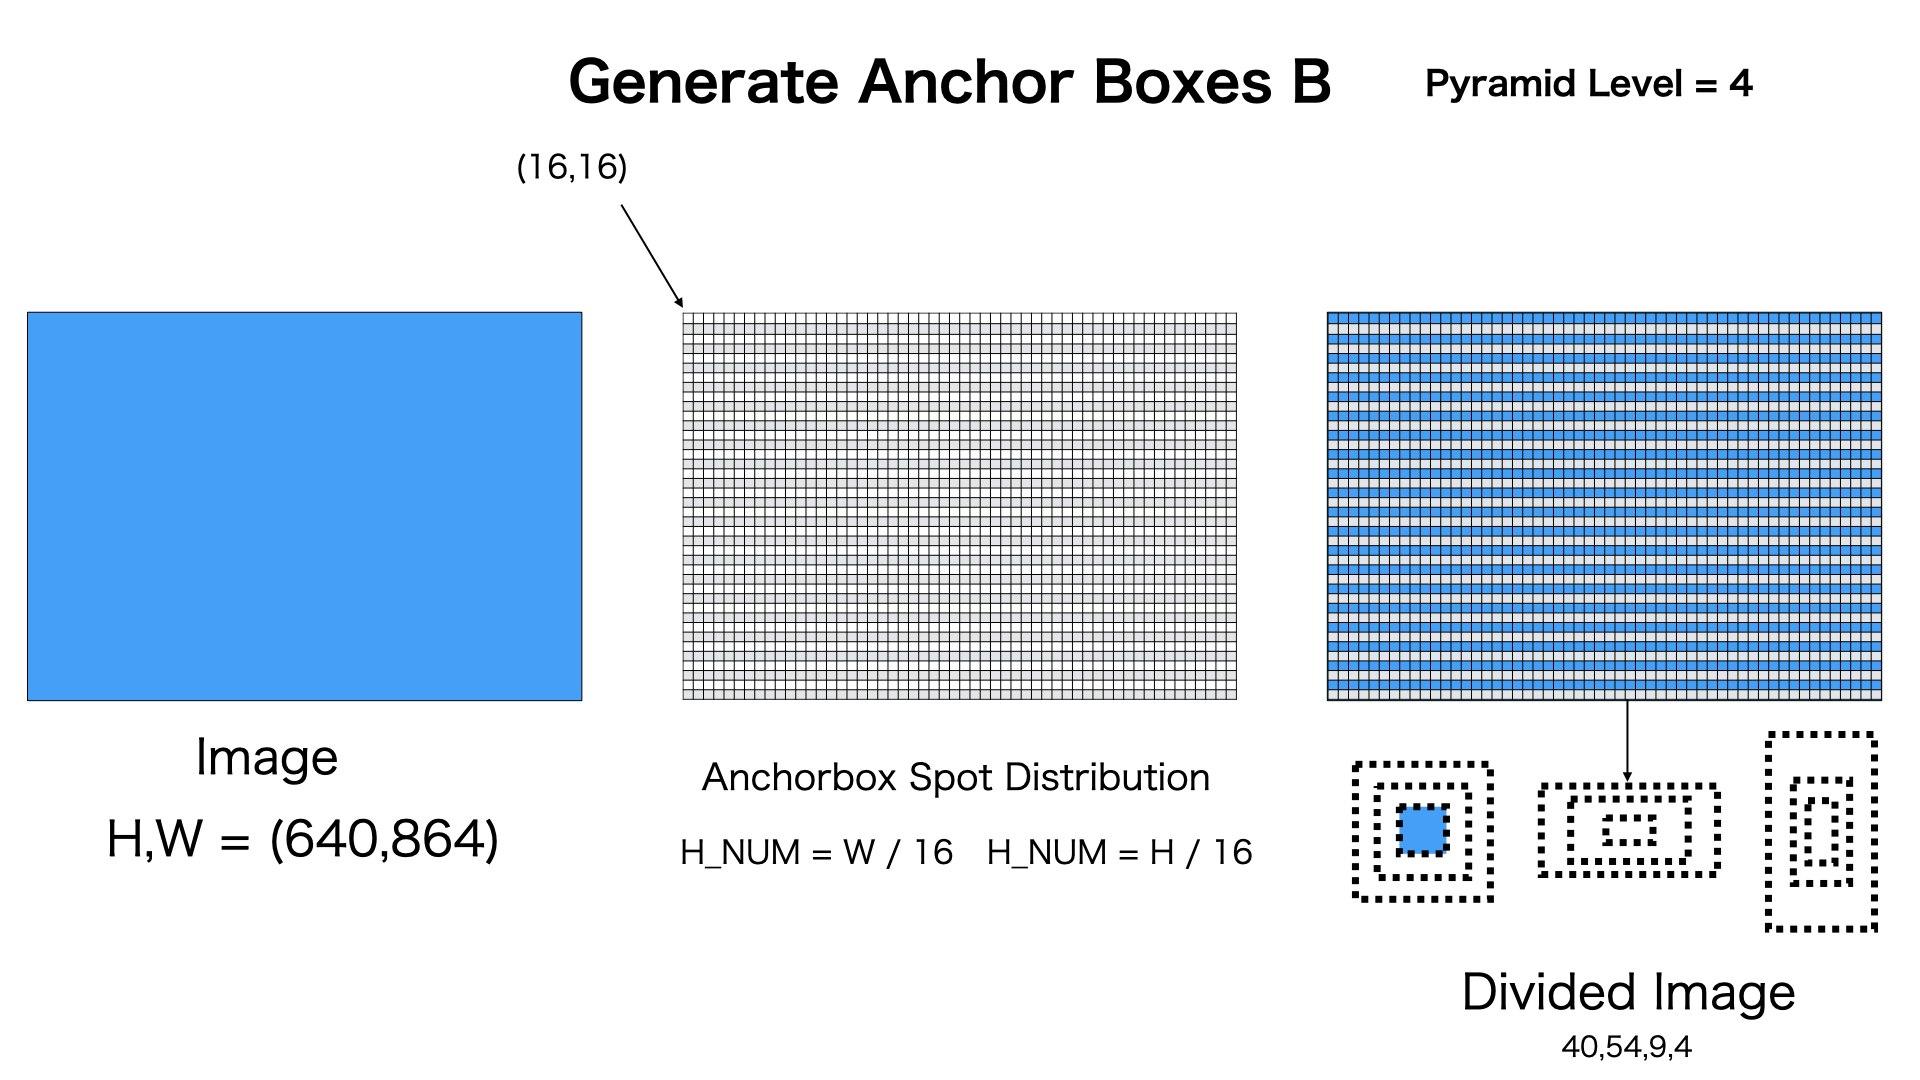
図のようにpyramid level=4の場合、[40,54,9,4]のAnchor Boxesを生成します
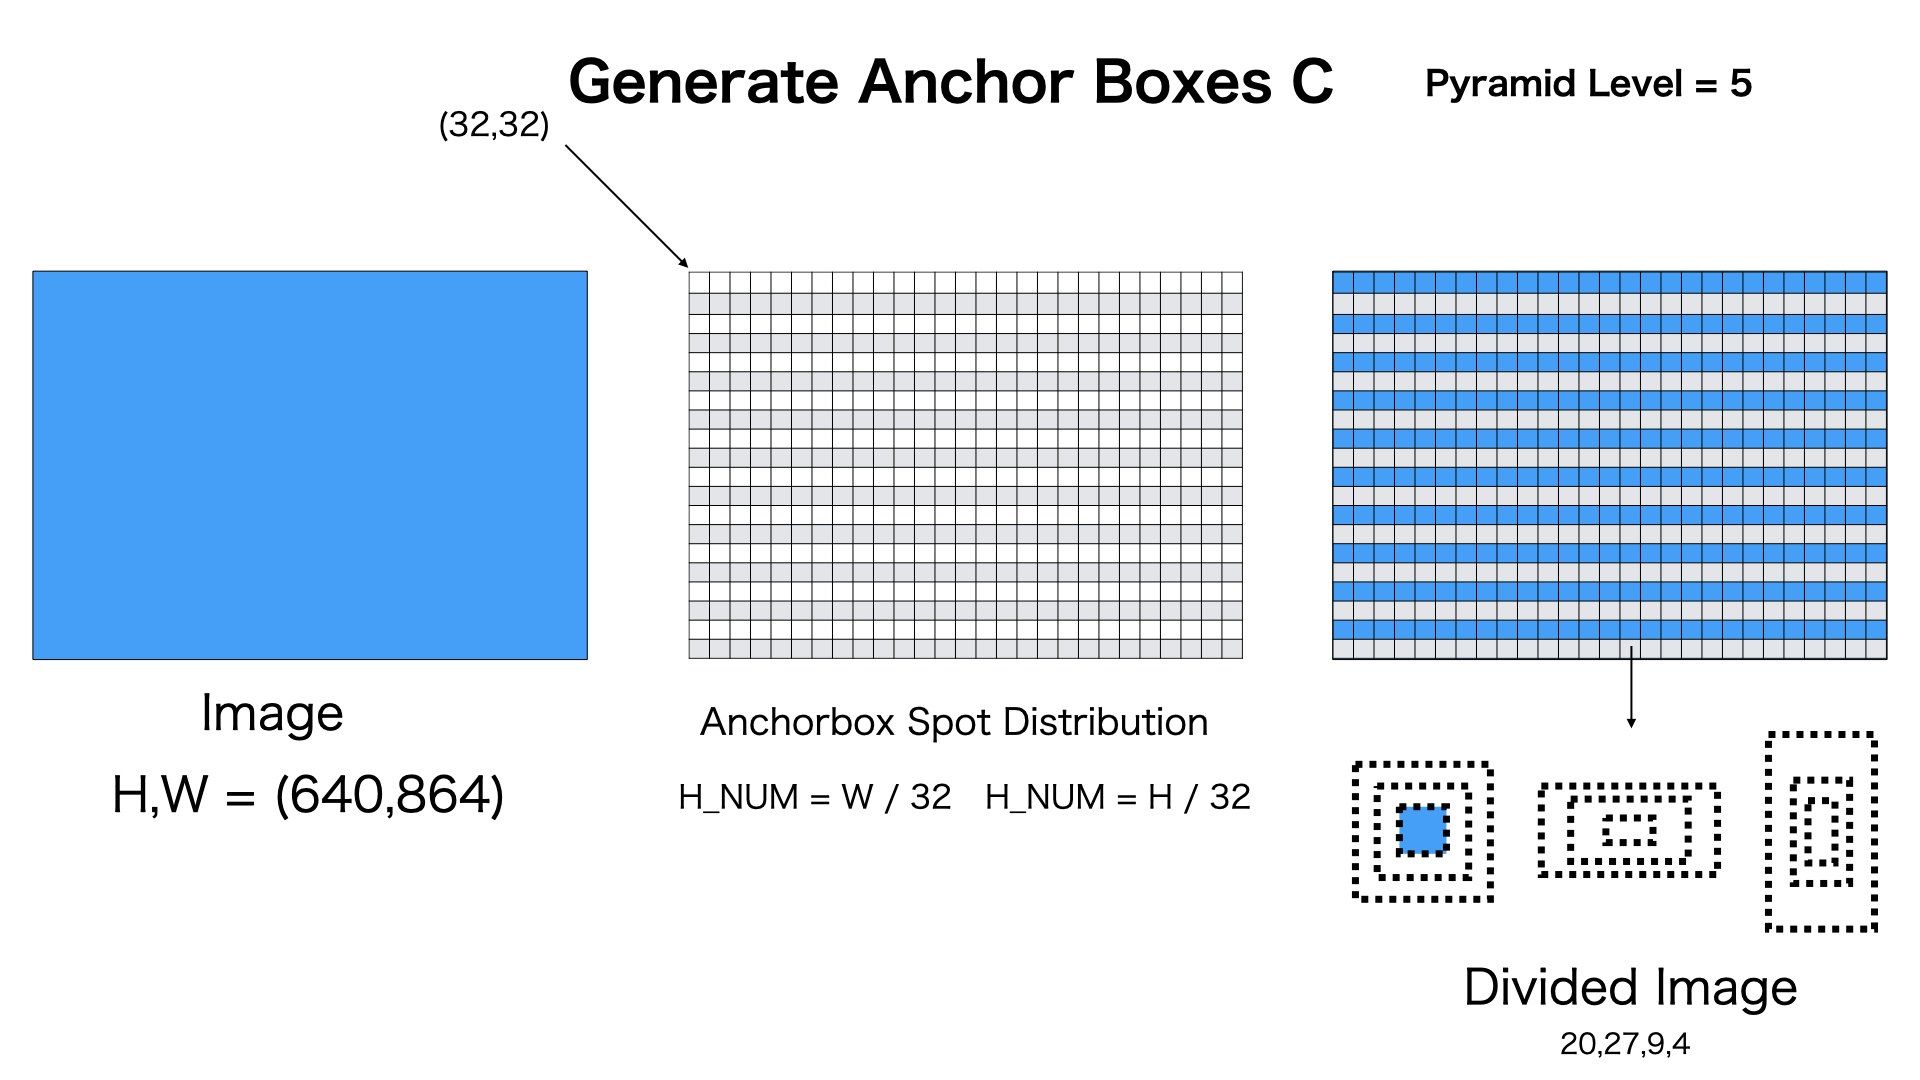
図のようにpyramid level=5の場合、[20,27,9,4]のAnchor Boxesを生成します
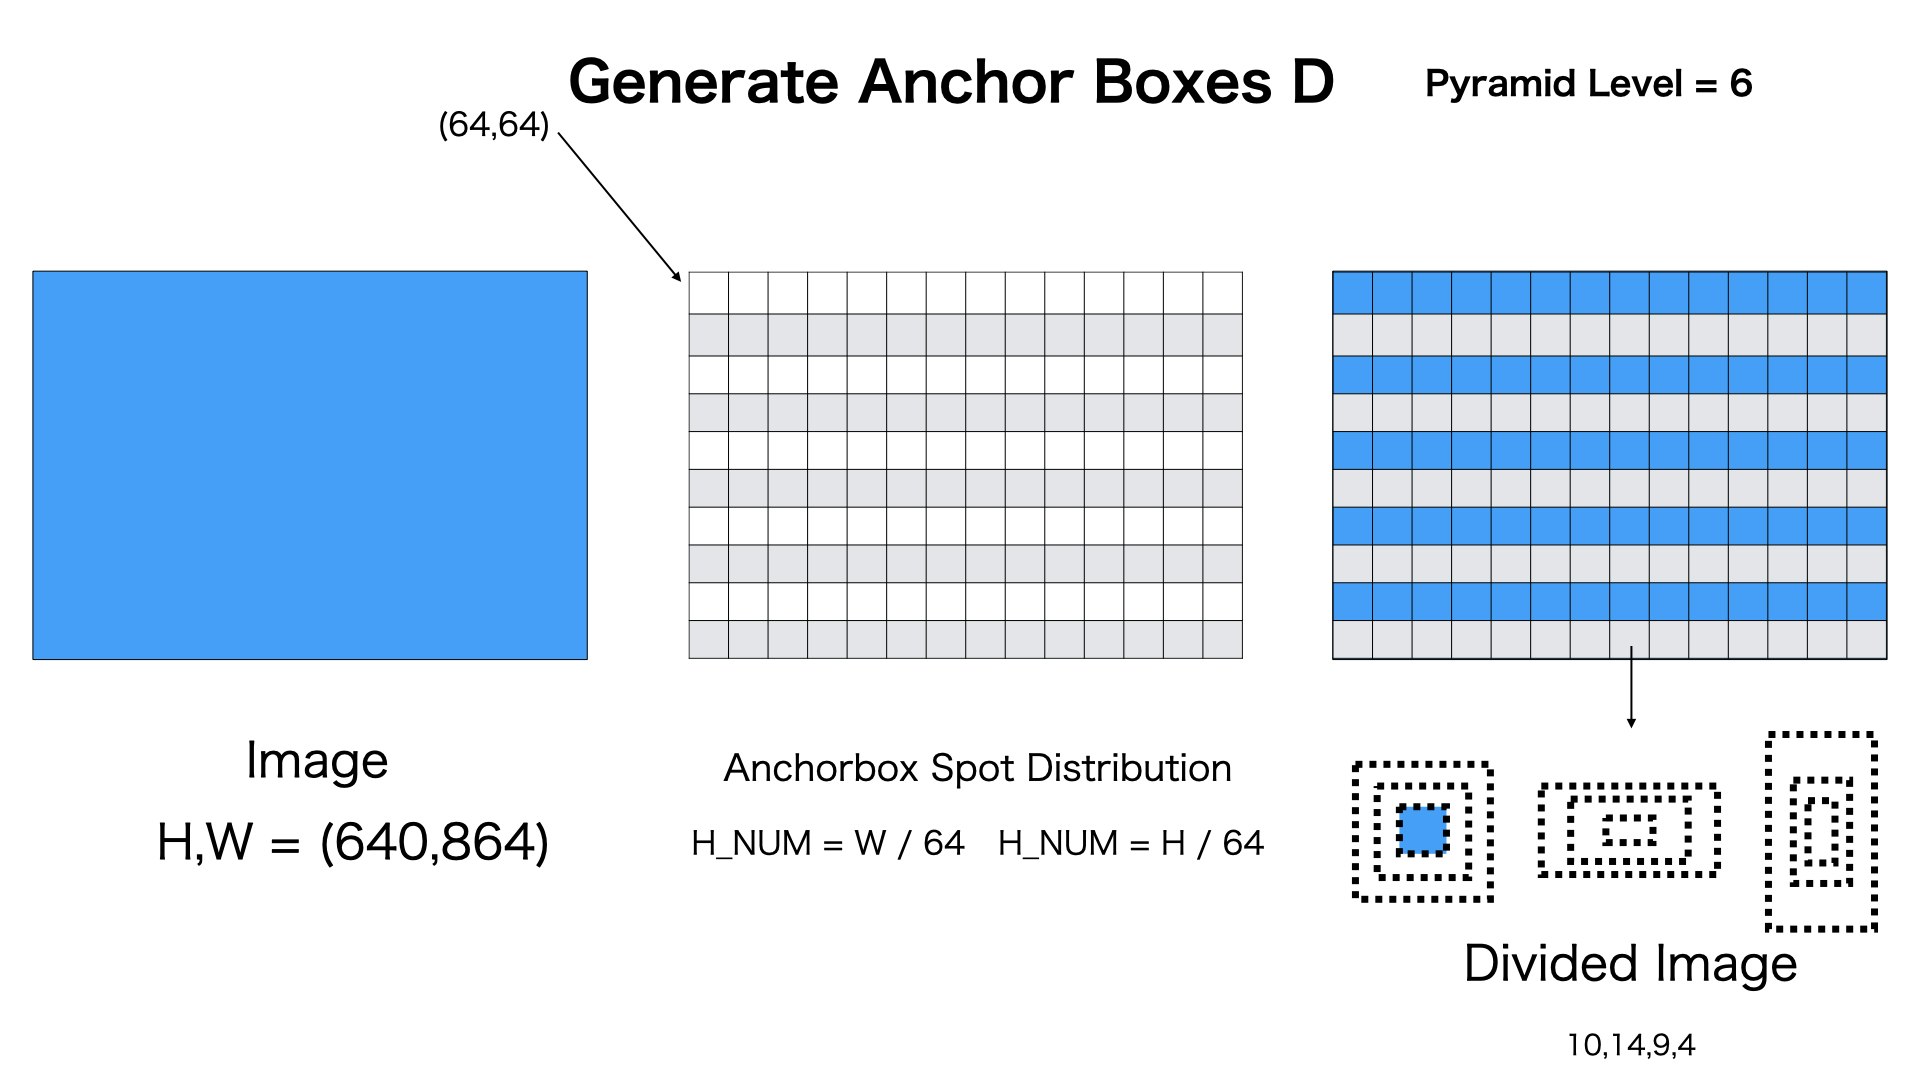
図のようにpyramid level=6の場合、[10,14,9,4]のAnchor Boxesを生成します
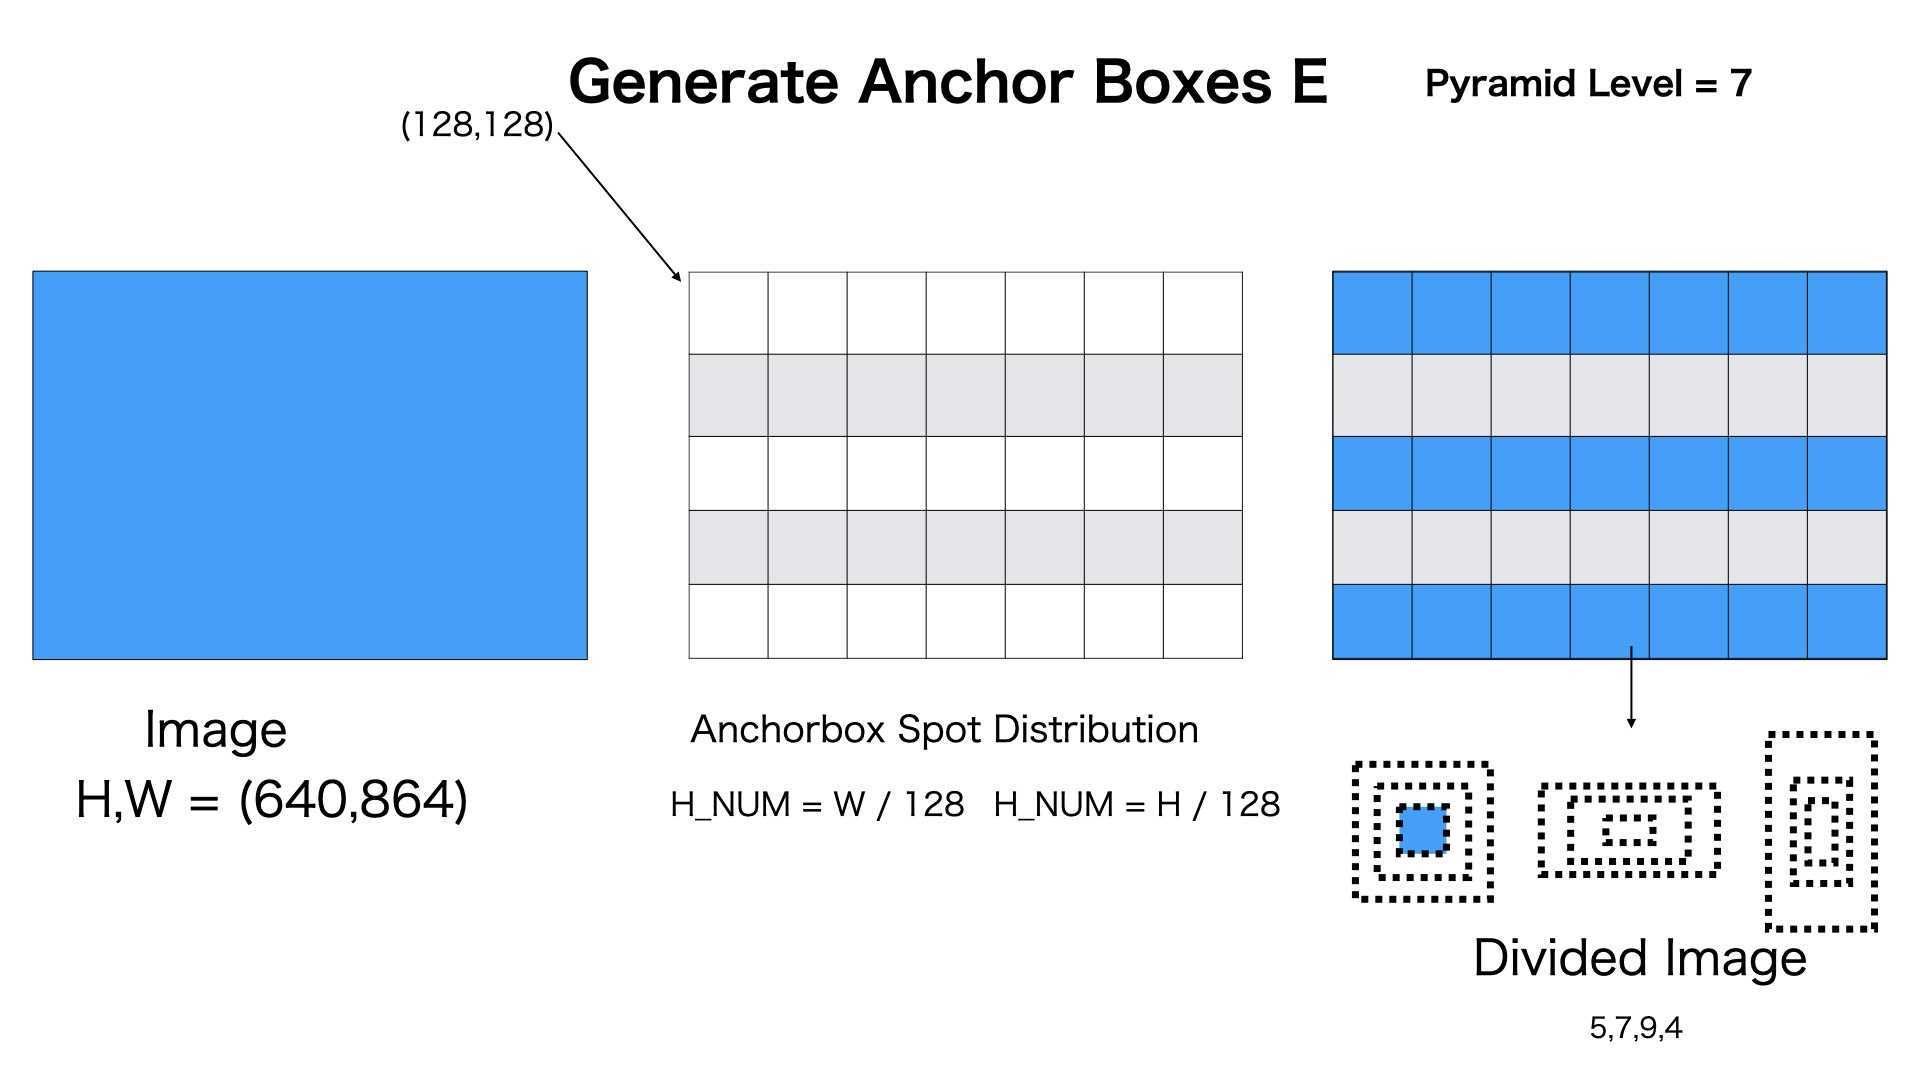
図のようにpyramid level=7の場合、[5,7,9,4]のAnchor Boxesを生成します
これで、Anchor Boxesの生成が終わります。
推論###
Anchor BoxesXRegression変形します
Anchor Boxesは予め用意したものですので、固定のままになってあります。
モデルの出力Regressionは入力された画像によって、AnchorBoxesを目標物体に変形するため、柔軟なデータを出力してあります。
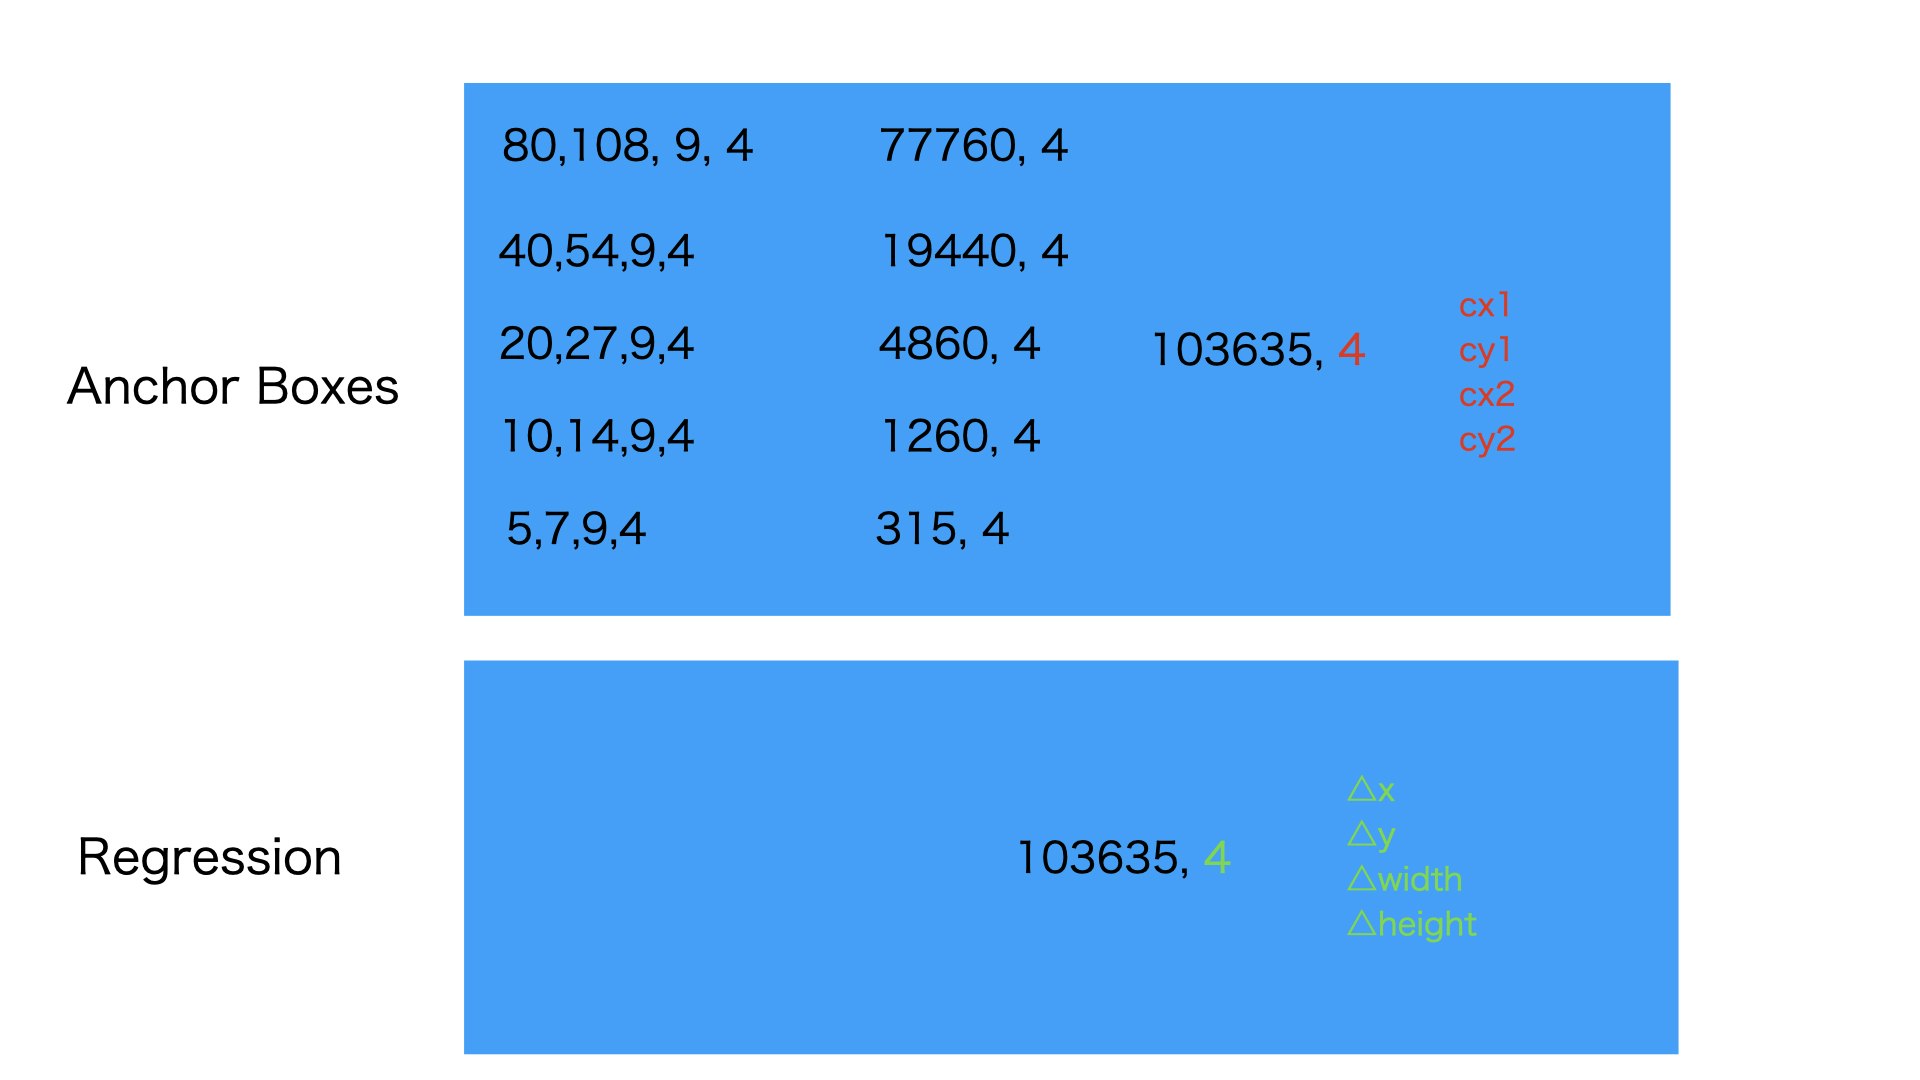
図のように、RegressionとAnchor Boxesのメイン次元は103635です、それは一個ずつ対応するものです。
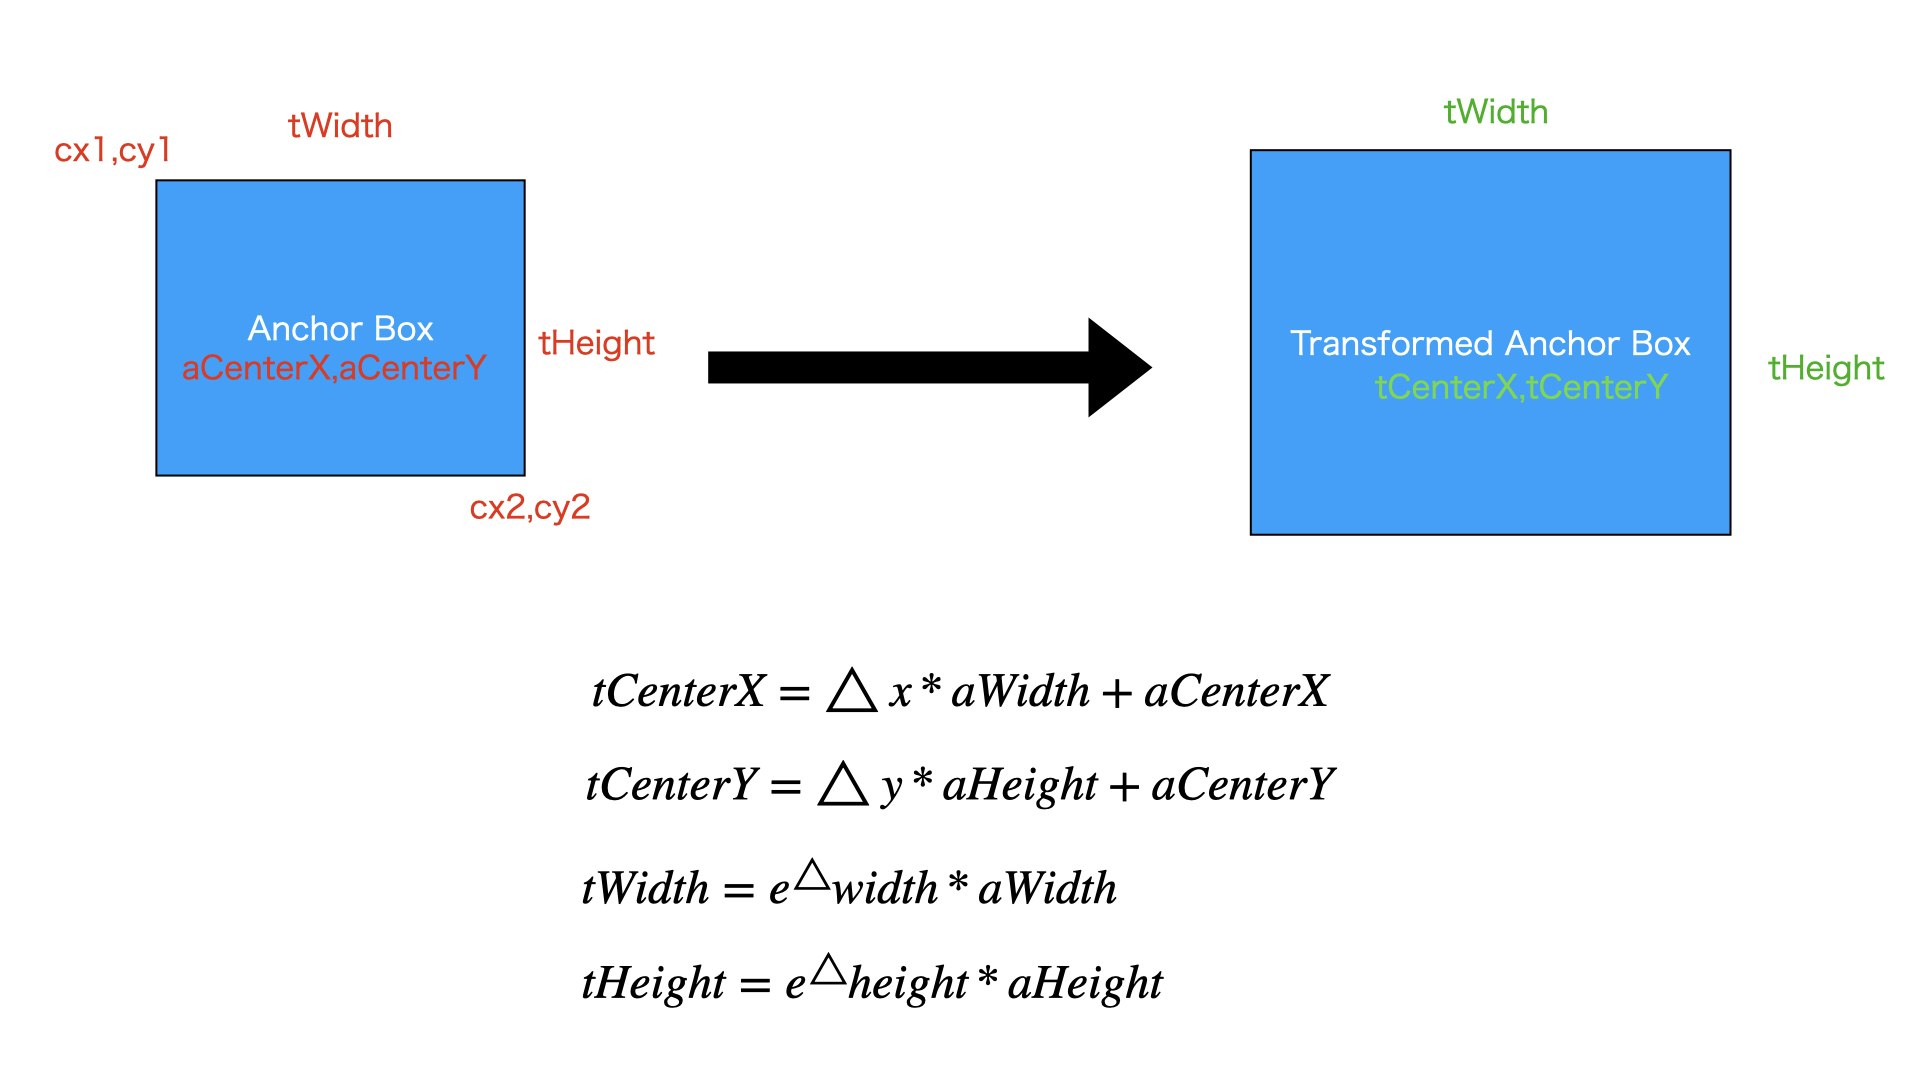
図のように、Anchor Boxはcx1,cy1,cx2,cy1をもってあります。
Regressionは△x、△y,△width,△heightを持ってます
図に書いてある数式で
変形後の枠の中心X座標tCenterX
変形後の枠の中心y座標tCenterY
変形後の枠の横幅tWidth
変形後の枠の縦幅tHeight
を計算できます。
NMS###
すべてのAnchor Boxを変形しました。ただ、今回の例では全てなAnchor Boxは103635です。それぞれのAnchor Boxはすべてのカテゴリーに対する信頼度情報がClassification Modelの出力に納められたあります。
すべてのAnchor Boxを残すわけにはいかないですので、フィルタリング処理をします。
それはNMS(NON-MAX-SUPPRESSION)になります。
詳しくはこちらへみてください。
nm_supression
キーポイントなのは、各カテゴリーで行います
各カテゴリーで出られた結果を最後にくっつけます。
実験##
ソースコード###
今回は実験用のソースコードを書いてみました。
import numpy as np
import torch
from torchvision.ops import nms
import matplotlib.pyplot as plt

PYRAMID_LEVEL = [3, 4, 5, 6, 7]

TEST_SCALE = np.array([2 ** 0, 2 ** (1.0 / 3.0), 2 ** (2.0 / 3.0)])
TEST_RATIO = np.array([0.5, 1, 2])

classNum = 10


def clip_anchor_boxes(transformedAnchorBoxes, w, h):
    cx = transformedAnchorBoxes[:, :, 0]
    cy = transformedAnchorBoxes[:, :, 1]
    width = transformedAnchorBoxes[:, :, 2]
    height = transformedAnchorBoxes[:, :, 3]

    torch.clamp(cx, min=0)
    torch.clamp(cy, min=0)
    torch.clamp(width, max=w)
    torch.clamp(height, max=h)

    result = torch.stack((cx, cy, width, height), dim=2)
    return result


def anchor_box_transform_with_regression(anchorBoxes, regressions):
    anchorBoxesWidth = anchorBoxes[:, :, 2] - anchorBoxes[:, :, 0]
    anchorBoxesHeight = anchorBoxes[:, :, 3] - anchorBoxes[:, :, 1]

    anchorBoxesCenterX = anchorBoxes[:, :, 0] + anchorBoxesWidth * 0.5
    anchorBoxesCenterY = anchorBoxes[:, :, 1] + anchorBoxesHeight * 0.5

    transformedCenterX = anchorBoxesCenterX + regressions[:, :, 0] * anchorBoxesWidth
    transformedCenterY = anchorBoxesCenterY + regressions[:, :, 1] + anchorBoxesHeight
    transformedWidth = torch.exp(regressions[:, :, 2]) * anchorBoxesWidth
    transformedHeight = torch.exp(regressions[:, :, 3]) * anchorBoxesHeight

    transformedStartX = transformedCenterX - 0.5 * transformedWidth
    transformedStartY = transformedCenterY - 0.5 * transformedHeight
    result = torch.stack((transformedStartX, transformedStartY, transformedWidth, transformedHeight), dim=2)

    return result


def generate_anchorbox(boxSize, scale, ratios):
    prevBoxsScales = np.tile(scale, (2, len(scale))).T
    prevBoxsScales = prevBoxsScales * boxSize

    preBoxAreas = prevBoxsScales[:, 0] * prevBoxsScales[:, 1]

    # w * h = area
    # w * w*ratio = area
    preBoxRatios = np.repeat(ratios, len(scale))
    preBoxW = np.sqrt(preBoxAreas / preBoxRatios)
    preBoxH = preBoxW * preBoxRatios

    anchorBox = np.zeros((len(scale) * len(ratios), 4))

    anchorBox[:, 2] = preBoxW
    anchorBox[:, 3] = preBoxH

    #
    anchorBox[:, 0::2] -= np.tile(anchorBox[:, 2] * 0.5, (2, 1)).T
    anchorBox[:, 1::2] -= np.tile(anchorBox[:, 3] * 0.5, (2, 1)).T
    return anchorBox


def shift_boxes(positionFixedAnchorBoxes, imageShape, stride):
    imageWidth = imageShape[1]
    imageHeight = imageShape[0]

    featuresWidth = int((imageWidth + 0.5 * stride) / stride)
    featureHeight = int((imageHeight + 0.5 * stride) / stride)

    featureXCoordinates = np.arange(0, featuresWidth) + 0.5
    featureYCoordinates = np.arange(0, featureHeight) + 0.5

    featureXCoordinates = featureXCoordinates * stride
    featureYCoordinates = featureYCoordinates * stride

    a, b = np.meshgrid(featureXCoordinates, featureYCoordinates)
    m = np.vstack((a.ravel(), b.ravel(), a.ravel(), b.ravel()))
    m = m.transpose()

    positionFixedAnchorBoxes = np.expand_dims(positionFixedAnchorBoxes, 0)
    m = np.expand_dims(m, 1)

    res = m + positionFixedAnchorBoxes

    return m[:, :, :2], res


strides = [2 ** level for level in PYRAMID_LEVEL]
boxSizeBaseSizes = [2 ** (level + 2) for level in PYRAMID_LEVEL]
imageShape = (640, 832)
idx = 4
boxSizeBaseSizes[idx]

position_fixed_anchor_boxes = generate_anchorbox(boxSizeBaseSizes[idx], TEST_SCALE, TEST_RATIO)
centerPositions, anchorBoxes = shift_boxes(position_fixed_anchor_boxes, imageShape, strides[idx])

featuresWidth = int((imageShape[1] + 0.5 * strides[idx]) / strides[idx])
featureHeight = int((imageShape[0] + 0.5 * strides[idx]) / strides[idx])

anchorBoxes = torch.from_numpy(anchorBoxes)

classifications = torch.rand((featuresWidth * featureHeight, 9, classNum)) * 0.01

regressions = torch.rand((featuresWidth * featureHeight, 9, 4))

transformedAnchorBoxes = anchor_box_transform_with_regression(anchorBoxes, regressions)

transformedAnchorBoxes = clip_anchor_boxes(transformedAnchorBoxes, imageShape[1], imageShape[0])

anchorBoxes = transformedAnchorBoxes.view(-1, 4)
classifications = classifications.view(-1, classNum)

targetNum = 3
targetFrequent = (featuresWidth * featureHeight * 9) // 3
for i in range(featuresWidth * featureHeight * 9):
    if i % targetFrequent == 0:
        classifications[i] = torch.rand((classifications[i].shape))

    if i % 57 == 0:
        classifications[i] = torch.rand((classifications[i].shape))

regressions = regressions.view(-1, 4)

finalResult = []
for i in range(classNum):
    scores = classifications[:, i]
    scoreMask = scores > 0.02

    anchorBoxIndexes = nms(anchorBoxes[scoreMask], scores[scoreMask].double(), 0.5)

    resLocations = anchorBoxes[scoreMask][anchorBoxIndexes].double()
    resScores = scores[scoreMask][anchorBoxIndexes].double()

    resScores = torch.unsqueeze(resScores, dim=1)

    result = torch.cat((resLocations, resScores), dim=1)

    classTensor = torch.zeros((result.shape[0], 1))
    classTensor[:, 0] = i

    result = torch.cat((result, classTensor.double()), dim=1)

    finalResult.append(result)

fig = plt.figure()
ax = fig.add_subplot(111)

for classWrapper in finalResult:
    for box in classWrapper:
        if box[4] < 0.5:
            continue

        width = box[2]
        height = box[3]
        cx = box[0] - 0.5 * width
        cy = box[1] - 0.5 * height
        rect = plt.Rectangle([cx, cy], width, height, fill=None)
        ax.add_patch(rect)

        ax.text(box[0].int(), box[1].int(), str(int(box[5])))

plt.xlim(-1200, 1900)
plt.ylim(-1200, 1900)
plt.show()
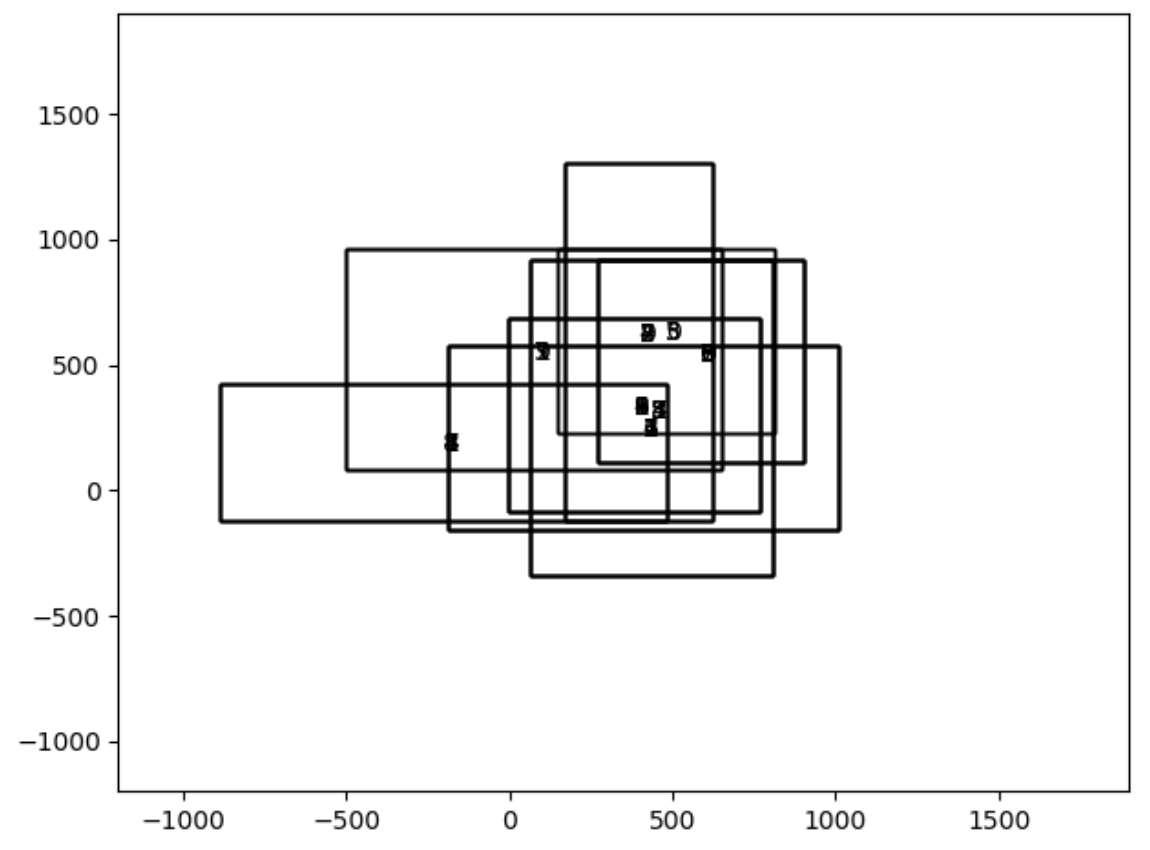
実験結果###
実験に得られた結果は以下のものになります
まとめ##
今回は、RetinaNetモデルの出力を使って推論流れを紹介しました。
RetinaNetモデルの出力RegressionはすべてなAnchor Boxesを変形するためな出力です。
RetinaNetモデルの出力ClassificationはNMS処理でAnchor Boxesをフィルタリングするためな出力です。
これでRetinaNetの紹介が終わります。
間違ってあるところがあれば、ぜひ教えていただきたいと思います。