「PublishでWebサイトを構築する」は6部構成です。
記事を順番に読み進めると、PublishでWebサイトが構築できるようになります。
第1部: セットアップ&使い方 ←イマココ
第2部: カスタムテーマの作成
第3部: プラグインのインストール
第4部: プラグインの作成(未投稿)
第5部: ツイートボタンの表示
第6部: はてなブックマークボタンの表示
「Publish」とは?
Swift製の静的サイトジェネレータです。
SwiftとMarkdownファイルからHTMLやCSSを生成し、GitHub Pagesなどへデプロイできます。
環境
- OS:macOS Monterey 12.2.1
- Xcode:13.3 (13E113)
- Swift:5.6
- Publish:0.8.0
セットアップ
CLIツールのインストール
Publishで静的サイトを生成するには、CLIツールとライブラリの両方を使います。
どちらも1つのパッケージで管理されています。
let package = Package(
    // ...
    products: [
        .library(name: "Publish", targets: ["Publish"]),
        .executable(name: "publish-cli", targets: ["PublishCLI"])
    ],
    // ...
)
私はCLIツールとライブラリでバージョンを揃えたい、かつどちらもSwiftPMで管理したいため、まず以下のような Package.swift を用意しました。
後述しますが、あとで捨てるので丁寧に作る必要はありません。
// swift-tools-version:5.6

import PackageDescription

let package = Package(
    name: "Tools",
    platforms: [
        .macOS(.v12),
    ],
    dependencies: [
        .package(url: "https://github.com/johnsundell/publish.git", from: "0.8.0"),
    ],
    targets: [.target(name: "Tools", path: "")]
)
Package.swift を作成したら、PublishのCLIツールをリリースビルドします。
$ swift build -c release --product publish-cli
グローバル環境を汚したくないため、パスを通さずに使うことにします。
リリースビルドしたCLIツールは .build/release/ フォルダに生成されます。
$ .build/release/publish-cli help
Publish Command Line Interface
------------------------------
Interact with the Publish static site generator from
the command line, to create new websites, or to generate
and deploy existing ones.

Available commands:

- new: Set up a new website in the current folder.
- generate: Generate the website in the current folder.
- run: Generate and run a localhost server on default port 8000
       for the website in the current folder. Use the "-p"
       or "--port" option for customizing the default port.
- deploy: Generate and deploy the website in the current
       folder, according to its deployment method.
publish-cli help を実行して、new generate run deploy と、コマンドが4つあることがわかります。
これでインストールは完了です。
Webサイトの基盤生成
publish-cli new を実行し、Webサイトの基盤を生成します。
Package.swift などが残っていると生成できないので、削除します。
$ .build/release/publish-cli new
❌ New projects can only be generated in empty folders.
$ rm -f Package.swift Package.resolved
$ .build/release/publish-cli new
✅ Generated website project for 'WebsiteSample'
Run 'open Package.swift' to open it and start building
成功すると Package.swift やソースなどが生成されます。(すごい!)
tree コマンドだと見えないですが .gitignore も生成されています。
$ tree
.
├── Content
│   ├── index.md
│   └── posts
│       ├── first-post.md
│       └── index.md
├── Package.resolved
├── Package.swift
├── Resources
└── Sources
    └── WebsiteSample
        └── main.swift

5 directories, 6 files
プロジェクト名は現在のフォルダ名をアッパーキャメルケースに変換した文字列が使われます。
私は website-sample フォルダで実行したため、プロジェクト名が WebsiteSample になりました。
必要に応じてパッケージ名などを変更してください。
指示通り open Package.swift を実行し、生成されたパッケージをXcodeで開いて開発します。
プロジェクトの更新
Publish 0.8.0現在、生成されるパッケージのswift-tools-versionが古かったりするので、更新します。
- // swift-tools-version:5.2
+ // swift-tools-version:5.6

import PackageDescription

let package = Package(
    name: "WebsiteSample",
    products: [
        .executable(
            name: "WebsiteSample",
            targets: ["WebsiteSample"]
        )
    ],
    dependencies: [
-        .package(name: "Publish", url: "https://github.com/johnsundell/publish.git", from: "0.7.0")
+        .package(url: "https://github.com/johnsundell/publish.git", from: "0.8.0")
    ],
    targets: [
-        .target(
+        .executableTarget(
            name: "WebsiteSample",
-            dependencies: ["Publish"]
+            dependencies: [
+                .product(name: "Publish", package: "publish")
+            ]
        )
    ]
)
成果物(HTMLなど)が生成される Output フォルダが .gitignore に記述されていないため、成果物をGit管理しない場合は追記します。
+ Output
実装によりますが、成果物の生成時に Resources フォルダが存在しないとエラーが発生するため、フォルダ内に .gitkeep を追加しておくといいです。
$ .build/release/publish-cli generate
[1/1] Planning build
Building for debugging...
[1/3] Emitting module WebsiteSample
[2/3] Compiling WebsiteSample main.swift
[3/3] Linking WebsiteSample
Build complete! (0.51s)
Swift/ErrorType.swift:200: Fatal error: Error raised at top level: Publish encountered an error:
[step] Copy 'Resources' files
[path] Resources
[info] Folder not found
/bin/bash: line 1: 77958 Trace/BPT trap: 5       swift run
❌ ShellOut encountered an error
Status code: 133
Message: "[1/1] Planning build
Building for debugging...
[1/3] Emitting module WebsiteSample
[2/3] Compiling WebsiteSample main.swift
[3/3] Linking WebsiteSample
Build complete! (0.51s)
Swift/ErrorType.swift:200: Fatal error: Error raised at top level: Publish encountered an error:
[step] Copy 'Resources' files
[path] Resources
[info] Folder not found
/bin/bash: line 1: 77958 Trace/BPT trap: 5       swift run"
Output: ""
make: *** [generate] Error 1
.copyResources() を実行しなければエラーは発生しないので、実装でも防げます。
try WebsiteSample().publish(using: [
    .addMarkdownFiles(),
-   .copyResources(),
    .generateHTML(withTheme: .foundation),
    .generateRSSFeed(including: [.posts]),
    .generateSiteMap(),
    .deploy(using: .gitHub("uhooi/uhooi.github.io", useSSH: false))
])
これらの更新はすべてPublishにPRを作成したので、マージされれば不要になります。
- https://github.com/JohnSundell/Publish/pull/126
- https://github.com/JohnSundell/Publish/pull/127
- https://github.com/JohnSundell/Publish/pull/128
- https://github.com/JohnSundell/Publish/pull/129
publish-cliコマンドのラップ
Webサイトの動作確認のため、 publish-cli run を頻繁に使います。
毎回 .build/release/publish-cli と入力するのは手間なので、 Makefile に隠蔽すると便利です。
PUBLISH_CLI_PATH := ./.build/release/publish-cli

.PHONY: setup
setup:
	$(MAKE) build-cli-tool

.PHONY: build-cli-tool
build-cli-tool:
	swift build -c release --product publish-cli

.PHONY: help
help:
	${PUBLISH_CLI_PATH} help

.PHONY: run
run:
	${PUBLISH_CLI_PATH} run

.PHONY: generate
generate:
	${PUBLISH_CLI_PATH} generate
これで make run や make generate と実行するだけで publish-cli を使えます。
私は new は最初の1回のみ、 deploy は使わないため、 Makefile に定義していません。
ついでに make setup でCLIツールをビルドできるようにしています。
ローカルやCIで開発環境を構築する際に便利です。
使い方
Webサイトのプレビュー
publish-cli run を実行すると、Webサイトのプレビューを見れます。
$ make run
./.build/release/publish-cli run
Building for debugging...
Build complete! (0.10s)
Publishing MyWebsite (6 steps)
[1/6] Copy 'Resources' files
[2/6] Add Markdown files from 'Content' folder
[3/6] Sort items
[4/6] Generate HTML
[5/6] Generate RSS feed
[6/6] Generate site map
✅ Successfully published WebsiteSample
🌍 Starting web server at http://localhost:8000

Press ENTER to stop the server and exit
Enterキーを押下するまでローカルでWebサイトを参照できます。
http://localhost:8000
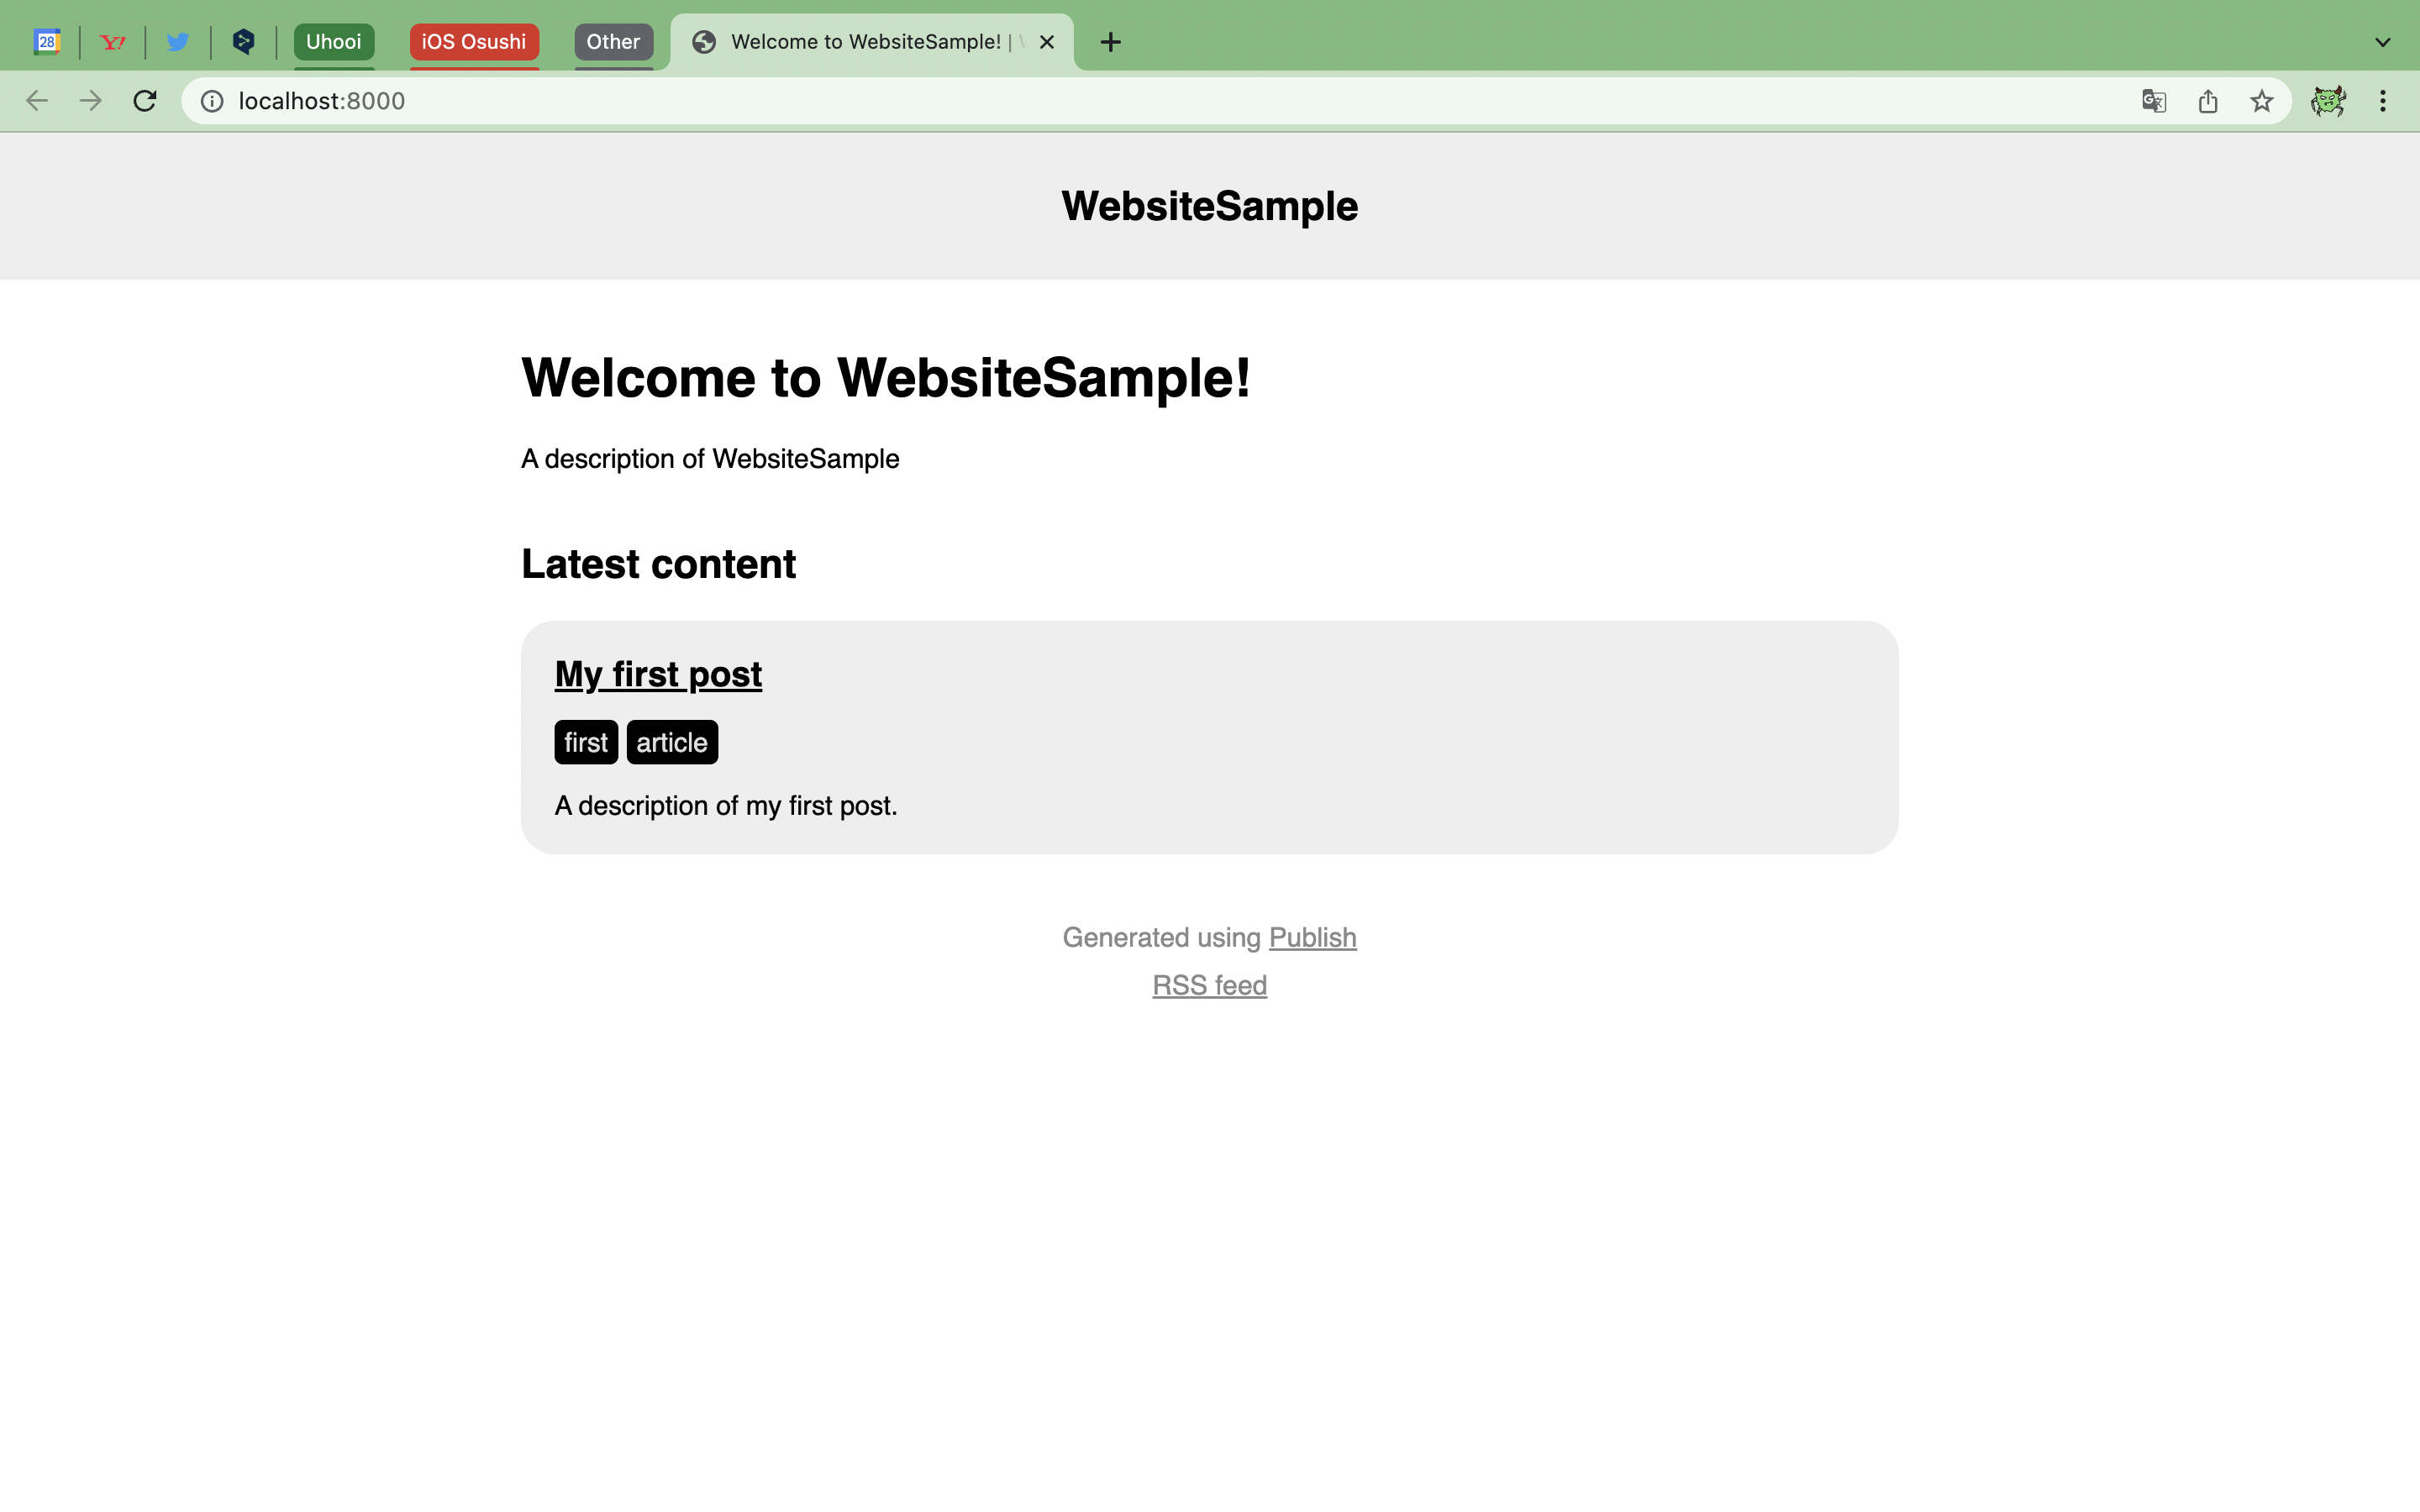
Webサイトが表示されました。
デフォルトのテーマ( foundation )がシンプルで、なんとなくAppleみを感じて好きです。
成果物の生成
publish-cli generate を実行すると、 Output フォルダに成果物が生成されます。
$ make generate
./.build/release/publish-cli generate
Building for debugging...
Build complete! (0.09s)
Publishing WebsiteSample (5 steps)
[1/5] Add Markdown files from 'Content' folder
[2/5] Copy 'Resources' files
[3/5] Generate HTML
[4/5] Generate RSS feed
[5/5] Generate site map
✅ Successfully published WebsiteSample
HTMLやCSS、RSSなどが生成されていることがわかります。
$ tree Output/
Output/
├── feed.rss
├── index.html
├── posts
│   ├── first-post
│   │   └── index.html
│   └── index.html
├── sitemap.xml
├── styles.css
└── tags
    ├── article
    │   └── index.html
    ├── first
    │   └── index.html
    └── index.html

5 directories, 9 files
publish-cli run でも生成されますが、ターミナルを止めてしまうため、CIで使えません。
成果物を生成するのみなら publish-cli generate を使うべきです。
Webサイトのデプロイ
publish-cli deploy を実行すると、Webサイトをデプロイします。
ただGitHub Actionsでデプロイを自動化したらエラーが発生しました。
おそらく認証周りが原因ですが、解決できませんでした。
そのため私は publish-cli deploy を使わず publish-cli generate で成果物を生成し、それをサードパーティ製のアクションでGitHub Pagesへデプロイしています。
以下がワークフローの例です。
name: Deploy

on:
  push:
    branches: [ main ]

jobs:
  deploy-github-pages:
    runs-on: ubuntu-latest
    container: "swift:5.6"
    steps:
    - uses: actions/checkout@v3

    - name: Setup
      run: make setup

    - name: Generate the website
      run: make generate

    - name: Deploy to GitHub Pages
      uses: peaceiris/actions-gh-pages@v3
      with:
        personal_token: ${{ secrets.PERSONAL_TOKEN }}
        external_repository: uhooi/uhooi.github.io
        publish_branch: master
        publish_dir: ./Output
peaceiris/actions-gh-pages アクションの詳細は、GitHubのREADMEをご参照ください。
https://github.com/peaceiris/actions-gh-pages
実装
メインファイルの更新
基本的には Sources/{パッケージ名}/main.swift の1ファイルのみ更新します。
GitHub Pagesへデプロイする場合は、以下のように変更します。
GitHub PagesのURLは http だとエラーになるので https で指定します。
struct WebsiteSample: Website {
    enum SectionID: String, WebsiteSectionID {
        case posts
    }

    struct ItemMetadata: WebsiteItemMetadata {
    }

-   var url = URL(string: "https://your-website-url.com")!
+   var url = URL(string: "https://uhooi.github.io")!
    var name = "WebsiteSample"
    var description = "A description of WebsiteSample"
    var language: Language { .english }
    var imagePath: Path? { nil }
}

- try WebsiteSample().publish(withTheme: .foundation)
+ try WebsiteSample().publish(using: [
+   .addMarkdownFiles(),
+   .copyResources(),
+   .generateHTML(withTheme: .foundation),
+   .generateRSSFeed(including: [.posts]),
+   .generateSiteMap(),
+   .deploy(using: .gitHub("uhooi/uhooi.github.io", useSSH: false))
+ ])
.deploy(using:useSSH:) は branch: も指定できるのですが、エラーになる不具合があるため、デフォルト( master )のブランチにしかプッシュできません。
参考:https://github.com/JohnSundell/Publish/pull/116
useSSH: は true が推奨ですが、CIでの設定がわからないため false にしてしまっています。
私は publish-cli deploy を使っていないので、おそらく false でも問題ありません。
必要に応じて名前や概要、言語なども変更します。
struct WebsiteSample: Website {
    enum SectionID: String, WebsiteSectionID {
        case posts
    }

    struct ItemMetadata: WebsiteItemMetadata {
    }

    var url = URL(string: "https://uhooi.github.io")!
-   var name = "WebsiteSample"
-   var description = "A description of WebsiteSample"
-   var language: Language { .english }
+   var name = "THE Uhooi"
+   var description = "Uhooi's Website"
+   var language: Language { .japanese }
    var imagePath: Path? { nil }
}
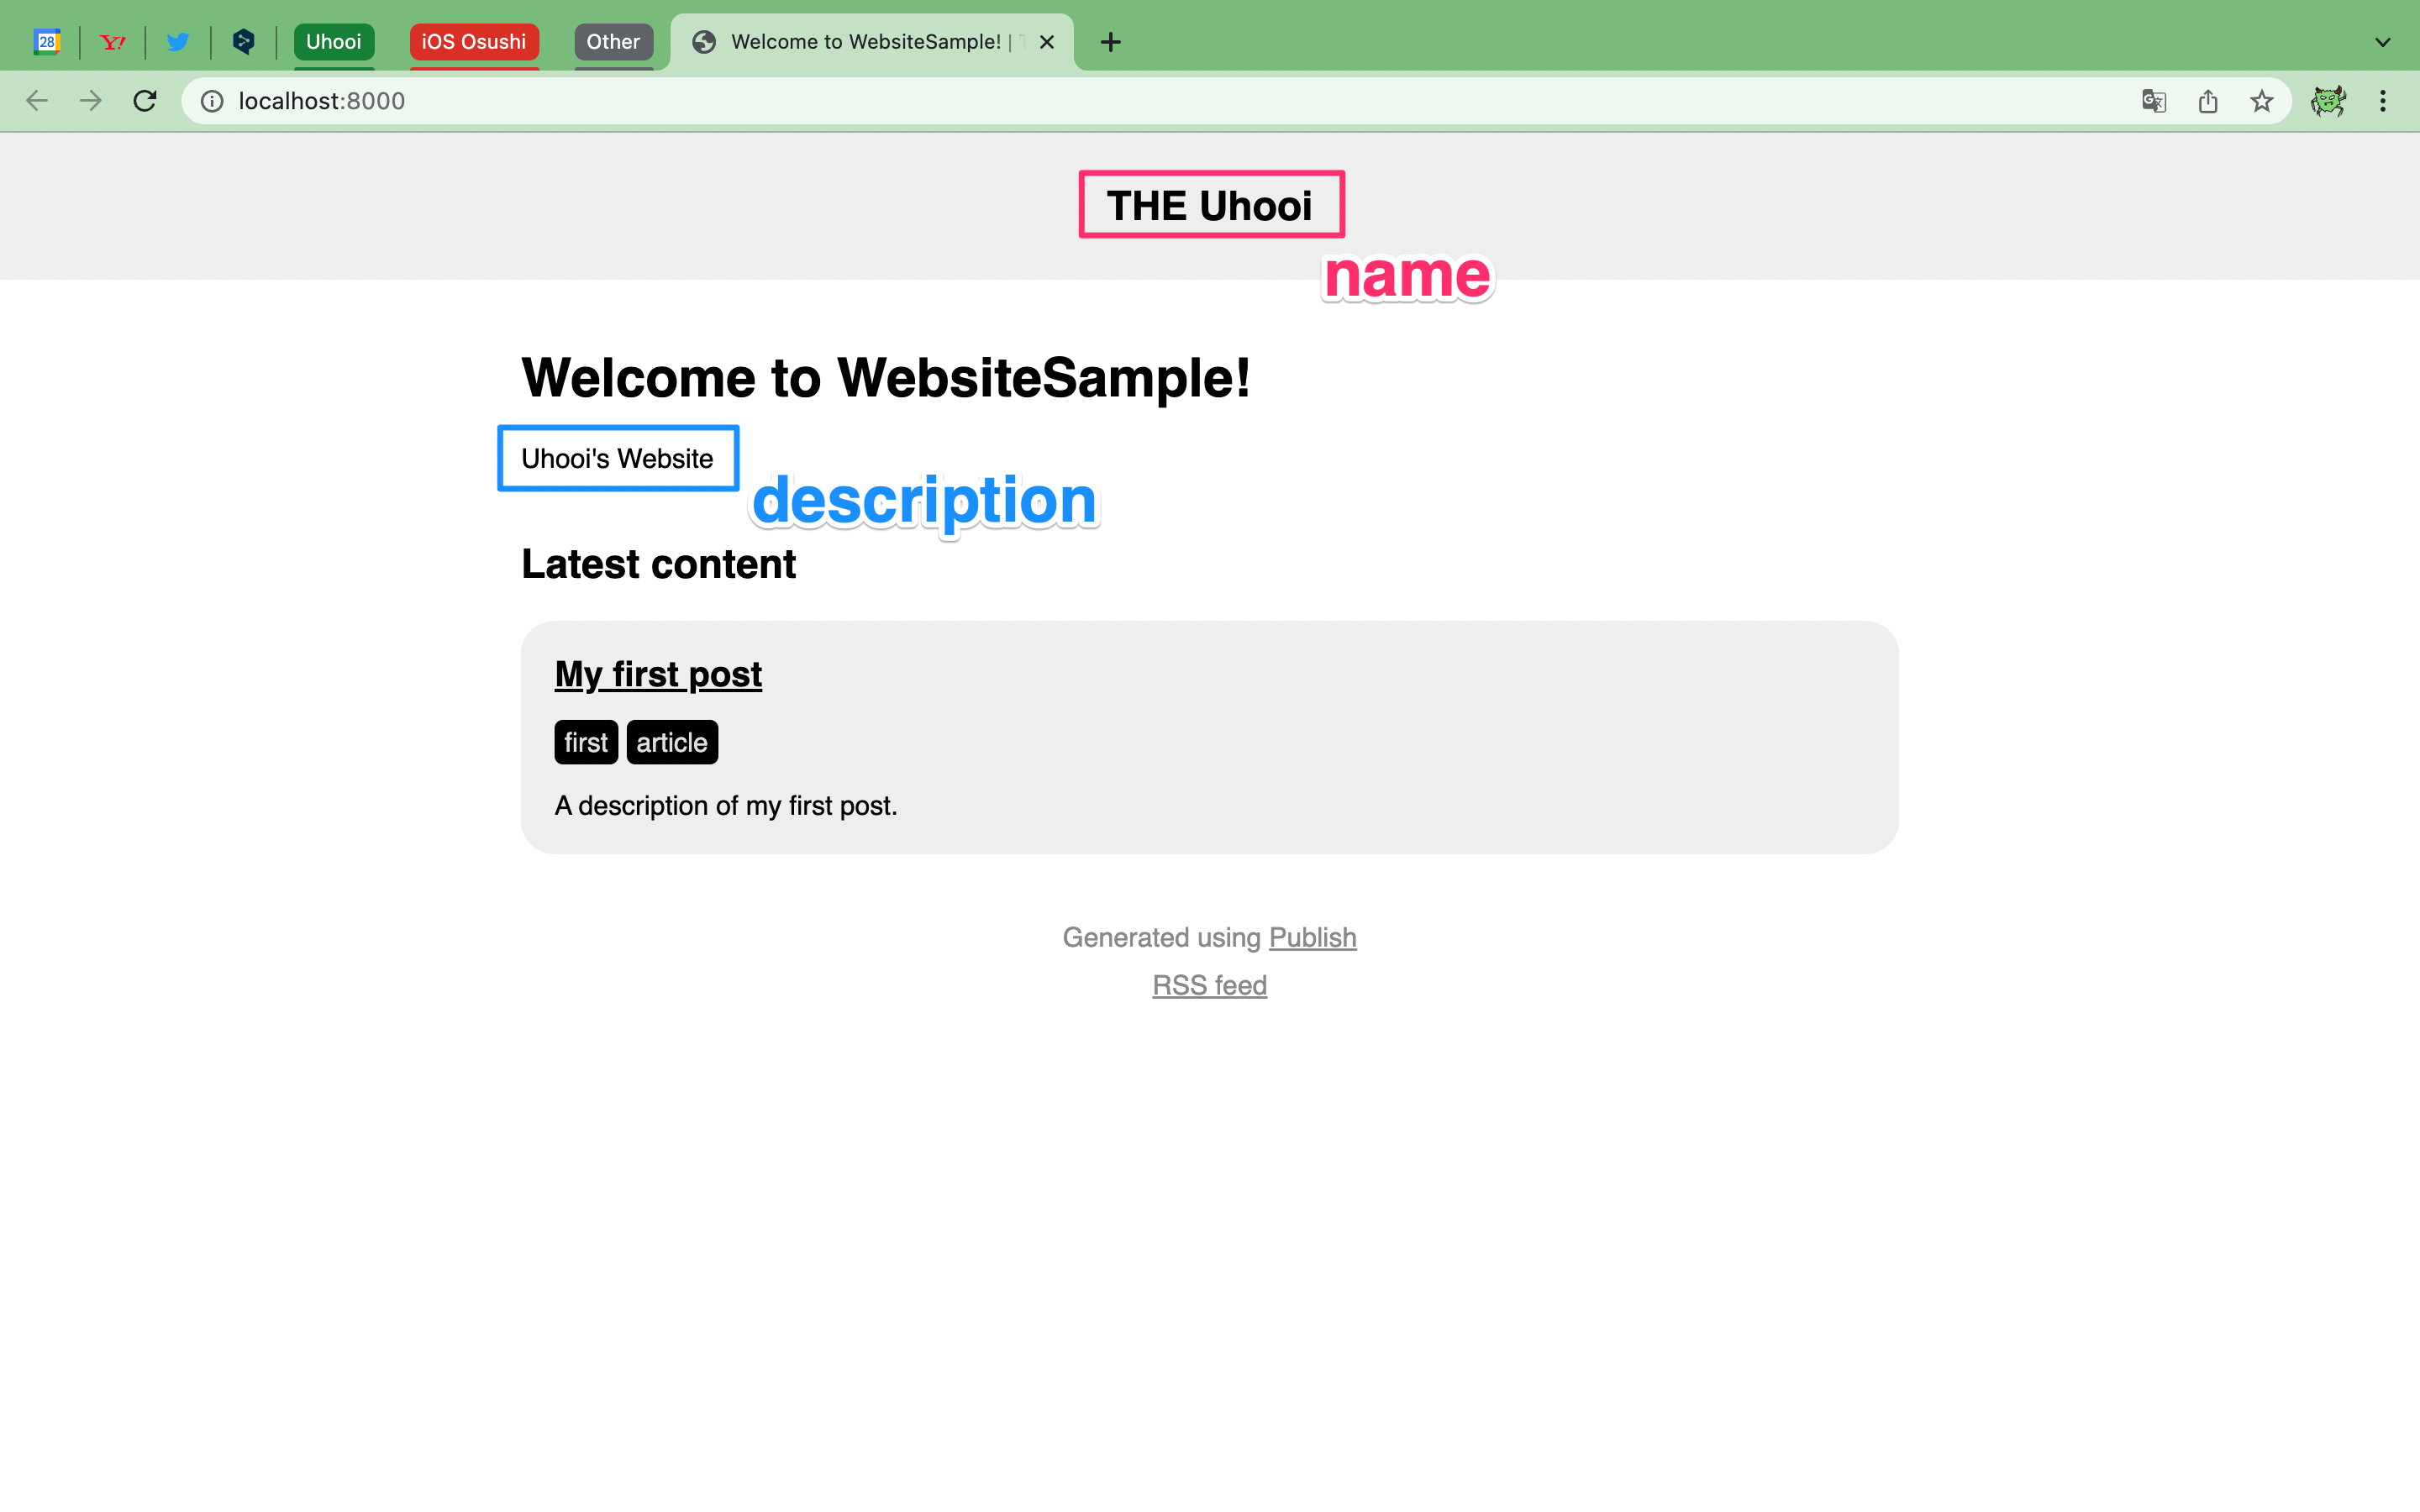
foundation テーマでは、名前や概要は以下に反映されます。
記事の追加や更新
記事は .md ファイルにMarkdown記法で書きます。
デフォルトでは Content/posts の中に .md ファイルを格納して run や generate するだけで記事がHTMLで生成されます。(簡単!)
記事の形式は以下の通りです。
---
date: 2022-03-28 12:40
description: A description of my first post.
tags: first, article
---
# My first post

My first post's text.

...
ヘッダーに date description tags を付けます。
date は YYYY-MM-DD hh:mm フォーマット、 description は文字列、 tags はカンマ区切りの文字列で記述します。
ヘッダー以下が本文になります。
Markdown記法を使って記述します。
例えば以下のMarkdownをもとにHTMLを生成します。
---
date: 2022-03-28 12:40
description: A description of my first post.
tags: first, article
---
# My first post

My first post's text.

## foo

foo.

### Swift

```swift
let foo = Foo()
```

```diff
- foo
+ bar
```

## bar

`bar` is code span.
_bar_ is italic.
__bar__ is bold.

- foo
- bar
  - test
  - test2

https://uhooi.github.io/

[https://uhooi.github.io/](https://uhooi.github.io/)
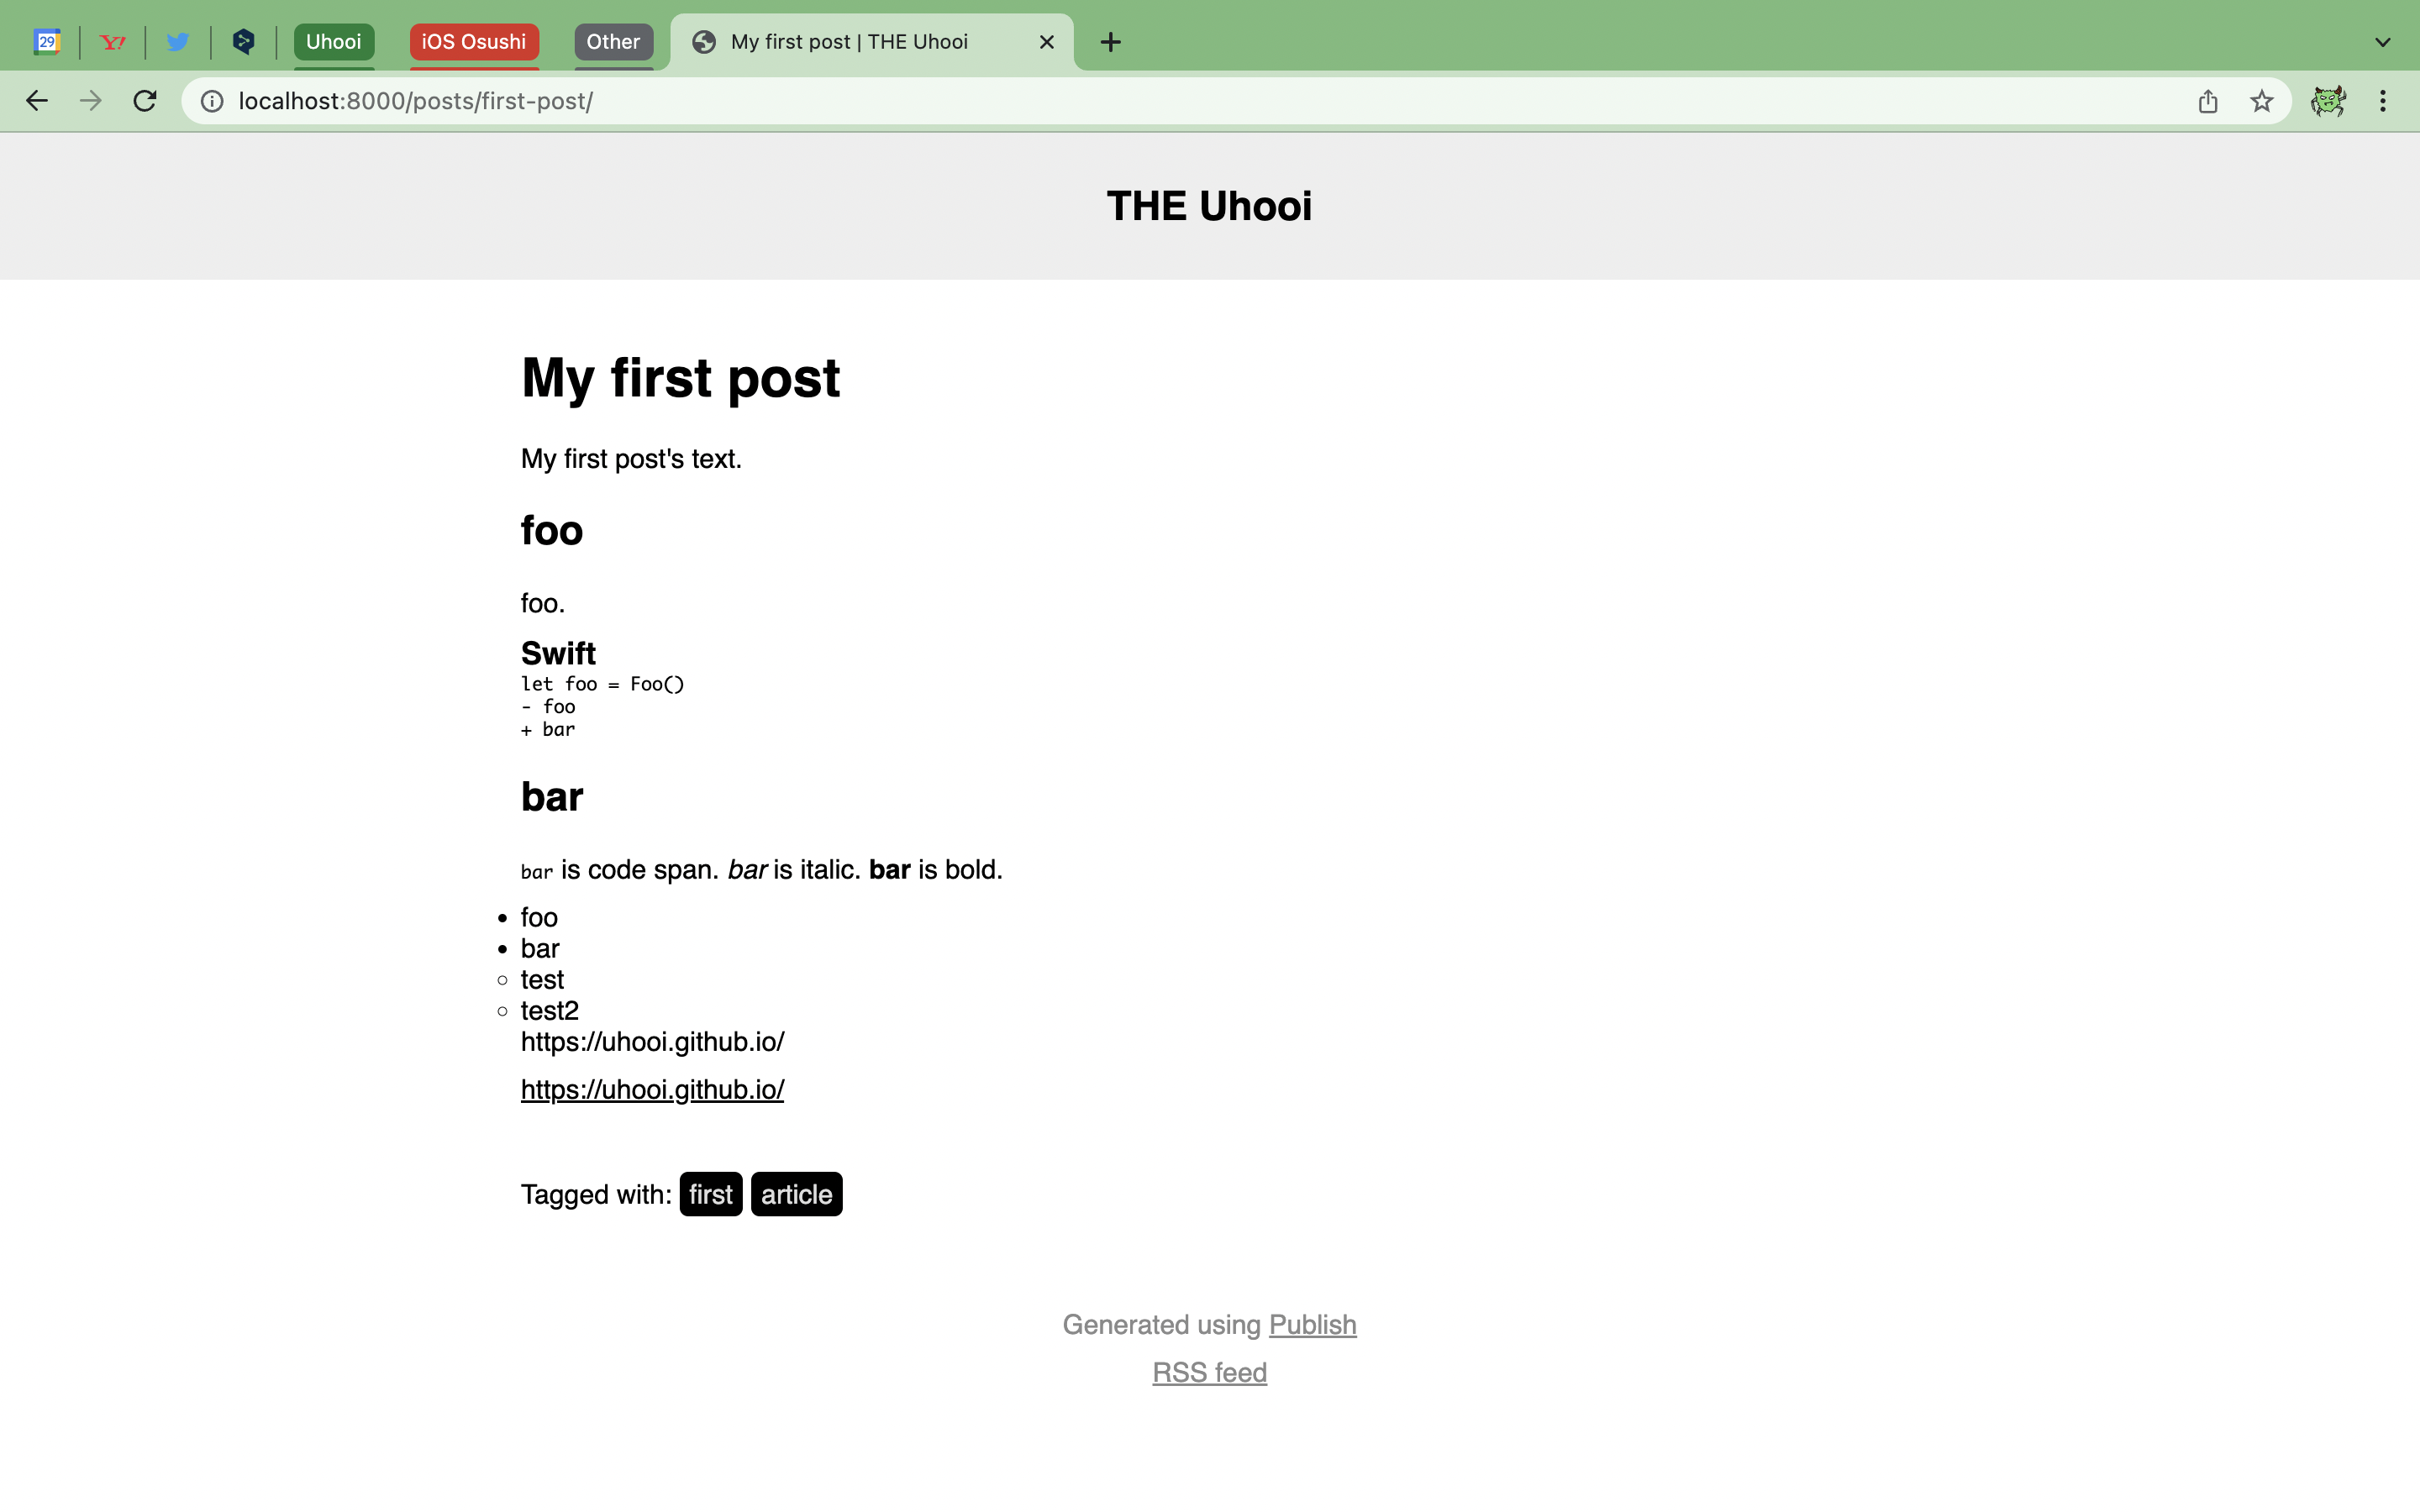
foundation テーマだとこのように変換されます。
いい感じですが、デフォルトのテーマなので、いくつか気になる箇所もあります。
- コードがシンタックスハイライトされない
- コードスパンとコードブロックの文字サイズが小さい
- 箇条書きがインデントされない
- コードブロックと箇条書きの前後にマージンがない
- URLがリンクにならない
これらはCSS修正のPRを作成するのもありだと思いますが、「プラグイン」という仕組みで解決できる可能性があります。
プラグインについてはまだ勉強不足であり、本記事とは別のタイミングで紹介したいです。
おわりに
これでSwiftとMarkdownを使ってWebサイトを構築できました!
ぜひみなさんも試してみてください ![]()


