はじめに
少し前ですが、MCPのRuby SDKがリリースされていたので、それを使って簡易的なMCPサーバーを作ってみようと思います。
Transport Support
- stdio: Notifications are sent as JSON-RPC 2.0 messages to stdout
- Streamable HTTP: Notifications are sent as JSON-RPC 2.0 messages over HTTP with streaming (chunked transfer or SSE)
とあるように、標準入出力とStreamable HTTPに対応しています。
今回は標準入出力を使ったMCPサーバーを実装してみます。
最小構成でMCPサーバーを起動する
特にpromptsやtools, resourcesを設定しない場合、以下の記述だけでMCPサーバーを起動することできます。
require "mcp"

server = MCP::Server.new(
  name: "example",
)
transport = MCP::Server::Transports::StdioTransport.new(server)
transport.open
この状態でサーバーを起動すると、標準入出力経由でメッセージをやり取りできるようになります。
$ ruby stdio.rb
{"jsonrpc":"2.0","id":"1","method":"ping"}
{"jsonrpc":"2.0","id":"1","result":{}}
{"jsonrpc":"2.0","id":"2","method":"tools/list"}
{"jsonrpc":"2.0","id":"2","result":{"tools":[]}}
実行できるメソッドは以下になります。
https://github.com/modelcontextprotocol/ruby-sdk?tab=readme-ov-file#supported-methods
Supported Methods
initialize- Initializes the protocol and returns server capabilitiesping- Simple health checktools/list- Lists all registered tools and their schemastools/call- Invokes a specific tool with provided argumentsprompts/list- Lists all registered prompts and their schemasprompts/get- Retrieves a specific prompt by nameresources/list- Lists all registered resources and their schemasresources/read- Retrieves a specific resource by nameresources/templates/list- Lists all registered resource templates and their schemas
toolsを追加してみる
toolsとして、簡単な足し算の機能を追加してみます。
MCP::Toolを継承したクラスを作成し、入力のschemaや実際に呼び出し時に実行されるメソッドを定義するだけで作成することができます。
class ExampleTool < MCP::Tool
  title "Example tool for sum"
  description "This tool adds two numbers."
  input_schema(
    properties: {
      a: { type: "number" },
      b: { type: "number" },
    },
    required: ["a", "b"]
  )

  def self.call(a:, b:, server_context:)
    MCP::Tool::Response.new([{ type: "text", text: "#{a} + #{b} = #{a + b}"}])
  end
end
MCP::Serverの初期化時にtoolsパラメータに配列で渡すだけで簡単に追加することができます。
server = MCP::Server.new(
  name: "example",
+ tools: [ExampleTool],
)
この状態でtools/listメソッドを実行すると、上記のtoolsが追加されていることが確認できます。
{"jsonrpc":"2.0","id":"1","method":"tools/list"}
{"jsonrpc":"2.0","id":"1","result":{"tools":[{"name":"example_tool","title":"Example tool","description":"This tool adds two numbers.","inputSchema":{"type":"object","properties":{"a":{"type":"number"},"b":{"type":"number"}},"required":["a","b"]}}]}}
input_schemaに沿ったJSONをパラメータにツールを実行すると、ExampleTool.callで定義した処理が実行されて返されます。
{"jsonrpc":"2.0","id":"2","method":"tools/call","params":{"name":"example_tool","arguments":{"a":7, "b": 7}}}
{"jsonrpc":"2.0","id":"2","result":{"content":[{"type":"text","text":"7 + 7 = 14"}],"isError":false}}
resourcesを追加してみる
次に、固定のテキストファイルの内容を返すresourcesを追加してみます。
まずは、resources/listに応答するためのリソース情報を定義します。
ここではexample.txtというローカルファイルをひとつ公開します。
resource = MCP::Resource.new(
  uri: "file:///Users/tsuzuki-takaaki/example.txt",
  name: "Example Resource",
  title: "Example Resource",
  description: "An example text file",
  mime_type: "text/plain",
)
これもtoolsと同様に、MCP::Serverの初期化時にresourcesパラメータに配列で渡すだけで簡単に追加することができます。
server = MCP::Server.new(
  name: "example",
  tools: [ExampleTool],
+ resources: [resource],
)
この状態でresources/listを実行すると、追加されていることが確認できます。
{"jsonrpc":"2.0","id":"2","method":"resources/list"}
{"jsonrpc":"2.0","id":"2","result":{"resources":[{"uri":"file:///Users/tsuzuki-takaaki/example.txt","name":"Example Resource","title":"Example Resource","description":"An example text file","mimeType":"text/plain"}]}}
このままだと、resources/readメソッドに反応できないので、リソースの実際の中身を返す処理を登録します。
uriで指定されたファイルのコンテンツを読む処理を追加しました。
server.resources_read_handler do |params|
  [{
    uri: params[:uri],
    mimeType: "text/plain",
    text: File.read(params[:uri].sub("file://", "")),
  }]
end
resources/readを実行してみると、uriで指定したファイルのコンテンツが読まれていそうです。
{"jsonrpc":"2.0","id":"1","method":"resources/read", "params": {"uri": "file:///Users/tsuzuki-takaaki/example.txt"}}
{"jsonrpc":"2.0","id":"1","result":{"contents":[{"uri":"file:///Users/tsuzuki-takaaki/example.txt","mimeType":"text/plain","text":"Example\n"}]}}
Claude Desktopで使ってみる
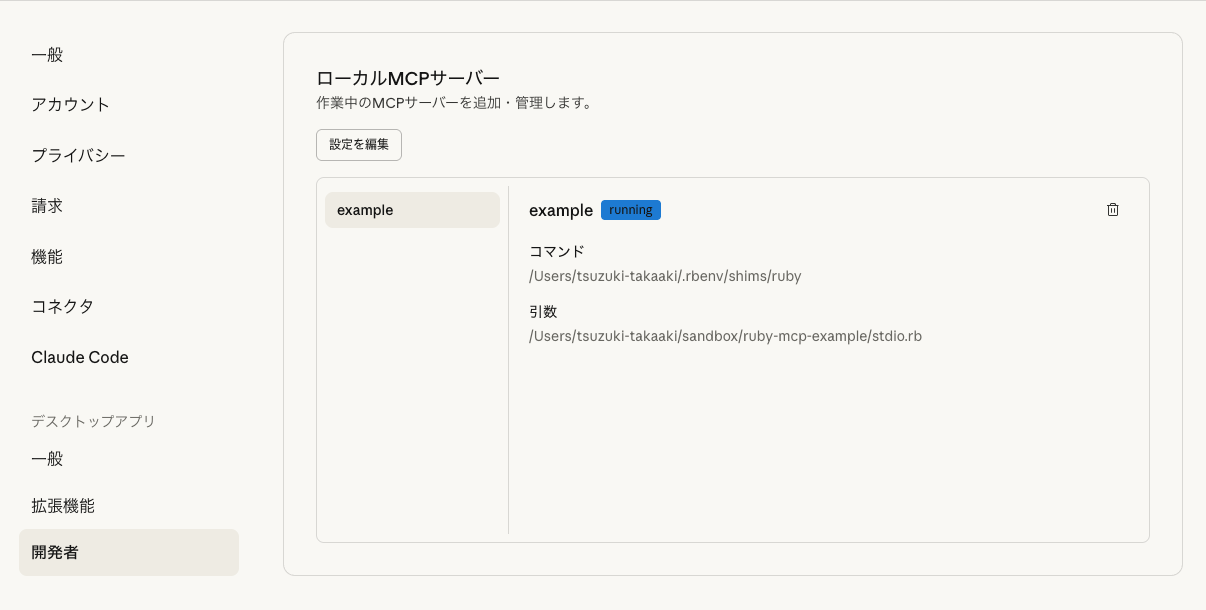
設定 -> 開発者 -> 設定を編集で、claude_desktop_config.jsonを編集することができます。
commandには、実行したいRubyのパスを、argsには作成したMCP server用のファイルのパスを指定します。
{
  "mcpServers": {
    "example": {
      "command": "{実行したいRubyのパス}",
      "args": [
        "{MCP server用のファイルのパス}"
      ]
    }
  }
}
問題なく設定が完了すると、設定画面に以下のように出力され、作成したMCPサーバーが使えるようになります。
終わりに
今回はtoolsとresourcesしか追加しませんでしたが、もちろんpromptsもあるので、そのあたりも触ってみたいなと思いました。