この記事はRaspberry Pi Advent Calendar 2020 10日目です。
前日は、@s51517765さんのエアコンをSlackでスマートリモコン化の効果を温湿度センサで測定する【2020年版】でした。
10日目はまだ投稿されていなかったので投稿してみました ![]()
はじめまして! よろしくお願いします! ![]()
![]()
![]()
はじめに
- 目覚ましアラームをつくります
- 7:00になったらGrove - Buzzerが鳴る
- Grove Button(P)を押したら音が止まる
What is Nerves ?
-
NervesはElixirのIoTでナウでヤングなcoolなすごいヤツです

-
Nervesを作っているJustin Schneckさんが、
 しているので間違いないです
-
Nervesを作っているJustin Schneckさんが、
- Elixirというプログラミング言語がありまして、それを使ってRaspberry Piで動くアプリケーションを作っていくことができます。
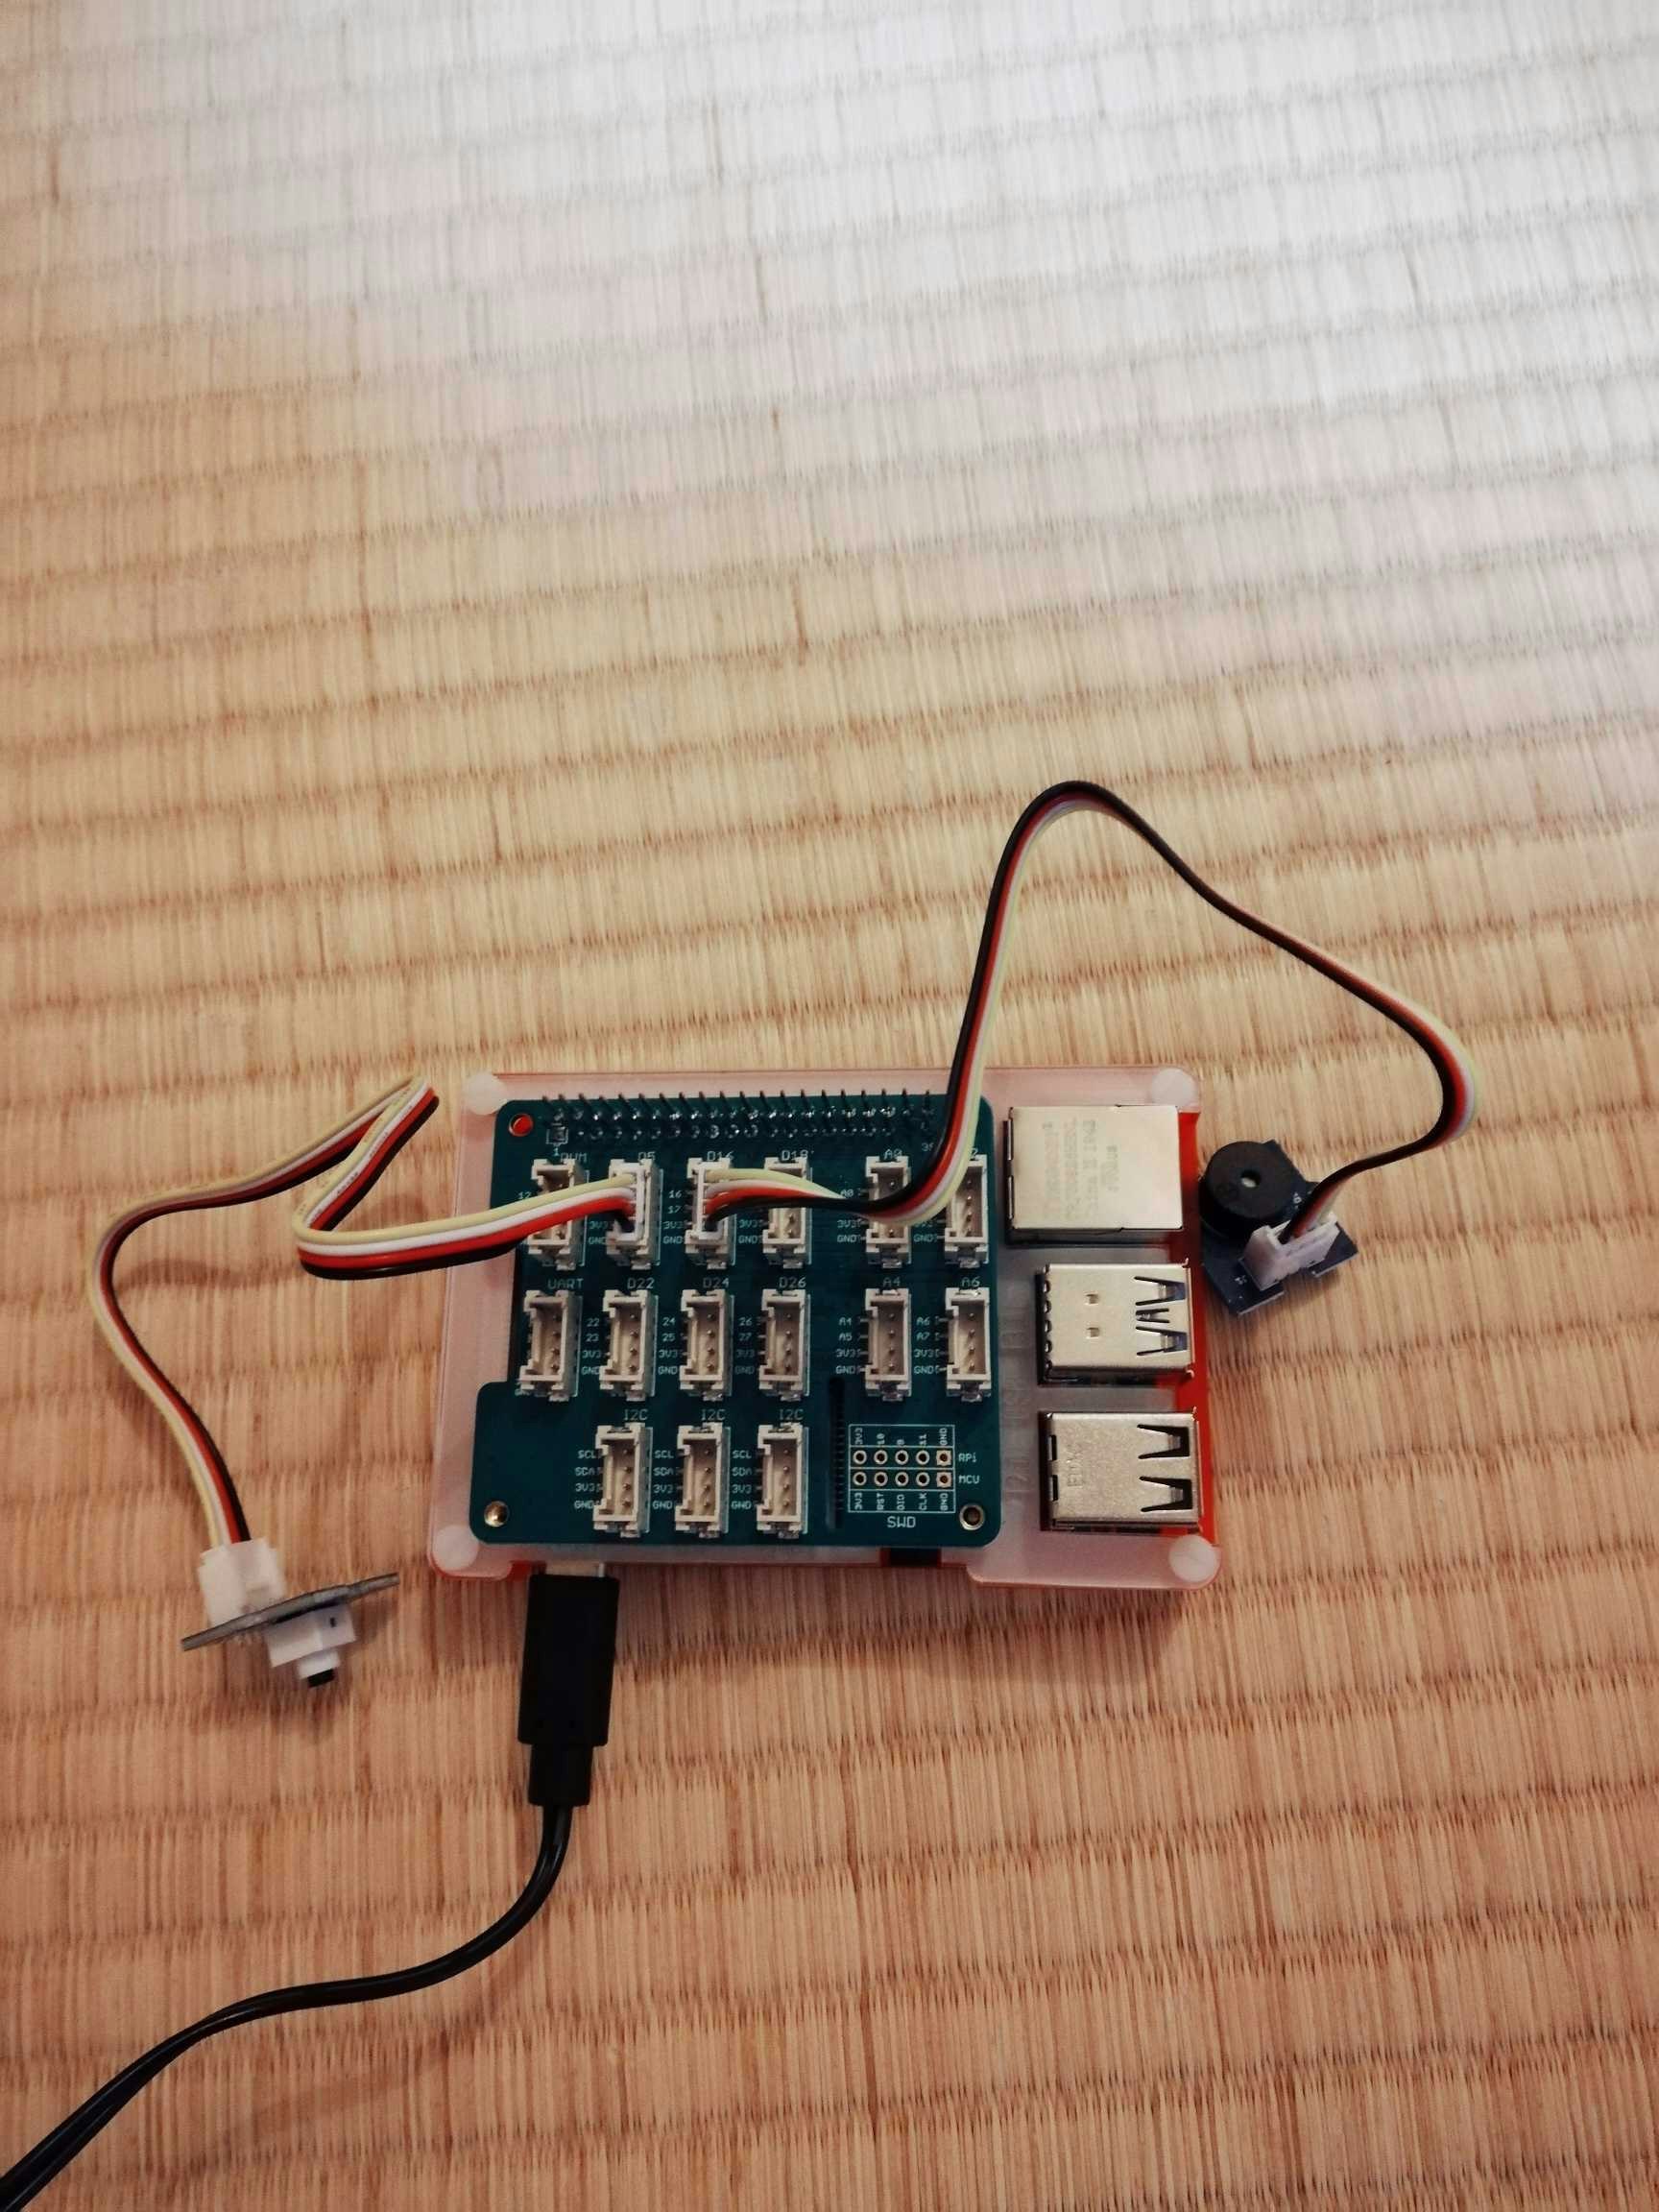
外観
- Raspberry Pi 4(4GB)
- Grove Base HAT for Raspberry Pi
-
Grove Button(P)
D5
-
Grove - Buzzer
D16
-
ヒートシンク
- 写真ではみえませんが、@myasu さんに教えてもらって貼っています
- だって、Raspberry Pi 4がものすごく熱くなるのですもの
- Seeed株式会社様のモノを使うことで、工作が簡単にできます!
- なにせ自分は、不器用ですから
準備
- 公式のGetting Started
- @takasehideki先生のElixirでIoT#4.1:Nerves開発環境の準備
- @takasehideki先生のElixirでIoT#4.1.2:[使い方篇] Docker(とVS Code)だけ!でNerves開発環境を整備する
- @kentaroさんのウェブチカでElixir/Nervesに入門する
mix nerves.new alarm
- このコマンドでばーっと、プロジェクトの雛形が作られます
$ mix nerves.new alarm
$ cd alarm
$ export MIX_TARGET=rpi4
- 今回はRaspberry Pi 4を使っているので
rpi4です - その他のものを使う場合は、Targetsをご参照ください
依存ライブラリの導入
mix.exs
@@ -49,7 +49,11 @@ defmodule Alarm.MixProject do
       {:nerves_system_rpi4, "~> 1.13", runtime: false, targets: :rpi4},
       {:nerves_system_bbb, "~> 2.8", runtime: false, targets: :bbb},
       {:nerves_system_osd32mp1, "~> 0.4", runtime: false, targets: :osd32mp1},
-      {:nerves_system_x86_64, "~> 1.13", runtime: false, targets: :x86_64}
+      {:nerves_system_x86_64, "~> 1.13", runtime: false, targets: :x86_64},
+
+      # add
+      {:circuits_gpio, "~> 0.4"},
+      {:quantum, "~> 3.0"}
     ]
   end
-
Alarm.MixProject.deps/0に追加します - circuits_gpioは、GPIOを扱えるライブラリです
- quantumは、cronライクなジョブスケジューラです
lib/alarm/buzzer.ex
- ブザーを鳴らしたり、止めたりします
-
D16にGrove - Buzzerを挿したので16をopenしています
lib/alarm/buzzer.ex
defmodule Alarm.Buzzer do
  @pin 16

  def start do
    Circuits.GPIO.write(gpio(), 1)
  end

  def stop do
    Circuits.GPIO.write(gpio(), 0)
  end

  def pin, do: @pin

  defp gpio do
    {:ok, gpio} = Circuits.GPIO.open(@pin, :output)
    gpio
  end
end
lib/alarm/button.ex
-
D5にGrove Button(P)を挿したので5をopenしています
lib/alarm/button.ex
defmodule Alarm.Button do
  @pin 5

  def pin, do: @pin

  def gpio do
    {:ok, gpio} = Circuits.GPIO.open(@pin, :input)
    gpio
  end
end
lib/alarm/set_interrupter.ex
lib/alarm/set_interrupter.ex
defmodule Alarm.SetInterrupter do
  use GenServer

  def start_link(state \\ []) do
    GenServer.start_link(__MODULE__, state, name: __MODULE__)
  end

  def init(state) do
    Circuits.GPIO.set_interrupts(Alarm.Button.gpio(), :both, receiver: Alarm.Observer)

    {:ok, state}
  end
end
-
Grove Button(P)が押されたり、離されたりすると、
Alarm.Observerモジュールで処理をします
lib/alarm/observer.ex
lib/alarm/observer.ex
defmodule Alarm.Observer do
  use GenServer

  require Logger

  @button_pin Alarm.Button.pin()

  def start_link(state) do
    GenServer.start_link(__MODULE__, state, name: __MODULE__)
  end

  def init(state) do
    {:ok, state}
  end

  def handle_info({:circuits_gpio, @button_pin, _timestamp, 1}, state) do
    Logger.debug("Received rising event on pin #{@button_pin}")
    Alarm.Buzzer.State.toggle()
    {:noreply, state}
  end

  def handle_info({:circuits_gpio, @button_pin, _timestamp, 0}, state) do
    Logger.debug("Received falling event on pin #{@button_pin}")
    {:noreply, state}
  end
end
- ボタンが押されたときに、
Alarm.Buzzer.State.toggle/0を呼び出しています(後述) - ボタンが離されたときは特に処理はしていません
lib/alarm/buzzer/state.ex
lib/alarm/buzzer/state.ex
defmodule Alarm.Buzzer.State do
  use GenServer

  def start_link(_state) do
    GenServer.start_link(__MODULE__, false, name: __MODULE__)
  end

  def init(state) do
    {:ok, state}
  end

  def toggle do
    GenServer.cast(__MODULE__, :toggle)
  end

  # 鳴らしていないときはこちらが実行される
  def handle_cast(:toggle, false) do
    Alarm.Buzzer.start()

    {:noreply, true}
  end

  # 鳴らしているときはこちらが実行される
  def handle_cast(:toggle, true) do
    Alarm.Buzzer.stop()

    {:noreply, false}
  end
end
- 初期状態を
falseにしておいて、Grove - Buzzerを鳴らしているときには、状態をtrueにしています
日本時間07:00に鳴動するようにする
lib/alarm/scheduler.ex
defmodule Alarm.Scheduler do
  use Quantum, otp_app: :alarm
end
config/config.exs
config :alarm, Alarm.Scheduler,
  jobs: [
    {"0 22 * * *", {Alarm.Buzzer.State, :toggle, []}}
  ]
- UTC時刻で指定しています
Wi-Fiで接続する(オプション)
- LANケーブルでネットワーク接続する場合には必要ありません
- 今回のアプリケーションではネットワークにつながなくてもよいのですが、ネットワークにつながっていると、
sshで接続できてさらに後述する良いことがあるので、ネットワークにつなげておくことはオススメです
- 今回のアプリケーションではネットワークにつながなくてもよいのですが、ネットワークにつながっていると、
- VintageNet Cookbook — WiFi
- 環境変数
NERVES_NETWORK_SSID、NERVES_NETWORK_PSKを開発マシンにセットしておいてください
config/target.exs
config :vintage_net,
  regulatory_domain: "US",
  config: [
    {"usb0", %{type: VintageNetDirect}},
    {"eth0",
     %{
       type: VintageNetEthernet,
       ipv4: %{method: :dhcp}
     }},
    {"wlan0",
     %{
       type: VintageNetWiFi,
       vintage_net_wifi: %{
         networks: [
           %{
             key_mgmt: :wpa_psk,
             ssid: System.get_env("NERVES_NETWORK_SSID"),
             psk: System.get_env("NERVES_NETWORK_PSK")
           }
         ]
       },
       ipv4: %{method: :dhcp}
     }}
  ]
Alarm.Application
-
mix nerves.new alarmしたときにほとんどできあがっています - やることは、今回
use GenServerしているモジュールを追加するのみです- 「#add」をつけた4行のみです
lib/alarm/application.ex
defmodule Alarm.Application do
  # See https://hexdocs.pm/elixir/Application.html
  # for more information on OTP Applications
  @moduledoc false

  use Application

  def start(_type, _args) do
    # See https://hexdocs.pm/elixir/Supervisor.html
    # for other strategies and supported options
    opts = [strategy: :one_for_one, name: Alarm.Supervisor]

    children =
      [
        # Children for all targets
        # Starts a worker by calling: Alarm.Worker.start_link(arg)
        # {Alarm.Worker, arg},
        Alarm.Scheduler #add
      ] ++ children(target())

    Supervisor.start_link(children, opts)
  end

  # List all child processes to be supervised
  def children(:host) do
    [
      # Children that only run on the host
      # Starts a worker by calling: Alarm.Worker.start_link(arg)
      # {Alarm.Worker, arg},
    ]
  end

  def children(_target) do
    [
      # Children for all targets except host
      # Starts a worker by calling: Alarm.Worker.start_link(arg)
      # {Alarm.Worker, arg},
      Alarm.Observer, #add
      Alarm.SetInterrupter, #add
      Alarm.Buzzer.State #add
    ]
  end

  def target() do
    Application.get_env(:alarm, :target)
  end
end
ファームウェアビルド
$ mix firmware
microSDカードに焼く
- microSDカードを開発マシンに挿して焼き込みます
$ mix burn
- こんがり焼けたらRaspberry Pi 4に挿して電源ON!!!
- 朝7時に「フ、ピェ〜〜〜〜〜〜〜〜〜〜〜〜〜〜〜〜〜〜〜〜〜〜〜〜」ってけっこう大きい音が鳴り続けますので、ボタンを押して止めてください!
おまけ
ssh 接続
$ ssh nerves.local

iex>
-
IEx(Elixir's interactive shell)が立ち上がります
ファームウェアアップデート
- ソースコードを修正する
$ mix firmware
$ mix upload
- microSDカードを抜かずにネットワーク経由でファームウェアのアップデートができます!
- これは便利ですよ〜〜
- 開発マシンとRaspberry Pi 4は同じネットワークに接続しておいてください
- さらにさらに @kentaro さんのkentaro/mix_tasks_upload_hotswapを使うともっとはやく反映することができます
Wrapping Up 


-
Nervesを使うと、Elixirだけで、Raspberry Piで動くアプリケーションを作ることができます
- (circuits_gpioはよ〜く探検していくと、C言語のコードが入っています)
- ソースコード全体はTORIFUKUKaiou/alarmです
- Seeed株式会社様のモノを利用することで、**不器用ですから**な自分でも、簡単に工作できます!
- 最後に紹介したネットワーク越しにファームウェアをアップデートできるのはとても便利です
- いちいちmicroSDカードを抜き差ししなくて済むのはvery very


 です
です
- いちいちmicroSDカードを抜き差ししなくて済むのはvery very
- この記事で少しでもNervesに興味を持っていただけましたら、ぜひNervesJPにご参加ください
- NervesJP Slack
- 愉快なfolksたちが歓迎してくれます
- Enjoy Elixir !!!


