目次
Laravelの記事一覧は下記
PHPフレームワークLaravelの使い方
Laravelバージョン
動作確認はLaravel Framework 7.19.1で行っています
前提条件
eclipseでLaravel開発環境を構築する。デバッグでブレークポイントをつけて止める。(WindowsもVagrantもdockerも)
本記事は上記が完了している前提で書かれています
プロジェクトの作成もapacheの設定も上記で行っています
LaravelでDIを使う
本記事は上記で作成したフォルダとファイルを使用します
Laravelの認証(web画面)
本記事は上記が完了している前提で書かれています
LaravelでRedisを操作する
本記事は上記で作成したフォルダとファイルを使用します。LaravelでRedisを使う設定は完了済みで、sessionもRedisに格納されている前提で書かれています
Ratchetのインストール
今回はRatchetを使っていきます
Ratchet (http://socketo.me/)
コマンドラインで
cd sample
composer require cboden/ratchet
xdebugの設定をしているとeclipseが実行していいですかというプロンプトを出すのでOKを押します
eclipseのプロジェクトを右クリック→リフレッシュ
サービスクラス修正
LaravelでRedisを操作するで作成したサービスクラスを修正します
このサービスクラスは上記記事でServiceProviderに登録してあります
(1) /sample/app/Services/Interfaces/RedisService.php修正
<?php
namespace App\Services\Interfaces;

interface RedisService
{
    public function __construct();

    public function setKey1($value);
    public function getKey1();
    public function getSession($key);

}
getSessionメソッドを追加しました
(2) /sample/tests/Services/Impl/RedisServiceImpl.php修正
‥‥
    public function getSession($key){
    }
‥‥
getSessionメソッドを追加しました
(3) /sample/app/Services/Impl/RedisServiceImpl.php修正
‥‥
    private $sessionConn = null;

    public function __construct()
    {
‥‥
        $this->sessionConn = Redis::connection(config('session.connection'));
    }
‥‥
    public function getSession($key)
    {
        $key = config('cache.prefix') . ':' . $key;
        $value = $this->sessionConn->get($key);
        return $value;
    }
‥‥
$sessionConnプロパティを追加しました
コンストラクタを修正しました
getSessionメソッドを追加しました
WebSocket処理作成
(1) /sample/app/Http/Controllers/ChatController.php作成
<?php
namespace App\Http\Controllers;
use Ratchet\MessageComponentInterface;
use Ratchet\ConnectionInterface;

class ChatController implements MessageComponentInterface  {

    protected $userList;

    public function __construct() {
        $this->userList = [];
    }

    public function addUser($resourceId, $user) {
        $this->userList[$resourceId] = ["user" => $user];
    }

    public function onOpen(ConnectionInterface $from) {
        if (!array_key_exists($from->resourceId, $this->userList)) {
            $this->userList[$from->resourceId] = ["user" => null];
        }
        $this->userList[$from->resourceId]["conn"] = $from;
        $msg = 'ゲストさんが入室しました';
        if (!is_null($this->userList[$from->resourceId]["user"])) {
            $msg = $this->userList[$from->resourceId]["user"]->name . 'さんが入室しました';
        }
        foreach ($this->userList as $userInfo) {
            $data = ['msg' => $msg, 'position' => 'center'];
            $userInfo["conn"]->send(json_encode($data));
        }
    }

    public function onMessage(ConnectionInterface $from, $msg) {
        foreach ($this->userList as $userInfo) {
            $data = ['msg' => $msg];
            if (!is_null($this->userList[$from->resourceId]["user"])) {
                $data['name'] = $this->userList[$from->resourceId]["user"]->name;
            } else {
                $data['name'] = 'ゲスト';
            }
            if ($from === $userInfo["conn"]) {
                $data['position'] = 'right';
            } else {
                $data['position'] = 'left';
            }
            $userInfo["conn"]->send(json_encode($data));
        }
    }

    public function onClose(ConnectionInterface $conn) {
        unset($this->userList[$conn->resourceId]);
    }

    public function onError(ConnectionInterface $conn, \Exception $e) {
        $conn->close();
    }
}
onOpenはクライアントが接続してきたときに自動的に実行されます
onMessageはクライアントがsendしてきたときに自動的に実行されます
onCloseはクライアントが切断したときに自動的に実行されます
$this->userListにEloquentのユーザーモデルとWebSocketのコネクションが格納されます
$this->userListをforeachで回してWebSocket接続している全ユーザーにJSONをsendしています
(2) /sample/app/Serversフォルダ作成
/sample/app/Servers/WsServer.php作成
<?php
namespace App\Servers;

use Ratchet\ComponentInterface;
use Ratchet\ConnectionInterface;
use Psr\Http\Message\RequestInterface;
use App\Services\Interfaces\RedisService;
use App\Models\User;

class WsServer extends \Ratchet\WebSocket\WsServer
{

    private $component;

    public function __construct(ComponentInterface $component) {
        parent::__construct($component);
        $this->component = $component;
    }

    public function onOpen(ConnectionInterface $conn, RequestInterface $request = null) {

        $sessionName = config('session.cookie');
        $sessKey = null;
        $sessValue = null;

        $headerCookie = $request->getHeader('Cookie');
        if (isset($headerCookie[0])) {
            $cookieList = explode(';', $headerCookie[0]);
            foreach ($cookieList as $cookie) {
                $cookie = trim($cookie);
                $cookieKeyValue = explode('=', $cookie, 2);
                if ($sessionName === $cookieKeyValue[0]) {
                    $sessKey = decrypt(urldecode($cookieKeyValue[1]), false);
                    break;
                }
            }
        }

        $redisService = app()->makeWith(RedisService::class);
        if (!is_null($sessKey)) {
            $sessValue = $redisService->getSession($sessKey);
            $sessValue = unserialize(unserialize($sessValue));
            foreach ($sessValue as $k => $v) {
                if (strpos($k, 'login_web_') === 0) {
                    $user = User::find($v);
                    $this->component->addUser($conn->resourceId, $user);
                }
            }
        }

        return parent::onOpen($conn, $request);
    }

}
コンストラクタに渡されてくる$componentは先ほど作成したChatControllerです
onOpenはクライアントが接続してきたときに自動的に実行されます
Cookieを取得し、その中からsessionに使っているCookie値を取りだします(if ($sessionName === $cookieKeyValue[0]))。
取り出したCookie値を使いRedisからsessionを取得します($sessValue = $redisService->getSession($sessKey);)。
LaravelでRedisを操作するでsessionはRedisに格納されるようにしました。
そこからユーザーIDをとります。sessionの中のlogin_web_から始まるキーにユーザーIDがvalueとして格納されています(if (strpos($k, 'login_web_') === 0))。
(3) /sample直下にwsServer.php作成
<?php

use Ratchet\Server\IoServer;
use Ratchet\Http\HttpServer;
use Illuminate\Contracts\Console\Kernel;
use App\Http\Controllers\ChatController;
use App\Servers\WsServer;

require dirname(__FILE__) . '\vendor\autoload.php';


$app = require __DIR__.'/bootstrap/app.php';
$app->make(Kernel::class)->bootstrap();

$server = IoServer::factory(
    new HttpServer(
        new WsServer(
            new ChatController()
            )
        ),
    8282
    );

$server->run();
webSocketのエントリポイントになります
8282は今回WebSocketで使うポートです。firewallで許可しているポートにしてください
Controllerにメソッド追加
(1) /sample/app/Http/Controllers/SampleController.phpにwebSocketメソッドを追記
    public function webSocket(Request $request)
    {
        return view('sample.webSocket');
    }
(2) /sample/routes/web.phpに下記を追記
Route::get('sample/web-socket', 'SampleController@webSocket');
viewの作成
(1) /sample/resources/views/sample/webSocket.blade.phpファイル作成
<html>
    <head>
        <title>sample</title>
        <style type="text/css">
        .container {
            width: 100%;
            height: 100%;
            box-sizing: border-box;
        }
        .msg-log {
            width: 100%;
            height: 92%;
            vertical-align:top;
            box-sizing: border-box;
            padding: 0px;
            border: black solid 1px;
            overflow-y: scroll;
        }
        .input-area {
            width: 100%;
            box-sizing: border-box;
        }
        .msg {
            width: 90%;
            height: 8%;
            vertical-align:top;
            box-sizing: border-box;
            padding: 0px;
            float: left;
        }
        .btn {
            width: 10%;
            height: 8%;
            vertical-align:top;
            box-sizing: border-box;
            padding: 0px;
        }
        .receive-msg-left {
            border-radius: 10px;
            border: black solid 1px;
            padding: 10px;
            margin: 0px 10px 10px 10px;
            display: inline-block;
            float: left;
            background-color: #FFFFFF;
        }
        .receive-msg-right {
            border-radius: 10px;
            border: black solid 1px;
            padding: 10px;
            margin: 0px 10px 10px 10px;
            display: inline-block;
            float: right;
            background-color: #00FF00;
        }
        .receive-msg-center {
            border: none;
            padding: 0px;
            margin: 10px;
            display: block;
            text-align: center;
            background-color: transparent;
        }
        .name-left {
            border: none;
            padding: 0px;
            margin: 0px 0px 0px 10px;
            display: inline-block;
            float: left;
            background-color: transparent;
        }
        .name-right {
            border: none;
            padding: 0px;
            margin: 0px 10px 0px 0px;
            display: inline-block;
            float: right;
            background-color: transparent;
        }
        .br {
            line-height: 0px;
            clear: both;
        }
        </style>
        <script type="text/javascript">

          var conn = "";

          function open(){

        	  conn = new WebSocket('ws://localhost:8282');

        	  conn.onopen = function(e) {
              };

              conn.onerror = function(e) {
                alert("エラーが発生しました");
              };

              conn.onmessage = function(e) {
            	  var data = JSON.parse(e.data);
            	  var msgLog = document.getElementById("msg_log");
                  var divObj = document.createElement("DIV");
                  var msg = null;
                  var msgSplit = null;
                  var nameObj = null;
                  var rowObj = null;
                  var br = null;
                  if (data["name"]) {
                      msg = document.createTextNode(data["name"]);
                      nameObj = document.createElement("DIV");
                      if (data["position"] == "left") {
                    	  nameObj.className = 'name-left';
                      } else {
                    	  nameObj.className = 'name-right';
                      }
                      nameObj.appendChild(msg);
                	  msgLog.appendChild(nameObj);

                	  br = document.createElement("BR");
                      br.className = 'br';
                	  msgLog.appendChild(br);
                  }
                  if (data["position"] == "left") {
                      divObj.className = 'receive-msg-left';
                  } else if (data["position"] == "center") {
                      divObj.className = 'receive-msg-center';
                  } else {
                      divObj.className = 'receive-msg-right';
                  }
            	  msgSplit = data["msg"].split('\n');
            	  for (var i in msgSplit) {
                      msg = document.createTextNode(msgSplit[i]);
                      rowObj = document.createElement("DIV");
                      rowObj.appendChild(msg);
                      divObj.appendChild(rowObj);
            	  }

            	  msgLog.appendChild(divObj);

            	  br = document.createElement("BR");
                  br.className = 'br';
            	  msgLog.appendChild(br);

                  msgLog.scrollTop = msgLog.scrollHeight;

              };

              conn.onclose = function() {
                  alert("切断しました");
                  setTimeout(open, 5000);
              };

          }

          function send(){
        	  conn.send(document.getElementById("msg").value);
          }

          function close(){
        	  conn.close();
          }

          open();

        </script>
    </head>
    <body>
        <div class="container">
            <div id="msg_log" class="msg-log"></div>
            <div class="input-area">
                <textarea id="msg" class="msg"></textarea>
                <button class="btn" onclick="send();" >送信</button>
            </div>
        </div>
    </body>
</html>
conn = new WebSocket('ws://localhost:8282');で接続してます。8282は先ほどwsServer.phpに書いたポートです
conn.send(document.getElementById("msg").value);でWebSocketサーバーにデータ送信しています
conn.onmessageはwebSocketサーバーからsendがあった場合に自動的に実行されます
動作確認
コマンドラインで
cd sample
php wsServer.php
xdebugの設定をしているとeclipseが実行していいですかというプロンプトを出すのでOKを押します
これでWebSocketサーバーが起動します
Chromeから
http://localhost/laravelSample/
左上のLOGINリンクからログインする
Firefoxから
http://localhost/laravelSample/
左上のLOGINリンクからログインする
Chromeから
http://localhost/laravelSample/sample/web-socket
にアクセスする
Firefoxから
http://localhost/laravelSample/sample/web-socket
にアクセスする
Chromeで
あいうえお
かきくけこ
と入力し、送信ボタンをクリックします
Firefoxで
さしすせそ
と入力し、送信ボタンをクリックします
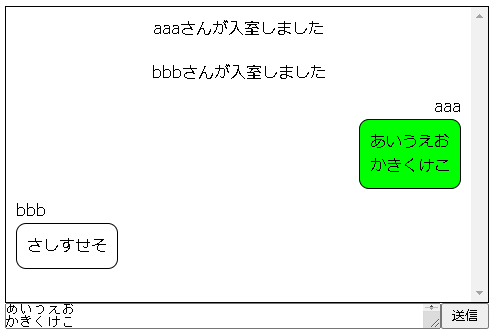
動きました