目次
Laravelの記事一覧は下記
PHPフレームワークLaravelの使い方
Laravelバージョン
動作確認はLaravel Framework 7.19.1で行っています
前提条件
eclipseでLaravel開発環境を構築する。デバッグでブレークポイントをつけて止める。(WindowsもVagrantもdockerも)
本記事は上記が完了している前提で書かれています
プロジェクトの作成もapacheの設定も上記で行っています
LaravelでDIを使う
本記事は上記で作成したフォルダとファイルを使用します
PhpRedisのインストール
PhpRedisを介してRedisを操作します
下記リンクで環境構築した人はインストールされているはずです
LAMP+Redis環境を超短手数で構築する
インストールしていない人は下記リンクに従ってインストールしてください
phpredis インストール
設定
(1) /sample/.env修正
Redisへアクセスするための設定を書く
‥‥
REDIS_HOST=127.0.0.1
REDIS_PASSWORD=null
REDIS_PORT=6379
‥‥
REDIS_HOST、REDIS_PASSWORD、REDIS_PORTを自分の環境に合ったものにしてください
vagrantのforwarded_port設定でポートを変えたりしている場合、自分の環境にあった値に変えてください
(2) /sample/config/database.php修正
.envに書いたRedis接続定義はdatabase.phpで使われています
database.phpに定義されている配列の'redis'=>'default'要素修正、'redis'=>'db2'要素追加
‥‥
'redis' => [
‥‥
        'default' => [
            'url' => env('REDIS_URL'),
            'host' => env('REDIS_HOST', '127.0.0.1'),
            'password' => env('REDIS_PASSWORD', null),
            'port' => env('REDIS_PORT', '6379'),
            'database' => env('REDIS_DB', '0'),
        ],

        'db2' => [
            'url' => env('REDIS_URL'),
            'host' => env('REDIS_HOST', '127.0.0.1'),
            'password' => env('REDIS_PASSWORD', null),
            'port' => env('REDIS_PORT', '6379'),
            'database' => '2',
        ],
‥‥
Redisへの接続定義を2つ作りました
(3) /sample/config/app.php修正
aliases要素内のRedisをコメントにする
‥‥
//'Redis' => Illuminate\Support\Facades\Redis::class,
‥‥
サービスクラス作成
(1) /sample/app/Services/InterfacesフォルダにRedisService.php作成
<?php
namespace App\Services\Interfaces;

interface RedisService
{
    public function __construct();

    public function setKey1($value);
    public function getKey1();

}
(2) /sample/tests/Services/ImplフォルダにRedisServiceImpl.php作成
<?php
namespace Tests\Services\Impl;

use App\Services\Interfaces\RedisService;

class RedisServiceImpl implements RedisService
{

    public function __construct()
    {
    }

    public function setKey1($value)
    {
    }

    public function getKey1()
    {
    }

}
(3) /sample/app/Services/ImplフォルダにRedisServiceImpl.php作成
<?php
namespace App\Services\Impl;

use App\Services\Interfaces\RedisService;
use Illuminate\Support\Facades\Redis;

class RedisServiceImpl implements RedisService
{

    private $redis = null;

    public function __construct()
    {
        $this->redis = Redis::connection('db2');
    }

    public function setKey1($value)
    {
        Redis::set('key1', 'default_' . $value);
        $this->redis->set('key1', 'db2_' . $value);
    }

    public function getKey1()
    {
        $default = Redis::get('key1');
        $db2 = $this->redis->get('key1');

        return [$default, $db2];

    }

}
static関数としてRedis::setのように書くと、さきほどdatabase.phpに書いたdefault接続が使われます。
他の接続を使いたい場合は、Redis::connection('db2');のように明示的に接続を取ってください
Redisクラスのメソッド名はRedisコマンド名がそのまま使えます
DI登録
(1) /sample/app/Providers/DiServiceProvider.phpに下記を追記
use App\Services\Interfaces\RedisService;
(2) /sample/app/Providers/DiServiceProvider.phpのregisterメソッドに下記を追記
app()->singleton(RedisService::class, $prefix . 'RedisServiceImpl');
DiServiceProvider.phpはLaravelでDIを使うで作成したファイルです
LaravelでDIを使うでconfig/app.phpのprovidersに登録してあります
Controllerにメソッド追加
(1) /sample/app/Http/Controllers/SampleController.phpにuse文を追記
use App\Services\Interfaces\RedisService;
(2) /sample/app/Http/Controllers/SampleController.phpにredis1メソッド、redis2メソッドを追記
    public function redis1(Request $request, RedisService $redisService)
    {
        $key1Value = $request->input('key1');

        if (!is_null($key1Value)) {
            $redisService->setKey1($key1Value);
        }

        return view('sample.redis1');

    }

    public function redis2(RedisService $redisService)
    {
        $key1Value = $redisService->getKey1();

        $data = ['key1Value' => var_export($key1Value, true)];

        return view('sample.redis2', $data);
    }
(3) /sample/routes/web.phpに下記を追記
Route::get('sample/redis1', 'SampleController@redis1');
Route::get('sample/redis2', 'SampleController@redis2');
viewの作成
(1) /sample/resources/views/sample/redis1.blade.phpファイル作成
<html>
    <head>
        <title>sample</title>
    </head>
    <body>

        <form action="{{ url('sample/redis1') }}" method="get">
            <div>key1<input type="text" name="key1" value=""></div>
            <input type="submit" >
        </form>

    </body>
</html>
(2) /sample/resources/views/sample/redis2.blade.phpファイル作成
<html>
    <head>
        <title>sample</title>
    </head>
    <body>

        <div>{{$key1Value}}</div>

    </body>
</html>
動作確認1
http://localhost/laravelSample/sample/redis1
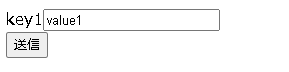
何か値を入れて送信ボタンをクリック
http://localhost/laravelSample/sample/redis2

sample/redis1で入力した値が出てくる
redisを見てみる
127.0.0.1:6379> select 0
OK
127.0.0.1:6379> keys *
1) "laravel_database_key1"
laravel_database_という接頭辞が付いた形で保存されています
これはconfig/database.phpのredis=>options=>prefix要素で接頭辞を設定しているためです
127.0.0.1:6379[2]> select 0
OK
127.0.0.1:6379> get laravel_database_key1
"default_value1"
127.0.0.1:6379> select 2
OK
127.0.0.1:6379[2]> get laravel_database_key1
"db2_value1"
127.0.0.1:6379[2]>
redisにも値が入っていることがわかります
sessionの格納先をRedisにする
(1) /sample/.env修正
sessionの設定を書く
‥‥
# SESSION_DRIVER=file
SESSION_DRIVER=redis
SESSION_CONNECTION=db2
‥‥
SESSION_DRIVERをredisに変える。SESSION_CONNECTIONに格納先のRedis接続を指定する
動作確認2
Laravelでセッションを使う
上記記事で作成した
http://localhost/laravelSample/sample/session1
にアクセスする
redisを見てみる
127.0.0.1:6379[2]> select 2
OK
127.0.0.1:6379[2]> keys *
1) "laravel_database_laravel_cache:xxxxxxxxxxxxxxxxxxxxxx"
Redisに入っていることがわかります