1. 大まかな流れ
(1) AWS 公式の Amazon Linux 2 イメージ (VirutalBox版)をダウンロードして、Mac 上の Oracle VM VirutalBox に Vagrant 設定を施した Amazon Linux 2 の VMマシンを作成する。
(2) (1)で作成した VMマシンから Vagrant Box を作成する。
(3) (2)で作成した Vagrant Box から Amazon Linux 2 の VMマシンを作成する。
(4) (3)で作成した VMマシンに Chef のテストレシピを収束する。
2. 作業環境
バージョン
- macOS: 10.14.3
- Oracle VirtualBox: 6.0.4
- Vagrant: 2.2.3
- ChefDK: 3.7.23
- knife-zero 1.19.3
作業ディレクトリ
-
Oracle VM VirtualBox
/Users/nishimura.toru/Work/VirtualBoxVMs -
Oracle VM VirtualBox (seed.iso用)
/Users/nishimura.toru/Work/VirtualBoxSeeds -
Vagrant
/Users/nishimura.toru/Work/Vagrant -
Chef
/Users/nishimura.toru/Work/Chef
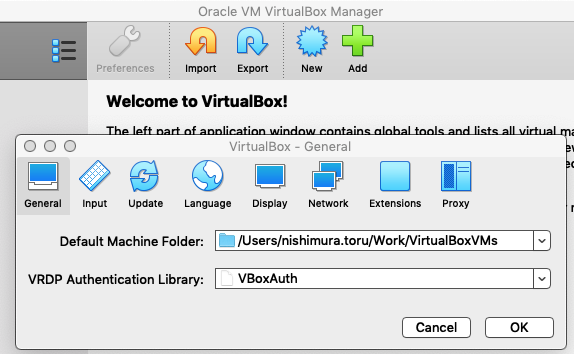
Oracle VM VirtaulBox Manager 設定
- Defatul Machine Folder: を/Users/nishimura.toru/Work/VirtualBoxVMs に設定する
3. 作業内容
(1) AWS 公式の Amazon Linux 2 イメージ (VirutalBox版)をダウンロードして、Mac 上の Oracle VM VirutalBox に Vagrant 設定を施した Amazon Linux 2 の VMマシンを作成する
参考
Amazon Linux 2 を仮想マシンとしてオンプレミスで実行する
Amazon Linux 2 を VirtualBox でオンプレミスの開発環境に使用する
① seed.iso 起動イメージを作成する
- seed.iso に Vagrant 用の設定を仕込んでおき、VMマシンを新規作成する際に seed.iso を読み込ませてその設定を VMマシンに施す。
- seed.iso を作成するにあたり、meta-data と user-data という名前のファイルを新規作成する。
今回は、~/Work/VirtualBoxSeeds ディレクトリ配下に AmazonLinux2 というディレクトリを作成し、その中に meta-data と user-data ファイルを置く。
$ cd ~/Work/VirtualBoxSeeds
$ mkdir AmazonLinux2
$ cd AmazonLinux2
meta-data ファイルと、user-data ファイルを作成する
meta-data の内容
local-hostname: amazonlinux2
user-data の内容
# cloud-config
# vim:syntax=yaml
users:
  - default
  - name: vagrant
    sudo: [ 'ALL=(ALL) NOPASSWD:ALL' ]
    ssh-authorized-keys:
      - ssh-rsa AAAAB3NzaC1yc2EAAAABIwAAAQEA6NF8iallvQVp22WDkTkyrtvp9eWW6A8YVr+kz4TjGYe7gHzIw+niNltGEFHzD8+v1I2YJ6oXevct1YeS0o9HZyN1Q9qgCgzUFtdOKLv6IedplqoPkcmF0aYet2PkEDo3MlTBckFXPITAMzF8dJSIFo9D8HfdOV0IAdx4O7PtixWKn5y2hMNG0zQPyUecp4pzC6kivAIhyfHilFR61RGL+GPXQ2MWZWFYbAGjyiYJnAmCP3NOTd0jMZEnDkbUvxhMmBYSdETk1rRgm+R4LOzFUGaHqHDLKLX+FIPKcF96hrucXzcWyLbIbEgE98OHlnVYCzRdK8jlqm8tehUc9c9WhQ== vagrant insecure public key
chpasswd:
  list: |
    ec2-user:password
- user-data の簡単な説明
参考
Creating a Base Box ⇒ Default User Settings
Insecure Keypair
-
vagrant というユーザとグループを作成する。
-
vagrant ユーザに 'ALL=(ALL) NOPASSWD:ALL' という sudo 設定を行う。
-
vagrant ユーザのキーペアは、Vagrant が提供しているキーペアを使用するので、
ssh-authorized-keys には次の Public Key を設定する。
https://github.com/hashicorp/vagrant/blob/master/keys/vagrant.pub
この vagrant .pub を設定しておかないと、vagrant up で仮想マシンが起動しない。
ちなみに、秘密鍵は、vagrant up 時に ~/Work/Vagrant/VM名/.vagrant/machines/default/virtualbox/private_key に作成され、
このキーペアにより vagran ssh コマンドでSSHログインすることができる。 -
設定確認用に ec2-user にパスワードを設定する。
-
今回は、root パスワードに vagrant は設定しない。
② seed.iso ファイルを作成する
(今回は、AmazonLinux2-seed.iso という名前にしている)
meta-data, user-deta のあるディレクトの1つ上のディレクトリに移動して、
$ cd ~/Work/VirtualBoxSeeds/
Mac にもともと入っている hdiutil コマンドで iso ファイルを作成する。
$ hdiutil makehybrid -o AmazonLinux2-seed.iso -hfs -joliet -iso -default-volume-name cidata ./AmazonLinux2
Creating hybrid image...
........................
AmazonLinux2-seed.iso
③ Oracle VirtualBox 版の Amazon Linux 2 VM イメージをローカルにダウンロードする
https://cdn.amazonlinux.com/os-images/latest/virtualbox/
amzn2-virtualbox-2.0.20190115-x86_64.xfs.gpt.vdi
↓
~/Downloads/amzn2-virtualbox-2.0.20190115-x86_64.xfs.gpt.vdi
④ ダウンロードした Amazon Linux 2 イメージを使って仮想マシンを作成する。その際に seed.iso の設定を仮想マシンに施す
Oracle VM VirtualBox 用ディレクトリへ移動
$ cd ~/Work/VirtualBoxVMs
ダウンロードした イメージを コピーする
$ cp ~/Downloads/amzn2-virtualbox-2.0.20190115-x86_64.xfs.gpt.vdi .
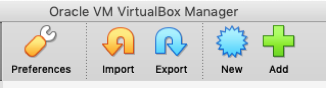
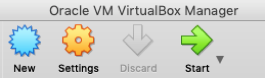
Oracle VM VirtualBox Manager から 仮想マシンを作成する (New)
仮想マシン設定
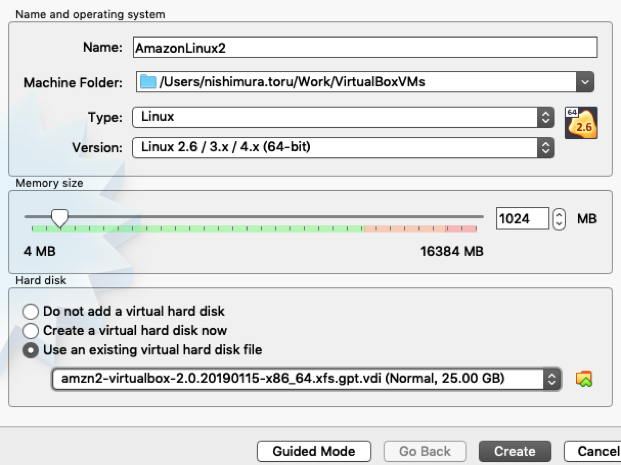
- Name: 今回は「AmazonLinux2」と入力
- Hard disk: Use an existeng virtual hard disk file にチェックして、「~/Work/VirtualBoxVMs/amzn2-virtualbox-2.0.20190115-x86_64.xfs.gpt.vdi」を選択
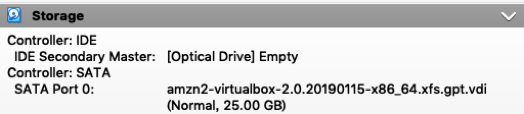
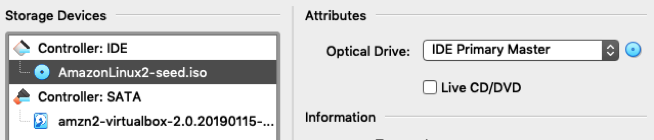
AmazonLinux2-seed.iso ファイルを Device Contoroller: IDE に追加する
↓
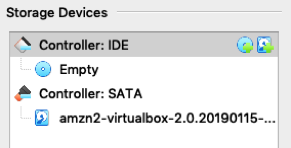
- Empty を取り除く
- ~/Work/VirtualBoxSeeds/AmazonLinux2-seed.iso を追加する
↓
起動 (Start)
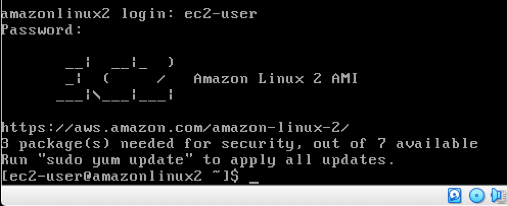
⑤ 仮想マシン のサーバ内部の設定を確認
- ec2-user でログイン(パスワードは password )
- vagrant ユーザの確認
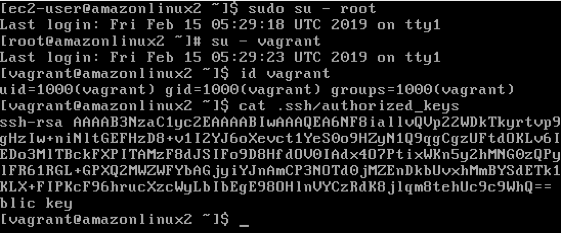
- sudo の設定は次のファイルにある。
/etc/sudoers.d/90-cloud-init-users
- user-data の内容は次のファイルに書き込まれている。
/var/lib/cloud/instance/user-data.txt
補足: user-data ファイルを育てたい場合は、次の手順を踏んでから新しい仮想マシンを作るようにすること
-
現VMマシンを停止した後に、すべてのファイルを削除 (Delete all files)する
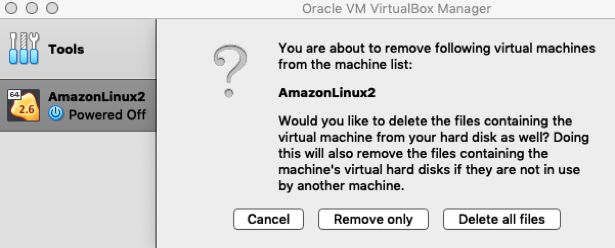
すると、次のディレクトリにあった AmazonLinux2 ディレクトリと vdi ファイルが消える。
/Users/nishimura.toru/Work/VirtualBoxVMs -
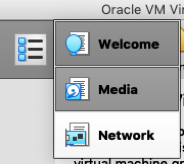
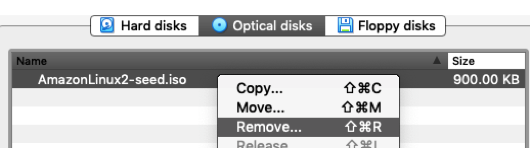
Oracle VM VIrtualBox Manager で前回の seed.iso を取り除く
 ⇒
⇒
-
以上が終わったら、「④ ダウンロードした Amazon Linux 2 イメージを使って仮想マシンを作成する。その際に seed.iso の設定を仮想マシンに施す」へ
(2) (1)で作成した VMマシンから Vagrant Box を作成する
-
仮想マシンを停止する

-
Vagrant作業ディレクトリに移動
$ cd ~/Work/Vagrant
- AmazonLinux2 ディレクトリ作成
$ mkdir AmazonLinux2
$ cd AmazonLinux2
$ pwd
/Users/nishimura.toru/Work/Vagrant/AmazonLinux2
- Vagrant Box 作成
$ vagrant package --base AmazonLinux2 --output AmazonLinux2.box
==> AmazonLinux2: Exporting VM...
==> AmazonLinux2: Compressing package to: /Users/nishimura.toru/Work/Vagrant/AmazonLinux2/AmazonLinux2.box
- Vagrnat Box を追加する
$ vagrant box add AmazonLinux2 AmazonLinux2.box
==> box: Box file was not detected as metadata. Adding it directly...
==> box: Adding box 'AmazonLinux2' (v0) for provider:
    box: Unpacking necessary files from: file:///Users/nishimura.toru/Work/Vagrant/AmazonLinux2/AmazonLinux2.box
==> box: Successfully added box 'AmazonLinux2' (v0) for 'virtualbox'!
$ vagrant box list
AmazonLinux2 (virtualbox, 0)
(3) (2)で作成した Vagrant Box から Amazon Linux 2 の VMマシンを作成する
- Vagrantfile 作成
Vagrant.configure("2") do |config|
  config.vm.box = "AmazonLinux2"
  config.vm.provider "virtualbox" do |vb|
    vb.memory = "256"
    vb.name = "AmazonLinux2-Vagrant"
  end
  config.vm.synced_folder ".", "/vagrant", disabled: true
end
- 仮想マシン起動
$ vagrant up
Bringing machine 'default' up with 'virtualbox' provider...
==> default: Importing base box 'AmazonLinux2'...
==> default: Matching MAC address for NAT networking...
==> default: Setting the name of the VM: AmazonLinux2-Vagrant
==> default: Clearing any previously set network interfaces...
==> default: Preparing network interfaces based on configuration...
    default: Adapter 1: nat
==> default: Forwarding ports...
    default: 22 (guest) => 2222 (host) (adapter 1)
==> default: Running 'pre-boot' VM customizations...
==> default: Booting VM...
==> default: Waiting for machine to boot. This may take a few minutes...
    default: SSH address: 127.0.0.1:2222
    default: SSH username: vagrant
    default: SSH auth method: private key
    default:
    default: Vagrant insecure key detected. Vagrant will automatically replace
    default: this with a newly generated keypair for better security.
    default:
    default: Inserting generated public key within guest...
    default: Removing insecure key from the guest if it's present...
    default: Key inserted! Disconnecting and reconnecting using new SSH key...
==> default: Machine booted and ready!
==> default: Checking for guest additions in VM...
    default: No guest additions were detected on the base box for this VM! Guest
    default: additions are required for forwarded ports, shared folders, host only
    default: networking, and more. If SSH fails on this machine, please install
    default: the guest additions and repackage the box to continue.
    default:
    default: This is not an error message; everything may continue to work properly,
    default: in which case you may ignore this message.
- 確認
- vagrant ssh で仮想マシンへSSHログインする
$ vagrant ssh
Last login: Fri Feb 15 08:04:17 2019

        __|  __|_  )
        _|  (     /   Amazon Linux 2 AMI
       ___|\___|___|

https://aws.amazon.com/amazon-linux-2/
3 package(s) needed for security, out of 7 available
Run "sudo yum update" to apply all updates.
- ポートフォワーディングで仮想マシンへSSHログインする
$ ssh -i ~/Work/Vagrant/AmazonLinux2/.vagrant/machines/default/virtualbox/private_key -l vagrant 127.0.0.1 -p 2222
(4) (3)で作成した VMマシンに Chef のテストレシピを収束する
- ~/.ssh/config に VMマシンの情報を追加する
Host vm-amazonlinux2
    StrictHostKeyChecking no
    UserKnownHostsFile=/dev/null
    Hostname 127.0.0.1
    Port 2222
    User vagrant
    IdentityFile ~/Work/Vagrant/AmazonLinux2/.vagrant/machines/default/virtualbox/private_key
- 仮想マシンのスナップショット作成
$ cd ~/Work/Vagrant/AmazonLinux2
$ vagrant snapshot push
$ vagrant snapshot list
push_1550210014_9851

- 確認用の Chef リポジトリ作成
$ cd ~/Work/Chef
$ chef generate repo .
- Chef クックブック作成
$ chef generate cookbook cookbooks/test
- Chef レシピ作成
$ vim cookbooks/test/recipes/default.rb
#
# Cookbook:: test
# Recipe:: default
#
# Copyright:: 2019, The Authors, All Rights Reserved.
file "/root/test.txt" do
  content "Hello world!"
end
- 仮想マシンに Chef をインストール
$ knife zero bootstrap vm-amazonlinux2 --sudo -N vm-amazonlinux2
- vm-amazonlinux2 ノードに レシピを追加する
$ knife node run_list add vm-amazonlinux2 'recipe[test]'
vm-amazonlinux2:
 run_list: recipe[test]
- vm-amazonlinux2 ノードに レシピを収束する
$ knife zero converge "name:vm-amazonlinux2" --sudo -x vagrant --attribute knife_zero.host
- 確認
$ ssh vm-amazonlinux2
[vagrant@amazonlinux2 ~]$ sudo cat /root/test.txt
Hello world![vagrant@amazonlinux2 ~]$
- 仮想マシンをスナップショットを取る前に戻す
$ cd ~/Work/Vagrant/AmazonLinux2
$ vagrant snapshot pop
$ vagrant snapshot list
==> default: No snapshots have been taken yet!
- 確認
$ ssh vm-amazonlinux2
[vagrant@amazonlinux2 ~]$ sudo cat /root/test.txt
cat: /root/test.txt: No such file or directory
4. 撤収 - Vagrant周り
- 仮想マシン停止
$ cd ~/Work/Vagrant/AmazonLinux2
$ vagrant halt
- 仮想マシン削除
$ vagrant destroy
- 仮想マシン ステータス確認
$ vagrant status
Current machine states:

default                   not created (virtualbox)
- Vagrant Box 削除
$ vagrant box remove AmazonLinux2
- Vagrant Box リスト確認
$ vagrant box list
There are no installed boxes! Use `vagrant box add` to add some.