#はじめに
IBM Wazi Developer for Red Hat CodeReady Workspaces という製品が2020年6月にリリースされました(以降Waziと表記します)。この製品は、Red Hat OpenShiftクラスター上でメインフレーム(z/OS)開発環境を提供するものです。この連載記事ではWaziの環境をIBM Cloud上のマネージドのOpenShiftクラスター上に作成した時のログを記載していきます。
まずは事前準備編です。
※2021年3月19日にIBM Wazi Developer for Red Hat CodeReady Workspace V1.2というバージョンがリリースされましたが、当一連の記事はV1.1.0をベースにしています。(一部後からV1.2の情報を追記している部分もあります)
##関連記事
Wazi: OpenShift上でのメインフレーム開発環境構築 - (1)事前準備
Wazi: OpenShift上でのメインフレーム開発環境構築 - (2)ライセンス・サーバーの構成
Wazi: OpenShift上でのメインフレーム開発環境構築 - (3)イメージ・ストレージ・サーバーの構成
Wazi: OpenShift上でのメインフレーム開発環境構築 - (4)OpenShiftクラスターの構成
Wazi: OpenShift上でのメインフレーム開発環境構築 - (5)Sandboxインスタンスの作成
Wazi: OpenShift上でのメインフレーム開発環境構築 - (6)Sandboxインスタンスの確認
Wazi: OpenShift上でのメインフレーム開発環境構築 - (7)Sandboxインスタンスへの接続
Wazi: OpenShift上でのメインフレーム開発環境構築 - (8)Sandboxのカスタマイズ
Wazi: OpenShift上でのメインフレーム開発環境構築 - (9)Wazi Developer for Workspacesの作成
#Wazi概要
冒頭に挙げた通り、WaziはOpenShiftクラスター上にz/OSの開発環境を提供するものです。ざっくり言うと主に以下の機能から構成されています。
(1) Sandboxと呼ばれるz/OSエミュレーター(z/OSランタイム)
(2) Codeと呼ばれる開発ツール(Eclipse, VSCodeからCOBOL, PL/I, ASMなどを開発するためのツール)
(3) +α : DevOps連携(GitやJenkinsなどと連携を行うためのツール)など
コアになる部分はz/OSランタイム部分である(1)のSandboxですが、これはZD&TというIntel/Linux上で稼働するz/OSエミュレーターがベースとなっています。Sandboxは"ZD&TをOpenShift上で稼働させるようにしたもの"と捉えていただくとよいと思います。
OpenShift上のPodとしてz/OS開発環境をデプロイすることができますので、z/OSの開発環境をOpenShiftの1リソースとして容易に管理することができます。
(2)のCode部分は、各開発用PCに導入したEclipse、VSCodeからSandboxに接続して開発作業を行う形態と、Wazi Developer for WorkspacesというコンポーネントをOpenShift上に構成する形態があります。後者はEclipase Theiaをベースにしており、各開発用PCからはブラウザ経由で開発ツールを利用するイメージとなります(個別にEclipseやVSCodeを導入しなくてもよい)。
ここでは、Wazi Developer for Workspaceは置いておいて、まずはOpenShift上にSandboxを稼働させて、それを各PC上のEclipseやVSCodeから利用する構成を目標に環境構築を進めていきます。
※豆知識: "Wazi"というのは何かの略称という訳では無くスワヒリ語から取ったらしいです。"Wazi"はスワヒリ語で"Open"というような意味合いがあるようです。(Google翻訳で変換すると英語:"clear"、日本語:"晴れ" に変換されますが...。英語:"openly" => スワヒリ語:"waziwazi"でした。)
#環境準備
一連の記事で使用する主要S/Wのバージョンは以下の通りです。
OpenShift V4.5.18
IBM Wazi Developer for Red Hat CodeReady Workspaces V1.1.0
全体像
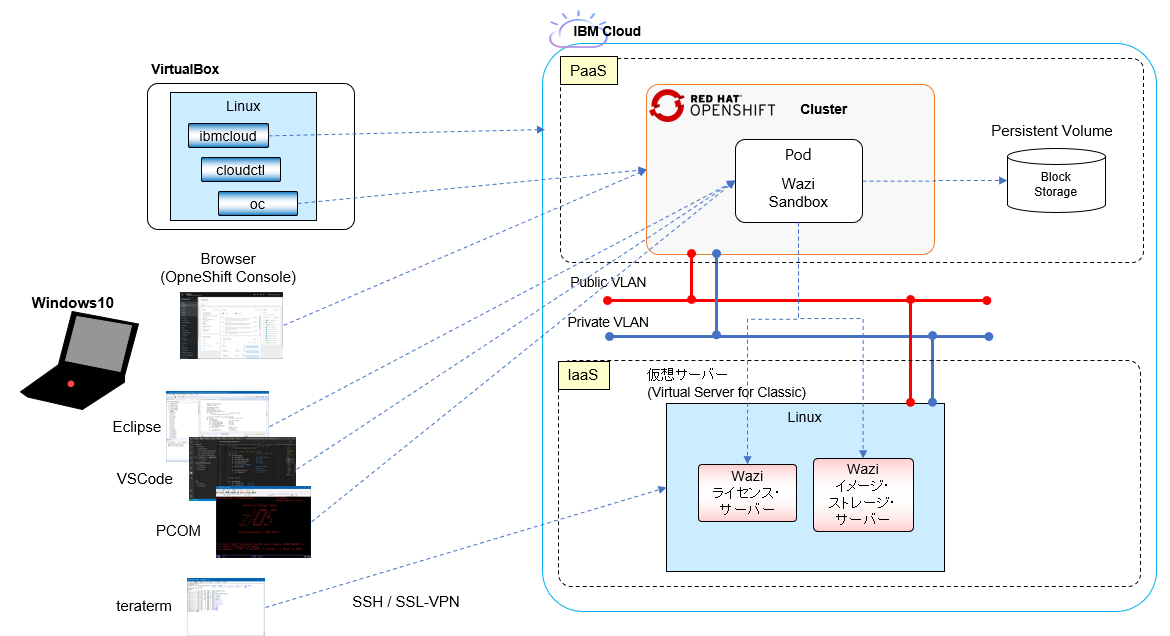
Waziのコア・コンポーネントであるSandboxはOpenShiftクラスター上で稼働しますが、このSandboxを稼働させるためにはZD&Tと同様ライセンス・サーバーを用意してライセンス管理させる必要があります。ライセンス・サーバーはOpenShiftクラスターの外に構成する必要があります。Wazi SandboxやZD&Tのライセンス・サーバーは、ライセンス・サーバーが稼働するH/W情報と紐づけてライセンスを管理することになるため、稼働するH/Wが変わる可能性がある環境には構築できません。クラウド上にライセンス・サーバーを構築する場合は特定のH/Wに専用でアサインできるメニューを選択する必要がありますのでご注意ください。
今回は一時的に利用するテスト環境ということでその辺りは目をつぶって共用の仮想サーバー上に構築しますが、別のH/Wに切り替えられた場合ライセンスの認証がうまく動かずSandboxが使えない状況になることが想定されます。
参考: Enabling the Sandbox License Server
-The Sandbox License Server needs to be a static resource in any infrastructure configuration. In a virtualized infrastructure, the license server cannot be moved physically. If the Sandbox License Server is manually or automatically moved, you need to return the license before you move the license server. Then, you need to acquire the license, and apply the license to the Sandbox License Server again after the movement.
-The license for Sandbox is based on a hardware signature. If the underlying hardware changes, the licenses on the Sandbox License Server will become invalid, and prevent any Sandbox instance from working. This scenario might occur easily if the Sandbox License Server is installed on a virtual machine, and it will require the assistance of IBM® to help resolve the problem. This time-consuming effort might need a week to resolve the problem. Therefore, it is strongly recommended that you install the Sandbox License Server only on a physical hardware.
Wazi前提条件
Cluster requirements
The OpenShift® cluster must be at version 4.3 or later.
The minimum required cluster environment for Sandbox is three control nodes (might be called "master nodes" in external documentation), and one worker node with a minimum of 32 GB memory. You need to reserve extra memory for the node and its required pods. Depending on the number of sandbox instances that will be running on the cluster, the environment requirements vary. Each running sandbox requires 300 GB of storage, 8 GB of memory, and four cores of CPU. A sandbox that is not running might continue to consume storage if an existing PersistentVolumeClaim is used for the sandbox.Due to the requirements of setting up and running the zPDT® emulator, Sandbox system container requires privileged access. This elevated access might cause security risks because the access might be knowingly or unknowingly used to affect the hosting system. To avoid the security risks, you can run development and test workloads like Sandbox, and production workloads in a separate cluster. Also, the cluster administrators need to be informed about the privileged access that is granted to the Sandbox service account and Sandbox system containers that are executed by the access. For more information about securing your cluster, see Kubernetes documentation.
※Wazi V1.2.0ではOpenShift clusterはV4.5以降となっています。
Image storage server requirements
To install and run Sandbox, an image storage server to host the Sandbox artifacts, such as Z system volumes, data sets, Sandbox metadata, must be set up. To transfer volumes images files from the image storage server, or transfer volumes images files to the image storage server, you must use SFTP as the transferring method.
- Disk space
- Sufficient space is needed to hold numerous and potentially large files for extracted IBM® Z volumes.
- 300 GB of disk space is needed for ADCD z/OS® V2.4 distribution.
- Software requirements
- A running SFTP server
- SFTP server
- Open the firewall port for SFTP commands.
OpenShiftクラスター
IBM Cloud上にManagedのOpenShiftクラスターを作成します。
OpenShiftクラスター作成時の設定内容は以下の通りです。
IBM Cloud 画面イメージ
OpenShift V4.5.18
単一ゾーン
CPU: 8vCPU, Memory: 32GB x1ワーカーノード
Block Storage
z/OSのDASDイメージ・ファイルは永続ストレージに保持する必要があるので、何らかのストレージ・サービスが必要になります。ここではIBM Cloud上のBlock Storageを使用することにします。
IBM Cloud上のOpenShiftクラスターでは、IBM Cloud Block Storageを使用するためのStorage Classがデフォルトで提供されているので、今回はそれを使用してDynamic Provisioningで永続ストレージを確保することにします。(そのため事前準備は特に無し。料金体系などを確認しておくくらい。)
参考: クラシック IBM Cloud Block Storage へのデータの保管 - ストレージ・クラス・リファレンス
仮想サーバー
仮想サーバーインスタンス作成
実際のロケーションなどは違っていますが、プロファイルとしては以下のように仮想サーバーを作成しました。
IBM Cloud 画面イメージ
Virtual Server for Classic x1インスタンス
CPU: 2vCPU
Memory: 16GB
OS: RHEL V7
Disk: Boot 100GB, 追加 1TB
ストレージのマウント
参考: IBM Cloud の 仮想サーバーに 追加ストレージ(ポータルブル・ストレージ)をマウントする
仮想サーバーを作成する際、追加で1TBのストレージをオプションで追加していますが、自動ではマウントされないのでマウントします。
まずは状況確認から。
[TOMOTAG@iseip20201222-1106-alphabet-1 ~]$ lsblk
NAME    MAJ:MIN RM  SIZE RO TYPE MOUNTPOINT
xvda    202:0    0  100G  0 disk
tqxvda1 202:1    0    1G  0 part /boot
mqxvda2 202:2    0   99G  0 part /
xvdb    202:16   0    2G  0 disk
mqxvdb1 202:17   0    2G  0 part [SWAP]
xvdc    202:32   0 1000G  0 disk
xvdh    202:112  0   64M  0 disk

[TOMOTAG@iseip20201222-1106-alphabet-1 ~]$ df -Tm
Filesystem     Type     1M-blocks  Used Available Use% Mounted on
devtmpfs       devtmpfs      7930     0      7930   0% /dev
tmpfs          tmpfs         7940     0      7940   0% /dev/shm
tmpfs          tmpfs         7940    17      7924   1% /run
tmpfs          tmpfs         7940     0      7940   0% /sys/fs/cgroup
/dev/xvda2     ext3         99852  2597     92187   3% /
/dev/xvda1     ext3           976   154       772  17% /boot
tmpfs          tmpfs         1588     0      1588   0% /run/user/1008
xvdcというブロックデバイスがありますのでこのデバイスをext4でフォーマットします。
[TOMOTAG@iseip20201222-1106-alphabet-1 ~]$ sudo mkfs.ext4 /dev/xvdc
mke2fs 1.42.9 (28-Dec-2013)
Filesystem label=
OS type: Linux
Block size=4096 (log=2)
Fragment size=4096 (log=2)
Stride=0 blocks, Stripe width=0 blocks
65536000 inodes, 262144000 blocks
13107200 blocks (5.00%) reserved for the super user
First data block=0
Maximum filesystem blocks=2409627648
8000 block groups
32768 blocks per group, 32768 fragments per group
8192 inodes per group
Superblock backups stored on blocks:
        32768, 98304, 163840, 229376, 294912, 819200, 884736, 1605632, 2654208,
        4096000, 7962624, 11239424, 20480000, 23887872, 71663616, 78675968,
        102400000, 214990848

Allocating group tables: done
Writing inode tables: done
Creating journal (32768 blocks): done
Writing superblocks and filesystem accounting information: done
確認
[TOMOTAG@iseip20201222-1106-alphabet-1 ~]$ sudo parted -l
Model: Xen Virtual Block Device (xvd)
Disk /dev/xvda: 107GB
Sector size (logical/physical): 512B/512B
Partition Table: msdos
Disk Flags:

Number  Start   End     Size    Type     File system  Flags
 1      1049kB  1075MB  1074MB  primary  ext3         boot
 2      1075MB  107GB   106GB   primary  ext3


Model: Xen Virtual Block Device (xvd)
Disk /dev/xvdb: 2147MB
Sector size (logical/physical): 512B/512B
Partition Table: msdos
Disk Flags:

Number  Start   End     Size    Type     File system     Flags
 1      32.3kB  2147MB  2147MB  primary  linux-swap(v1)


Model: Xen Virtual Block Device (xvd)
Disk /dev/xvdc: 1074GB
Sector size (logical/physical): 512B/512B
Partition Table: loop
Disk Flags:

Number  Start  End     Size    File system  Flags
 1      0.00B  1074GB  1074GB  ext4


Model: Xen Virtual Block Device (xvd)
Disk /dev/xvdh: 67.1MB
Sector size (logical/physical): 512B/512B
Partition Table: loop
Disk Flags:

Number  Start  End     Size    File system  Flags
 1      0.00B  67.1MB  67.1MB  fat16
/mntにマウントします。
[TOMOTAG@iseip20201222-1106-alphabet-1 /]$ sudo mount -t ext4 /dev/xvdc /mnt

[TOMOTAG@iseip20201222-1106-alphabet-1 /]$ df -Tm
Filesystem     Type     1M-blocks  Used Available Use% Mounted on
devtmpfs       devtmpfs      7930     0      7930   0% /dev
tmpfs          tmpfs         7940     0      7940   0% /dev/shm
tmpfs          tmpfs         7940    17      7924   1% /run
tmpfs          tmpfs         7940     0      7940   0% /sys/fs/cgroup
/dev/xvda2     ext3         99852  2597     92187   3% /
/dev/xvda1     ext3           976   154       772  17% /boot
tmpfs          tmpfs         1588     0      1588   0% /run/user/1008
/dev/xvdc      ext4       1007801    77    956509   1% /mnt
マウントされました。
リブート後も自動マウントされるように、/etc/fstabを編集します。(最終行を追加)
UUID=4ea159cb-3168-422a-a451-4427a174de31 / ext3 defaults,noatime 1 1
UUID=72261d76-ae23-49ac-9291-69da91557d65 /boot ext3 defaults,noatime 0 0
LABEL=SWAP-xvdb1        swap    swap    defaults,nofail 0       0
/dev/xvdc /mnt ext4 defaults 0 0
ICOS(IBM Cloud Object Storage)利用の設定
当仮想サーバーをイメージ・ストレージ・サーバーとして使用する場合、z/OSのDASDイメージを配置する必要があるため、このサーバーに非常に大きなサイズのファイルを配置する必要があります(数10GB)。
SCP/VPN経由のファイル転送は速度制限されているため、ファイル転送用にICOSの設定をしておきます。詳細は以下の記事参照。
参考: IBM Cloud Object Storageを介したファイル転送
追加OSパッケージ
sudo yum install lsof
sudo yum install tree
##ネットワーク構成
IaaS上に構成している仮想サーバー(ライセンス・サーバー、イメージ・ストレージ・サーバー)とOpenShiftクラスター上のサービス間でTCP/IPの通信が行えるようにしておく必要があります。
PC側
Waziの環境セットアップするステップの中で、PC側でLinux環境が必要そうなので、VirtualBox上にLinux(CentOS7)を用意しておきます。
このLinuxでは、IBM CloudやOpenShiftを管理するためのCLIを入れておきます。
IBM Cloud CLI (ibmcloud)
IBM Cloudを操作するためのCLIです。
参考: スタンドアロン IBM Cloud CLI のインストール
以下のコマンドでインストール
[root@Test05 ~]# curl -fsSL https://clis.cloud.ibm.com/install/linux | sh
Current platform is linux64. Downloading corresponding IBM Cloud CLI...
  % Total    % Received % Xferd  Average Speed   Time    Time     Time  Current
                                 Dload  Upload   Total   Spent    Left  Speed
100   111  100   111    0     0    155      0 --:--:-- --:--:-- --:--:--   155
100 11.5M  100 11.5M    0     0  4634k      0  0:00:02  0:00:02 --:--:-- 6918k
Download complete. Executing installer...
  % Total    % Received % Xferd  Average Speed   Time    Time     Time  Current
                                 Dload  Upload   Total   Spent    Left  Speed
100    40  100    40    0     0     55      0 --:--:-- --:--:-- --:--:--    55
Bluemix_CLI/
Bluemix_CLI/bin/
Bluemix_CLI/bin/ibmcloud
Bluemix_CLI/bin/ibmcloud.sig
Bluemix_CLI/bin/NOTICE
Bluemix_CLI/bin/LICENSE
Bluemix_CLI/bin/CF_CLI_Notices.txt
Bluemix_CLI/bin/CF_CLI_SLC_Notices.txt
Bluemix_CLI/autocomplete/
Bluemix_CLI/autocomplete/bash_autocomplete
Bluemix_CLI/autocomplete/zsh_autocomplete
Bluemix_CLI/install
Bluemix_CLI/uninstall
Bluemix_CLI/install_bluemix_cli
Install complete.
インストール完了です。
バージョン確認。
[root@Test05 ~]# ibmcloud -v
ibmcloud version 1.3.0+4308925-2020-12-16T07:53:49+00:00
ibmcloud oc コマンド用のプラグインをインストールします。
[root@Test05 ~]# ibmcloud plugin install container-service
リポジトリー 'IBM Cloud' から 'container-service' を検索しています...
プラグイン 'container-service/kubernetes-service 1.0.208' がリポジトリー 'IBM Cloud' 内で見つかりました
バイナリー・ファイルをダウンロードしようとしています...
 21.20 MiB / 21.20 MiB [============================================================================================================================================================] 100.00% 2s
22233088 バイトがダウンロードされました
バイナリーをインストールしています...
OK
プラグイン 'container-service 1.0.208' は /root/.bluemix/plugins/container-service に正常にインストールされました。 'ibmcloud plugin show container-service' を使用して詳細を表示してください。
OpenShift CLI (oc)
OpenShift管理用のCLIです。
参考: OpenShift Origin CLI (oc) のインストール
ダウンロードサイトのlatest/linux以下からoc.tar.gzをダウンロード
https://mirror.openshift.com/pub/openshift-v4/clients/oc/latest/linux/
解凍
[root@Test05 /Inst_Image/oc]# tar -zxvf oc.tar.gz
README.md
oc
kubectl
ocとkubectlをPATHが通っているディレクトリに移動
[root@Test05 /Inst_Image/oc]# mv oc /usr/local/bin/
[root@Test05 /Inst_Image/oc]# mv kubectl /usr/local/bin/
OSパッケージ"bash-completion"をインストール
yum install bash-completion
オートコンプリートの設定
[root@Test05 ~]# kubectl completion bash >/etc/bash_completion.d/kubectl
[root@Test05 ~]# oc completion bash >/etc/bash_completion.d/oc_completion
APIKeyでのログイン
ocコマンドでOpenShiftクラスターにログインする際、APIKeyでログインできるようにします。
ibmcloudコマンドでIBM Cloudにログイン。
[root@Test05 ~]# ibmcloud login --sso
API エンドポイント: https://cloud.ibm.com

Get a one-time code from https://identity-2.ap-north.iam.cloud.ibm.com/identity/passcode to proceed.
デフォルトのブラウザーで URL を開きますか? [Y/n] > n
One-time code >
認証中です...
OK

アカウントを選択:
1. xxxxx
2. yyyyy
3. zzzzz
4. aaaaa
数値を入力してください> 2
ターゲットのアカウント yyyyy <-> nnnnn


リージョンを選択します (または Enter キーを押してスキップします):
1. au-syd
2. in-che
3. jp-osa
4. jp-tok
5. kr-seo
6. eu-de
7. eu-gb
8. ca-tor
9. us-south
10. us-south-test
11. us-east
12. br-sao
数値を入力してください> 4
ターゲットのリージョン jp-tok


API エンドポイント:      https://cloud.ibm.com
リージョン:              jp-tok
ユーザー:                TOMOTAG@jp.ibm.com
アカウント:              yyyyy <-> nnnnn
リソース・グループ:      リソース・グループがターゲットになっていません。'ibmcloud target -g RESOURCE_GROUP' を使用してく ださい
CF API エンドポイント:
組織:
スペース:
以下のコマンドでAPI Keyを作成します。名前は適当に付ければOK。
[root@Test05 ~]# ibmcloud iam api-key-create taguchi_oc_key01
xxxxx@xxxxx として xxxxxに API キー taguchi_oc_key01 を作成しています...
OK
API キー taguchi_oc_key01 が作成されました

API キーを保存してください。 作成後に取得することはできません。

ID         ApiKey-xxxxx
名前       taguchi_oc_key01
説明
作成日時   2020-12-29T10:08+0000
API キー   xxxxx
ロック中   false
以下のコマンドでkubeconfigファイル設定を行います。
[root@Test05 ~]# ibmcloud oc cluster config -c x15k5-tok02-b3c.8x32
Kubernetes removed deprecated APIs, which impacts clusters that run Kubernetes version 1.16, OpenShift version 4.4, or later. For more information, see <http://ibm.biz/k8s-1-16-apis>

The Kubernetes Ingress controller image is now supported for Ingress ALBs, and all new ALBs now run the Kubernetes Ingress image by default. Additionally, you must move any existing Ingress setups to the new Kubernetes Ingress before support for the legacy IBM Cloud Kubernetes Service Ingress image ends on April 30, 2021. More info: <https://ibm.biz/kube-ingress>

From 01 December 2020 virtual and bare metal servers that run Ubuntu 16 will be deprecated, in consideration of the upcoming April 2021 end-of-support date for Ubuntu 16. For more details, please see the announcement <https://ibm.biz/kube-flavors>

From 01 December 2020 the older generation bare metal flavors will be deprecated. For more details, please see the announcement <https://ibm.biz/kube-flavors>

OK
x15k5-tok02-b3c.8x32 の構成は正常にダウンロードされました。

x15k5-tok02-b3c.8x32 のコンテキストを現在の kubeconfig ファイルに追加しました。
これで、クラスターに対して「kubectl」コマンドを実行できます。 例えば、「kubectl get nodes」を実行します。
クラスターに初めてアクセスする場合、RBAC の同期中に「kubectl」コマンドが数秒間失敗することがあります。
kubectlでkubernetesクラスターにアクセスする際に使用する接続先の情報は、kubeconfigファイル(~/.kube/config)で管理されるようで、ocコマンドでもこれがそのまま使われるようです。
ここまでの設定をしておけば、apikeyでOpenShiftクラスターにログインできるようになります。
oc loginコマンドでapikeyを指定してログイン
[root@Test05 ~]# oc login -u apikey -p xxxxx
Login successful.

You have access to 62 projects, the list has been suppressed. You can list all projects with ' projects'

Using project "default".
ログインできました!
IBM Cloud Pak CLI (cloudctl)
参考: Installing the Sandbox CASE with the cloudctl CASE launcher
上の記述にあるように、Waziセットアップのプロセスの中で、IBM Cloud Pak CLIを使う必要があるようなので、インストールしておきます。
参考: GitHub - IBM/cloud-pak-cli
ダウンロード
wget https://github.com/IBM/cloud-pak-cli/releases/latest/download/cloudctl-linux-amd64.tar.gz
解凍
[root@Test05 /Inst_Image/cloudctl]# tar -xvf cloudctl-linux-amd64.tar.gz
cloudctl-linux-amd64
PATHが通っているディレクトリに移動
[root@Test05 /Inst_Image/cloudctl]# mv cloudctl-linux-amd64 /usr/local/bin/cloudctl
バージョン確認
[root@Test05 /Inst_Image/cloudctl]# cloudctl version
クライアント・バージョン: v3.6.1-2002+578459450f5d91a34df6063cfd84e41648ec2cc2