はじめに
以下の記事を参考に、Red Hat OpenShift on IBM Cloudを試してみたときのログです。
参考: OpenShift on IBM Cloud をデモサイトから無料で試す方法
ここではLab2を実施してみます。
※Lab2の前提としてLab1を完了している必要があります。
関連記事
Red Hat OpenShift on IBM Cloud の無料Hands-onを試してみる - Lab1
Red Hat OpenShift on IBM Cloud の無料Hands-onを試してみる - Lab2
Red Hat OpenShift on IBM Cloud の無料Hands-onを試してみる - Lab3
Hands on 実施
Lab2
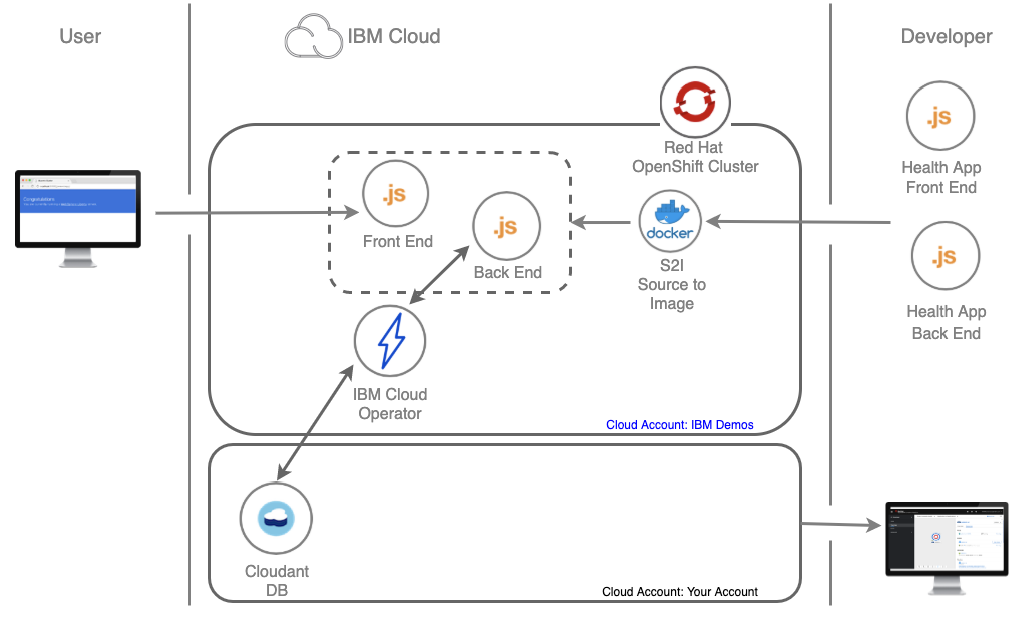
このLabでは、Lab1を少し拡張し、OpenShiftの外のサービス(IBM Cloud上のCloudantDBサービス)を利用したアプリケーションの管理について体験できます。
Lab2で扱う環境の全体像です。
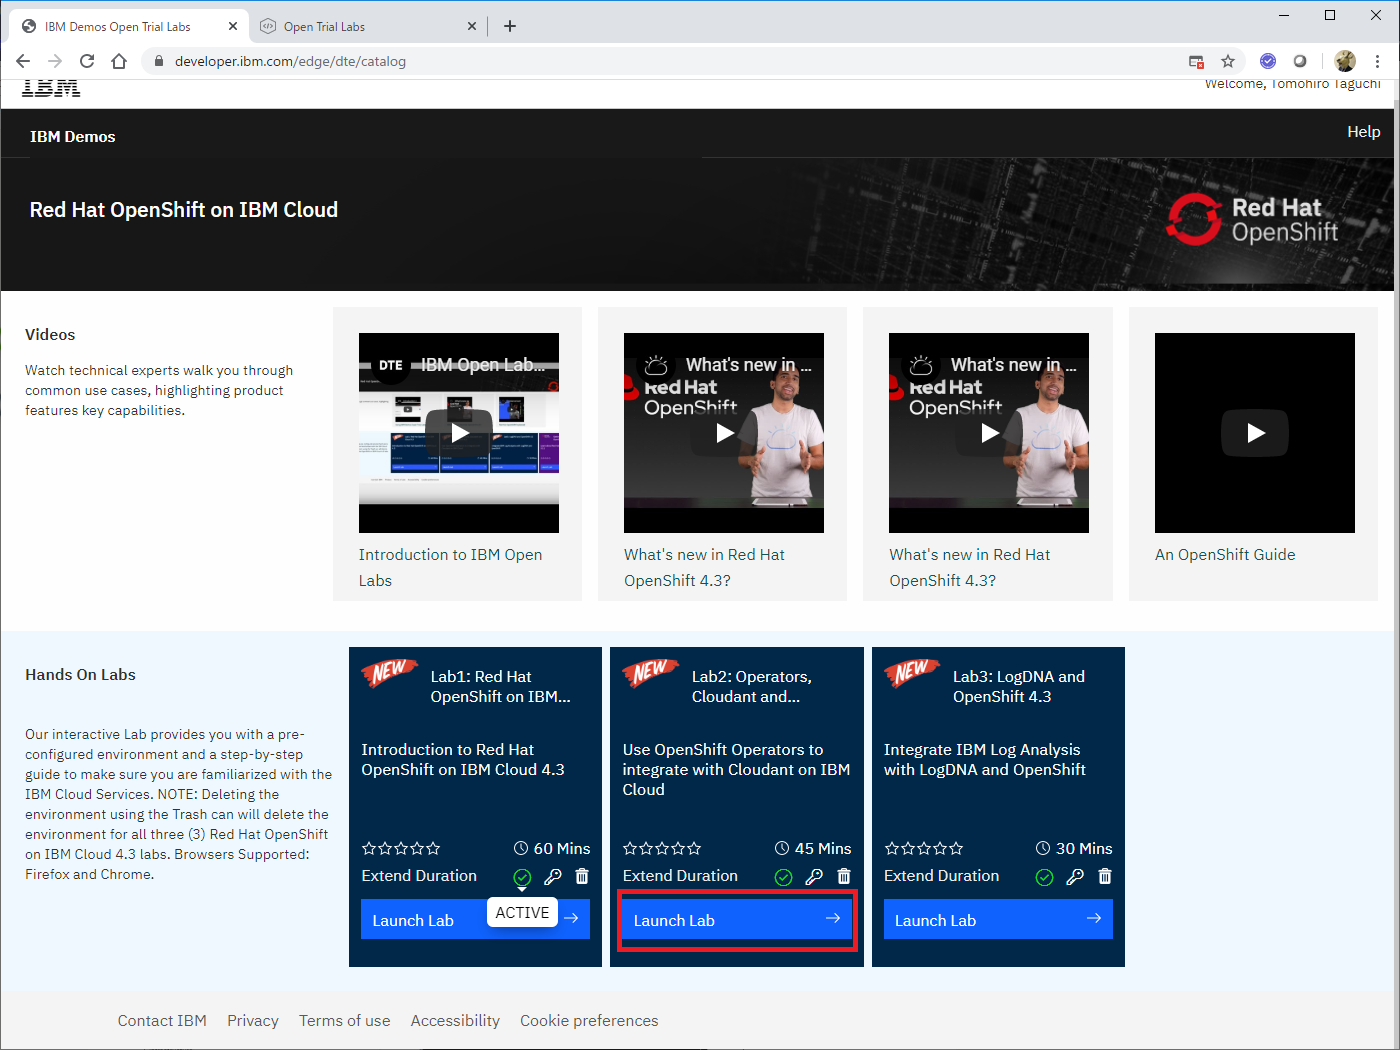
以下からLab2のLaunch Labをクリックします。
Exercise 1 / Install IBM Cloud Operator from Operator Hub
ここでは"オペレーター"を扱ってみます。"オペレーター"は運用関連の作業をコード化して運用を自動化するために用いられる仕組みです。また、Kubenetes APIを拡張して独自のリソースを扱えるようにCRD(Custom Resource Definition)という仕組みがあり、これを利用することで、Kubernetes(OpenShift)環境外で稼働するサービス(IBM Cloud上のサービスなど)も、Kubernetesの管理に統合して扱うことができるようです。
参考:
Kubernetes - オペレーターパターン
Kubernetes - カスタムリソース
KubernetesのCRDまわりを整理する。
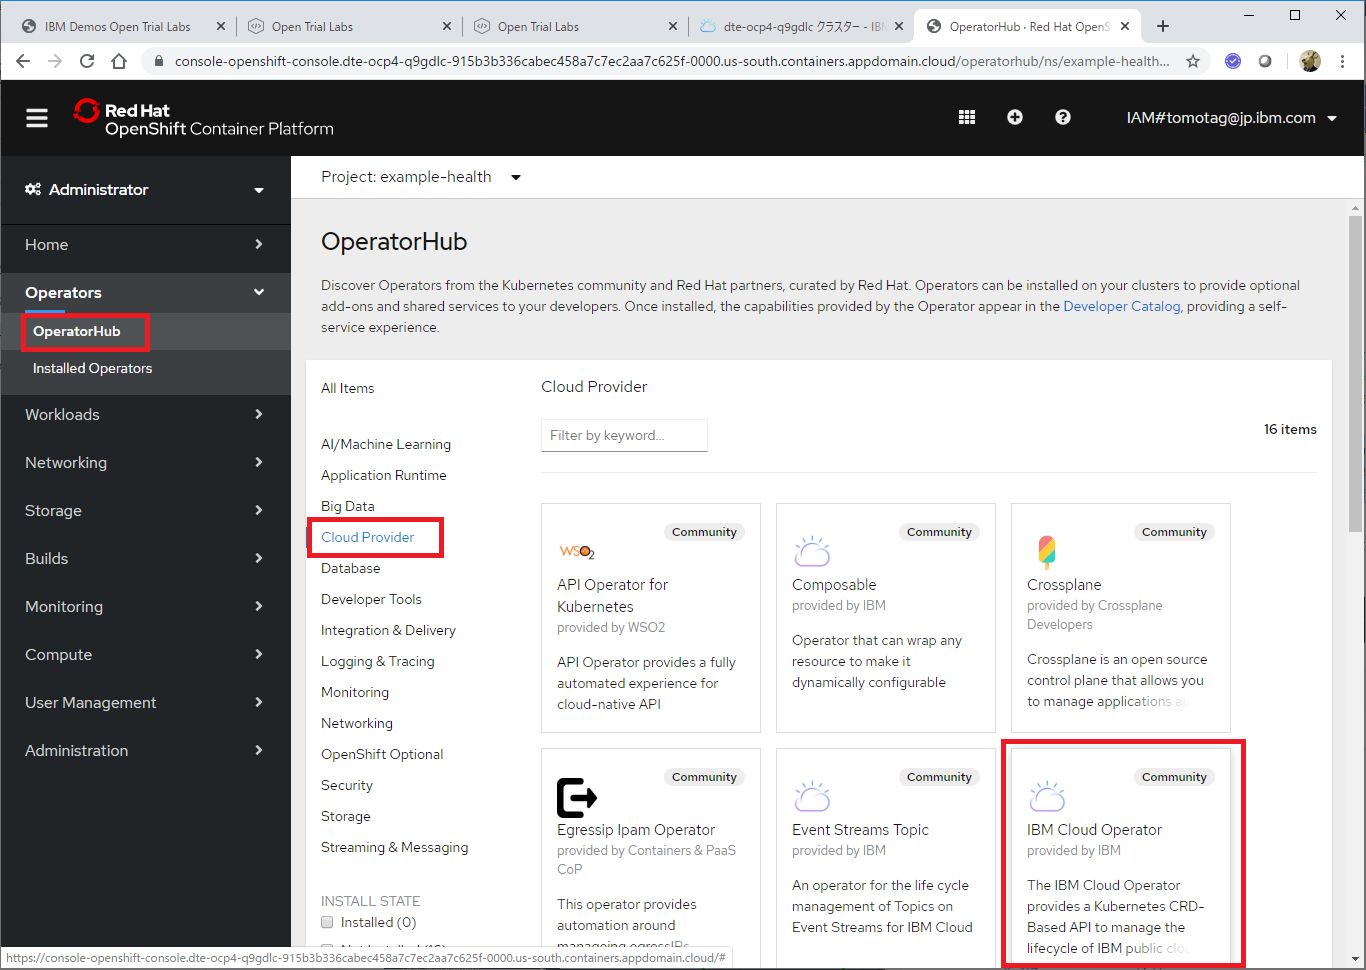
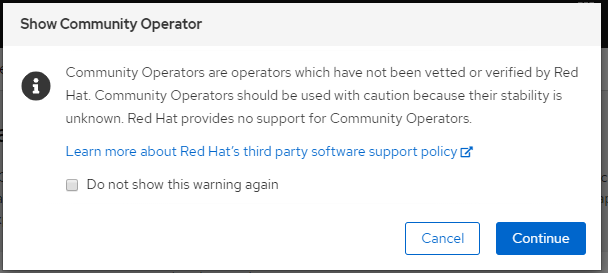
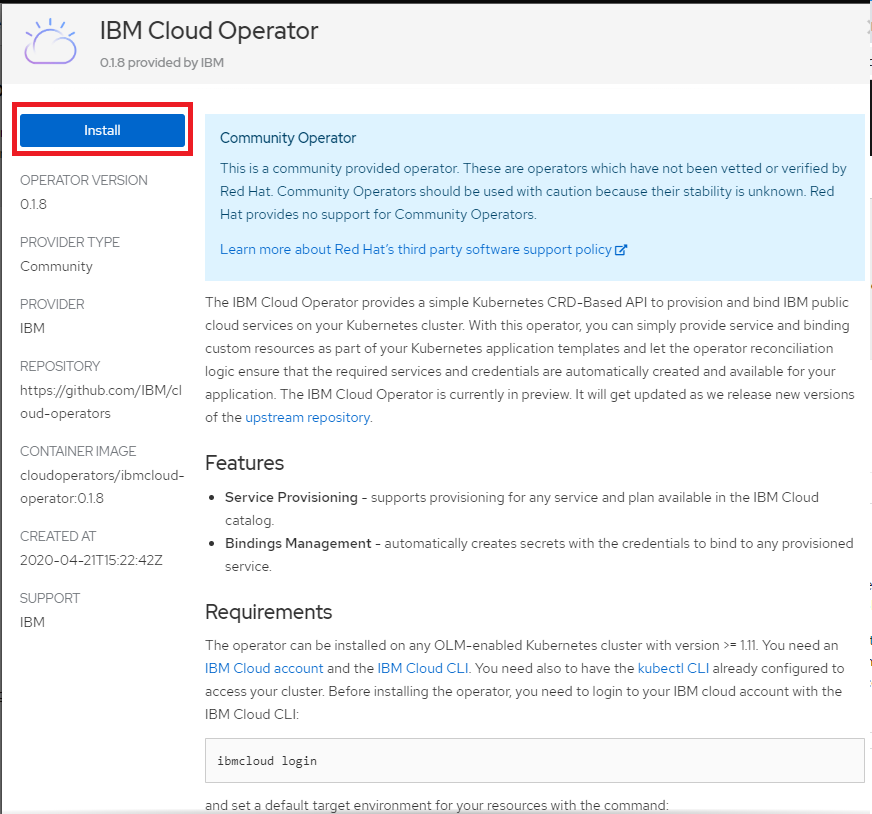
OpenShift Web Consoleにて、Operators - OperatorHub を選択し、Cloud ProviderからIBM Cloud Operatorを選択。
Continue
Install
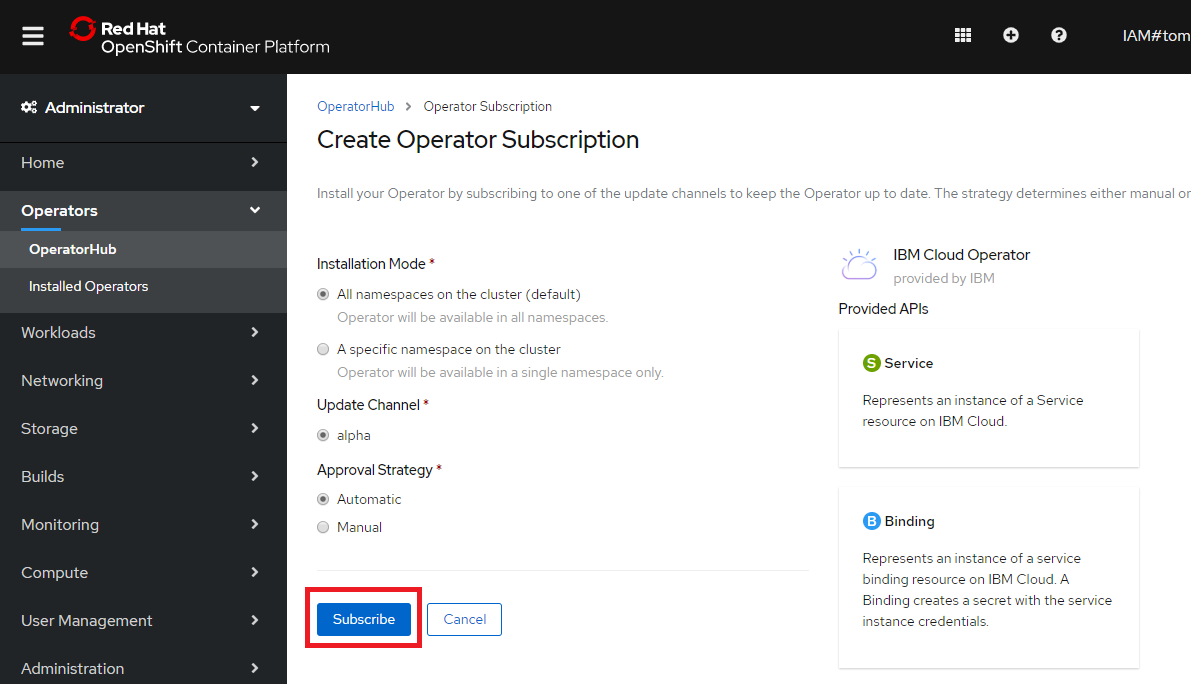
Subscribe
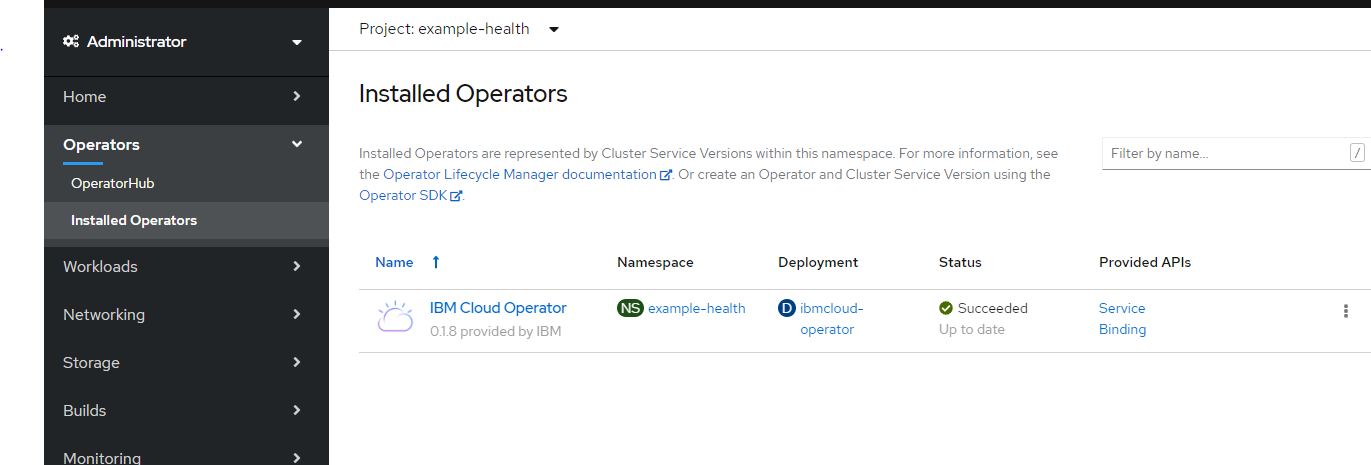
しばらくすると、StatusがSucceededになります。
Launch Labで開いたブラウザ画面の右側のTerminalから、ibmcloudにログインし、Accountを選択。
container-lab$ ibmcloud login --sso
API endpoint: https://cloud.ibm.com
Region: us-south

Get One Time Code from https://identity-1.us-south.iam.cloud.ibm.com/identity/passcode to proceed.
Open the URL in the default browser? [Y/n] > Y
One Time Code >
Authenticating...
OK

Select an account:
1. Tomohiro Taguchi's Account (9xxxxxxxxxxxxxxxxxx0)
2. Ixxxxx <-> 1xxxx3
3. Ixxxx - xxxxx (4xxxxxxxxxxxxx3) <-> 423632
4. DTE Cloud Platform (aexxxxx1) <-> 20xxx24
Enter a number> 1
Targeted account Tomohiro Taguchi's Account (9xxxxxxxxxxxxxxxxxxx0)


API endpoint:      https://cloud.ibm.com
Region:            us-south
User:              TOMOxxxxxx
Account:           Tomohiro Taguchi's Account (9sssssssssssssssssssssssssssssss0)
Resource group:    No resource group targeted, use 'ibmcloud target -g RESOURCE_GROUP'
CF API endpoint:
Org:
Space:

New version 1.1.0 is available.
Release notes: https://github.com/IBM-Cloud/ibm-cloud-cli-release/releases/tag/v1.1.0
TIP: use 'ibmcloud config --check-version=false' to disable update check.

Do you want to update? [y/N] > N
Resource Groupを指定。
container-lab$ ibmcloud target --cf -g default
Targeted resource group default

Targeted Cloud Foundry (https://api.us-south.cf.cloud.ibm.com)

Targeted org TOMOxxxxxx

Targeted space dev_dallas


API endpoint:      https://cloud.ibm.com
Region:            us-south
User:              TOMOxxxxxx
Account:           Tomohiro Taguchi's Account (99fa8026b325659bd73faab4f9315210)
Resource group:    default
CF API endpoint:   https://api.us-south.cf.cloud.ibm.com (API version: 2.147.0)
Org:               TOMOxxxxxx
Space:             dev_dallas
設定確認。
container-lab$ ibmcloud target


API endpoint:      https://cloud.ibm.com
Region:            us-south
User:              TOMOxxxxx
Account:           Tomohiro Taguchi's Account (99fa8026b325659bd73faab4f9315210)
Resource group:    default
CF API endpoint:   https://api.us-south.cf.cloud.ibm.com (API version: 2.147.0)
Org:               TOMOxxxxx
Space:             dev_dallas
OpenShift Clusterへのログイン
container-lab$ oc login --server https://c100-e.us-south.containers.cloud.ibm.com:32416 -u apikey -p 80d5c862c51a1464caedd0a477b1e0b3
Login successful.

You have access to 58 projects, the list has been suppressed. You can list all projects with 'oc projects'

Using project "example-health".
Cluster Projectをdefaultに設定
container-lab$ oc project default
Now using project "default" on server "https://c100-e.us-south.containers.cloud.ibm.com:32416".
API tokenを生成するためのスクリプト実行
実行している中身はこちら => operator.sh
container-lab$ curl -sL https:\/\/raw.githubusercontent.com/IBM/cloud-operators/master/hack/config-operator.sh | bash
*** Generating new APIKey
Please preserve the API key! It cannot be retrieved after it's created.
secret/secret-ibm-cloud-operator created
configmap/config-ibm-cloud-operator created
configmapの設定内容確認。
container-lab$ oc get configmap/config-ibm-cloud-operator -o yaml -n default
apiVersion: v1
data:
  org: TOMOxxx
  region: us-south
  resourcegroup: default
  resourcegroupid: 2fe3cdca4103477ca944feabd7e76076
  space: dev_dallas
  user: TOMOxxx
kind: ConfigMap
metadata:
  annotations:
    kubectl.kubernetes.io/last-applied-configuration: |
      {"apiVersion":"v1","data":{"org":"TOMOxxx","region":"us-south","resourcegroup":"default","resourcegroupid":"2fxxxxxx076","space":"dev_dallas","user":"TOMOxxx"},"kind":"ConfigMap","metadata":{"annotations":{},"labels":{"app.kubernetes.io/name":"ibmcloud-operator"},"name":"config-ibm-cloud-operator","namespace":"default"}}
  creationTimestamp: "2020-05-25T06:59:45Z"
  labels:
    app.kubernetes.io/name: ibmcloud-operator
  name: config-ibm-cloud-operator
  namespace: default
  resourceVersion: "1186645"
  selfLink: /api/v1/namespaces/default/configmaps/config-ibm-cloud-operator
  uid: 3559764e-3d2e-44b1-8b36-795643056255
container-lab$
secretの設定内容確認
container-lab$ oc get secret/secret-ibm-cloud-operator -o yaml -n default
apiVersion: v1
data:
  api-key: M3xxxxxxxxxxx=
  region: dxxxxx=
kind: Secret
metadata:
  annotations:
    kubectl.kubernetes.io/last-applied-configuration: |
      {"apiVersion":"v1","data":{"api-key":"M3xxxxxxxxs=","region":"dxxxxxxx="},"kind":"Secret","metadata":{"annotations":{},"labels":{"app.kubernetes.io/name":"ibmcloud-operator","seed.ibm.com/ibmcloud-token":"apikey"},"name":"secret-ibm-cloud-operator","namespace":"default"},"type":"Opaque"}
  creationTimestamp: "2020-05-25T06:59:45Z"
  labels:
    app.kubernetes.io/name: ibmcloud-operator
    seed.ibm.com/ibmcloud-token: apikey
  name: secret-ibm-cloud-operator
  namespace: default
  resourceVersion: "1186642"
  selfLink: /api/v1/namespaces/default/secrets/secret-ibm-cloud-operator
  uid: 6xxxxx0
type: Opaque
Exercise 2 / Create a Cloudant service
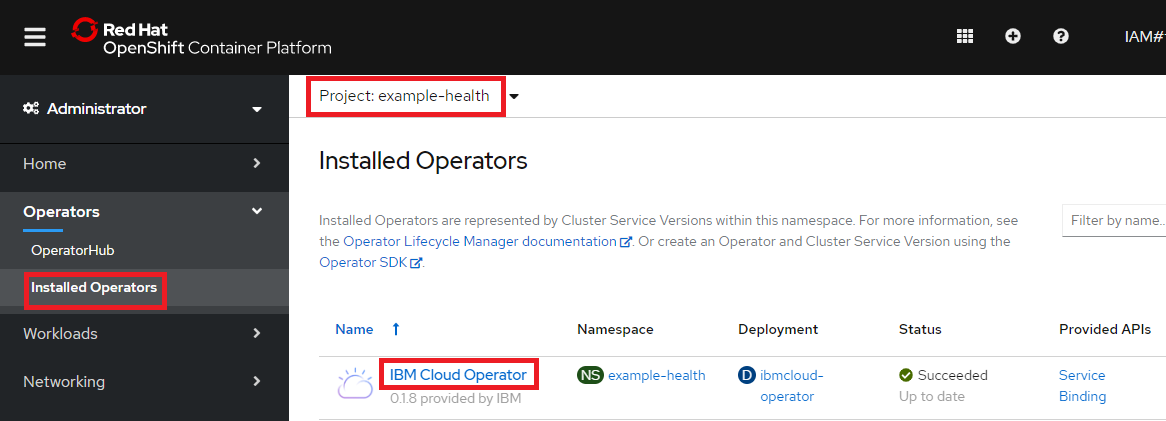
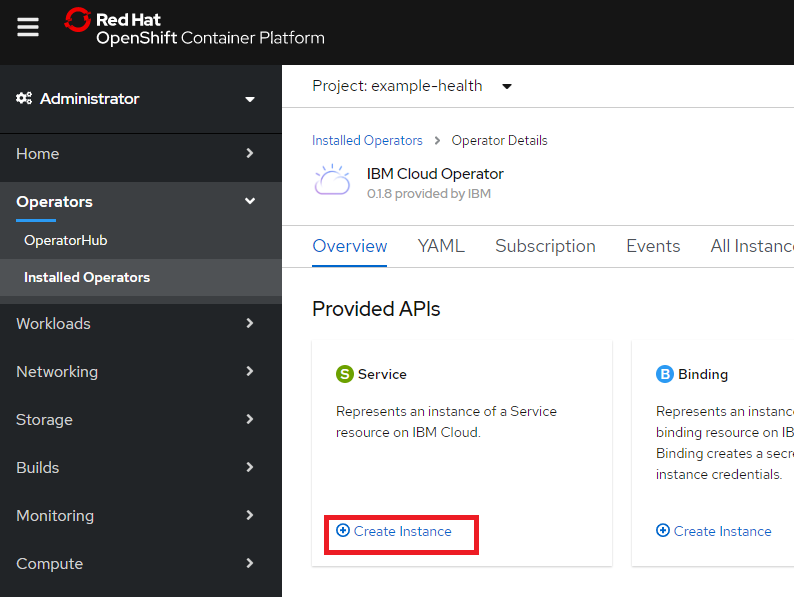
Openshift Web Consoleにて、Operators - Installed Operators からProject: example-healthを選択してIBM Cloud Operatorをクリック。
ServiceのCreate Instanceをクリック
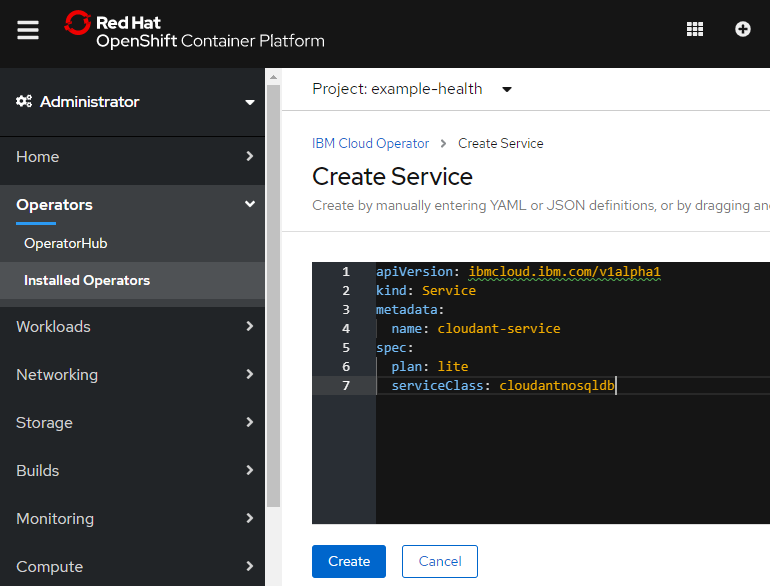
以下のYAMLに置き換えます。
apiVersion: ibmcloud.ibm.com/v1alpha1
kind: Service
metadata:
  name: cloudant-service
spec:
  plan: lite
  serviceClass: cloudantnosqldb
Createをクリック
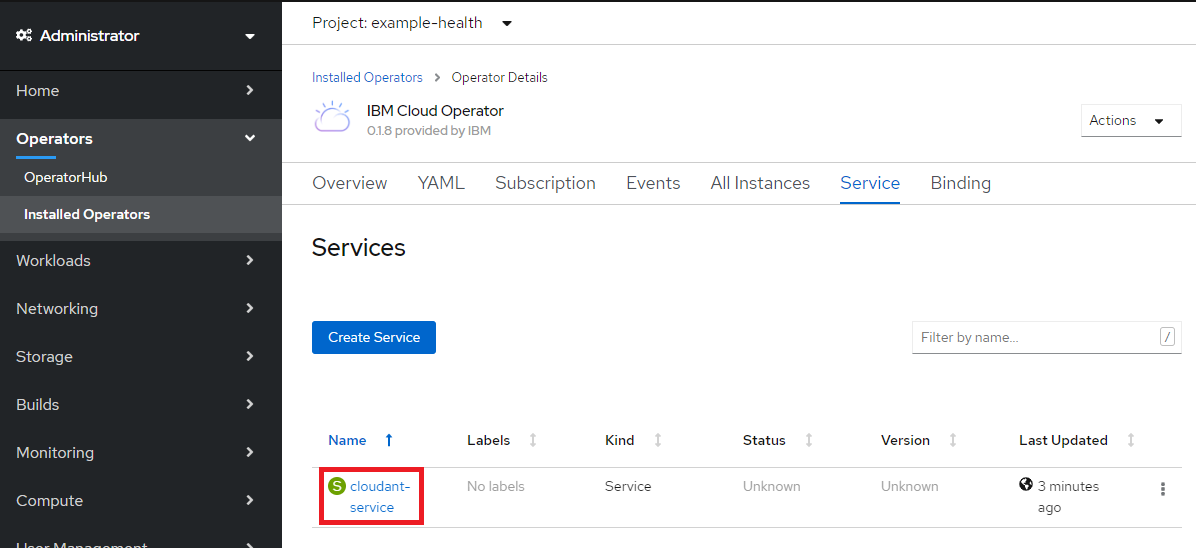
しばらく待って、cloudant-serviceをクリック
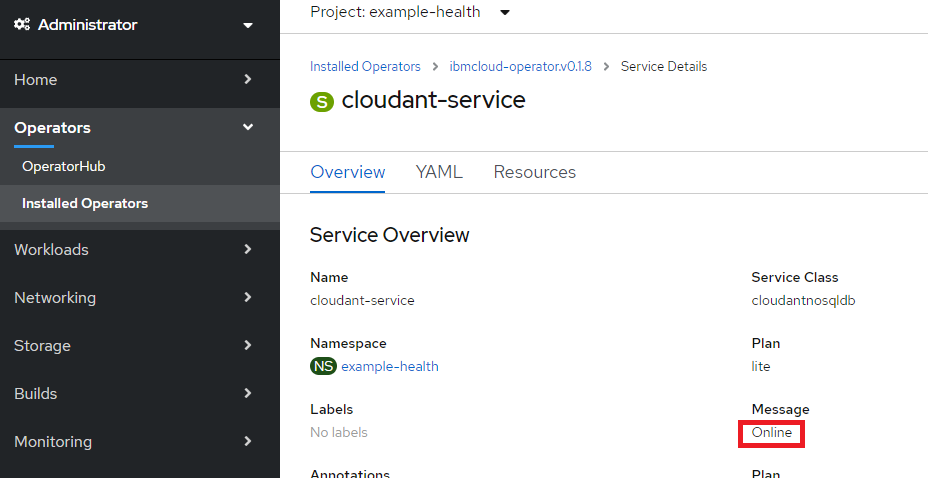
Onlineになっていることを確認
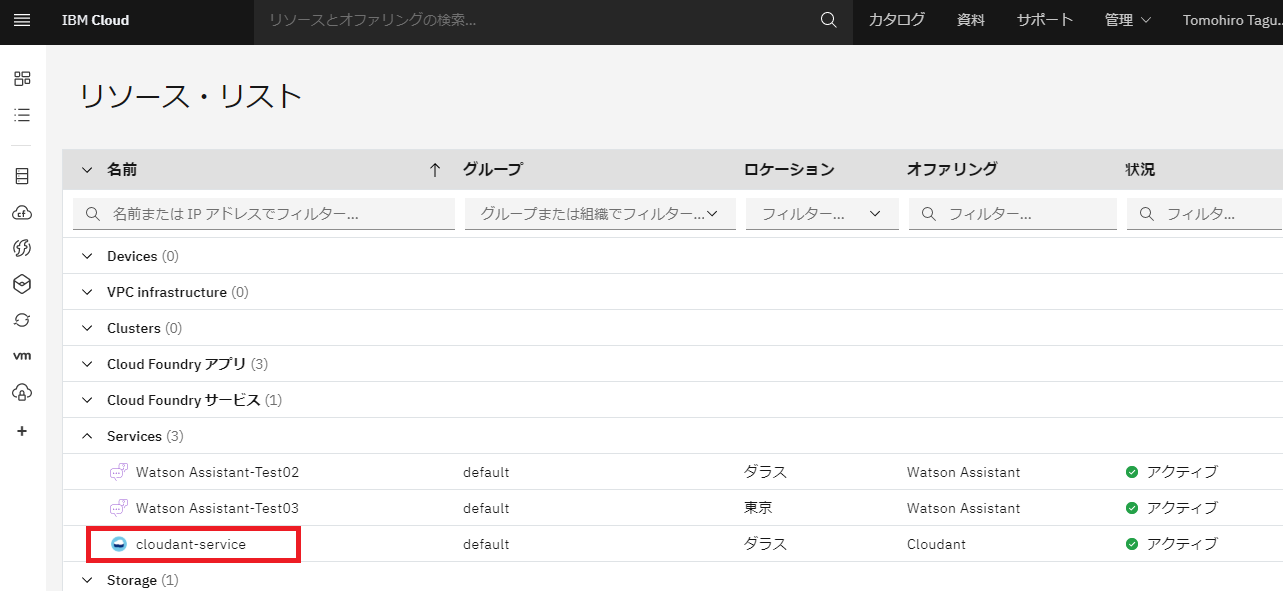
さらに、IBM Cloudにログインして、cloudant serviceが作成されていることを確認します。
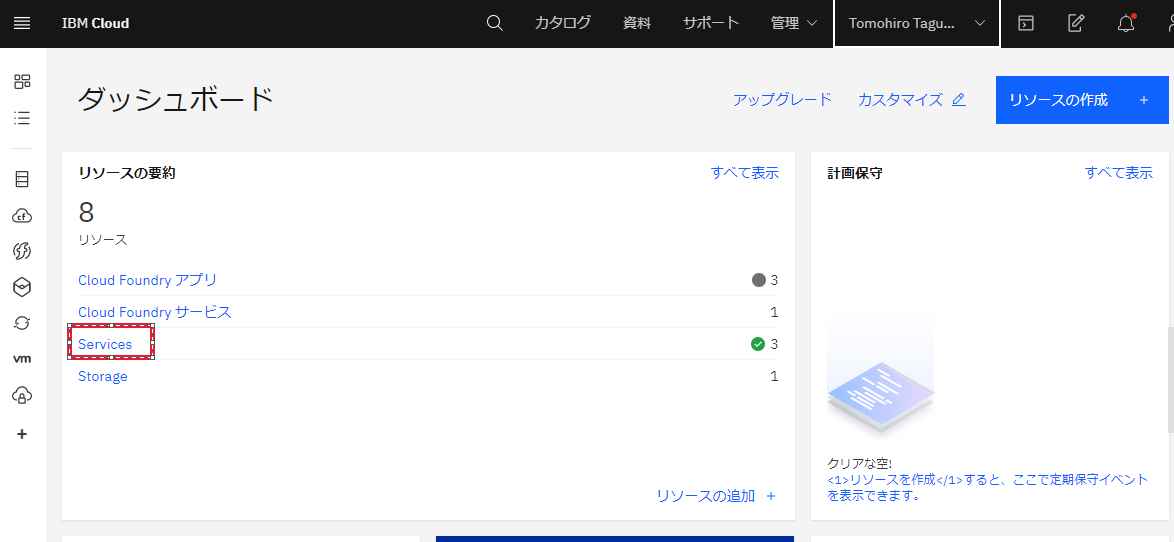
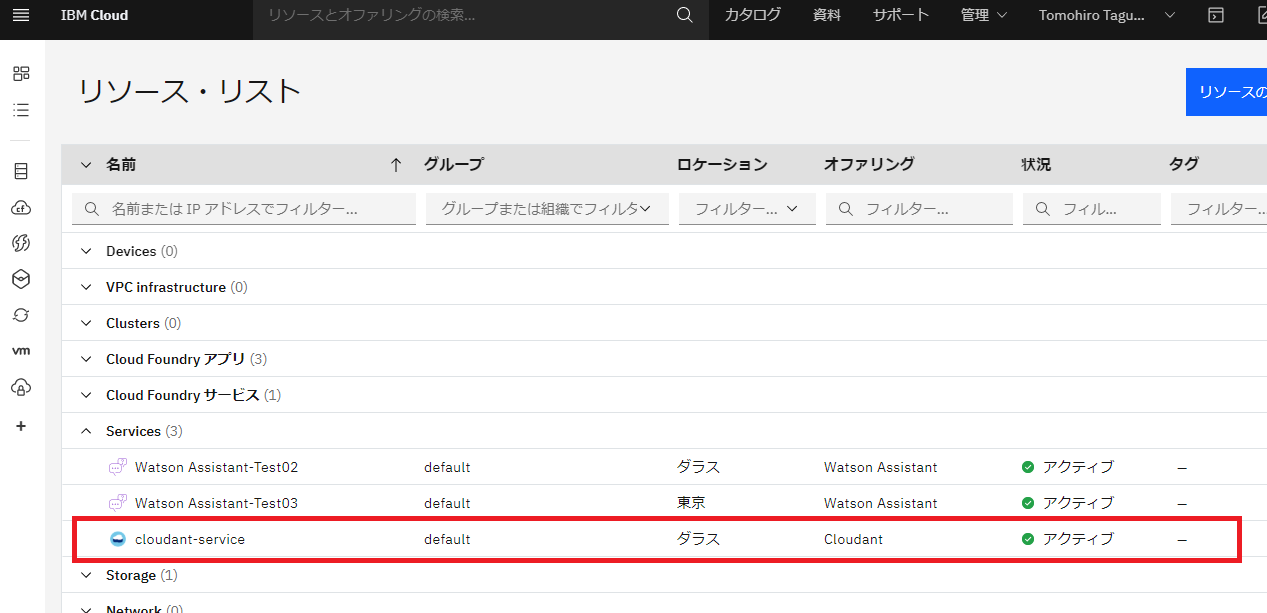
IBM Cloudのダッシュボードから、Servicesを選択。
cloudant-serviceがアクティブになっていることが確認できました。
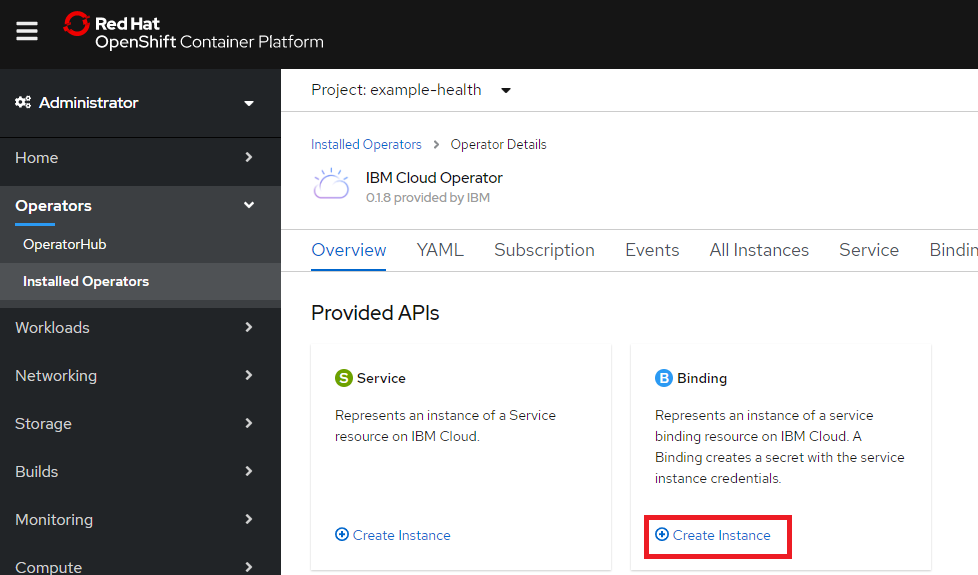
Openshit web consoleに戻って、BindingのCreate Instanceをクリック
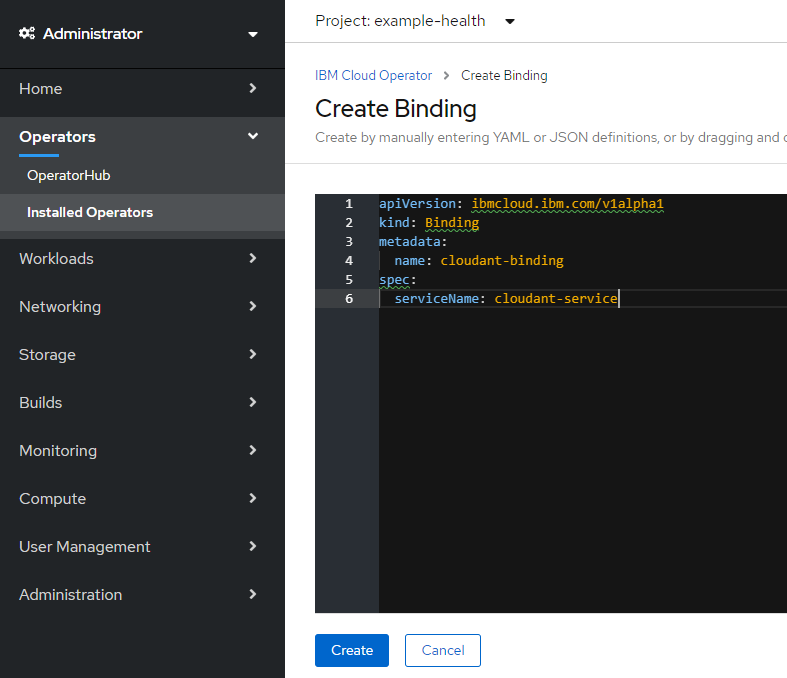
以下のYAMLに置き換えます。
apiVersion: ibmcloud.ibm.com/v1alpha1
kind: Binding
metadata:
  name: cloudant-binding
spec:
  serviceName: cloudant-service
Createをクリック
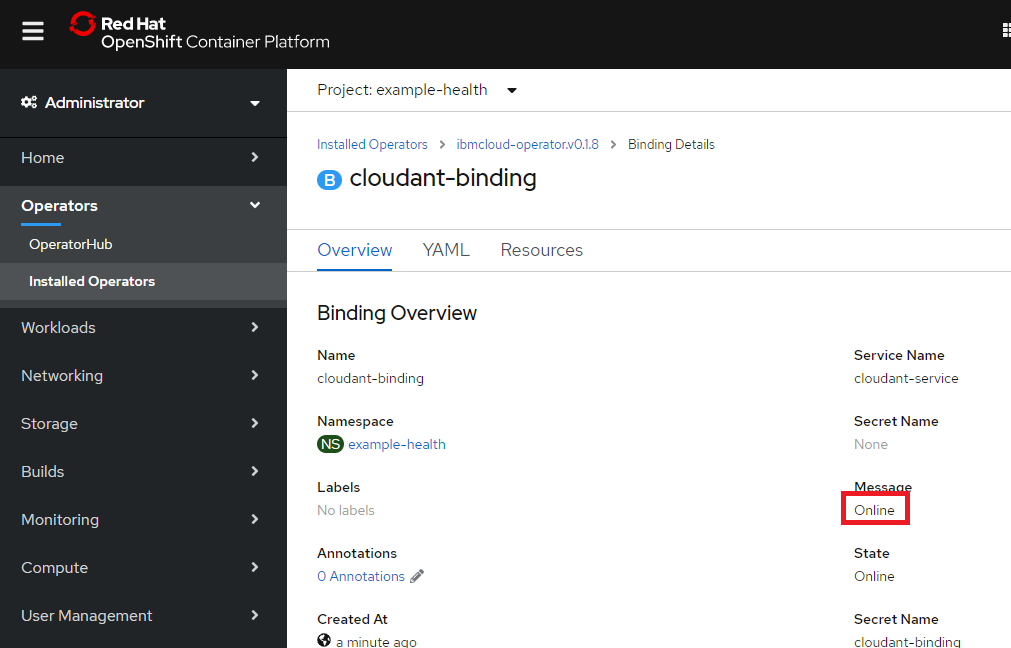
しばらく待ってcloudant-bindingをクリック
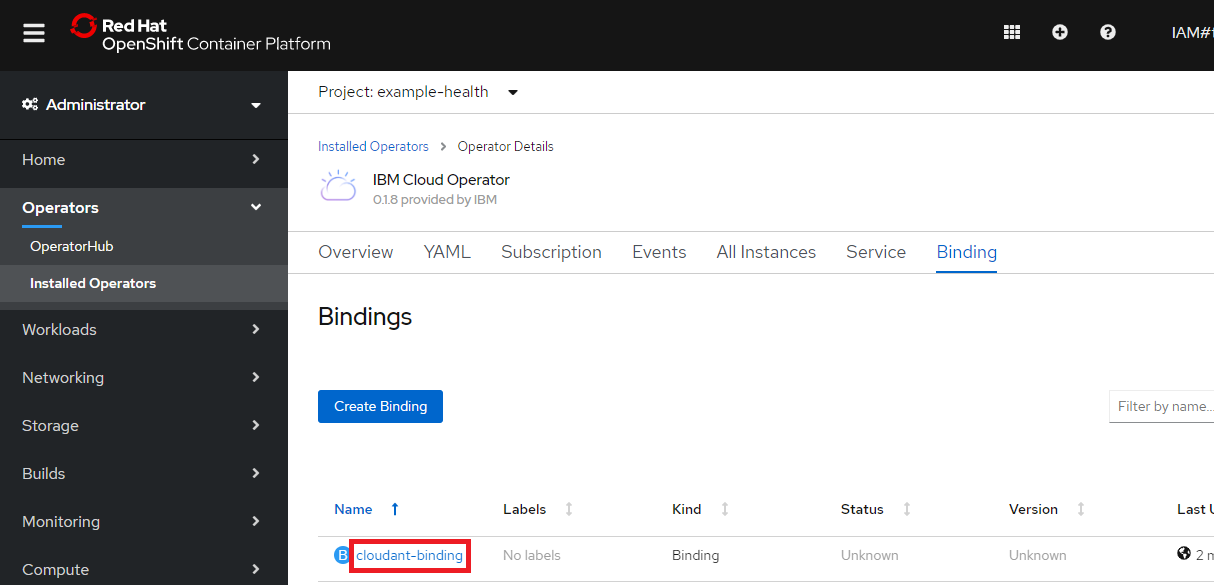
Onlineになっていることを確認
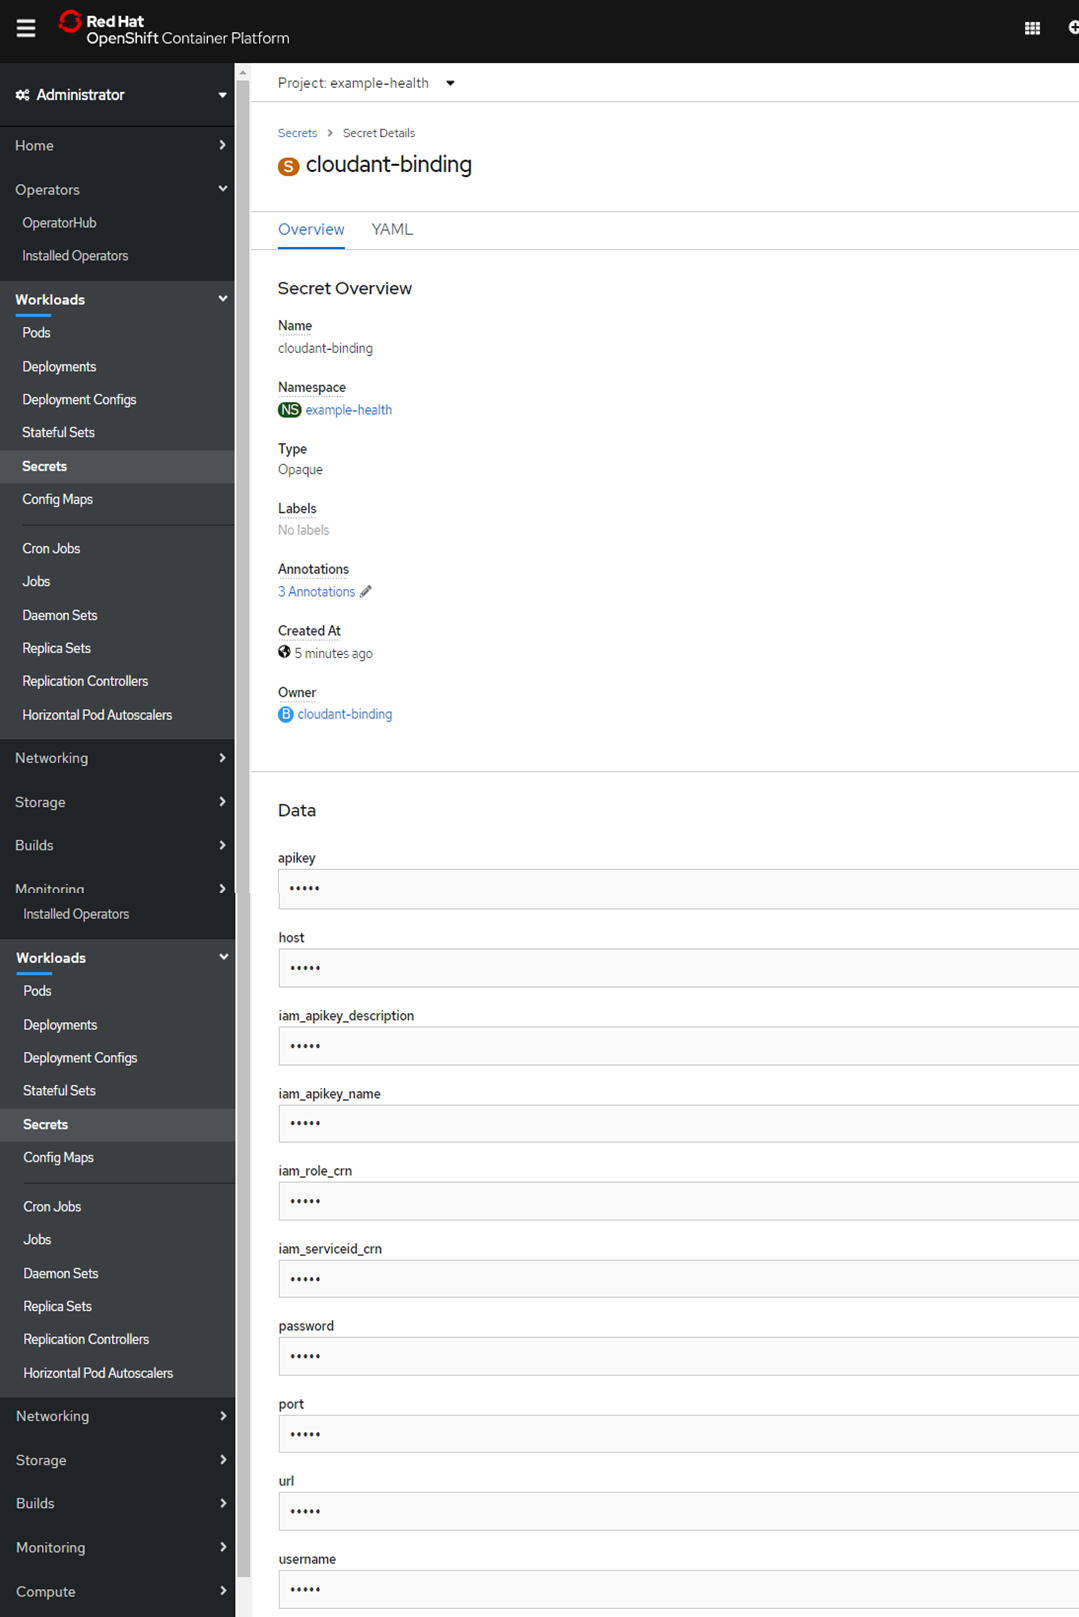
Resourceタブからcloudant-bindingをクリック
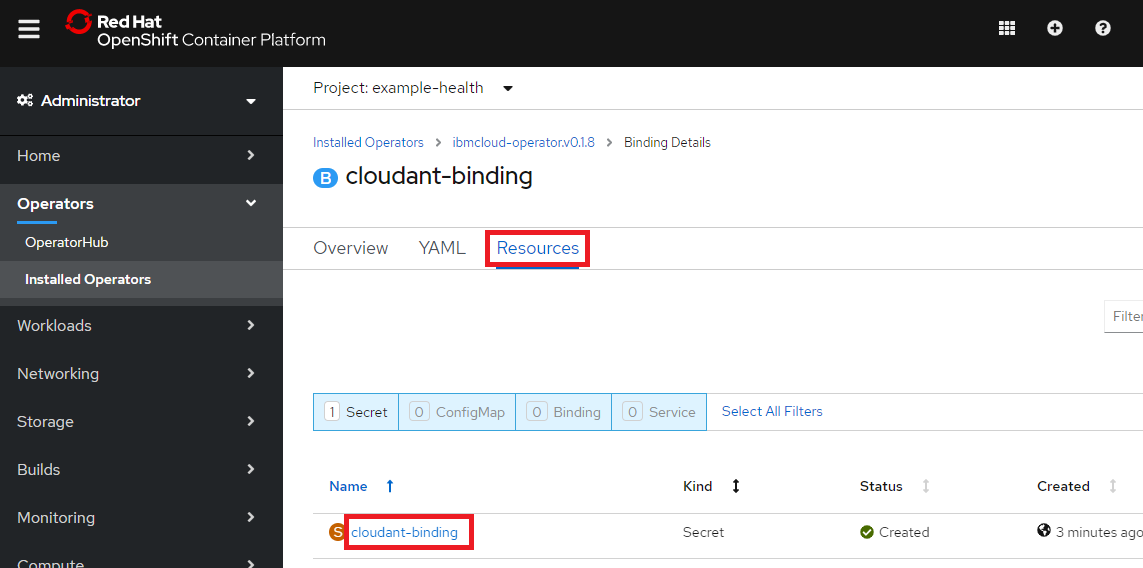
CloudantDBへのアクセス情報を確認
Exercise 3 / Deploy new application back-end
Terminalにて、プロジェクトをexample-healthにセットします。
container-lab$  oc project example-health
Now using project "example-health" on server "https://c100-e.us-south.containers.cloud.ibm.com:32416".
S2Iメソッドを使って、バックエンドのNode.jsアプリをデプロイします。
container-lab$ oc new-app --name=patient-db centos/nodejs-10-centos7~https://github.com/svennam92/nodejs-patientdb-cloudant
--> Found container image d138d6e (2 weeks old) from Docker Hub for "centos/nodejs-10-centos7"

    Node.js 10
    ----------
    Node.js 10 available as container is a base platform for building and running various Node.js 10 applications and frameworks. Node.js is a platform built on Chrome's JavaScript runtime for easily building fast, scalable network applications. Node.js uses an event-driven, non-blocking I/O model that makes it lightweight and efficient, perfect for data-intensive real-time applications that run across distributed devices.

    Tags: builder, nodejs, nodejs10

    * An image stream tag will be created as "nodejs-10-centos7:latest" that will track the source image
    * A source build using source code from https://github.com/svennam92/nodejs-patientdb-cloudant will be created
      * The resulting image will be pushed to image stream tag "patient-db:latest"
      * Every time "nodejs-10-centos7:latest" changes a new build will be triggered
    * This image will be deployed in deployment config "patient-db"
    * Port 8080/tcp will be load balanced by service "patient-db"
      * Other containers can access this service through the hostname "patient-db"

--> Creating resources ...
    imagestream.image.openshift.io "nodejs-10-centos7" created
    imagestream.image.openshift.io "patient-db" created
    buildconfig.build.openshift.io "patient-db" created
    deploymentconfig.apps.openshift.io "patient-db" created
    service "patient-db" created
--> Success
    Build scheduled, use 'oc logs -f bc/patient-db' to track its progress.
    Application is not exposed. You can expose services to the outside world by executing one or more of the commands below:
     'oc expose svc/patient-db'
    Run 'oc status' to view your app.
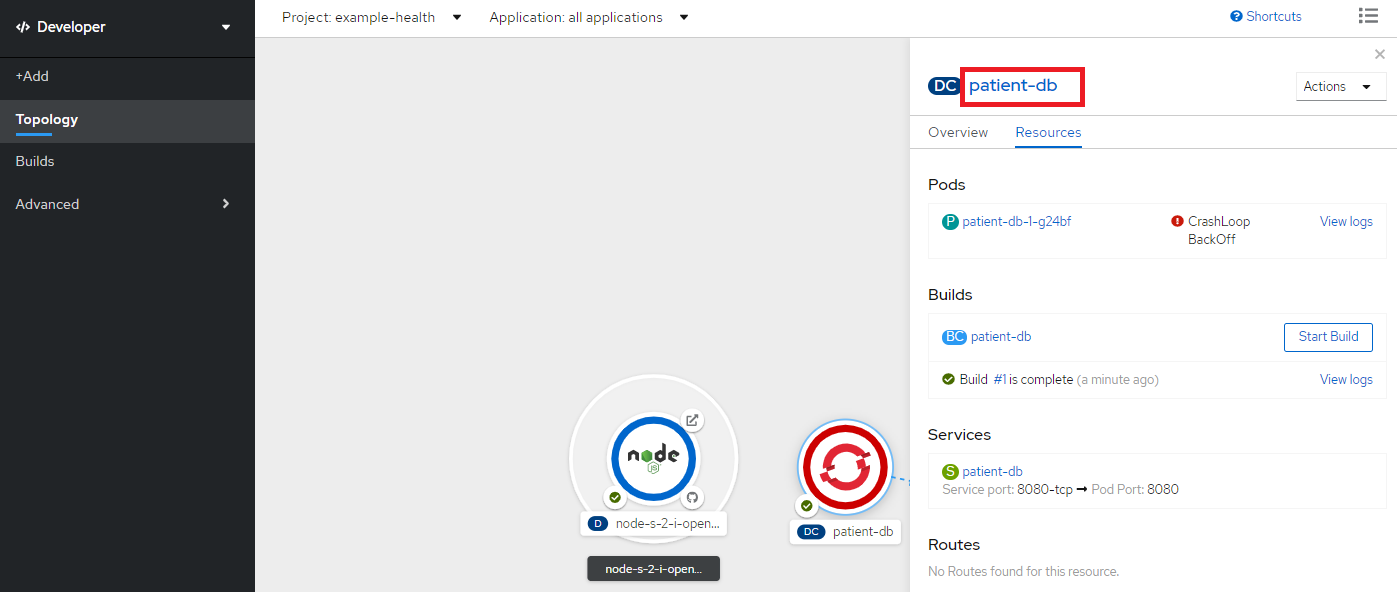
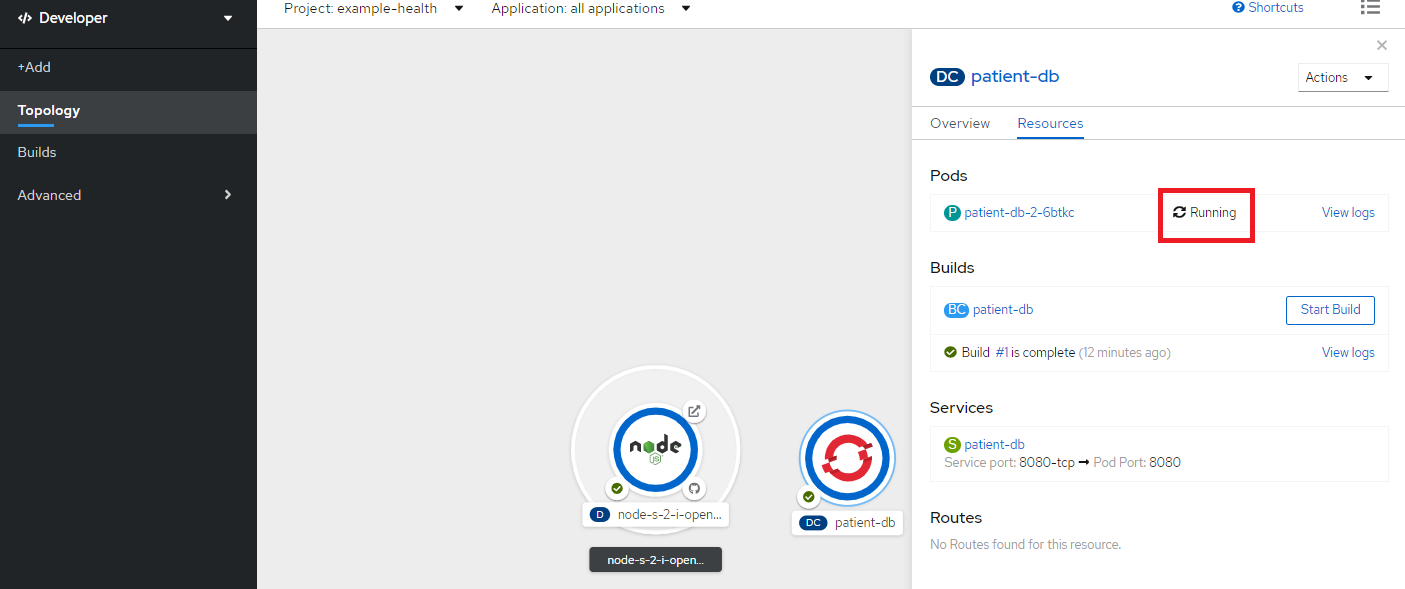
Opneshift web consoleにて、Developer perspective - Topologyからpatient-dbをクリックして右側のResourcesタブにてCrashLoopBackOffというステータスになっていることを確認します(CloudantDBとの接続ができていないのでエラーになっている状態)。
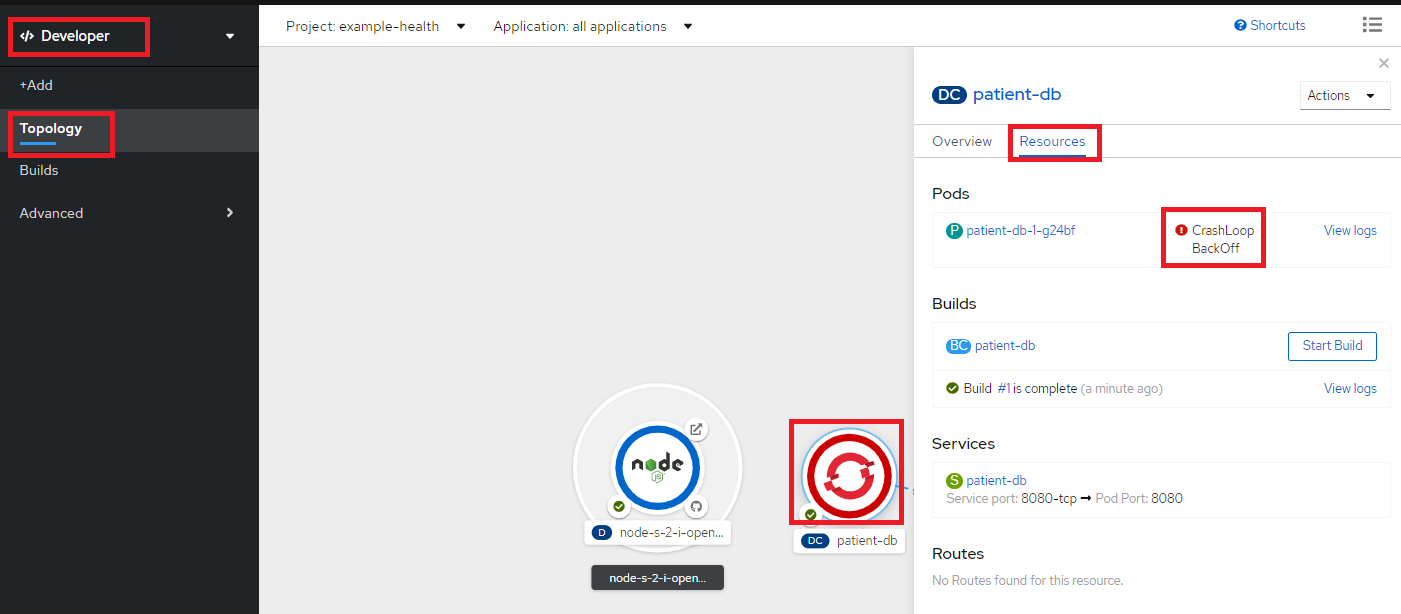
patient-db をクリックします。
Environment タブからAdd from Config Map or Secreteをクリック
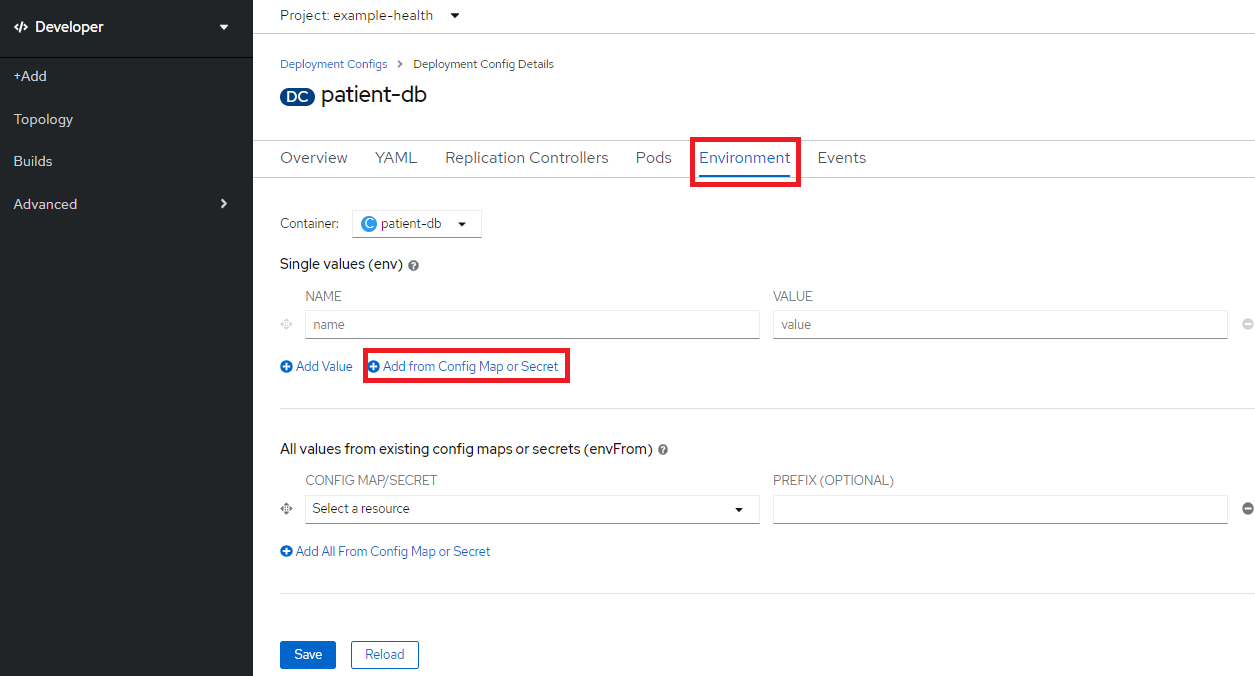
Name: CLOUDANT_URL, resource: cloudant-binding, key: urlを指定してSaveをクリック
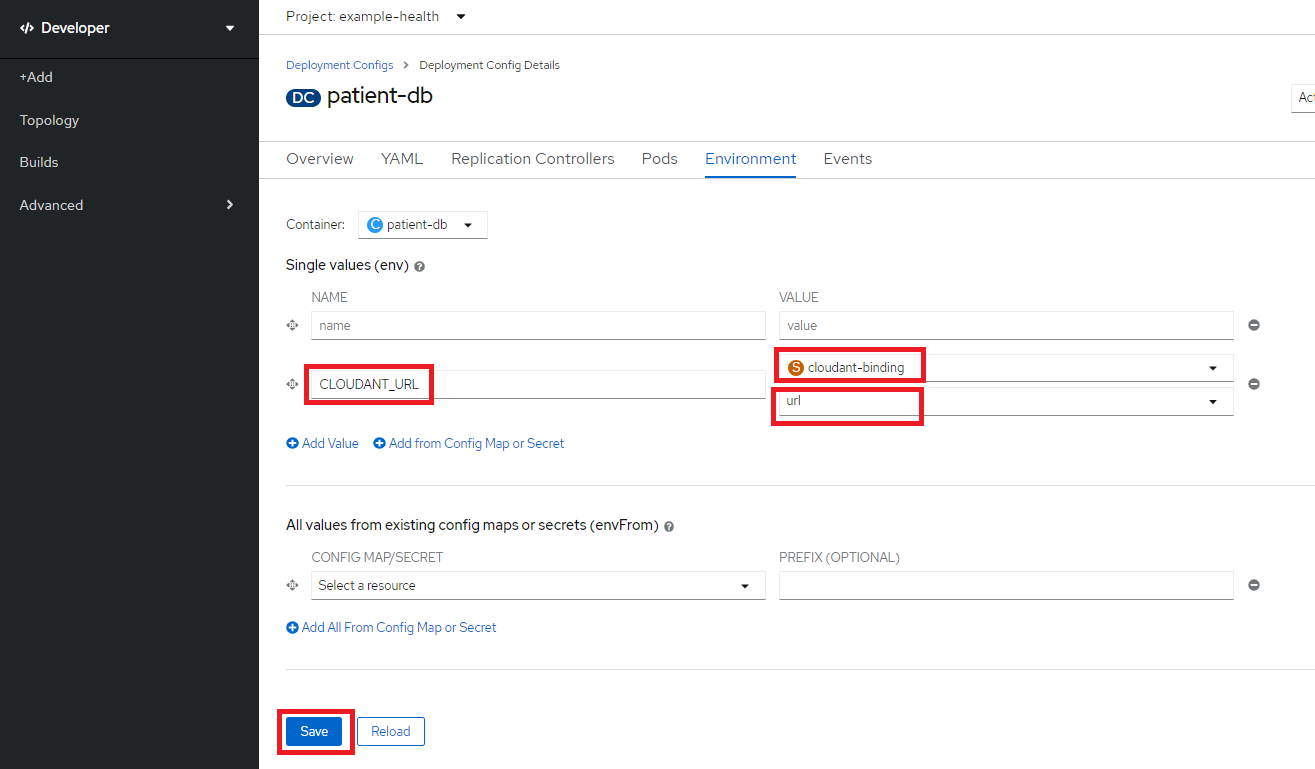

再度patient-dbのステータスを確認し、Runningになっていることを確認
Exercise 4 / Configure Application to Use Cloudant
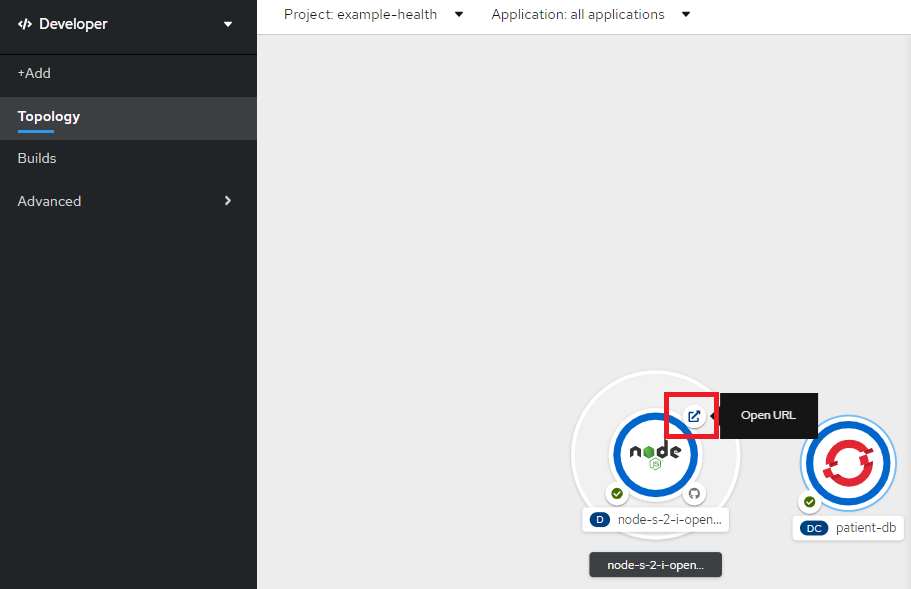
Node.jsのOpen URLのアイコンをクリックして、フロントエンドアプリにアクセスします。
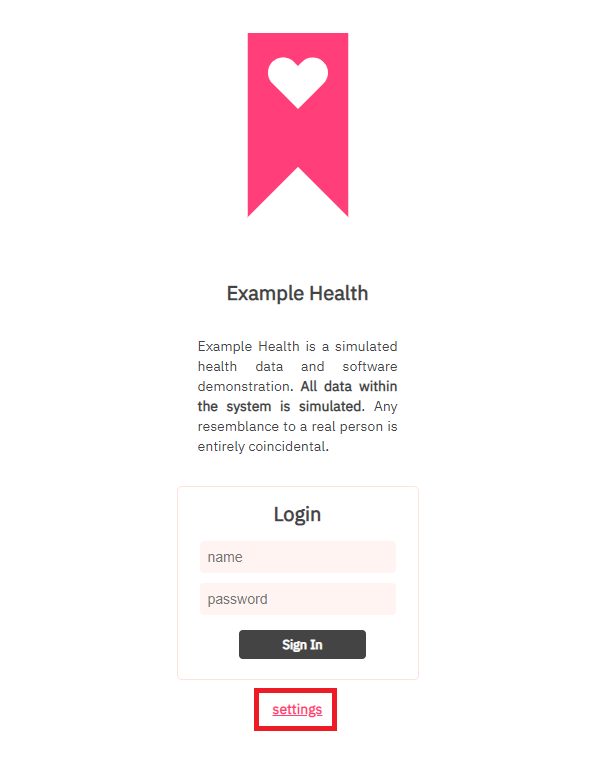
settingsをクリック
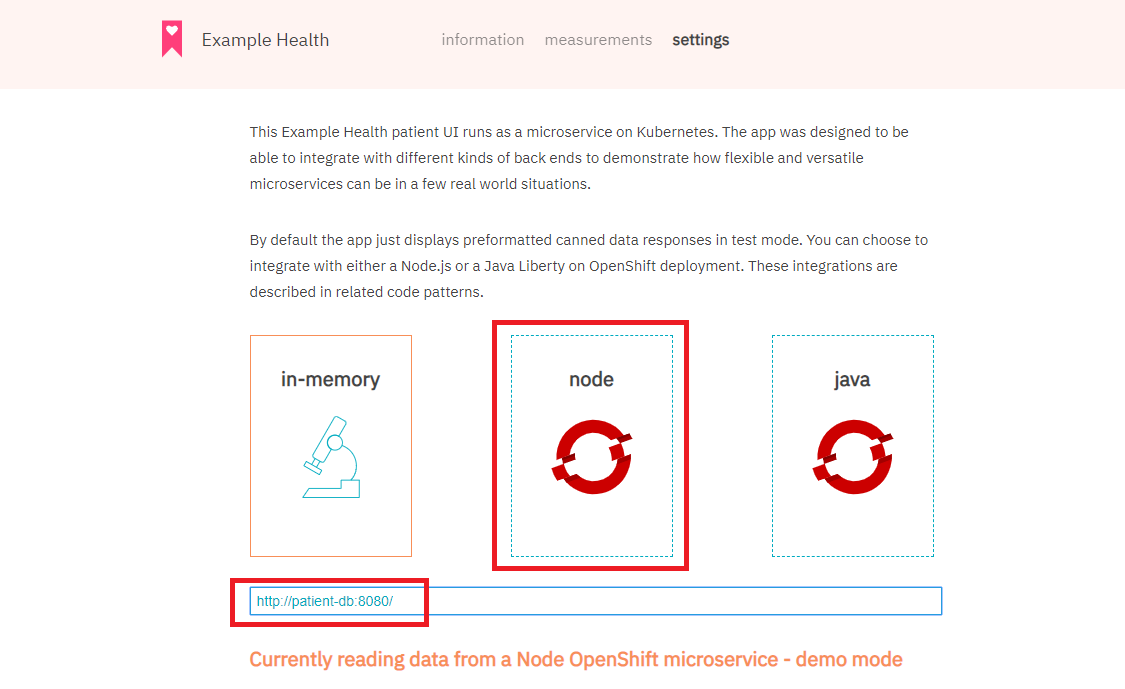
URLにhttp://patient-db:8080/を指定して、nodeをクリック
opall/opallでログイン
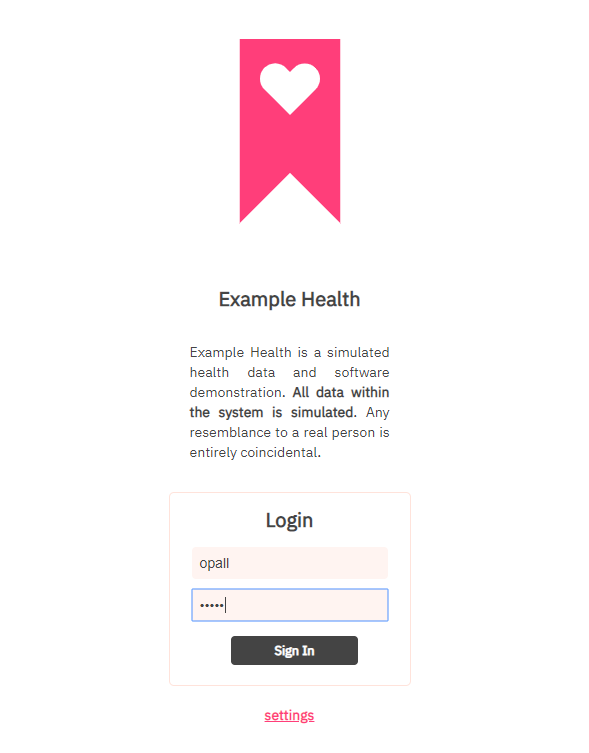
これは、CloudantDBに登録されているユーザーID/Passwordでログインしていることになります。Lab1では人にの名前でログインできていましたが、ここではCloudantDBを使うように変更されているので、任意の名前でのログインはできなくなっています(CloudantDBに登録されていないユーザーでのログインは不可)。
CloudantDBの中身を確認してみます。
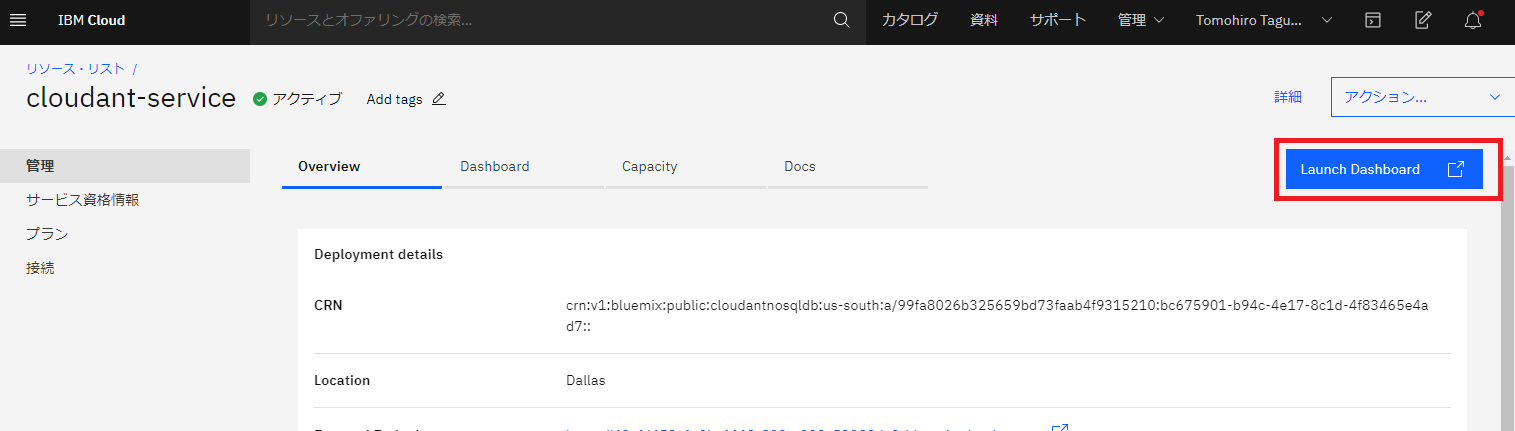
IBM Cloudにログインして、cloudant-serviceを選択します。
Launch Dashboardをクリック
patientsをクリック
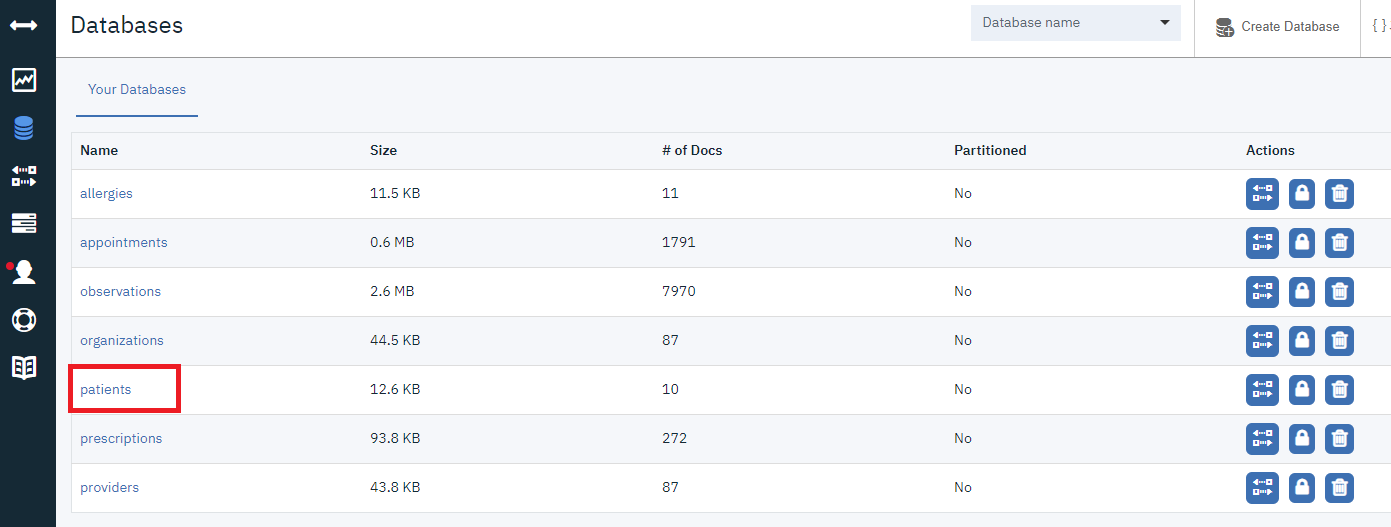
JSONタブをクリックして、データの中身を確認。
