Kubernetes CRDまわりを整理する。
KubernetesにはCustom Resource Definitions(CRD)という機能があります。CRDはKubernetes APIを拡張して独自のリソースを定義するものです。KubernetesのリソースとはDeploymentやPodのようなもののことですが、CRDではDeploymentやPodと並ぶリソースを自分で定義し実装することが可能となっています。
本記事ではCRDについて、概念やツールを整理します(2018/12/24時点の情報をもとに)。
リソースとオブジェクト
CRDに入る前にKubernetesのリソースとオブジェクトについて整理します。
リソース
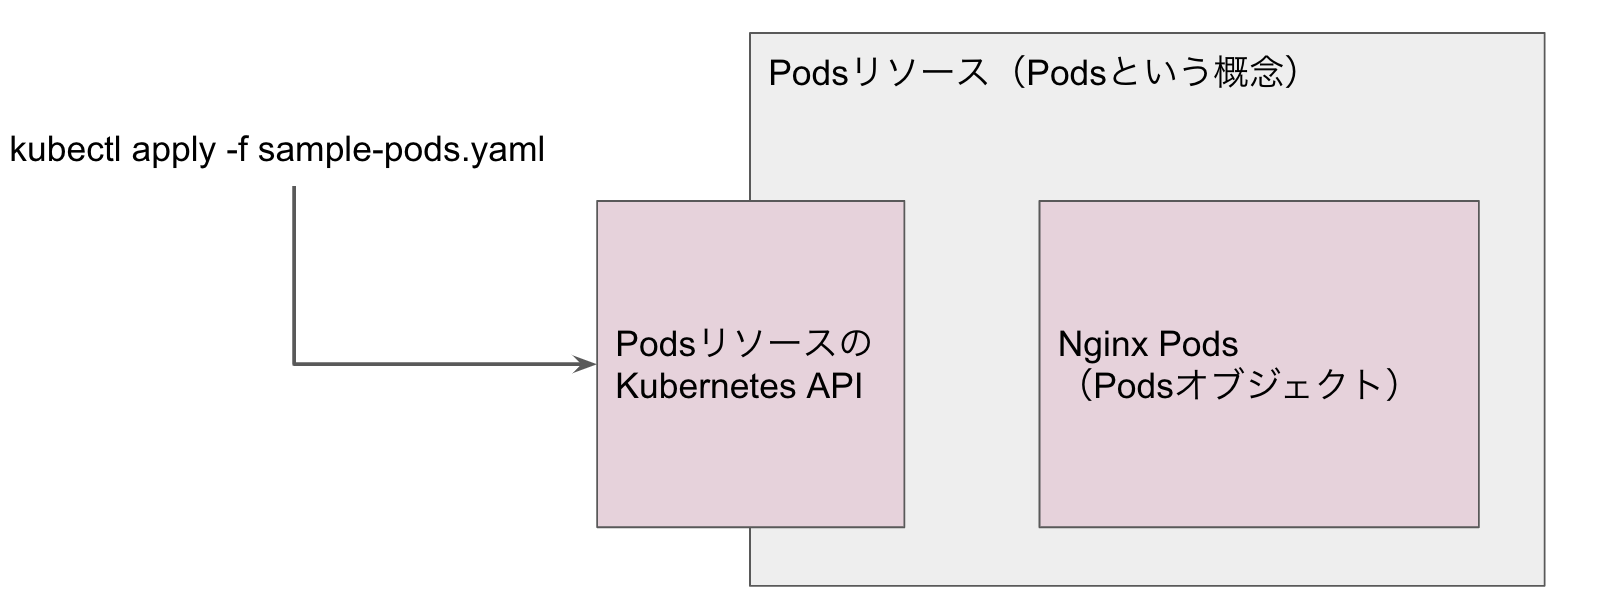
リソースとは何らかのオブジェクトを概念です。例えばDeploymentやPodsがリソースです。リソースはKubernetes APIを持ち、実際に配備されているオブジェクトとしてのPodsがリソースとしてのPodsに格納されます。要はクラスとインスタンスみたいなものです(リソースがクラス、オブジェクトがインスタンス)。
主なリソースとしては以下があります。
- Nodes
- Namespaces
- Configmaps
- Secrets
- Roles
- Rolebindings
- Pods
- Replicasets
- Deployments
- Daemonsets
- Jobs
- Cronjobs
- Services
- Ingresses
- Persistentvolumes
- Persistentvolumeclaims
オブジェクト
オブジェクトとは持続的なエンティティのことで、Kubernetesクラスターの状態を定義します。簡単に言うと、デプロイされたPodsやServiceのことです。オブジェクトには以下のような状態が定義されます。
- 実行されているコンテナ・アプリケーション
- そのアプリケーションに提供されているリソース
- そのアプリケーションの稼働ポリシー(リスタート、アップグレード、フォールトトレランス)
ユーザがPodsやDeployment、ServiceをKubernetesに配備するとき、多くの場合はKubernetes APIに対してyamlファイルで定義し、 kubectl apply -f sample.yaml のようにオブジェクトのdesired state(所望する状態)を実装すると思います。Kubernetesではこのyamlファイルをもとにオブジェクトを配備し、desired stateを維持できるようにオブジェクトを操作します。このとき kubectl がアクセスして実行しているのがクラスターのKubernetes APIになります。
オブジェクトのdesired stateはyaml上で spec として定義されます。Kubernetesは spec に定義された状態 state を維持する役割を果たします。
以下はDeploymentオブジェクトの例ですが、最初の spec 配下でDeploymentの状態を定義し、二つ目の spec でDeployment内のPodsの状態を定義しています。
apiVersion: apps/v1 # for versions before 1.9.0 use apps/v1beta2
kind: Deployment
metadata:
  name: nginx-deployment
spec:
  selector:
    matchLabels:
      app: nginx
  replicas: 2 # tells deployment to run 2 pods matching the template
  template:
    metadata:
      labels:
        app: nginx
    spec:
      containers:
      - name: nginx
        image: nginx:1.7.9
        ports:
        - containerPort: 80
これが配備されると、Kubernetesクラスターにはnginx:1.7.9のコンテナイメージを使ってPodsが2個立ち上がり、いずれも80ポートで公開される、という状態になります。
Custom Resource
上記で説明した標準的にKubernetesで提供されているリソースの他に、自分でリソースを定義することができます。これがCustom Resourceと呼ばれるもので、Kubernetes APIを拡張して実装します。Custom Resourceはあくまで独自のリソースのなので、Kubernetes API(kubectlコマンドも使用可能)を通して利用し、オブジェクトを管理する、という点はリソースと同じです。
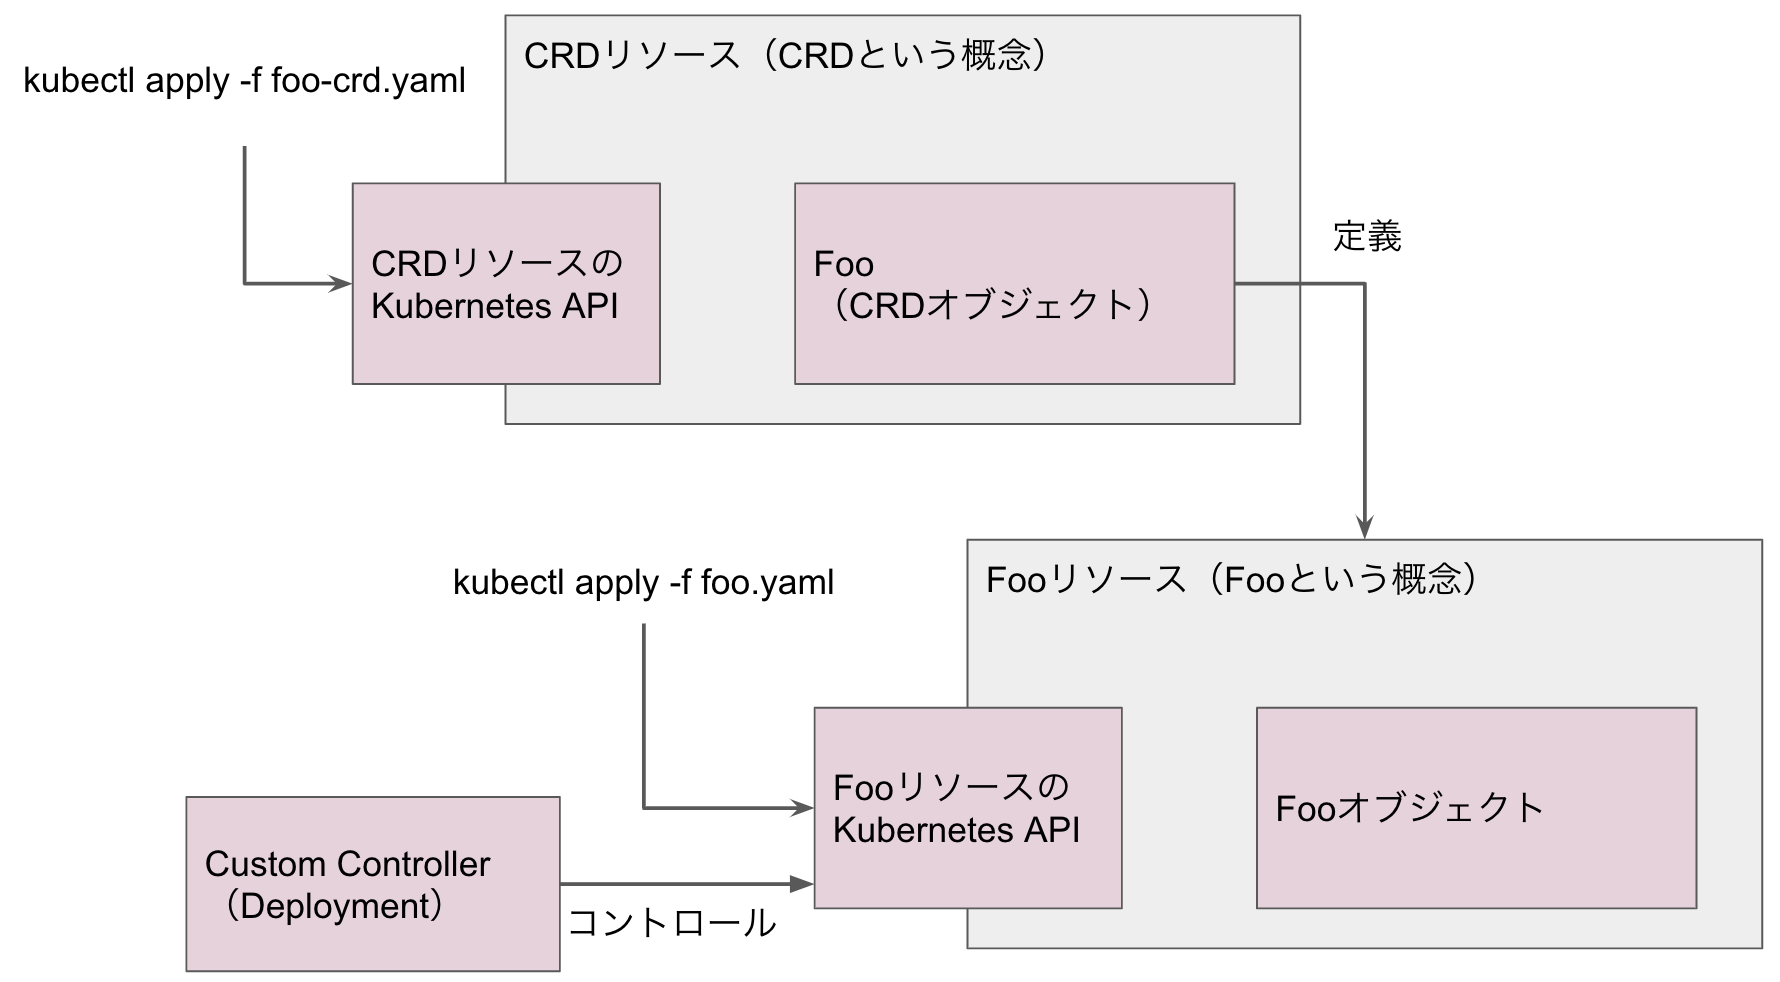
Custom Resource自体は構造化されたデータを格納するための箱で、実際の操作にはCustom Controllerを実装する必要があります。
Custom Controller
Custom ControllerはCustom Resourceをコントロールするためのdeclarative API(宣言的なAPI)です。declarative APIでは、ユーザはオブジェクトのdesired stateを宣言することで配備と維持を行います。オブジェクトに対する実際の操作方法や命令はCustom Controllerが行います。Custom Controllerはオブジェクトの状態をdesired stateと一致するように継続的に操作します。
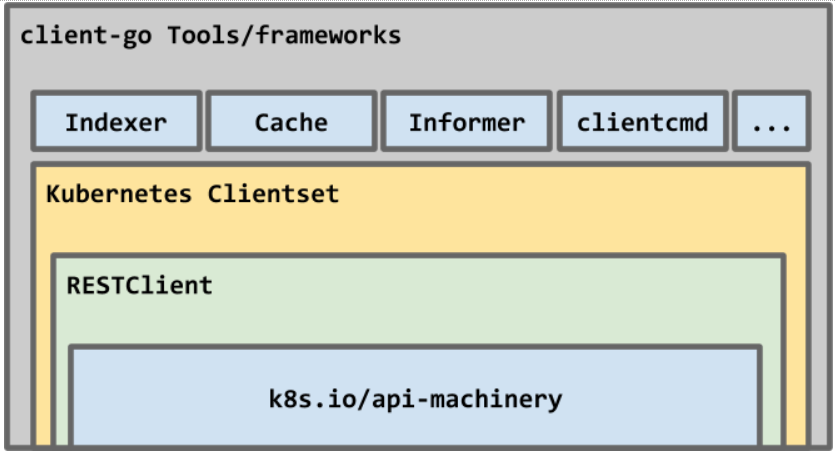
Custom Controller自体はGolangでclient-go実装してcode-generatorでクライアントライブラリを生成します。
client-goはKubernetesクラスターを操作するクライアントのGolang実装です。ご参考。

code-generatorはKubernetesスタイルのAPIを生成するジェネレーターです。
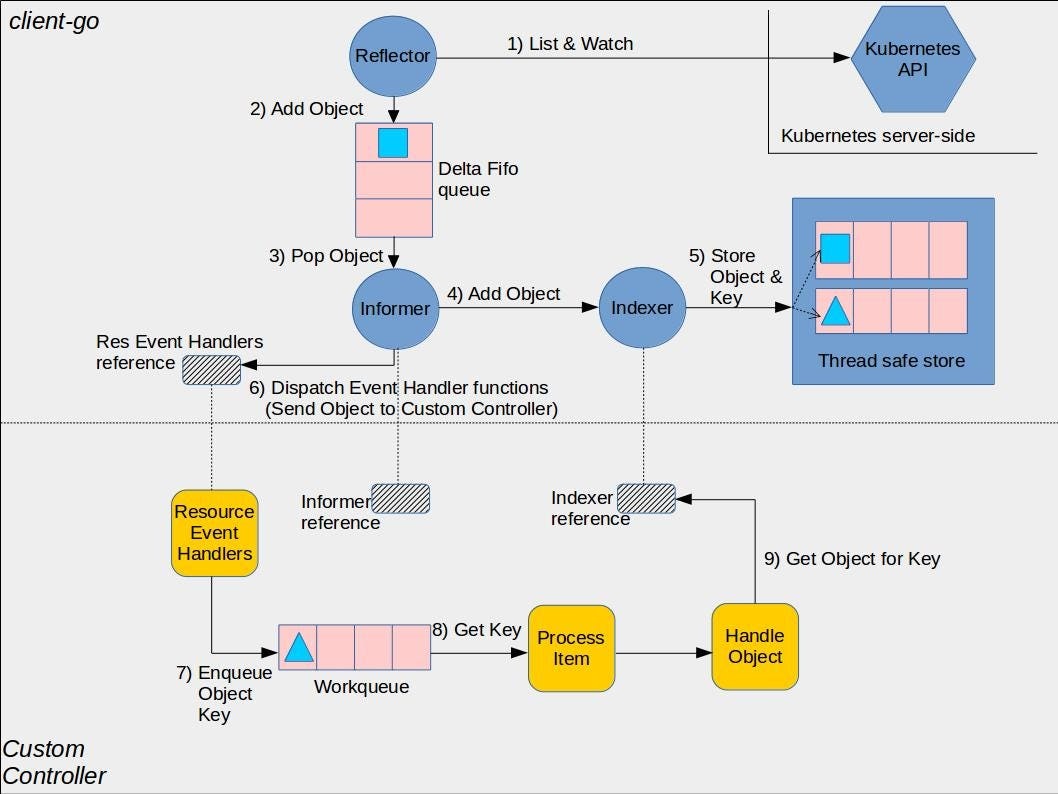
Kubernetes API、Custom Controller、client-goの関係は以下のようになっています。
Custom Controllerはclient-goを通してKubernetes APIを操作します。このCustom Controllerを実行するDocker ImageをCRDのコントローラとしてDeploymentとして配備することで、CRDのCustom ControllerをKubernetes上で稼働させることができるようになります。
Custom ResourceとCustom Controllerで独自にリソースとKubernetes APIを定義することが可能になりますが、その実装方法は2通りあります。
- CRD:プログラミング不要でAPIを定義可能
- API Aggregation:プログラミングが必要だが、より詳細なAPIを定義可能
API Aggregation(AA)
AAはKubernetes APIの拡張になります。AAはKubernetes1.7以降で追加された機能で、kube-apiserverにAAのためのaggregation layerが追加されています。ユーザはAPIServiceオブジェクトを実装しAPIに登録することで(独自のAAに対するURLを設定することで)、aggregation layerがプロキシとして当該URLへのリクエストを転送します。
AAはPIServerの一部として機能します。AAを利用するためにはAPIServerにこちらの拡張設定を追加する必要があります。
AAはapiserver-builderまたはservice-catalogを利用して開発すると便利です。
CRD
AAより手軽に独自のリソースを追加するのがCRDです。CRDはAPIServerにAPIを追加することなく実装可能です。
CRDはCustom Resourceを定義します(名前どおりです)。CRDの定義はyamlで行うことができます。
以下はCRDのサンプルから持ってきたCRDの定義例です。
# crd.yaml
apiVersion: apiextensions.k8s.io/v1beta1
kind: CustomResourceDefinition
metadata:
  name: foos.samplecontroller.k8s.io
spec:
  group: samplecontroller.k8s.io
  version: v1alpha1
  names:
    kind: Foo
    plural: foos
  scope: Namespaced
ここでは foos.samplecontroller.k8s.io というエンドポイントで Foo というCRDを定義しています。これをもとに kubectl apply -f crd.yaml を実行するだけで、新たなKubernetes APIのエンドポイントが生成されます。
CRDもリソースの一種なので、上記ではCRDリソースに Foo というCRDオブジェクトが配備されます。
kubectl get crd で配備済みのCRDの一覧を取得することができます。
CRDオブジェクト Foo が配備された状態で、Foo のカスタムオブジェクトを作ることも可能になります。
以下はその例です。
# example-foo.yaml
apiVersion: samplecontroller.k8s.io/v1alpha1
kind: Foo
metadata:
  name: example-foo
spec:
  deploymentName: example-foo
  replicas: 1
kubectl apply -f example-foo.yaml を実行することで Foo リソースに example-foo というオブジェクトが配備されます。
kubectl get foo で配備済みの Foo の一覧を取得をすることができます。
CRDの拡張機能
CRDを定義する際に便利な機能を紹介します。
Finalizer
Finalizerはカスタムオブジェクト削除前の処理を定義します。Finalizerを定義することで、カスタムオブジェクトを kubectl delete した時、実際に削除される前に実行すべき処理を定義します。例えばDeploymentではDeploymentを削除するとPodsやReplicasetが削除されますが、このようにDeploymentの削除の前にPodsやReplicasetを削除する、というのと同じ動作をFinalizerで定義することが可能です。
Validation
CRDの定義に、カスタムオブジェクトの設定値のValidationを以下のように追加することができます。
apiVersion: apiextensions.k8s.io/v1beta1
kind: CustomResourceDefinition
metadata:
  name: foos.samplecontroller.k8s.io
spec:
  group: samplecontroller.k8s.io
  version: v1alpha1
  names:
    kind: Foo
    plural: foos
  scope: Namespaced
  validation:
    openAPIV3Schema:
      properties:
        spec:
          properties:
            replicas:
              type: integer
              minimum: 1
              maximum: 10
ここでは replicas に設定可能な値をintegerで1~10の値と定義し、それ以外の値でカスタムオブジェクトを kubectl apply するとエラーにすることができます。
- OKな例:
# example-foo-ok.yaml
apiVersion: samplecontroller.k8s.io/v1alpha1
kind: Foo
metadata:
  name: example-foo
spec:
  deploymentName: example-foo
  replicas: 1
- NGな例1:
# example-foo-ng-1.yaml
apiVersion: samplecontroller.k8s.io/v1alpha1
kind: Foo
metadata:
  name: example-foo
spec:
  deploymentName: example-foo
  replicas: 1.1
- NGな例2:
# example-foo-ng-2.yaml
apiVersion: samplecontroller.k8s.io/v1alpha1
kind: Foo
metadata:
  name: example-foo
spec:
  deploymentName: example-foo
  replicas: 111
Printer
Kubernetes1.11以降では、カスタムオブジェクトをkubectl get する際に表示するパラメータを定義することが可能です。カスタムオブジェクトはデフォルトでは、 kubectl get オブジェクト名しか表示されません。他のパラメータを表示するためには以下のように表示対象のパラメータをCRDで定義する必要があります。
例えば以下のように additionalPrinterColumns を設定することで、 kubectl get にレプリカ数やタイムスタンプを標準で表示するようにできます。
apiVersion: apiextensions.k8s.io/v1beta1
kind: CustomResourceDefinition
metadata:
  name: foos.samplecontroller.k8s.io
spec:
  group: samplecontroller.k8s.io
  version: v1alpha1
  names:
    kind: Foo
    plural: foos
  scope: Namespaced
  additionalPrinterColumns:
  - name: Replicas
    type: integer
    description: The number of jobs launched by the Foo
    JSONPath: .spec.replicas
  - name: Age
    type: date
    JSONPath: .metadata.creationTimestamp
Subresource
/statusと/scaleというサブリソースをサポートしています。これらはCRDのAPIエンドポイントのサブリソースとして機能します。
/statusはオブジェクトの現在の状態を意味します(desired stateはspecです)。/scaleはレプリカ数です。
apiVersion: apiextensions.k8s.io/v1beta1
kind: CustomResourceDefinition
metadata:
  name: foos.samplecontroller.k8s.io
spec:
  group: samplecontroller.k8s.io
  version: v1alpha1
  names:
    kind: Foo
    plural: foos
  scope: Namespaced
  subresources:
    # status enables the status subresource.
    status: {}
    # scale enables the scale subresource.
    scale:
      # specReplicasPath defines the JSONPath inside of a custom resource that corresponds to Scale.Spec.Replicas.
      specReplicasPath: .spec.replicas
      # statusReplicasPath defines the JSONPath inside of a custom resource that corresponds to Scale.Status.Replicas.
      statusReplicasPath: .status.replicas
      # labelSelectorPath defines the JSONPath inside of a custom resource that corresponds to Scale.Status.Selector.
      labelSelectorPath: .status.labelSelector
サブリソースを使うことで以下のようなエンドポイントを公開することが可能になります。
# status
/apis/samplecontroller.k8s.io/v1alpha1/namespaces/default/foos/example-foo/status

# scale
/apis/samplecontroller.k8s.io/v1alpha1/namespaces/default/foos/example-foo/scale
参考URL
CRDの説明
CRD例
- sample-controller
- KubernetesのCRD(Custom Resource Definition)とカスタムコントローラーの作成
- KubernetesのCustom Resource Definition(CRD)とCustom Controller


